How to Use Arduino with Fingerprint Sensor to Control LED
How to Use Arduino with Fingerprint Sensor to Control LED
In this tutorial, you’ll learn how to use Arduino with a Fingerprint Sensor to scan fingerprints and control an LED. We’ll start by registering fingerprints into the sensor, then compare them to determine which ID is detected. If it’s the thumb (ID1), the LED turns ON. If it’s the index finger (ID2), the LED turns OFF.
Required Components
- Arduino UNO R3 with USB cable
- Fingerprint Sensor V2.0 or V3.0
- 5mm Red LED 1 piece
- 220 Ohm 1/4W Resistor
- Breadboard (MB-102)
- Male-to-male and Male-to-female jumper wires
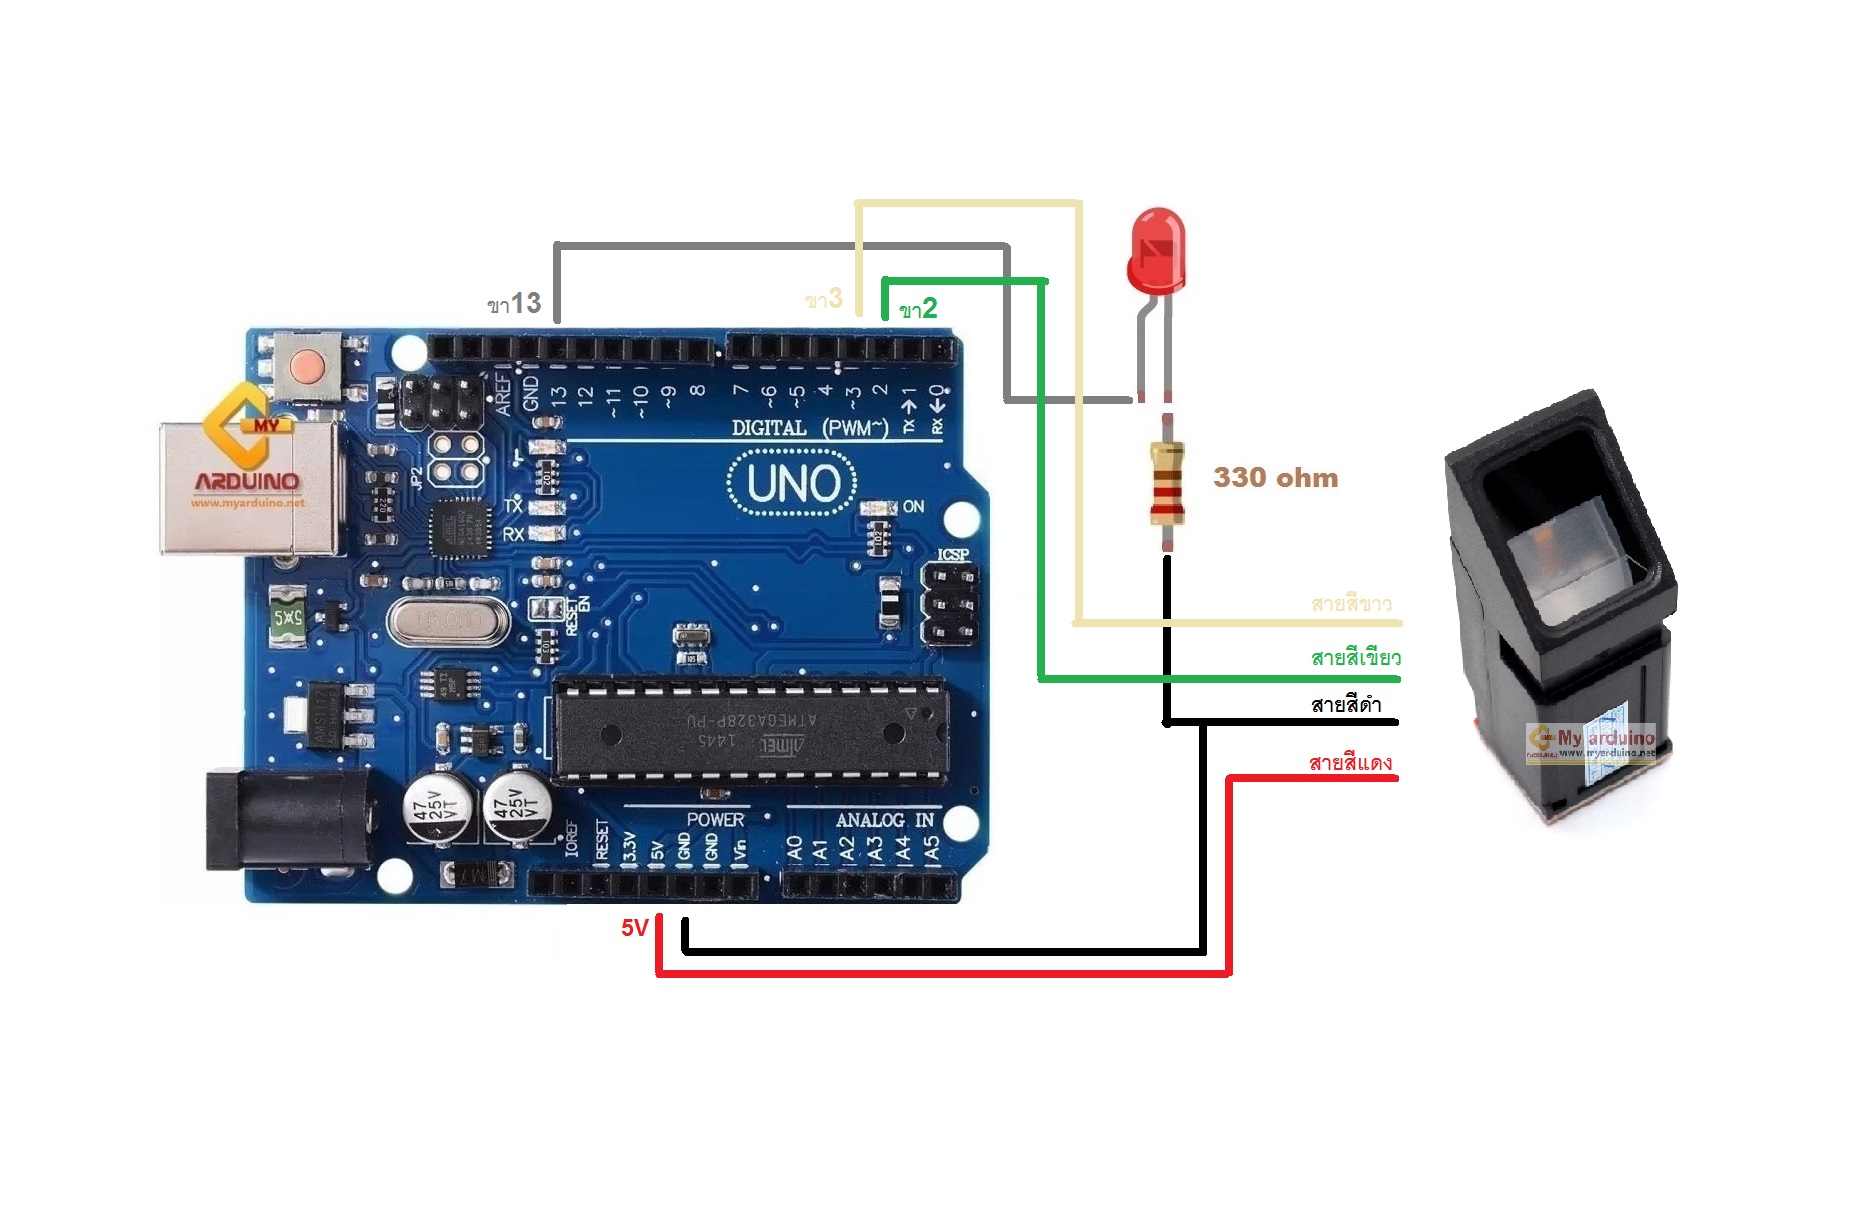
Wiring Fingerprint Sensor with Arduino
Connect the wires between Fingerprint Sensor and Arduino UNO R3 as follows:
| Fingerprint Sensor | Arduino UNO R3 |
|---|---|
| Red wire (5V) | 5V pin |
| Black wire (GND) | GND pin |
| Green wire (TX) | Pin 2 |
| White wire (RX) | Pin 3 |
The LED connects to Pin 13 through a 220 Ohm resistor in series.
Installing the Fingerprint Sensor Library
Download the Adafruit Fingerprint Sensor Library from GitHub, or open Arduino IDE, go to Sketch > Include Library > Manage Libraries, search for “Adafruit Fingerprint”, and click Install.
After installation, restart Arduino IDE and go to File > Examples > Adafruit Fingerprint Sensor Library to find sample code for testing.
Steps to Enroll a Fingerprint
Before using the sensor, you need to enroll fingerprints. Upload the code below to Arduino.
#include <Adafruit_Fingerprint.h>
#include <SoftwareSerial.h>
SoftwareSerial mySerial(2, 3);
Adafruit_Fingerprint finger = Adafruit_Fingerprint(&mySerial);
void setup() {
Serial.begin(9600);
finger.begin(57600);
if (finger.verifyPassword()) {
Serial.println("Fingerprint sensor found");
} else {
Serial.println("Sensor not found. Check wiring");
while (1);
}
Serial.println("Enter ID to enroll (1-127)");
}
void loop() {
if (Serial.available()) {
int id = Serial.parseInt();
if (id > 0 && id < 128) {
enrollFingerprint(id);
}
}
}
uint8_t enrollFingerprint(uint8_t id) {
int p = -1;
Serial.print("Place finger to enroll ID ");
Serial.println(id);
// First scan
while (p != FINGERPRINT_OK) {
p = finger.getImage();
}
p = finger.image2Tz(1);
Serial.println("Remove finger and place again");
delay(2000);
// Second scan
while (p != FINGERPRINT_OK) {
p = finger.getImage();
}
p = finger.image2Tz(2);
// Create fingerprint model
p = finger.createModel();
if (p == FINGERPRINT_OK) {
Serial.print("Enrolled ID ");
Serial.println(id);
p = finger.storeModel(id);
if (p == FINGERPRINT_OK) {
Serial.println("Success!");
}
}
return p;
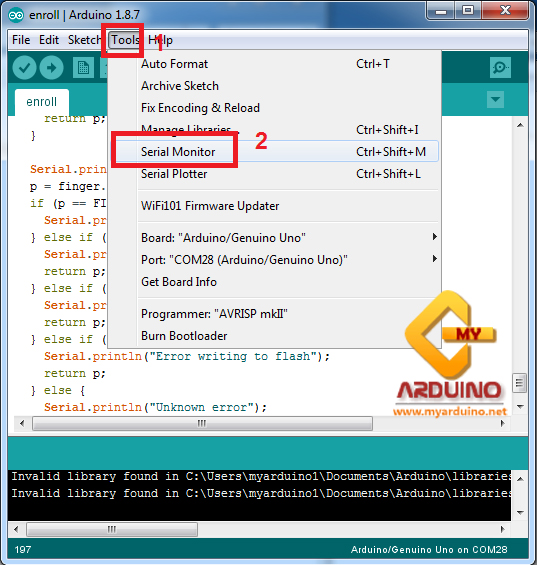
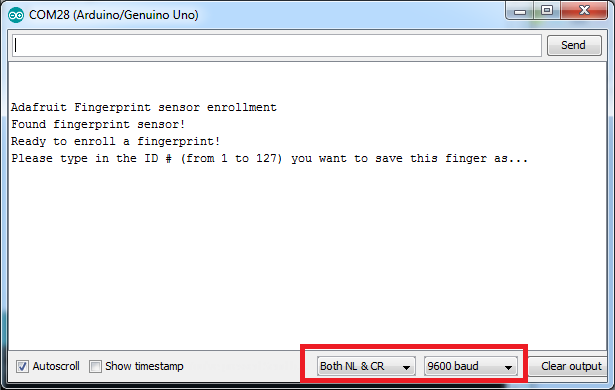
}Open Serial Monitor (set Baud Rate to 9600). You’ll see a prompt to enter the ID you want to enroll.
- Type 1 and press Send → green light on sensor will turn on → place your thumb for first scan
- Remove finger
- Place thumb again for second scan → shows “Enrolled ID 1 Success!”
- Type 2 and repeat the same steps with your index finger → enrolls as ID 2
LED Control Code with Fingerprint
After enrolling fingerprints, upload the code below to make the system verify fingerprints and control the LED based on detected ID.
#include <Adafruit_Fingerprint.h>
#include <SoftwareSerial.h>

SoftwareSerial mySerial(2, 3);
Adafruit_Fingerprint finger = Adafruit_Fingerprint(&mySerial);

#define LED_PIN 13

void setup() {
  Serial.begin(9600);
  pinMode(LED_PIN, OUTPUT);

  finger.begin(57600);

  if (finger.verifyPassword()) {
    Serial.println("Fingerprint sensor found");
  } else {
    Serial.println("Sensor not found");
    while (1);
  }

  Serial.println("Waiting for fingerprint scan...");
}

void loop() {
  getFingerprintID();
  delay(100);
}

uint8_t getFingerprintID() {
  uint8_t p = finger.getImage();

  if (p != FINGERPRINT_OK) {
    return p;
  }

  p = finger.image2Tz();
  if (p != FINGERPRINT_OK) {
    return p;
  }

  p = finger.fingerFastSearch();
  if (p != FINGERPRINT_OK) {
    Serial.println("Fingerprint not found");
    digitalWrite(LED_PIN, LOW);
    return p;
  }

  Serial.print("Found ID:");
  Serial.println(finger.fingerID);

  // Check ID and control LED
  if (finger.fingerID == 1) {
    digitalWrite(LED_PIN, HIGH);  // Thumb → LED ON
    Serial.println(">>> LED ON");
  } else if (finger.fingerID == 2) {
    digitalWrite(LED_PIN, LOW);   // Index finger → LED OFF
    Serial.println(">>> LED OFF");
  }

  return finger.fingerID;
}
Open Serial Monitor and try scanning your thumb. You’ll see “Found ID:1” and the LED on Pin 13 will turn ON. Try scanning your index finger, you’ll see “Found ID:2” and the LED will turn OFF.
How to Delete Enrolled Fingerprints
To delete fingerprints from the sensor, use the code below.
#include <Adafruit_Fingerprint.h>
#include <SoftwareSerial.h>

SoftwareSerial mySerial(2, 3);
Adafruit_Fingerprint finger = Adafruit_Fingerprint(&mySerial);

void setup() {
  Serial.begin(9600);
  finger.begin(57600);

  if (finger.verifyPassword()) {
    Serial.println("Fingerprint sensor found");
  } else {
    Serial.println("Sensor not found");
    while (1);
  }

  Serial.println("Enter ID to delete (e.g. 1)");
}

void loop() {
  if (Serial.available()) {
    int id = Serial.parseInt();
    if (id > 0 && id < 128) {
      deleteFingerprint(id);
    }
  }
}

uint8_t deleteFingerprint(uint8_t id) {
  uint8_t p = finger.deleteModel(id);

  if (p == FINGERPRINT_OK) {
    Serial.print("Deleted ID ");
    Serial.print(id);
    Serial.println(" successfully");
  } else {
    Serial.print("Failed to delete ID ");
    Serial.println(id);
  }

  return p;
}
Type the ID number you want to delete in the Serial Monitor and press Send. For example, type “1” to delete fingerprint ID 1.
Summary
In this tutorial, we learned how to use Arduino with a Fingerprint Sensor. We can enroll multiple fingerprint IDs into the sensor and use them to verify and control other devices, such as turning an LED ON or OFF as needed.
อยากทำโปรเจคแบบนี้?
รับทำโปรเจค Arduino / IoT จบงานไว ส่งงานครบ พร้อมสอน
If you need Arduino project service or urgent IoT development, see full service details on the home page
จ้างทำโปรเจคเลย