
Last updated on
How to Use KY-037 High Sensitivity Sound Sensor with Arduino
How to Use KY-037 High Sensitivity Sound Sensor with Arduino
The KY-037 is a high-sensitivity sound detection module that provides both analog and digital outputs. It’s suitable for projects that need to measure sound levels or trigger actions when specific sound events occur.
Required Components
- Arduino UNO R3
- USB cable for uploading code
- High Sensitivity Sound KY-037 sensor
- Red LED 1 pcs
- 220 Ohm resistor
- Breadboard
- Jumper wires
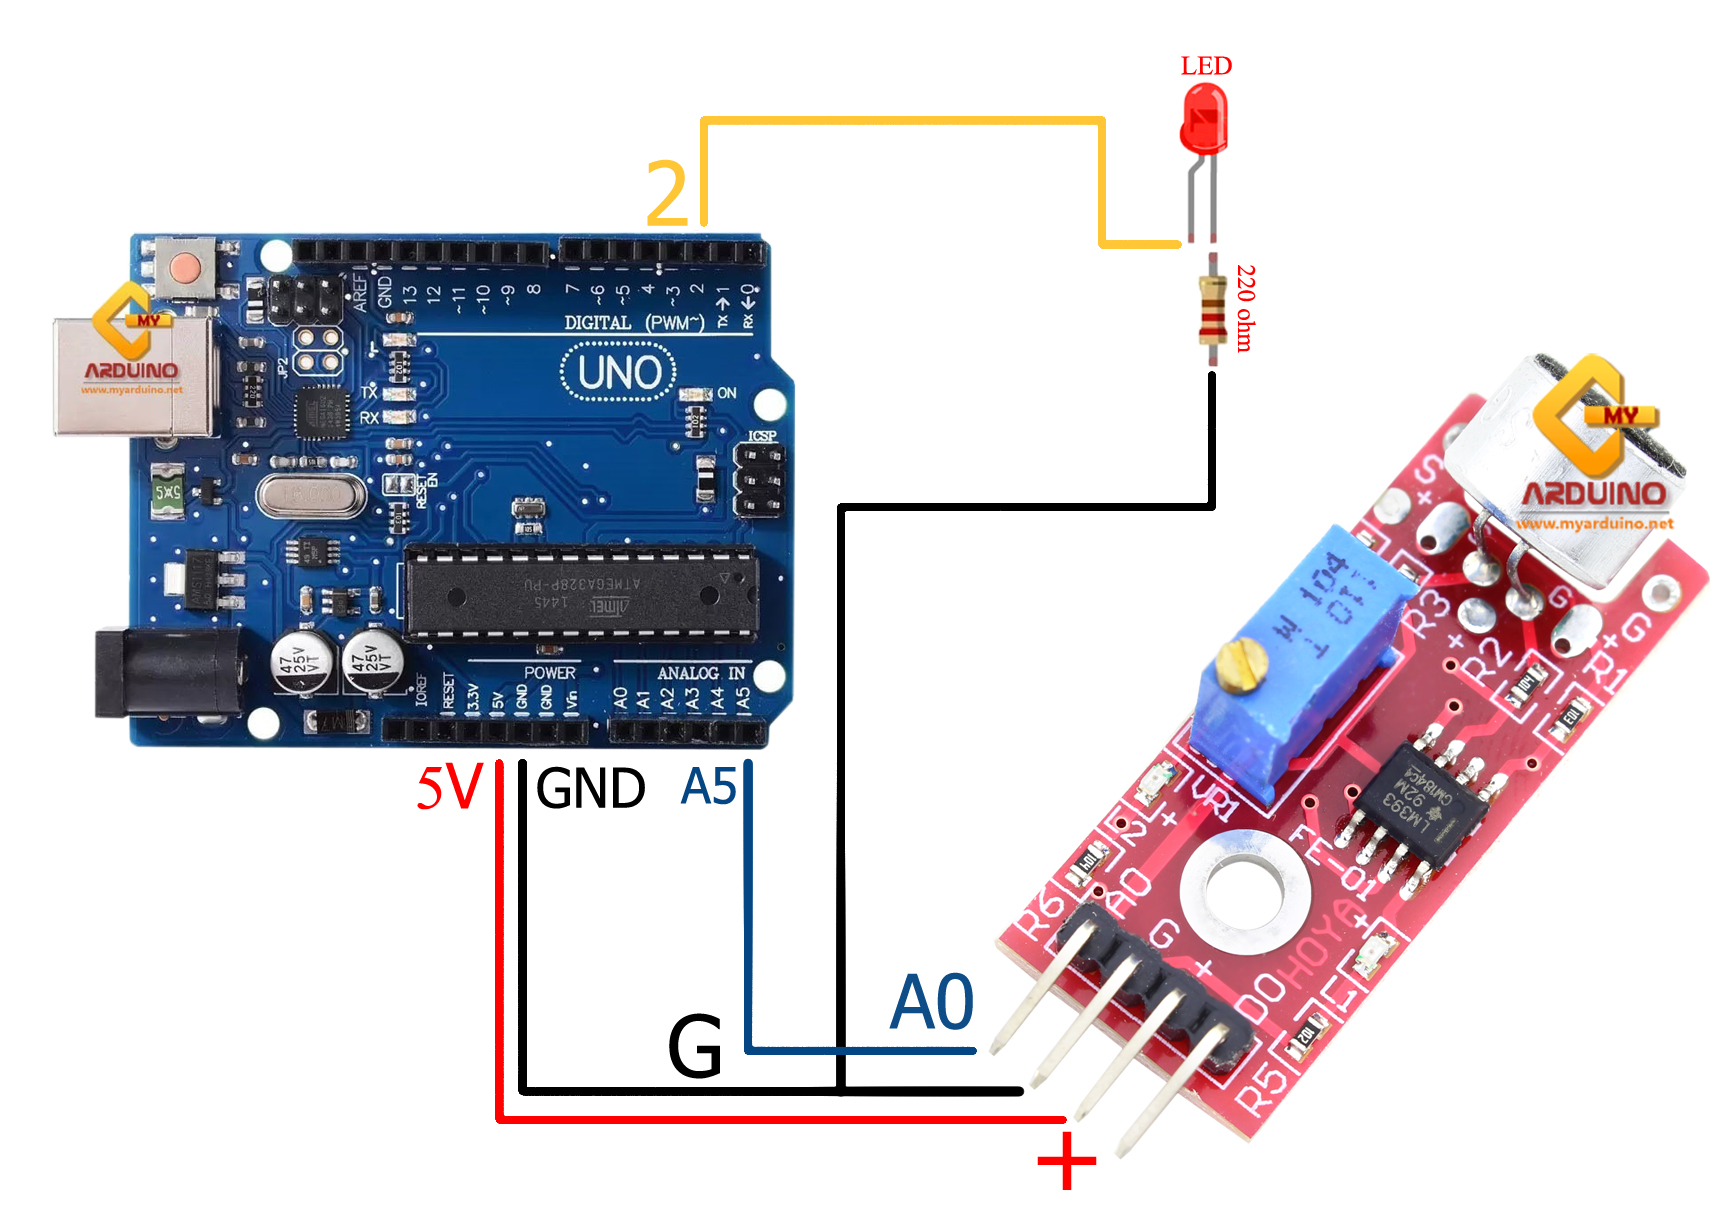
Wiring: Arduino + KY-037 + LED

| Arduino UNO | Device | Notes |
|---|---|---|
| Pin 2 | LED (through 220Ω R) | LED on/off control |
| 5V | KY-037 pin + | Power supply |
| GND | KY-037 pin G | Common ground |
| A5 | KY-037 pin A0 | Analog read |
Arduino Code: Read Sound from KY-037
const int soundPin = A5;    // Analog pin for sound
const int ledPin = 2;      // LED pin
const int threshold = 725; // Adjust based on your environment
int ledState = LOW;         // Initial LED state

void setup() {
  Serial.begin(9600);
  pinMode(ledPin, OUTPUT);
  pinMode(soundPin, INPUT);
}

void loop() {
  int soundValue = analogRead(soundPin);  // Read value 0-1023
  Serial.println(soundValue);                // Output to Serial Plotter


  // Toggle LED when sound exceeds threshold
  if (soundValue > threshold) {
    ledState = !ledState;                   // Toggle on/off
    digitalWrite(ledPin, ledState);
    delay(200);                              // Debounce to prevent rapid repeats
  }
}
Testing with Serial Plotter
- Upload the code to Arduino
- Open Serial Plotter via Tools → Serial Plotter (or Serial Monitor)
- Observe baseline reading when quiet — typically 0-50
- Clap your hands or make a sound near the sensor — value jumps up
- Adjust threshold in code based on your actual readings
Points to Customize
- threshold — If LED turns on by itself when quiet, raise this value. If LED doesn’t respond to loud sounds, lower it.
- delay(200) — Controls debounce. Smaller value = faster response but may flicker from a single sound event.
- A0 pin — You can change to A0-A4 as needed. Update the pin number in code accordingly.

Using Digital Output for Simpler Projects
If you only need to detect sound presence (HIGH/LOW), use D0 instead of analog:
const int digitalPin = 4;  // KY-037 D0 pin
const int ledPin = 2;

void setup() {
  Serial.begin(9600);
  pinMode(digitalPin, INPUT);
  pinMode(ledPin, OUTPUT);
}

void loop() {
  int digitalValue = digitalRead(digitalPin);
  Serial.println(digitalValue);
  digitalWrite(ledPin, digitalValue);  // LED lights when sound detected
}
Note: D0 switches HIGH/LOW based on the trimpot setting on the module. Adjust the trimpot directly to set sensitivity for digital mode.
Reference Video
อยากทำโปรเจคแบบนี้?
รับทำโปรเจค Arduino / IoT จบงานไว ส่งงานครบ พร้อมสอน
If you need Arduino project service or urgent IoT development, see full service details on the home page
จ้างทำโปรเจคเลย