How to Connect Bluetooth Module HC06 with Arduino and Mobile Application
How to Connect Bluetooth Module HC06 with Arduino and Mobile Application
This article explains how to connect HC06 Bluetooth module with Arduino for receiving and sending data to a mobile application via Software Serial. A practical approach that does not require expensive equipment.
HC06 is a Bluetooth module that enables devices to communicate with microcontrollers easily. This module operates as Slave only, waiting for other devices to connect via Serial Port. Configuration is possible through AT Commands such as changing the device name or setting a password.
Required Components
- Arduino UNO R3 with USB cable
- Bluetooth Module HC06
- Power Adapter 9V 2A
- Breadboard MB-102 830 Point
- Jumper wires M-M, M-F, F-F 20cm each type, 40 pieces per type
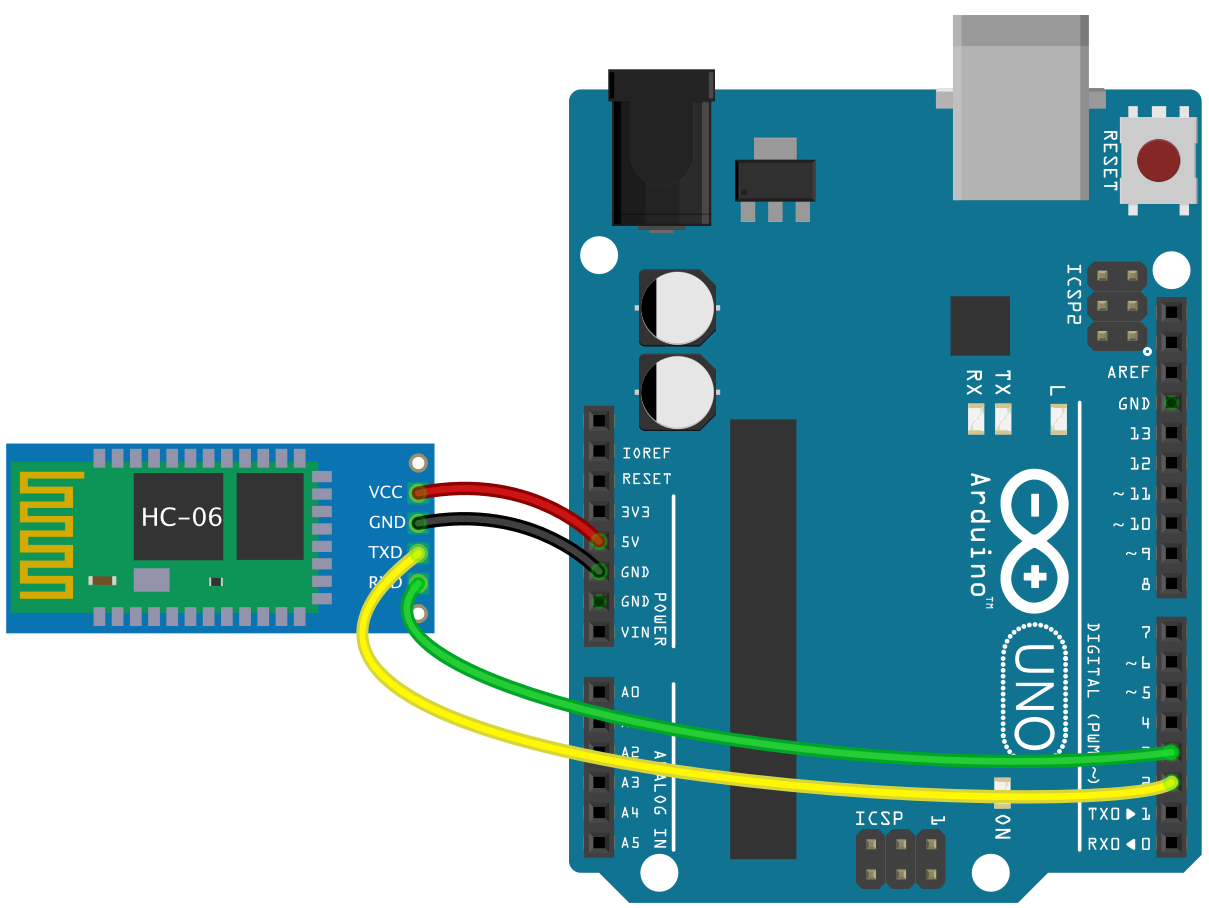
Wiring HC06 with Arduino
Connect the wires between HC06 and Arduino as follows
| HC06 | Arduino |
|---|---|
| VCC | 5V |
| GND | GND |
| TX | Pin 2 |
| RX | Pin 3 |
Important - TX of HC06 connects to RX of Arduino, and RX of HC06 connects to TX of Arduino (cross connection)
Arduino Code for Receiving Bluetooth Data
Use SoftwareSerial to preserve Hardware Serial for code upload and debugging
#include <SoftwareSerial.h>

SoftwareSerial mySerial(2, 3); // RX, TX


void setup() {
  Serial.begin(9600);
  while (!Serial) ;
  mySerial.begin(9600);
}

void loop() {
  if (mySerial.available())
    Serial.write(mySerial.read());
  if (Serial.available())
    mySerial.write(Serial.read());
}
This code receives data from HC06 and displays it on Serial Monitor, while forwarding data from Serial Monitor back to HC06. If you need to process received values for controlling devices like Relay, see the next section.
Configuring HC06 Using AT Commands
Before using, you may need to set the device name and password via AT commands through Serial Monitor
| Command | Function |
|---|---|
| AT | Test connection (returns OK) |
| AT+NAMEYourName | Set device name |
| AT+PINYourCode | Set 4-digit PIN |
How to - Upload the code above, hold the button on HC06 module, then power it on. The LED blinks slowly when in AT Command mode.
Using Ardroid Application
Download Ardroid app from Play Store or MediaFire link
https://play.google.com/store/apps/details?id=com.thechampanurag.arduinoWhen the app opens, tap the menu button (3 dots) at the top right, select the Bluetooth device to connect. Values sent from the buttons will appear on Serial Monitor.

Testing Digital Output Section
Press Pin1, Pin2, or Pin3 on the app. The button value appears on Serial Monitor immediately. If the code receives correctly, you will see 1, 2, or 3 displayed.
Testing Analog Section
Go to ANALOG tab. A slider bar will appear. When you move the slider, numerical values display on Serial Monitor continuously based on the position. This helps test receiving analog values.
Testing Data Section
Go to DATA tab. Type any text, for example “myarduino”, then press send. The value appears on Serial Monitor fully. This method works well for testing string reception.
[image: DATA tab of Ardroid app showing text input field and send button]
Example: Using Received Values for Control
After successfully receiving values from HC06, process them to control devices like Relay for switching lights or controlling motors. See the example code below
#include <SoftwareSerial.h>

SoftwareSerial mySerial(2, 3); // RX, TX

void setup() {
  Serial.begin(9600);
  mySerial.begin(9600);
  pinMode(13, OUTPUT); // On-board LED
}

void loop() {
  if (mySerial.available()) {
    char data = mySerial.read();
    Serial.write(data);

    // Example: Control LED with Pin1 button
    if (data == '1') {
      digitalWrite(13, HIGH);
    } else if (data == '2') {
      digitalWrite(13, LOW);
    }
    // Customize this part for your actual project
  }
}
Points to modify - Change the pin connected to Relay or your target device, and adjust conditions based on buttons used in the app.
Summary
Connecting HC06 Bluetooth module with Arduino requires only 4 wires with TX RX swapped. The code uses SoftwareSerial on pins 2, 3 to preserve Hardware Serial for uploads. After pairing with Ardroid app, data passes through HC06 to Arduino and displays on Serial Monitor for testing. Then apply the values to your actual project needs.
Reference Video
อยากทำโปรเจคแบบนี้?
รับทำโปรเจค Arduino / IoT จบงานไว ส่งงานครบ พร้อมสอน
If you need Arduino project service or urgent IoT development, see full service details on the home page
จ้างทำโปรเจคเลย