TinyGo 0.41.0 — รองรับ WiFi บน ESP32 และ Arduino UNO Q แล้ว
เตรียมของให้พร้อม!
โปรเจคนี้ต้องใช้: ESP32 ESP-WROOM-32 Dev Module
TinyGo 0.41.0 มาแล้ว
ทีม TinyGo ประกาศเวอร์ชันใหม่ล่าสุด TinyGo 0.41.0 ซึ่งถือว่าเป็น release ที่เต็มไปด้วยฟีเจอร์มากที่สุดเท่าที่เคยมี ด้วยการ commit มากกว่า 150 ครั้งไปยัง main repository โดยเฉพาะการรองรับ WiFi บน ESP32 และ Arduino UNO Q ที่เพิ่งเปิดตัว
TinyGo คืออะไร?
TinyGo คือ Go compiler ที่ออกแบบมาสำหรับ embedded systems และอุปกรณ์ที่มีทรัพยากรจำกัด ต่างจาก Go ปกติที่เน้น server-side หรือ cloud applications, TinyGo สามารถ compile โค้ด Go ให้รันบนอุปกรณ์เล็กๆ เช่น:
- Arduino Uno, Nano, Mega
- ESP32, ESP32-C3, ESP32-S3
- Raspberry Pi Pico / Pico W
- STM32 microcontrollers
- BBC micro:bit
สิ่งที่ทำให้ TinyGo น่าสนใจคือสามารถใช้ goroutine, channel, และ features ของ Go ที่ช่วยจัดการ concurrent operations ได้ดีบนอุปกรณ์ embedded ซึ่งปกติแล้วต้องใช้ C หรือ C++
มีอะไรใหม่ในเวอร์ชัน 0.41.0?
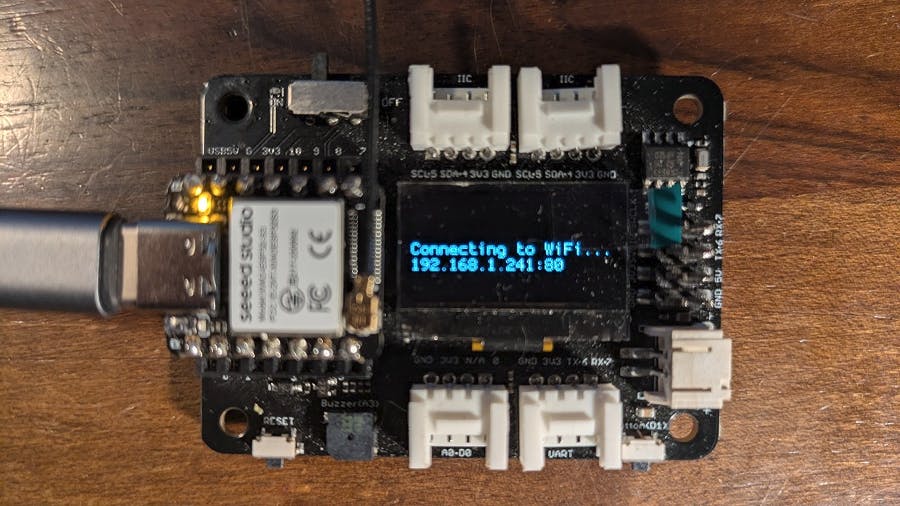
1. รองรับ WiFi บน ESP32-C3 และ ESP32-S3
ฟีเจอร์ที่รอคอยมานาน — ตอนนี้ TinyGo รองรับ WiFi บนชิป ESP32-C3 และ ESP32-S3 แล้ว ทำให้สามารถ:
// ตัวอย่าง: รัน Web Server บน ESP32 ด้วย Go
package main

import (
    "machine"
    "net/http"
    "net/netip"
    "tinygo.org/x/drivers/esp32wifi"
)

func main() {
    // เชื่อมต่อ WiFi
    eth := esp32wifi.New()
    eth.Connect("SSID", "password")

    // รัน HTTP server
    http.ListenAndServe(":80", http.HandlerFunc(func(w http.ResponseWriter, r *http.Request) {
        w.Write([]byte("Hello from TinyGo on ESP32!"))
    }))
}
ตามที่ Ron Evans จาก TinyGo team อธิบายว่า “คุณสามารถรัน web server หรือ MQTT client บนบอร์ด ESP32 ได้เลยโดยใช้ภาษาเดียวกันกับที่ขับ cloud infrastructure ของคุณ”
การสื่อสาร WiFi ใช้ package ‘espradio’ ที่ทีม TinyGo พัฒนาใหม่ โดยปัจจุบันรองรับ WiFi แล้ว และ Bluetooth อยู่ระหว่างพัฒนา
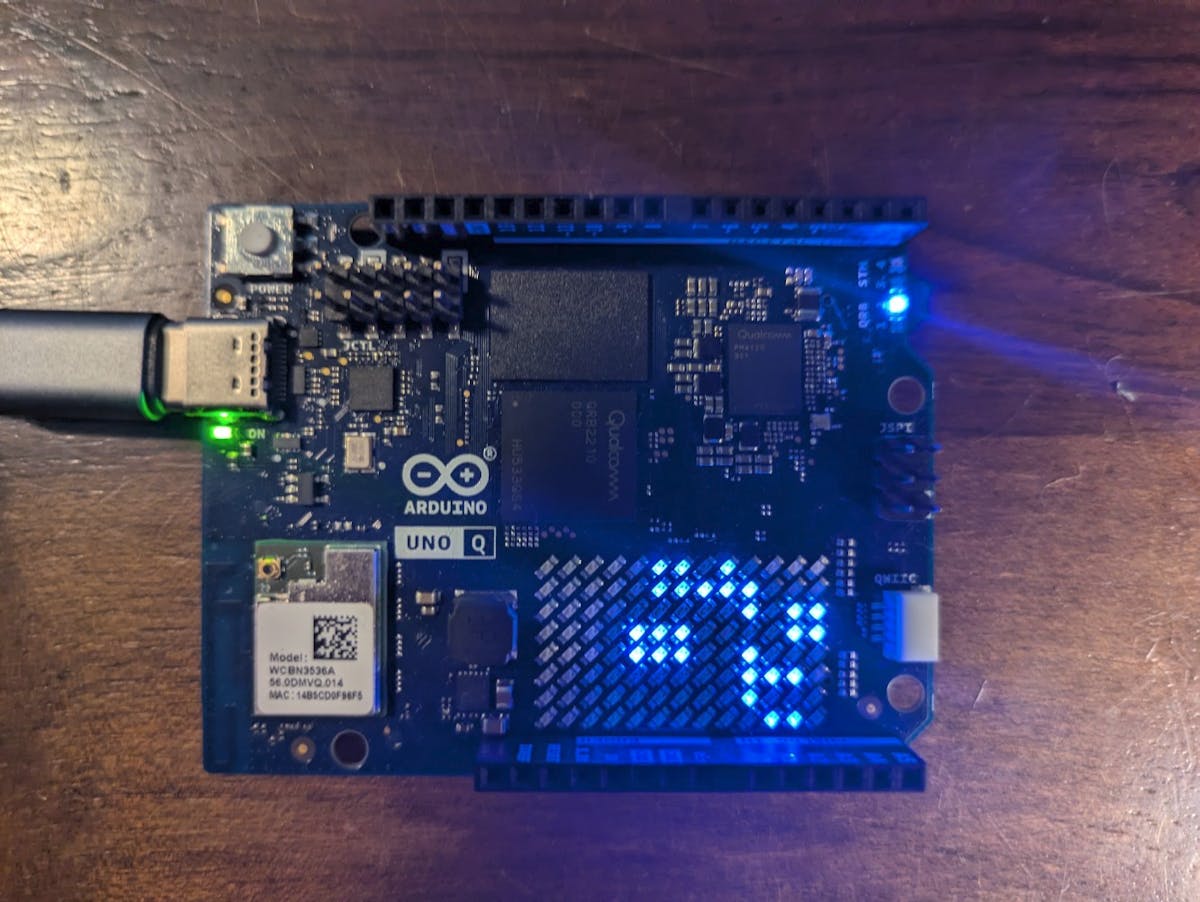
2. รองรับ Arduino UNO Q
Arduino UNO Q เปิดตัวเมื่อปลายปีที่แล้วพร้อมกับการที่ Qualcomm ซื้อกิจการ Arduino และแนะนำตัวบอร์ดนี้ว่าเป็น “dual-brain” board
ความพิเศษของ UNO Q คือ:
- ไมโครโปรเซสเซอร์ ฝั่ง Linux สำหรับรัน full OS
- STMicroelectronics STM32U585 microcontroller ฝั่ง coprocessor สำหรับงาน real-time
TinyGo 0.41.0 ทำให้สามารถ flash Go code ลงบน STM32 coprocessor ของ UNO Q ได้เลย พร้อมเข้าถึง:
- GPIO pins
- ADC (Analog to Digital Converter)
- PWM
- SPI และ I2C buses
- LED matrix ที่ติดตั้งบนบอร์ด
3. รองรับ Go 1.26
TinyGo 0.41.0 อัปเดตรองรับ Go 1.26 ทำให้ได้ฟีเจอร์ล่าสุดของ Go มาใช้บน embedded ด้วย
4. Flash ได้โดยตรงไม่ต้องใช้ External Tools
เพิ่ม ‘espflasher’ package ทำให้สามารถ flash โค้ดลงบอร์ด ESP32 ได้โดยตรงด้วยคำสั่ง tinygo flash โดยไม่ต้องติดตั้ง esptool หรือเครื่องมืออื่นเพิ่มเติม
เปรียบเทียบ: TinyGo vs Arduino IDE (C++)
| เกณฑ์ | TinyGo (Go) | Arduino IDE (C++) |
|---|---|---|
| ความเร็วในการเขียน | เร็วกว่า (concurrency built-in) | เขียนได้เร็ว |
| Memory safety | ✅ มี garbage collection | ❌ ต้องจัดการเอง |
| Concurrency | ✅ Goroutine + Channel | ❌ ต้องใช้ FreeRTOS |
| Library ecosystem | ใช้ Go libraries ได้ | ใช้ Arduino libraries |
| Hardware support | กำลังขยาย | ครอบคลุมมากกว่า |
| Learning curve | ต้องรู้ Go | ง่ายกว่าสำหรับมือใหม่ |
ตัวอย่างการใช้งานจริงของ TinyGo
MQTT Sensor Gateway
package main

import (
    "machine"
    "tinygo.org/x/drivers/esp32wifi"
    "tinygo.org/x/drivers/mqtt"
    "time"
)

func main() {
    wifi := esp32wifi.New()
    wifi.Connect("home-wifi", "password")

    client := mqtt.NewClient()
    client.Connect("tcp://mqtt.server:1883", "esp32-client")

    sensor := machine.ADC{Pin: machine.A0}

    for {
        value := sensor.Read()
        client.Publish("sensors/temp", []byte(string(value)))
        time.Sleep(5 * time.Second)
    }
}
LED Matrix Display บน UNO Q
package main

import (
    "machine"
    "tinygo.org/x/drivers/ledmatrix"
)

func main() {
    matrix := ledmatrix.New()
    matrix.Configure()

    for {
        matrix.Clear()
        matrix.DrawText("TinyGo!", 0, 0)
        matrix.Show()
        time.Sleep(1 * time.Second)
    }
}
ติดตั้งและเริ่มต้นใช้งาน
1. ติดตั้ง TinyGo
# macOS
brew tap tinygo-org/tinygo
brew install tinygo

# Linux (download binary)
wget https://github.com/tinygo-org/tinygo/releases/download/v0.41.0/tinygo_0.41.0_amd64.deb
sudo dpkg -i tinygo_0.41.0_amd64.deb

# Windows (ใช้ scoop)
scoop install tinygo
2. ติดตั้ง Go ก่อน (ถ้ายังไม่มี)
# ดาวน์โหลดจาก golang.org3. ต่อบอร์ดและ flash
# ดูบอร์ดที่ต่อ
tinygo targets

# flash ไปบน ESP32
tinygo flash -target=esp32-c3-mini yourcode.go
10 โปรเจกต์อ้างอิงสำหรับต่อยอด
- IoT Automation Dashboard
- IoT Dashboard Webserver with Gauges
- UNO R4 WiFi Weather Dashboard
- Loadmaster Online Dashboard and Data Logging
- Arduino MQTT to Grafana
- MKR Zero Weather Data Logger
- IoTerrific Data Logging
- Temperature/Humidity/Water Level Monitoring
- ESP32 Real-time AQI Tracking
- Connected Weather Station with ESP32
อุปกรณ์แนะนำสำหรับ TinyGo (ดึงจาก Me/merged_output.csv คอลัมน์ ลิงก์ข้อเสนอ)
- ESP32 ESP-WROOM-32 Dev Module — บอร์ดหลักสำหรับ TinyGo WiFi
- ESP32-C3 Dev Module — รองรับ TinyGo 0.41.0
- Arduino UNO R3 — บอร์ดเริ่มต้นสำหรับ TinyGo
- DHT22 Temperature Humidity Sensor — เซนเซอร์วัดอุณหภูมิและความชื้น
- OLED 0.96 inch I2C Display — หน้าจอแสดงผลสำหรับ projects
- HC-SR04 Ultrasonic Sensor — วัดระยะทาง
อ่านต่อ/ต่อยอด
- Arduino Mega 2560 คู่มือฉบับสมบูรณ์ — บอร์ดสำหรับโปรเจกต์ขนาดใหญ่
- ESP32 คืออะไร? — บอร์ด IoT ยอดนิยม
- บริการรับทำโปรเจค Arduino/IoT — ถ้าต้องการให้ช่วยขึ้นระบบให้
สรุป
TinyGo 0.41.0 เป็นก้าวสำคัญสำหรับนักพัฒนา Go ที่อยากลองเขียนโค้ดบน hardware — ตอนนี้รองรับ WiFi บน ESP32 แล้ว และยังขยายไปถึง Arduino UNO Q ที่เป็น dual-brain board ทำให้สามารถรัน Go บน microcontroller coprocessor ได้โดยตรง ถ้าใช้ Go อยู่แล้ว TinyGo เปิดโลกใหม่ของการเอา Go ไปรันบน edge devices ได้เลย
อยากทำโปรเจคแบบนี้?
รับทำโปรเจค Arduino / IoT จบงานไว ส่งงานครบ พร้อมสอน
หากต้องการ รับทำโปรเจคอาดูโน่ หรือระบบ IoT แบบเร่งด่วน สามารถดูรายละเอียดบริการได้ที่หน้าแรก
จ้างทำโปรเจคเลย