We have all seen different types and versions of LED cubes. Once they light up, we have always anticipated dazzling patterns. Some of us have even felt the urge to make one of those splendid LED cubes.
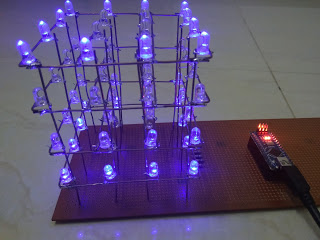
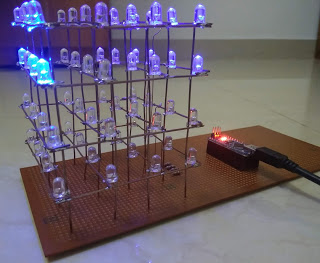
In this documentation, I will show you how to make an LED cube (4x4x4). I have used blue LEDs but you are allowed to use any other colour. This project took nearly two days for completion - one day to complete the structure and the next one to prepare the sketch. This project was specially designed for my Arduino Nano; unfortunately, the Arduino Nano had some issues while uploading the code. After several attempts, I realised that the problem was with the Arduino board and not my sketch. At first I used the Arduino Uno, but later I solved the issue with the Arduino Nano and used it.
Hardware components
- Arduino Nano - You can also use an Arduino Mega 2560 to manage I/O ports.
- LEDs (x64) - Generic, standard-sized LEDs (3mm or 5mm recommended).
- Resistors (x4) - 220Ω - Current limiting resistors to protect the LEDs.
Hand tools and fabrication machines
- Soldering iron - Generic
- Solder
- Cutting pliers
- Round-nose pliers
- Tweezers
- Ruler - 15cm
- Metal wires - 4" long and 20 gauge thick
- Wires
- Stripboard
- Cardboard sheet/ Wooden plank/ 3D printed template (to use as a jig)
Setup & Fabrication
The key to a beautiful LED Cube is symmetry, so the jig creation process is crucial.
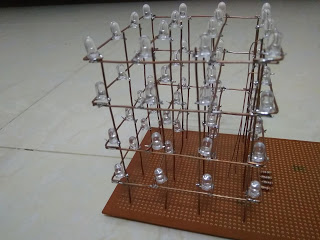
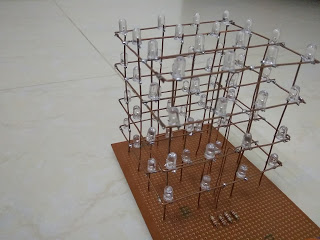
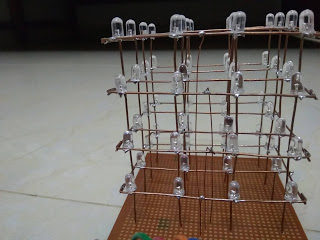
- Creating the Jig: Using your ruler, draw a grid onto a cardboard sheet/ wooden plank with 9 squares, each with a dimension of 1"x1". Carefully poke/drill a hole onto the points where the lines meet, and the diameter of the hole must be equal to the diameter of the LED. This ensures all LEDs are perfectly aligned on the same plane.
- Connecting Each Layer: Place the LEDs into the jig. Bend the Anode (positive terminal) leads parallel to the plane. Place the metal wires above the LEDs and solder the wires with the anodes of the LEDs. Then, place two other wires, one at the top and another at the bottom, and solder it with the four wires for added structural strength. Repeat this procedure for the other three layers.
- Connecting the Columns: Carefully place 16 metal wires (4" long) in an arrangement like the grid you've drawn. Solder the Cathode (negative terminal) leads of the LEDs in each vertical position together (connecting Layer 1 to Layer 4 at the same coordinate).
Your cube must look similar to the one in the images above.
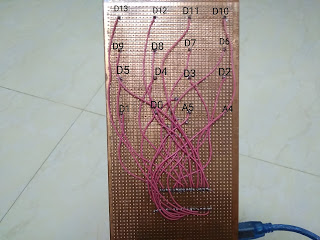
Connections & System Logic
To control 64 LEDs with limited ports, we use a Multiplexing technique by controlling "Layers" and "Columns" separately. The pins for the Layers are assigned as follows:
- Layer 01 (Bottom Layer) - A0
- Layer 02 - A1
- Layer 03 - A2
- Layer 04 (Top Layer) - A3
All 16 Columns are connected to the Arduino's Digital Pins to determine which LED in the currently active layer will light up.
The operation relies on the principle of Persistence of Vision (POV):
- The program turns on each Layer one by one at a very high speed.
- While one Layer is active (e.g., A0 is HIGH), the program sends signals to the Column pins to selectively turn on the desired LEDs in that layer.
- When all 4 layers are cycled through at a speed greater than 60 times per second, our eyes perceive that all LEDs are lit simultaneously, forming 3D shapes.
Final Look
Second version: https://arduinoprojectsbyr.blogspot.com/2019/11/35-led-cube-4x4x4-version-20.html
If anyone has any questions or suggestions about this projects, please comment them below.