Arduino 4WD Rover Bluetooth Controlled by an Android device
4WD Rover Robot Project Controlled via Bluetooth with Arduino
Welcome to the project of building a four-wheel drive (4WD Rover) robot powered by the intelligent microcontroller, Arduino. This project is not just about assembling a common toy; it's a fundamental learning experience in Embedded Systems, integrating mechanics, power electronics, and wireless communication.
This robot is designed to be controlled via an Android smartphone or tablet using Bluetooth communication. A key highlight of this project is the ability to precisely control motor speed using PWM (Pulse Width Modulation) technique, and also to steer the robot by tilting your mobile device, utilizing its Accelerometer (acceleration sensor).
At the heart of the project is the Arduino Sketch, which is Open Source and includes clear explanations of its Communication Protocol. This allows you to extend the code to control other types of robots or customize its functionality as needed.
Step 1: Required Components (Bill of Materials)

To build the 4WD Rover, you will need to prepare basic components, which are readily available from general electronics stores or online retailers. The main components selected have the following suitable engineering specifications:
- 4WD Robot Chassis Kit: Consists of a Chassis base plate, 4 DC Gear Motors, and 4 wheels. This kit is designed to support a maximum voltage of approximately 12V.
- Examples of where to buy: Robotik Center, RobotShop or search for "4WD chassis robot arduino" on Shopee/Lazada/Ebay
- Microcontroller Board: Arduino Uno R3 or Arduino Leonardo, serving as the central processing unit.
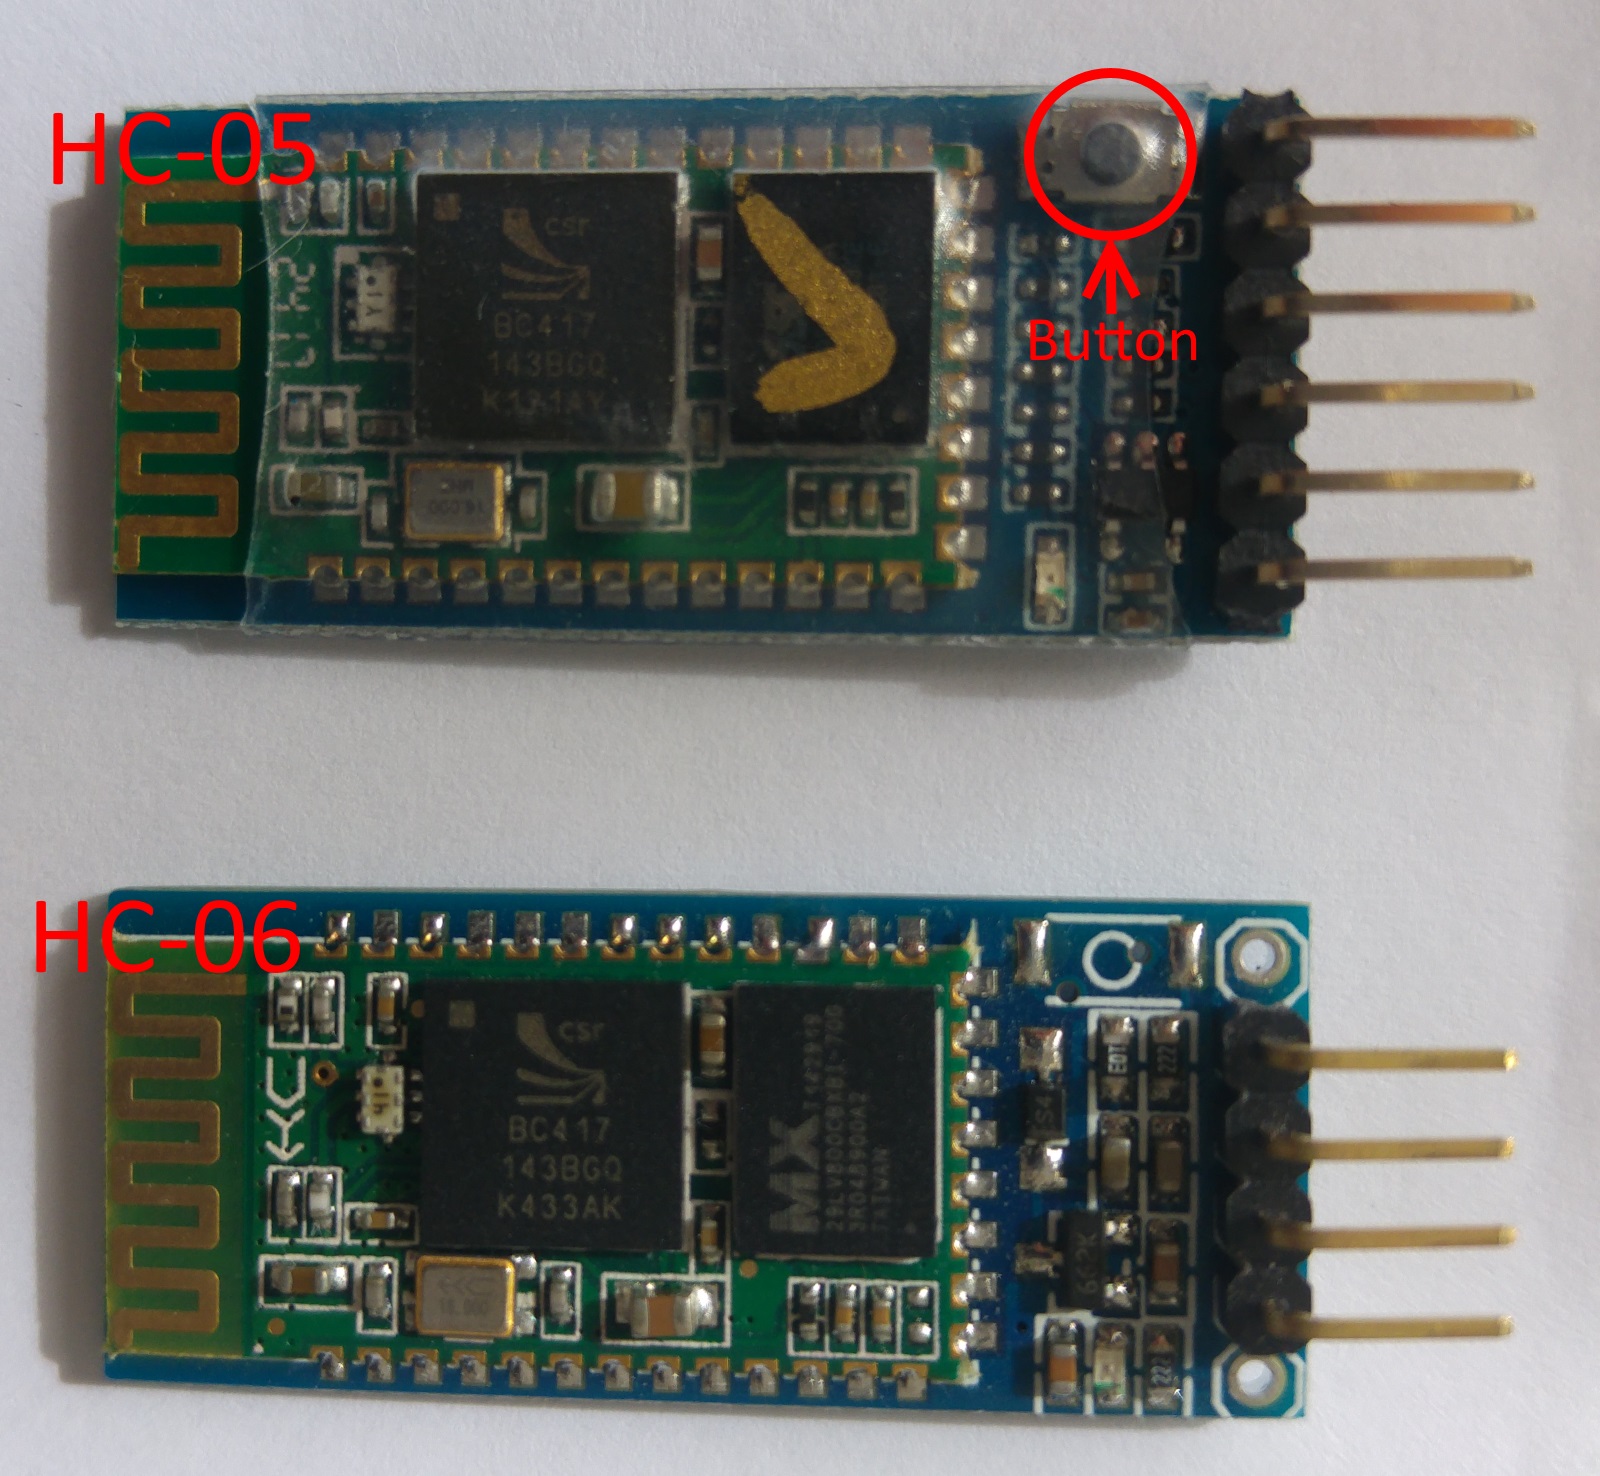
- Bluetooth Module: HC-05 or HC-06 for wireless data transmission via Serial UART.
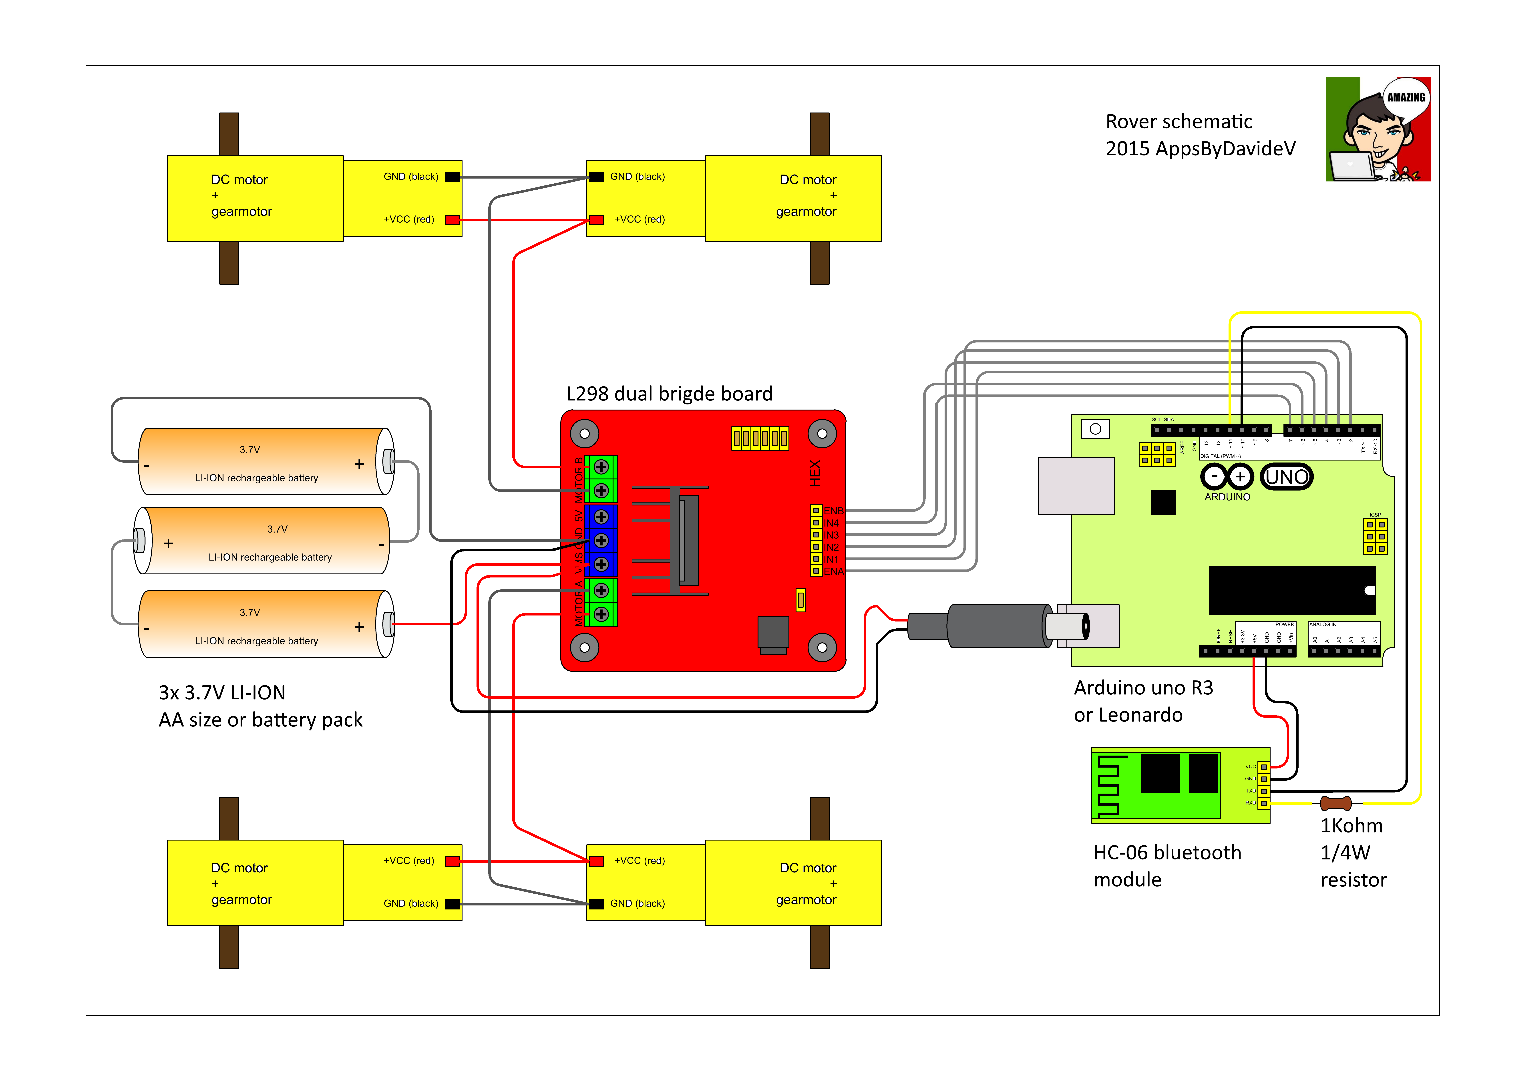
- L298N Dual H-Bridge Motor Driver Module: A very important power electronics component that converts low-voltage control signals from the Arduino into high current to drive 4 motors (separated into 2 sides: left and right).
- Power Supply: Three 3.7V Li-ion batteries (connected in series to achieve approximately 11.1V) or an 11.1V 1200mAh or higher Li-Po battery, to provide sufficient power for motor propulsion and to supply the control board.
- Accessories: DC Jack plug, 1k Ohm resistor (for signal voltage level maintenance), Flat cable, and heat shrink tubing.
Step 2: The Schematic Diagram
Circuit connection is critical for stability. Please verify pin assignments according to the diagram:
- L298N Driver: Connects to Arduino Digital pins for direction control (IN1, IN2, IN3, IN4) and PWM pins for speed control (ENA, ENB).
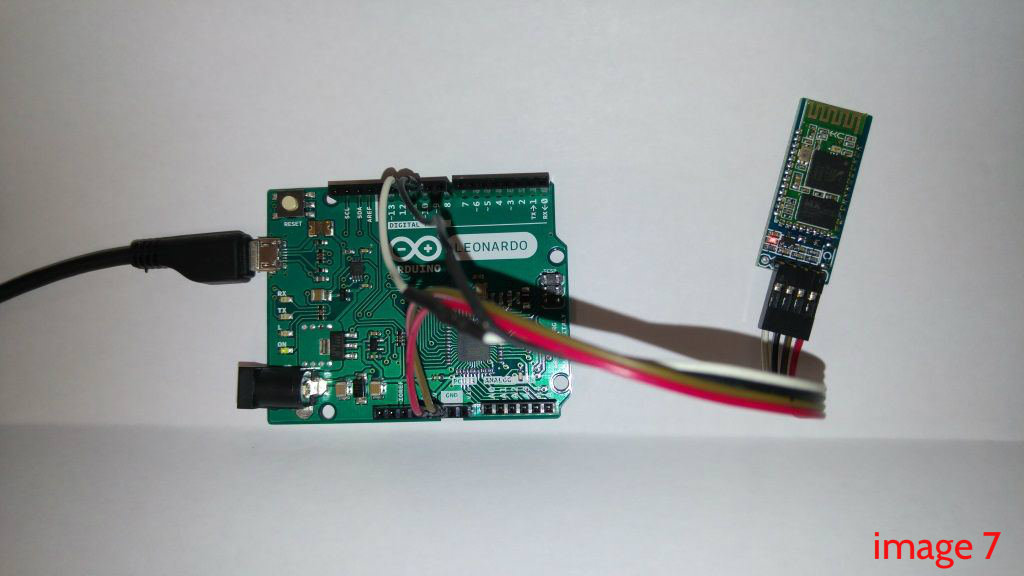
- Bluetooth Module: Connect the module's TX pin to Arduino's RX, and the module's RX pin to Arduino's TX. Caution: Most HC-05/06 modules operate at a 3.3V signal level, so a 1k Ohm resistor should be connected in series to the module's RX pin to prevent damage from the Arduino's 5V signal.
- Power Supply: The power supply from the battery will be split into two parts: directly to the L298N to drive the motors, and via the DC jack into the Arduino board to pass through its onboard Regulator circuit.
Step 3: Assembling the Rover

Follow the assembly steps in sequence:
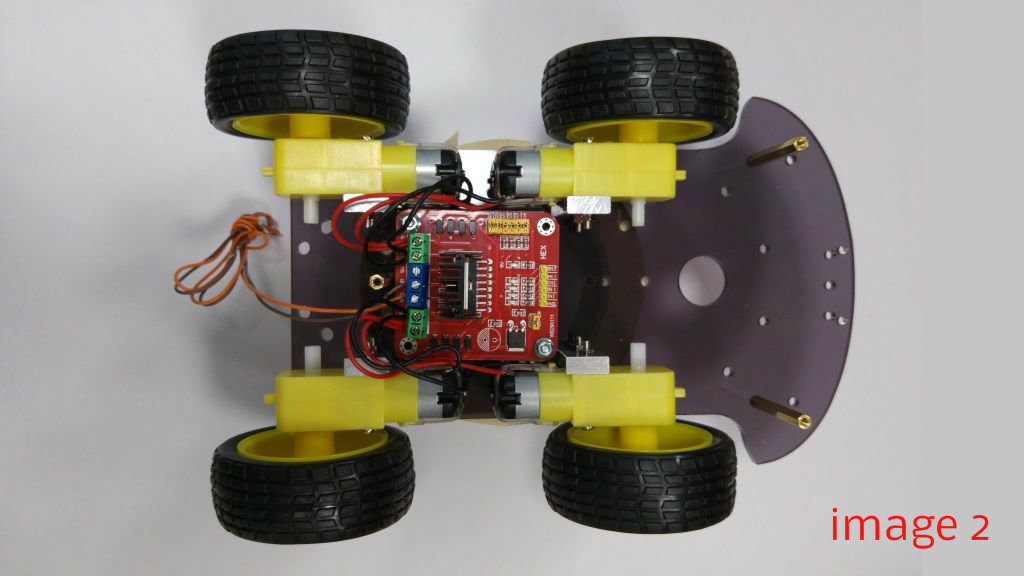
- Install Motors: Secure all 4 DC Gear Motors to the bottom chassis plate and firmly attach the wheels (Figure 1).
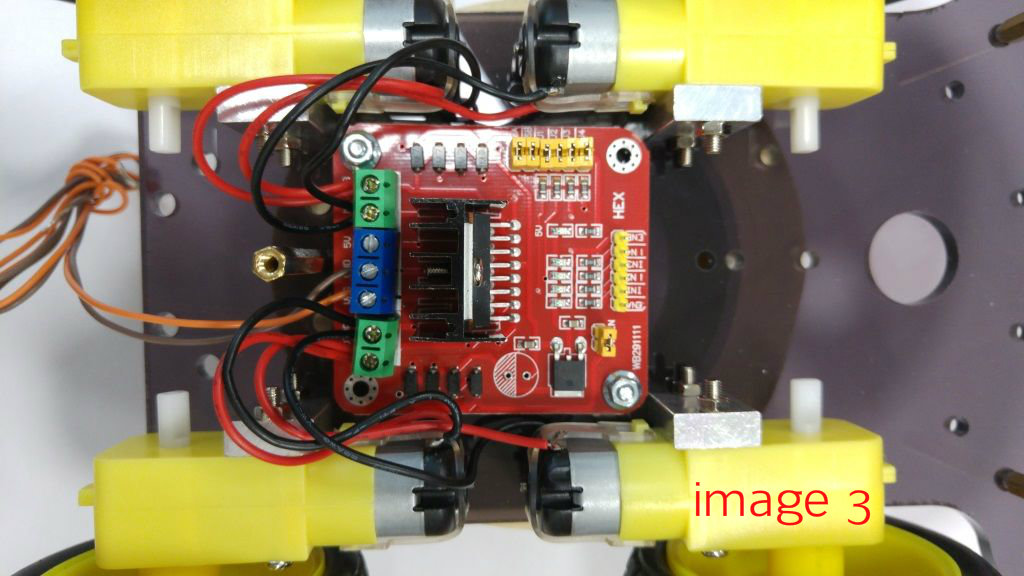
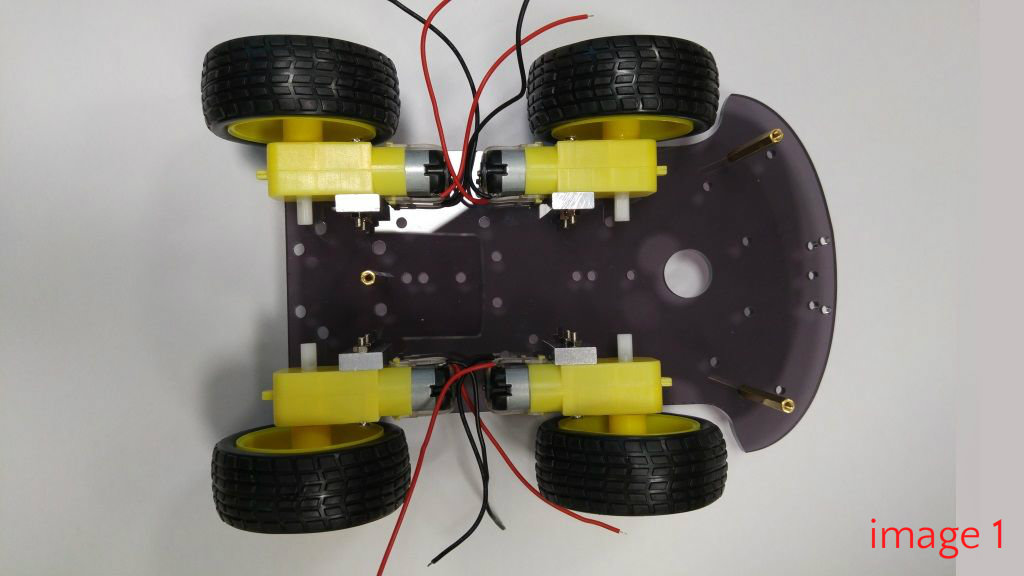
- Drive System: Install the L298N board and wire the motors to the board. The motors on the left and right sides will be connected in parallel as two separate sets (Figures 2-3).
- Cable Management: Use Flat cable for neatness. Connect the control pins from the L298N to the Arduino, and connect the DC jack to power the board, being careful with positive and negative polarities (Figure 4).
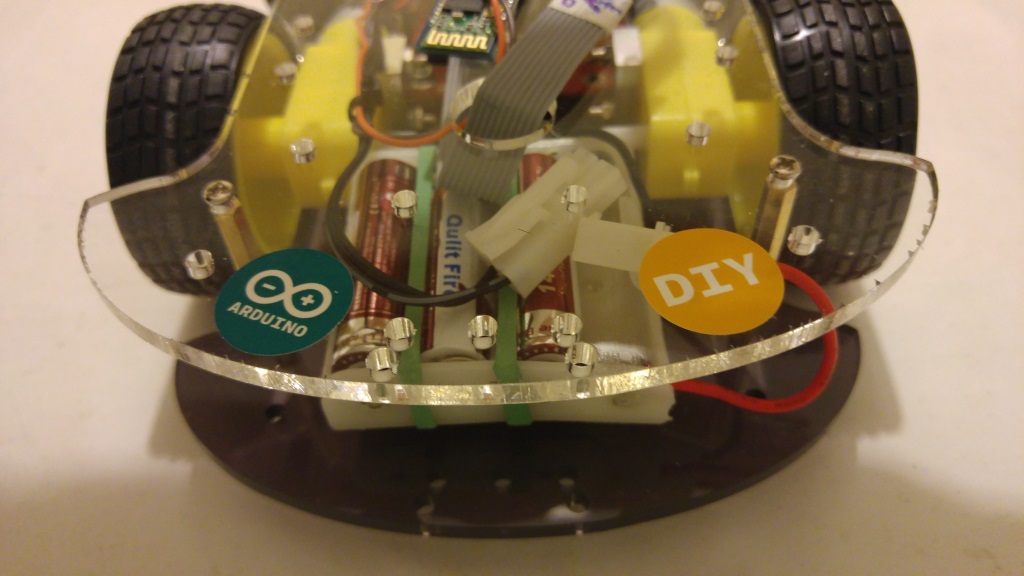
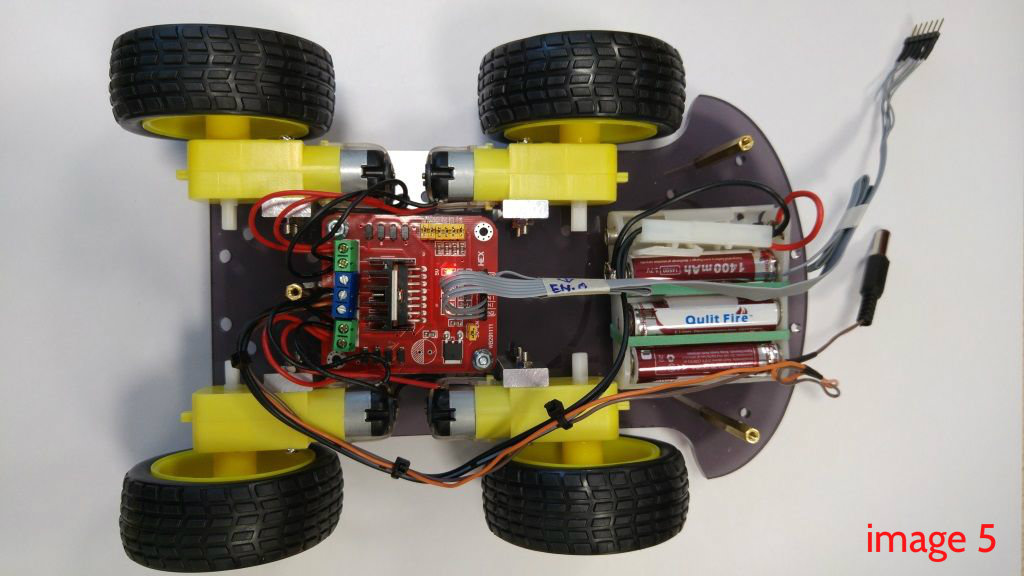
- Power Source: Place the battery holder or battery pack at the front of the robot for weight distribution. Secure it with strong double-sided tape (Figure 5).
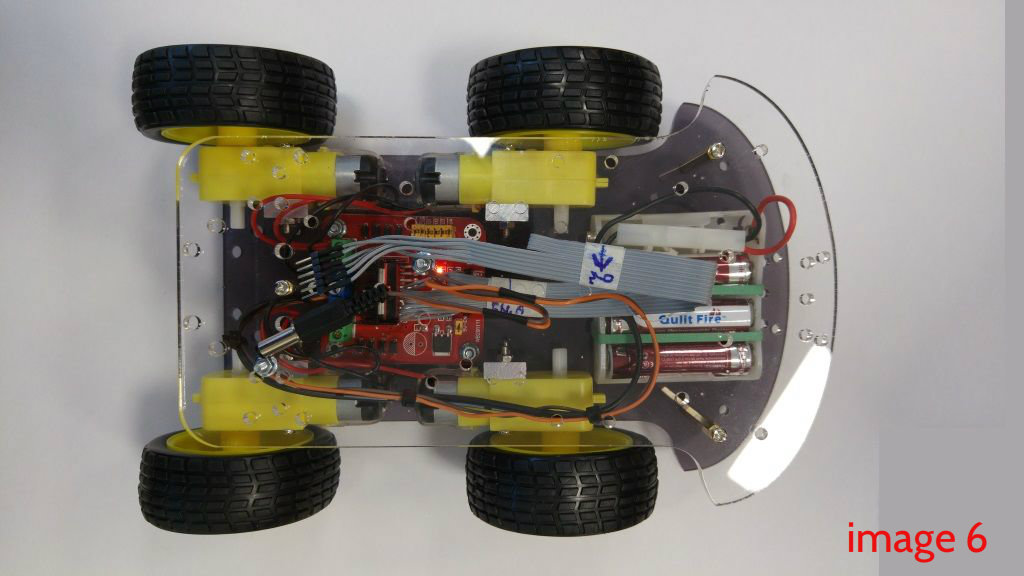
- Close Upper Chassis: Assemble the upper chassis plate, threading wires and DC jacks through the openings neatly (Figure 6).
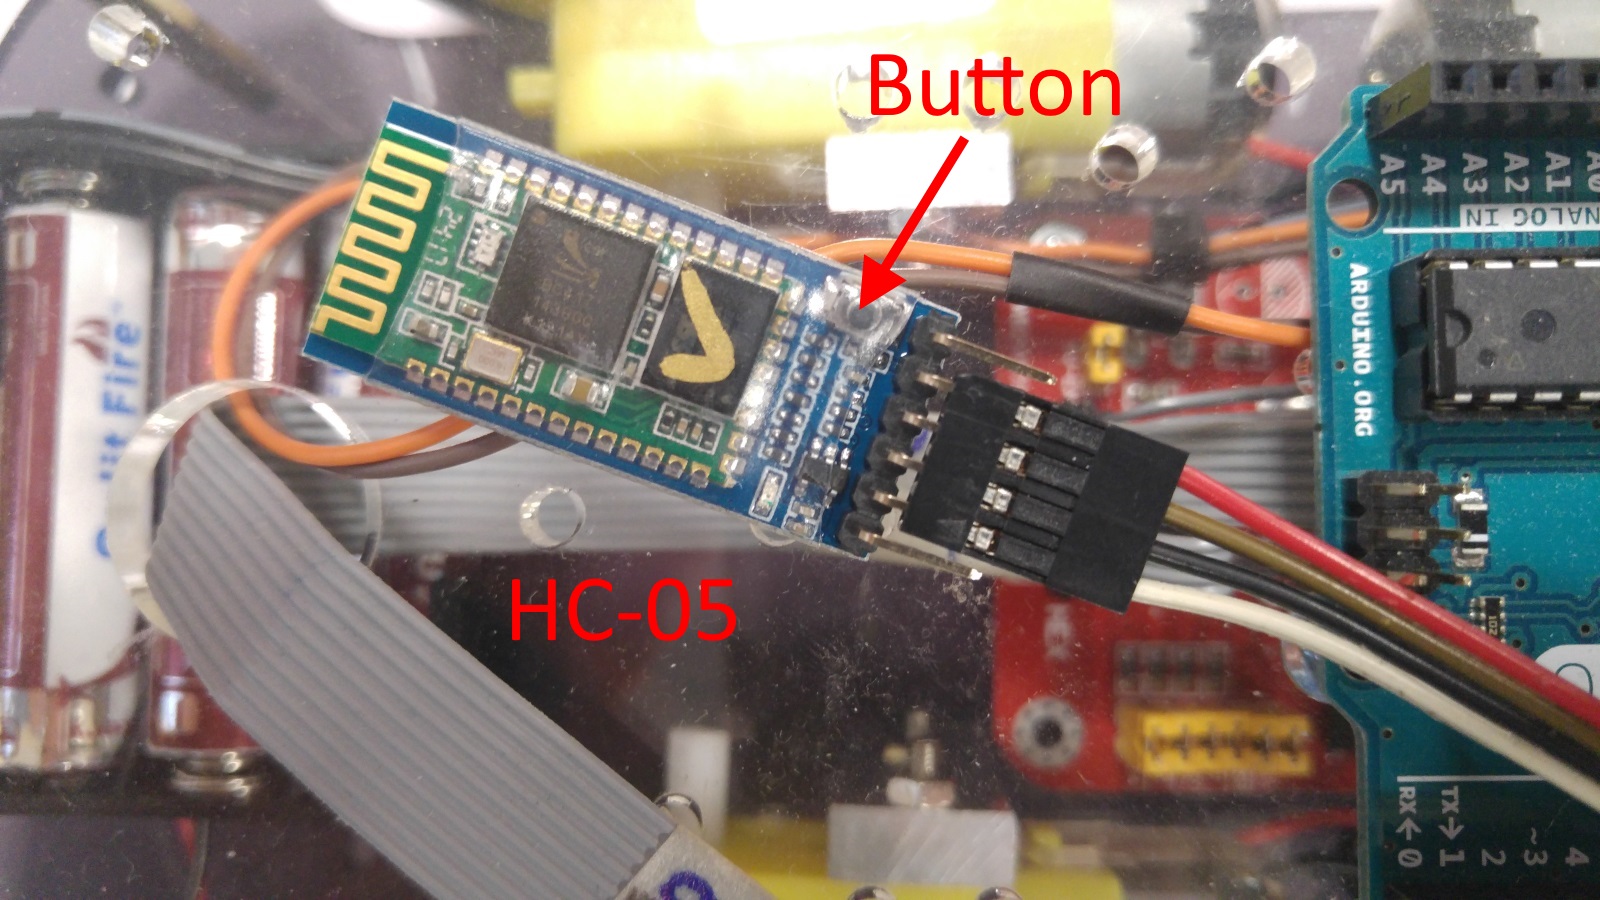
- Bluetooth Module: Connect the signal wires with a 1k Ohm resistor to the RXD pin to prevent heat and overvoltage. Cover with heat shrink tubing for neatness (Figure 7).
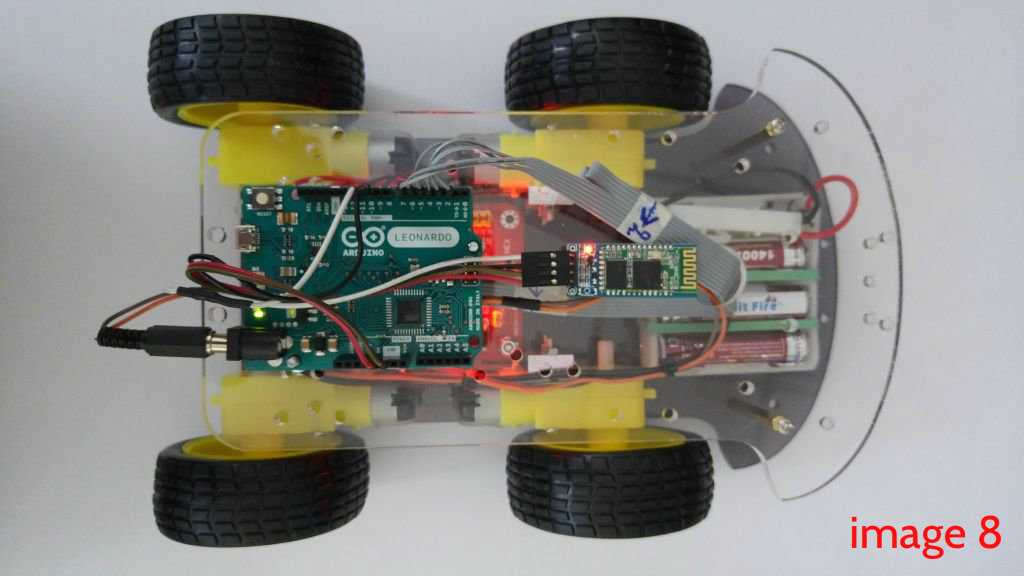
- Final Steps: Mount the Arduino and Bluetooth module on the upper chassis plate. Connect all power jacks and signal wires according to the schematic (Figure 8).
Step 4: Arduino Sketch & Logic
Before the robot can run, we need to program its 'brain' to understand Bluetooth communication:
Code Logic:
The program constantly listens for data sent from the application via the Serial port. Upon receiving a character (Command) such as 'F' (Forward), 'B' (Back), 'L' (Left), 'R' (Right), or a numerical speed value, the Arduino will process these values through a motor speed control function using the analogWrite() command to generate PWM signals sent to the L298N's Enable pins.
Module Setup Steps:
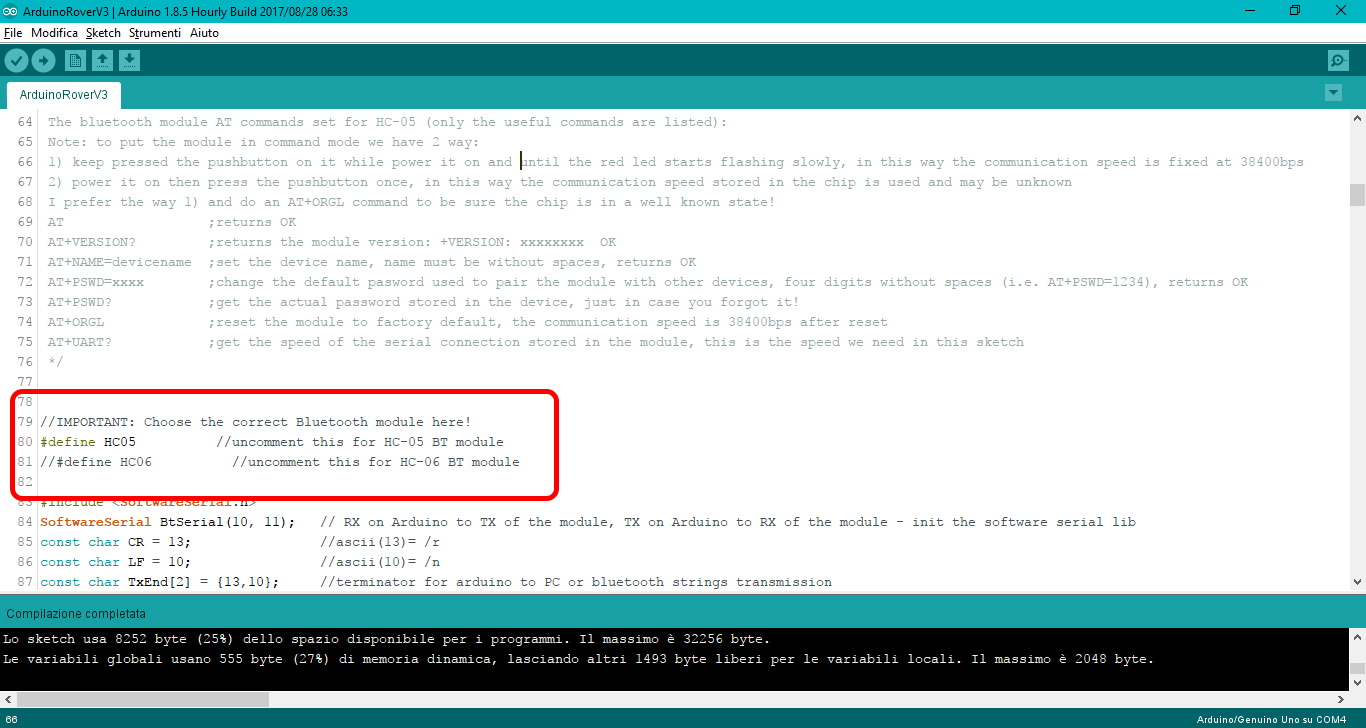
- Connect the Arduino to your computer, open the Sketch, and select the
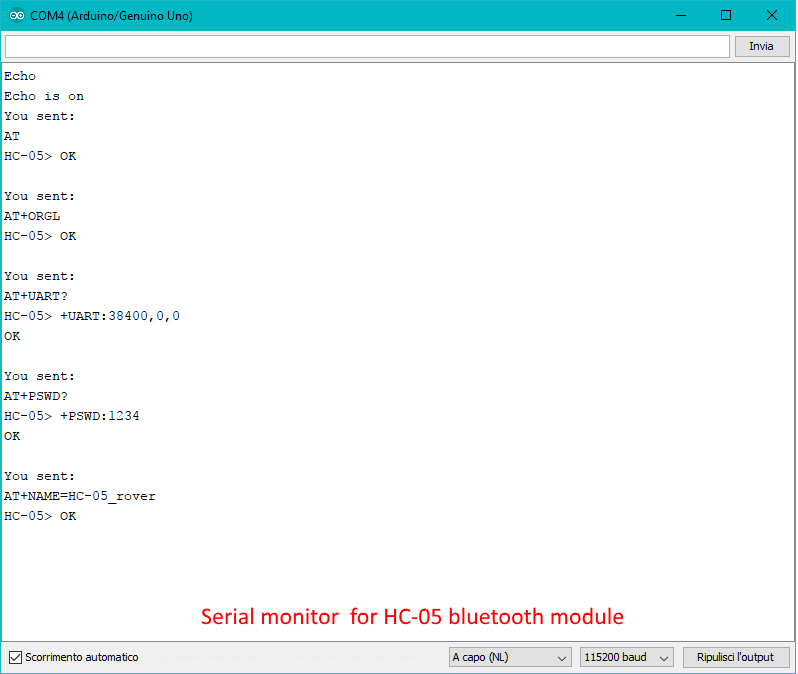
#definethat matches your module (HC-05 or HC-06). - Open the Serial Monitor, set the speed to 115200 baud, and select "Both NL & CR".
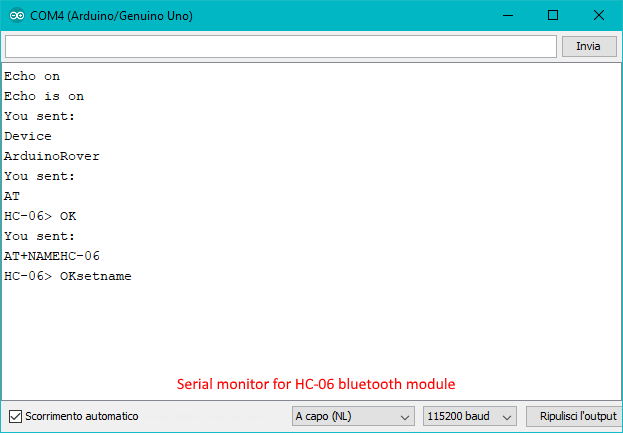
- For HC-06: Send the
ATcommand to test. If it responds withOK, it is ready to use. You can change the name with theAT+NAMEArduinoRovercommand. - For HC-05 (Special Mode): You must hold down the button on the module while powering it on to enter configuration mode (the red LED will flash slowly). Then, use AT commands to set the Baud rate and name as desired.
Step 5: Installing and Using the Application (The Android App)
ข้อมูล Frontmatter ดั้งเดิม
title: "Arduino 4WD Rover Bluetooth Controlled by an Android device"
description: "Run your 4WD Arduino powered rover using your Android phone!"
author: "AppsByDavideV"
category: "Motors & Robotics"
tags:
  - "robots"
  - "toys"
  - "remote control"
views: 14748
likes: 4
price: 2450
difficulty: "Intermediate"
components:
  - "1x Soldering iron (generic)"
  - "1x 4WD chassis with motors and gears"
  - "1x Resistor 1k ohm"
  - "1x Arduino UNO"
  - "1x HC-05 Bluetooth Module"
  - "3x 3.7V Li-Ion battery"
tools: []
apps:
  - "1x Arduino Bt controller android app"
downloadableFiles: []
documentationLinks: []
passwordHash: "e0f4d184f06cefeea796f148dc8e7fc653a39caffbc8efa9a08592cfa6874f8f"
encryptedPayload: "U2FsdGVkX18SkPsUgcJwnWEmignTB8v5U/4KA20NnUTWj5UUF4BKGl684JEi92MNdJnXKjrNCQO16WHoXmkNYhsfyZKGgXkgVane1+3I3KLycnD4e5Fogkv4Qpwd0p6T"
seoDescription: "Build and control an Arduino 4WD Rover via Bluetooth using an Android device. Simple DIY robotics tutorial."
videoLinks:
  - "https://www.youtube.com/embed/xmrNsbA97AE"
heroImage: "https://cdn.jsdelivr.net/gh/bigboxthailand/arduino-assets@main/images/projects/arduino-4wd-rover-bluetooth-controlled-by-an-android-device-0d1556_cover.png"
lang: "en"