RTT-GUI: High-performance Graphics Framework for Embedded Systems on Arduino
RTT-GUI is an open-source GUI Framework specifically designed for Embedded Systems. This project was forked from RT-Thread Package -- GUI Engine and has undergone heavy refactoring to achieve maximum efficiency when used with the Arduino environment. It focuses on flexibility and managing limited resources on microcontrollers.
System Architecture
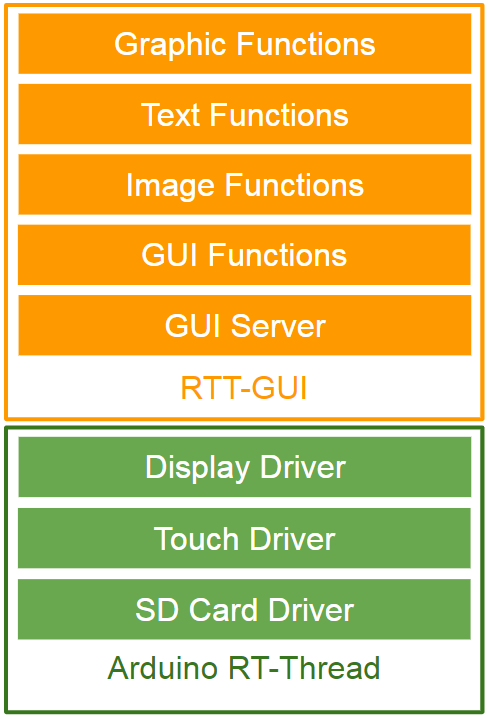
At the core of RTT-GUI is its operation on top of the Arduino RT-Thread library, which is a Real-time Operating System (RTOS). RT-Thread handles task queues and fundamental resources, while RTT-GUI manages the user interface through low-level device drivers connected to the graphics hardware.
This structure simplifies porting to various screens or boards by defining two main standard function sets: Common Device Operations and Graphic Device Operations:
/* common device operations (RT-Thread: "rtdef.h") */
struct rt_device_ops {
  rt_err_t (*init)(rt_device_t dev);
  rt_err_t (*open)(rt_device_t dev, rt_uint16_t oflag);
  rt_err_t (*close)(rt_device_t dev);
  rt_size_t (*read)(rt_device_t dev, rt_off_t pos, void *buffer, rt_size_t size);
  rt_size_t (*write)(rt_device_t dev, rt_off_t pos, const void *buffer, rt_size_t size);
  rt_err_t (*control)(rt_device_t dev, int cmd, void *args);
};
The rt_device_ops section serves as RT-Thread's standard interface for accessing resources, such as opening/closing the screen or writing data to video memory (Frame Buffer).
/* graphic device operations (RTT-GUI: "driver.h") */
struct rtgui_graphic_driver_ops {
  void (*set_pixel)(rtgui_color_t *c, int x, int y);
  void (*get_pixel)(rtgui_color_t *c, int x, int y);
  void (*draw_hline)(rtgui_color_t *c, int x1, int x2, int y);
  void (*draw_vline)(rtgui_color_t *c, int x , int y1, int y2);
  void (*draw_raw_hline)(rt_uint8_t *pixels, int x1, int x2, int y);
};
The rtgui_graphic_driver_ops section specifically focuses on controlling pixels on the screen, for example, drawing individual pixels (set_pixel) or drawing horizontal and vertical lines, which are fundamental for rendering more complex shapes.
Basic Graphic Functions
RTT-GUI comes with a comprehensive drawing library, ranging from basic points to complex geometric shapes:
/* graphic functions (RTT-GUI: "dc.h") */
void rtgui_dc_draw_point(rtgui_dc_t *dc, int x, int y);

void rtgui_dc_draw_vline(rtgui_dc_t *dc, int x, int y1, int y2);
void rtgui_dc_draw_hline(rtgui_dc_t *dc, int x1, int x2, int y);
void rtgui_dc_draw_line(rtgui_dc_t *dc, int x1, int y1, int x2, int y2);

void rtgui_dc_draw_rect(rtgui_dc_t *dc, rtgui_rect_t *rect);
void rtgui_dc_fill_rect(rtgui_dc_t *dc, rtgui_rect_t *rect);

void rtgui_dc_draw_round_rect(rtgui_dc_t *dc, rtgui_rect_t *rect, int r);
void rtgui_dc_fill_round_rect(rtgui_dc_t *dc, rtgui_rect_t *rect, int r);

void rtgui_dc_draw_annulus(rtgui_dc_t *dc, rt_int16_t x, rt_int16_t y, rt_int16_t r1, rt_int16_t r2, rt_int16_t start, rt_int16_t end);

void rtgui_dc_draw_pie(rtgui_dc_t *dc, rt_int16_t x, rt_int16_t y, rt_int16_t r, rt_int16_t start, rt_int16_t end);
void rtgui_dc_fill_pie(rtgui_dc_t *dc, rt_int16_t x, rt_int16_t y, rt_int16_t r, rt_int16_t start, rt_int16_t end);

void rtgui_dc_draw_polygon(rtgui_dc_t *dc, const int *vx, const int *vy, int count);
void rtgui_dc_fill_polygon(rtgui_dc_t *dc, const int *vx, const int *vy, int count);

void rtgui_dc_draw_circle(rtgui_dc_t *dc, int x, int y, int r);
void rtgui_dc_fill_circle(rtgui_dc_t *dc, rt_int16_t x, rt_int16_t y, rt_int16_t r);

void rtgui_dc_draw_arc(rtgui_dc_t *dc, rt_int16_t x, rt_int16_t y, rt_int16_t r, rt_int16_t start, rt_int16_t end);

void rtgui_dc_draw_ellipse(rtgui_dc_t *dc, rt_int16_t x, rt_int16_t y, rt_int16_t rx, rt_int16_t ry);
void rtgui_dc_fill_ellipse(rtgui_dc_t *dc, rt_int16_t x, rt_int16_t y, rt_int16_t rx, rt_int16_t ry);
When using these functions, the first parameter is the Device Context (DC), which acts as a "drawing context" storing current state information such as color and drawing boundaries. You can initiate drawing with rtgui_dc_begin_drawing().
Color can be set via the RTGUI_DC_FC() macro, which changes the foreground color (main color) of the target widget:
RTGUI_DC_FC(dc) = GREEN;
Most importantly, once drawing is complete, rtgui_dc_end_drawing() must be called to release resources and instruct the system to render the data onto the actual screen.
/* device context functions (RTT-GUI: "dc.h") */
rtgui_dc_t *rtgui_dc_begin_drawing(rtgui_widget_t *owner);
void rtgui_dc_end_drawing(rtgui_dc_t *dc, rt_bool_t update);
- rtgui_dc_begin_drawing: Accepts a pointer to the widget to be drawn to create the Context.
- rtgui_dc_end_drawing: Accepts a pointer to the DC and a Boolean parameter to indicate whether a Force Update (immediate screen refresh) is desired.
Text Functions
RTT-GUI supports displaying ASCII characters and simplified Chinese characters (Unicode), with two font sizes available: 12 and 16 pixels (asc12, asc16, hz12, and hz16).
To optimize the use of microcontroller Flash memory, if your project includes an SD Card connection, it is recommended to store font files on the SD Card (by setting CONFIG_USING_FONT_FILE == 1). RTT-GUI typically looks for fonts in the /font/ folder automatically.
/* font config (RTT-GUI: "guiconfig.h") */
#define CONFIG_USING_FONT_12                (0)
#define CONFIG_USING_FONT_16                (1)
#define CONFIG_USING_FONT_HZ                (0)
#define CONFIG_USING_FONT_FILE              (1)
Drawing text is straightforward via the function:
void rtgui_dc_draw_text(rtgui_dc_t *dc, const char *text, rtgui_rect_t *rect);
Image Functions
One of RTT-GUI's strengths is its ability to decode various popular image formats, using high-performance libraries optimized for embedded systems:
- BMP: Standard bitmap image
- JPEG: Supported via ChaN's TJpgDec project, which uses very little RAM for decoding.
- PNG: Experimentally supported via Lode Vandevenne's LodePNG.
- XPM: RTT-GUI's internal format for small icons.
You can enable or disable each decoder in the configuration file to save code space:
/* image decoder config (RTT-GUI: "guiconfig.h") */
#define CONFIG_USING_IMAGE_XPM              (1)
#define CONFIG_USING_IMAGE_BMP              (1)
#define CONFIG_USING_IMAGE_JPEG             (1)
#define CONFIG_USING_IMAGE_PNG              (0)
For loading images, you can choose to load from a file on the SD Card or directly from memory (MemBuffer):
rtgui_image_t *rtgui_image_create_from_file(const char *type, const char *fn, rt_int32_t scale, rt_bool_t load);
rtgui_image_t *rtgui_image_create_from_mem(const char *type, const rt_uint8_t *data, rt_size_t size, rt_int32_t scale, rt_bool_t load);
void rtgui_image_blit(rtgui_image_t *image, rtgui_dc_t *dc, rtgui_rect_t *rect);
GUI Mechanism
RTT-GUI employs a Client-Server architecture, where a Server Thread operates in the background to dispatch events to clients, which are various widgets. The operational system is similar to high-level UI frameworks, where events are passed from the topmost widget (e.g., Main Window) down to the deepest child widget until one of them handles the event (Event Handling).
The process of creating a GUI application begins by declaring an app instance:
CREATE_APP_INSTANCE(app, RT_NULL, "Demo App");
This function links the application to the current Thread. Important: A single Thread can only have one GUI app instance.
Next, create the main window:
main_win = CREATE_MAIN_WIN(win_event_handler, "Demo Window", RTGUI_WIN_STYLE_DEFAULT);
In the win_event_handl