Using Keypad Modules with Arduino: From Basics to Real-World Applications
In the world of Embedded Systems, user input is one of the most crucial elements. The Keypad module is a standard device favored by engineers due to its durability, I/O pin efficiency, and ease of use. This article will delve into the operation of various Keypad types and professional Arduino programming techniques for controlling them.
Why Keypad Matrix?
In circuit design, if we need 16 buttons and connect them in a conventional way, we would use 16 Arduino pins, which is very resource-intensive. However, with a Matrix (rows and columns) structure, we can reduce pin usage to just 8 pins (for a 4x4) by relying on the principle of scanning signals sequentially across rows and columns.
Popular Keypad Types
For Arduino projects, we can choose Keypads of various sizes to suit the application:
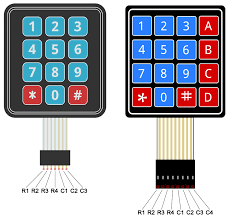
1. 4x4 Keypad This is the most popular model, featuring numbers 0-9 and letters A-D, as well as the * and # symbols. It is suitable for projects requiring additional function buttons.
2. 3x4 Keypad Its layout resembles a traditional phone keypad. It's suitable for applications that primarily require numeric input, such as calculators or password entry systems.
3. 1x4 Keypad Often used in applications requiring directional or basic menu control buttons (e.g., Up, Down, OK, Cancel). It is compact and easy to install.
Pin Configuration
The key to using a Keypad is correctly identifying the pins for Rows and Columns. Generally, Membrane Keypads come with a ribbon cable indicating the pin assignments, as shown in the following figure:
For use in highly durable environments (Industrial Grade), high-quality Keypads with better tactile feedback than typical Membrane types can be chosen.
Software Logic Analysis (Code Logic Analysis)
When programming, we often use the <Keypad.h> library, which has interesting underlying principles of operation, as follows:
- Scanning: The program sets the "Row" pins as OUTPUT and the "Column" pins as INPUT, enabling Internal Pull-up Resistors.
- Detection: At a certain moment, the program sends a LOW signal to Row 1 and checks which Columns are also LOW. If found, it indicates that the button at that intersection has been pressed.
- Debouncing: The library includes a small delay to prevent interference from mechanical chatter of the metal contacts, ensuring accurate readings.
Basic Code Structure Example:
#include <Keypad.h>

const byte ROWS = 4; // Four rows
const byte COLS = 4; // Four columns

// Define characters on the buttons
char keys[ROWS][COLS] = {
  {'1','2','3','A'},
  {'4','5','6','B'},
  {'7','8','9','C'},
  {'*','0','#','D'}
};

// Connect Arduino pins to Keypad Rows and Columns
byte rowPins[ROWS] = {9, 8, 7, 6};
byte colPins[COLS] = {5, 4, 3, 2};

// Create Keypad instance
Keypad keypad = Keypad( makeKeymap(keys), rowPins, colPins, ROWS, COLS );

void setup(){
  Serial.begin(9600);
}

void loop(){
  char key = keypad.getKey(); // Read the pressed button value

  if (key){
    Serial.println(key); // Display output on Serial Monitor
  }
}
Conclusion and Download
Choosing the appropriate Keypad depends on the application. For a cost-effective Prototype project, a Membrane Keypad is a good choice. However, for ATMs or security systems, selecting a metal or high-grade plastic Keypad will provide longer durability.
You can download the complete example code and related projects from our GitHub: