Developing a Smart Parking Sensor System with Arduino (Arduino Parking Sensor)
To make a parking sensor with Arduino, you need a few parts. One sensor, one buzzer to provide sound effect and 8 leds to show distance.
You can easily make the Arduino parking sensor using the HC-SR04 sensor, but you have to show the distance between you in some way. You can do this by using several LED's and buzzer.
Principles of Sensor Operation and Technical Components
The heart of this project is the HC-SR04 Ultrasonic Sensor, which operates using the principle of sound reflection (Sonar). The sensor emits high-frequency sound waves, beyond human hearing, via a Transmitter and waits to receive the waves reflected back from an object via a Receiver.
Technically, we need to write code to send a 10-microsecond Pulse signal to the sensor's Trigger pin. Then, we measure the duration that the Echo pin stays HIGH. This duration is called Time of Flight (ToF), which we can use to calculate the distance with the formula:
Distance (cm) = (Time traveled * 0.034) / 2
(where 0.034 is the speed of sound in air in centimeters per microsecond).
Breadboards & Jumpers Really Problem
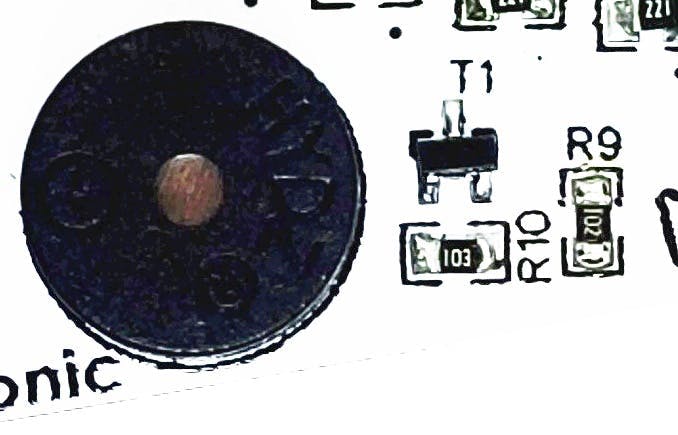
To use a buzzer, you need to use a transistor. Because the current of buzzer is not supported by Arduino's pins. Making this circuit can be boring and tiring.

Wiring Challenges on a Breadboard
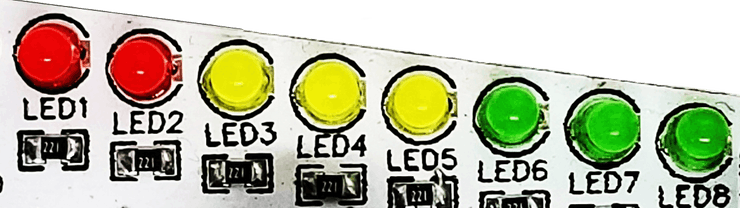
When building a system that requires detailed feedback, we need an effective display unit. In this project, we use a total of 8 LEDs, divided as follows:
- 3 Green LEDs: Safe distance
- 3 Yellow LEDs: Warning zone
- 2 Red LEDs: Stop zone
However, wiring circuits on a Breadboard often leads to messy Jumper wires and complexity in device management.
Project Details
We will use 8 leds in our project, 2 of them will be red, 3 will be yellow and 3 will be green. In order to use 8 leds, we need to use 8 220ohm resistors. But it would be really challenging to prepare a breadboard circuit to use 8 resistors and led together.
Furthermore, the audio system using a Buzzer has hidden complexities. While a buzzer might seem like a low-current device, in practice, Arduino pins cannot directly supply stable current to some types of buzzers, or the sound might not be loud enough. Therefore, we must use a Transistor (such as S8050 or 2N2222) to act as an electronic switch, drawing current directly from the power supply instead of from the Arduino pin.
A New Alternative: Circle Electronic Parking Sensor Kit
Circle Electronic Parking Sensor Kit
For those who want to make a parking sensor with Arduino, Circle Electronic has designed a circuit board. There are 8 LEDs with buzzers and resistors that you can use with the embedded transistor. After connecting the HC-SR04 sensor to the 4 female headers on the front, connect the 8 pin and you just have to do the coding part.
To reduce the complexity of hardware preparation, Circle Electronic has designed a dedicated pre-assembled circuit board for this project. This board integrates 8 LEDs, a buzzer, resistors, and a transistor for audio signal driving onto a single PCB.
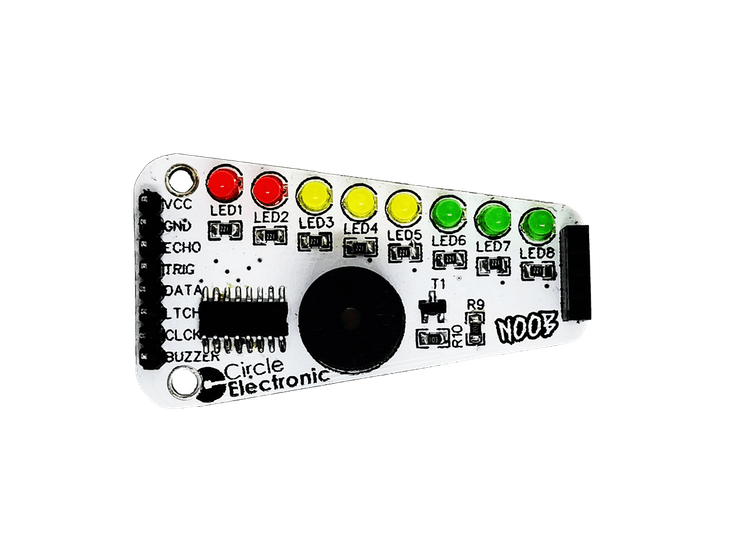
Users simply plug the HC-SR04 sensor into the 4-pin Female headers on the front and connect a few signal wires to the Arduino, making it ready for programming immediately. This significantly reduces the chance of Noise, which is often encountered with long wire connections on a Breadboard.
Programming Logic (Logic of Code)
The logic behind the operation of this parking sensor uses Threshold Comparison:
- Read Distance: Obtain the value from the HC-SR04 in centimeters.
- Data Mapping: Use conditional functions (if-else or switch-case) to check which range the distance falls into.
- If distance > 100 cm: Turn off all lights.
- If distance 50-100 cm: Turn on green lights incrementally based on proximity.
- If distance 20-50 cm: Turn on yellow lights and command the buzzer to emit slow, intermittent beeps.
- If distance < 20 cm: Turn on all red lights and have the buzzer emit a continuous beep for critical warning.
Using Non-blocking timing techniques with the millis() function instead of delay() to control the buzzer's beeping rhythm will ensure that the sensor's distance measurement is accurate and smooth, without stuttering while the buzzer is active.
More details and documents at https://www.circleelectronic.com