Hey everyone!! You're probably wondering, wait, you can send an Arduino to space? Almost. Using a weather balloon, you can send an Arduino, camera, garlic bread, or anything else you want to a third of a way to space! Even though it is a third of the way to space, almost 99% of the atmosphere isn't present, so we call it "the edge of space." This guide is super long, but unless you are just checking this project out, make sure to read everything until Path 1. Anyways, let's get into how you can do this.
There are going to be three paths for you to follow based on what you want and your skill level. All three pathways will require some soldering skills due to the incredible winds up in the stratosphere. Each path isn't better than the other in anyway, its just based on what you are interested in. Let's quickly go over them.
Path 1: Creating a simple data logger using a proto board, various sensors, with little soldering skills.
Path 2: Using a predesigned PCB shield (printed circuit board) to have a clean awesome looking board, designed and tested by us.
Path 3: Make your own PCB in a program. This guide will not go deep into how to design and make your own PCB, but it will go over some guidelines for you to think about. I will make sure to link some awesome guide for you to learn from.
We will go over each path a bit more, but here are some tips to help you choose:
Path 1 will be the easiest, and will allow for some flexibility. You can choose the sensors, board, and features on your board. You will need some soldering skills to make sure that everything stays together during the flight.
Path 2 will be the most restrictive, meaning that you will have to use a specified set of sensors, a specific Arduino board, but you will have a really clean looking PCB, not have to worry about soldering or coding, and it is a good start to learning about PCBs. We will provide the Gerber file, export settings, and code for you to look through. PCBs aren't very expensive, and it can depend where you get them from. We got 5 of these PCBs for $2, but this price can differ based on where you buy it from.
Path 3 will be the hardest and will require lots of skills. You will need to know (or learn) how to make your own PCB or Arduino PCB shield, know how to code the whole thing, and solder the board. In the case you know how to do all these things, you could probably do this project yourself, but there are some very important restrictions and details that this guide can help you with.
Okay!! Awesome! You should have chosen which path you want to go through now! But before we jump right in there are very important rules you need to keep in mind. Be sure to read these rules because sending things up in a weather balloon may be restricted based on where you live. This guide will not go over how to choose the right balloon, build the payload bay, and how to fill the balloon, but there are PLENTY of guides on how to do this so I will link them for you. I will go over the restrictions for your Arduino Datalogger, and leave a link for further FAA restrictions (if you live in the U.S). Here are things you need to keep in mind:
- Your payload bay cannot have any cell phone signals. If you for any reason have a cell phone on board, it must be in airplane mode.
- If you are using GPS to find your balloon, you need to obtain a HAM radio license (which requires tests and a fee).
- If the weight-to-size ratio of your payload is more than 3.0 ounces/square inch, then the total payload weight must be less than 4 pounds.
- Any individual payload/package must be less than 6 pounds.
- And if you have two payloads, the total payload weight must be less than 12 pounds.
This is a link to the full guidelines from the FAA for U.S residents.
The Harsh Environment of Near Space
Launching a Weather Balloon (High Altitude Balloon or HAB) is one of the most exciting endeavors a maker can undertake. This project involves building the brain of the balloon: an Arduino datalogger that must survive the extreme conditions of near space.
Standard electronics can fail at altitudes approaching 100,000 feet (over 30,000 meters). The environment presents unique challenges:
- Extreme Cold: Temperatures can plummet to -60°C (-76°F) in the stratosphere.
- Low Pressure: Atmospheric pressure is less than 1% of sea-level pressure.
- Power Challenges: Standard alkaline batteries can freeze and fail. You must use batteries rated for extreme cold, such as Energizer Ultimate Lithium batteries.
- Component Failure: Many common sensors, like most barometric pressure sensors, are not rated to function accurately above 30,000 feet.
Your Arduino datalogger must be designed with these factors in mind. Data collection typically involves constantly polling sensors like a GPS Module (for altitude and location), temperature probes, and other environmental sensors. All this data is written to an SD Card, ensuring you have a complete flight profile when you recover the payload.
Path 1 - Proto Board!
Before you start designing, there are a couple of considerations you need to keep in mind. First, what you want on there. In the schematic provided, you will have a simple temperature and humidity sensor, a barometric sensor, an IMU, and a SD card module. For most projects this should be enough, but if you want to find your payload bay with your Arduino, you will want to include a GPS module. There are several recovery options:
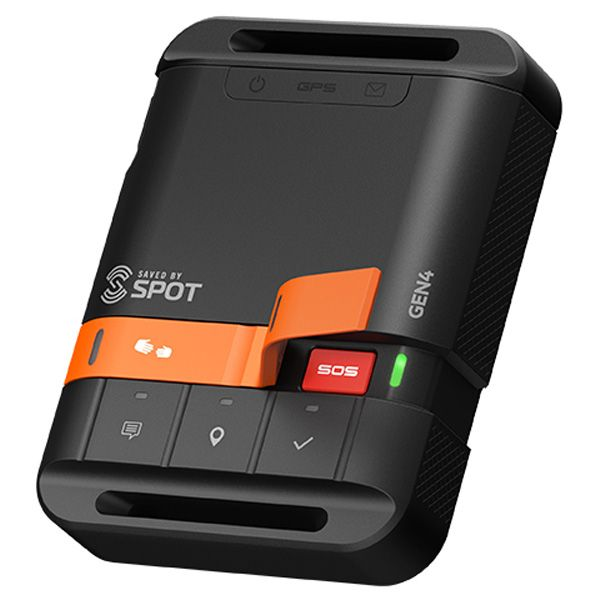
- SPOT GPS module. These have their benefits and disadvantages. These will be really easy to use, have unlimited range (they use satellites to send coordinates to your phone), have awesome battery life, and they are easy to obtain. However, they are expensive, do not work upside down, and the signal can be blocked by thick objects.
This is the method we used, but we designed and 3D printed a gimbal for it to keep it upright. We recommend the SPOT 3 Satellite Messenger (Amazon), but it is totally up to you, as long as you research this and see the benefits for the different types.
- APRS radio. This will be the most reliable and you can do a lot with it. You can connect a module to an Arduino and have the radio send back data, coordinates, etc. This will also allow you to get accurate altitude measurements.
Unfortunately, this will not be included in the wiring diagram so you will have to learn to wire this up yourself. Furthermore, you will need to obtain a HAM radio license, which you will need to take a test, and pay a small fee. This license is super useful so it may be worth it. (U.S - restrictions may differ based on where you live).
- Cell phone. You really shouldn't use this method. Not only do you need to figure out a way to get your phone out of airplane mode after the flight, the cell phone itself will probably be more expensive than a regular SPOT. The reason this is on the list is because many people use cell phone as a backup, but it really isn't something you should use.
Now that you have decided on how you are going to recover your payload, you will want to go over what the flight is going to look like. For instance, if you want to your Arduino to remotely deploy the parachute, you should look into ways to do that. You should also go over which which sensors you will use (the temperature can go down to -40C (-40F) so you will want to account for that.
You will also want to think about how you want to power the Arduino. Cold temperatures reduces the performance of many batteries, so you may want a large power supply, along with an enclosure such as a Styrofoam box to keep things cozy, while also staying under the weight limit.
I recommend you make some sort of checklist based on what you want type of data you want to get, if you will have a camera on board, and what you plan on having on board. It also can be a good idea to make the payload bay, and then design your data logger based on the payload. There are many things to think about and ensure before actually designing, so make sure you take a really long and careful time to go over everything.
Alright here is the schematic and wiring diagram for the sensors if you go our route:
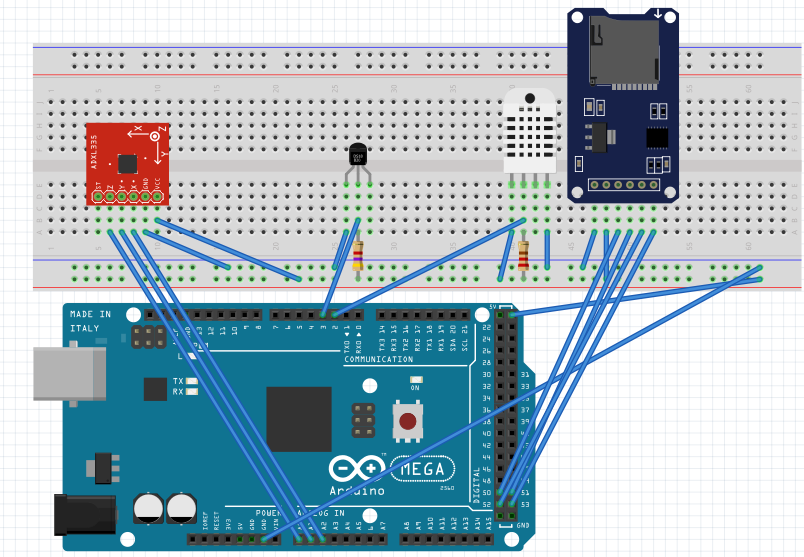
The Mega is super overkill for these sensors, but if you want to use our code as well, you will have to use the Mega. If you plan to use something like a Nano, change the MicroSD card module pinouts to the SPI pins of your board.
Here's a parts list:
SparkFun ADXL337 Header Pins Micro SD card module DHT22 Humidity Sensor DS18B20 Temperature Sensor Proto Board Arduino Mega
You can add another DS18B20 to read internal temperatures, and add any sensors you would like, but if you want to use the code provided, use the wiring diagram above.
//DHT22 Setup
#include "DHT.h"
#define DHTPIN 2
#define DHTTYPE DHT22
DHT dht(DHTPIN, DHTTYPE);
//SD Card Setup
#include <SPI.h>
#include <SD.h>
File sdcard_file;
int CS_pin = 10;
//DS18B20 Temperature sensor
#include <OneWire.h>
#include<DallasTemperature.h>
#define ONE_WIRE_BUS 3
OneWire oneWire(ONE_WIRE_BUS);
DallasTemperature sensors(&oneWire);
int scale = 3; // 3 (±3g) for ADXL337, 200 (±200g) for ADXL377
boolean micro_is_5V = true; // Set to true if using a 5V microcontroller such as the Arduino Uno, false if using a 3.3V microcontroller, this affects the interpretation of the sensor data
void setup() {
Serial.begin(9600);
sensors.begin();
 dht.begin();
 pinMode(CS_pin, OUTPUT);//declaring CS pin as output pin
 if (SD.begin()){
   Serial.print("SD Card found!");
 } else
 {
   Serial.print("Error finding SD Card");
   return;
 }
 sdcard_file = SD.open("data.csv", FILE_WRITE);
 if (sdcard_file) { //If the file is found
 }
 else {
   Serial.print("error initializing SD card");
 }
sdcard_file.print("DS18B20");
sdcard_file.print(",");
sdcard_file.print("DHT22 Temp");
sdcard_file.print(",");
sdcard_file.print("Hum");
sdcard_file.print(",");
sdcard_file.print("H.InX");
sdcard_file.print(",");
sdcard_file.print("rawX");
sdcard_file.print(",");
sdcard_file.print("rawY");
sdcard_file.print(",");
sdcard_file.print("rawZ");
sdcard_file.print(",");
sdcard_file.print("scaledX");
sdcard_file.print(",");
sdcard_file.print("scaledY");
sdcard_file.print(",");
sdcard_file.print("scaledZ");
sdcard_file.print(",");
sdcard_file.println(" ");
}
void loop() {
delay(222);
//Accelerometer
 int rawX = analogRead(A0);
 int rawY = analogRead(A1);
 int rawZ = analogRead(A2);
 float scaledX, scaledY, scaledZ;
 if (micro_is_5V) //scaling data if voltage is 5V (it is)
 {
   scaledX = mapf(rawX, 0, 675, -scale, scale);
   scaledY = mapf(rawY, 0, 675, -scale, scale);
   scaledZ = mapf(rawZ, 0, 675, -scale, scale);
 }
 else //scaling data if voltage is 3.3V
 {
   scaledX = mapf(rawX, 0, 1023, -scale, scale);
   scaledY = mapf(rawY, 0, 1023, -scale, scale);
   scaledZ = mapf(rawZ, 0, 1023, -scale, scale);
 }
//DS18B20 Temp
sensors.requestTemperatures();
int etemp=sensors.getTempCByIndex(0);
//DS18B20 Humidity Sensor
 float h = dht.readHumidity();
 float t = dht.readTemperature();
 float f = dht.readTemperature(true);
 // Check if any reads failed and exit early for DHT
 if (isnan(h) || isnan(t) || isnan(f)) {
   return;
 }
 // Compute heat index in Fahrenheit (the default)
 float hif = dht.computeHeatIndex(f, h);
 // Compute heat index in Celsius (isFahreheit = false)
 float hic = dht.computeHeatIndex(t, h, false);
 sdcard_file.print(etemp);
 sdcard_file.print(",");
 sdcard_file.print(t);
  sdcard_file.print(",");
 sdcard_file.print(h);
  sdcard_file.print(",");
 sdcard_file.print(hic);
  sdcard_file.print(",");
 sdcard_file.print(rawX);
  sdcard_file.print(",");
 sdcard_file.print(rawY);
  sdcard_file.print(",");
 sdcard_file.print(rawZ);
 sdcard_file.print(",");
 sdcard_file.print(scaledX);
  sdcard_file.print(",");
 sdcard_file.print(scaledY);
 sdcard_file.print(",");
 sdcard_file.print(scaledZ);
 sdcard_file.print(",");
 sdcard_file.print(" ");
 sdcard_file.println(" ");
sdcard_file.close();
delay(223);
}
float mapf(float x, float in_min, float in_max, float out_min, float out_max)
{
 return (x - in_min) * (out_max - out_min) / (in_max - in_min) + out_min;
}
If there are any problems be sure to check wiring, and use code for each individual sensor to isolate the problem. Make sure you SD or MicroSD card is formatted to FAT16 or FAT32, and is 16GB or less.
Also, it would be a good idea to wire up LEDs to show status indications of your datalogger. You really don't want to send the balloon up with the datalogger not running, so make sure you triple-check everything.
Furthermore, if you keep having trouble with the SD card module, try changing the power source. After lots of testing, we found that some modules are very sensitive to the power, so find a reliable power source.
There you go! Your datalogger is finished. It should read temp, humidity, and accelerometer data, and log it onto a SD card. If you want an altitude reading, you will have to use GPS. 90% of barometric sensor based altimeters do not work over 30, 000 ft. If you're balloon is going over this threshold (it probably is), you won't be able to use a barometer. If you want an awesome guide for the rest of the way, check out this guide, and feel free to contact us through this website if you have ANY questions at all. We are not professionals at this, but we are willing to help to the best of our abilities.
Comment below or contact us if there are any problems, and if you enjoyed this part of the guide, check out our YouTube channel, leave a comment and respect below, and we recommend looking through the other pathways, for inspiration and cool ideas!
Path 2 - Predesigned PCB
So! You are planning on using a predesigned PCB. This predesigned PCB will allow you to get internal temperature, external temperature, humidity, and accelerometer readings. You will need soldering skills, and these components:
5050 SMD LED SparkFun ADXL337 Lots of header pins Micro SD card module DHT22 Humidity Sensor 2X DS18B20 Temperature Sensor Arduino Mega The Eclipse PCB
The Gerber file for the PCB is in this GitHub repository. If you want to make edits to the PCB/s