title: DIY Home Automation: Turn an Ordinary House into a Smart Home with JARVIS-like Voice Control description: A project to build a home appliance control system using voice commands via Arduino and Bluetooth within an accessible budget.
Inspiration
As a true Iron Man fan, I've always dreamed of having a personal assistant system like JARVIS at home. The feeling of being able to control your surroundings just by speaking a command is truly amazing. While many off-the-shelf Home Automation systems are available today, the charm of building it yourself (DIY) lies in understanding every working mechanism and being able to customize it to your actual needs. Therefore, I decided to design and build this smart home control system with Arduino.
How It Works
The core of this project is to transform "spoken words" into "electrical actions." The system works in coordination across three main parts:
- Interface Layer (User Interface): We will use a smartphone to receive and process voice through an application, sending command strings via Bluetooth signals.
- Processing Layer: Arduino will receive data from the Bluetooth module (HC-05) via the Serial port and then compare the received text with conditions in the program.
- Control Layer: When the conditions match a command, Arduino will send a digital signal to the Relay module, which acts as an "electronic switch" to connect or disconnect the electrical circuits of various devices, such as lights, fans, or TVs.
Hardware Build
The circuit structure of this project emphasizes simplicity yet high efficiency. The total budget, including everything, does not exceed 700 Baht ($20), which is considered very cost-effective given the capabilities achieved.
Step 1: Parts and Material
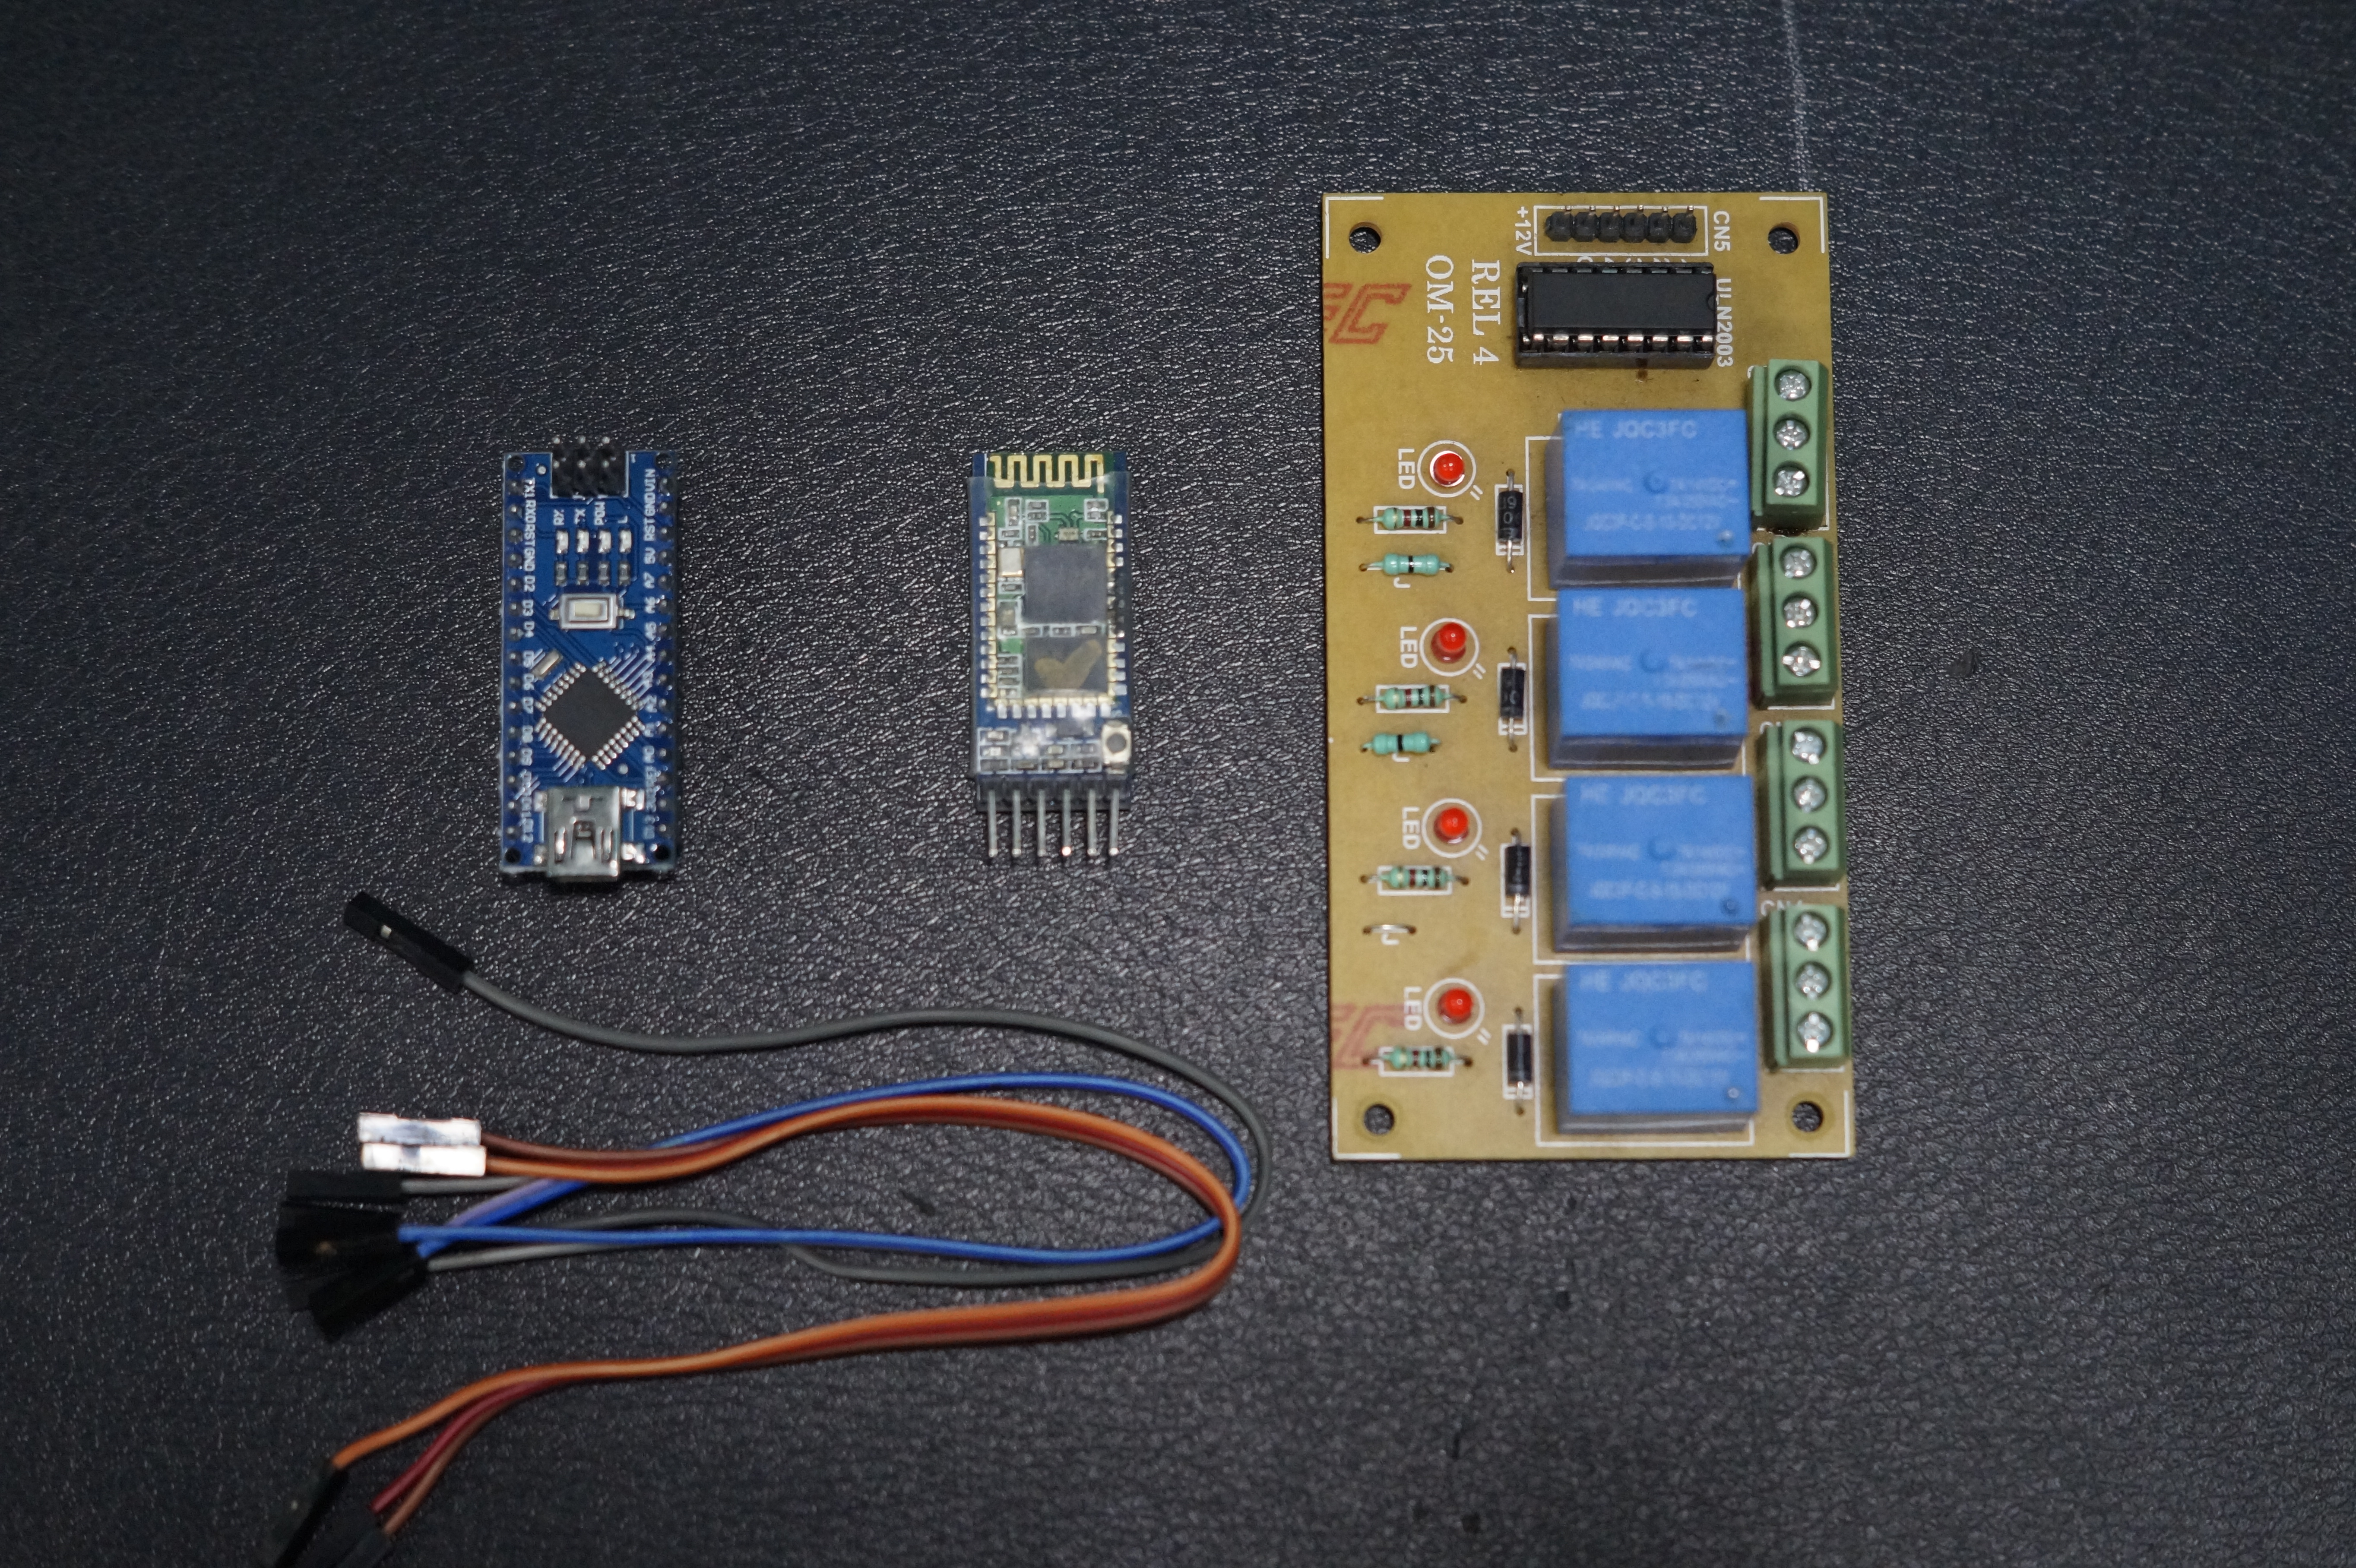
- Arduino Uno/Nano: The main microcontroller board for logic processing.
- Relay Breakout Board (4-Channel): A relay circuit board designed for ground isolation and back-EMF protection (Opto-isolated), allowing Arduino to safely control household electricity.
- Bluetooth Module HC-05: A wireless data transceiver module, 2.4GHz frequency standard.
- Jumper Cables: Jumper wires for connecting circuits on a Breadboard or direct connections.
Step 2: Connections
The connections in this project use Serial (UART) communication and Digital Output signals. In this example, we will use a 4-channel relay to control four different devices simultaneously.

Connections between Arduino -> Bluetooth Module (HC-05)
- TX (Arduino) -> RX (BT Module) (Note: Serial communication always requires cross-connection)
- RX (Arduino) -> TX (BT Module)
- VCC -> 3.3V (or 5V depending on the module's specifications)
- GND -> GND
Connections between Arduino -> Relay Module
- D2 -> IN1 (controls device 1, e.g., TV)
- D3 -> IN2 (controls device 2, e.g., fan)
- D4 -> IN3 (controls device 3, e.g., computer)
- D5 -> IN4 (controls device 4, e.g., bedroom lights)
- VCC -> VCC (5V)
- GND -> GND
Step 3: Programming and Code Analysis
The code below is designed to handle String data received from a smartphone, using the # symbol to indicate the end of the message for accurate data reception.
String voice;
int
led1 = 2, // Connect device 1 to Pin #2
led2 = 3, // Connect device 2 to Pin #3
led3 = 4, // Connect device 3 to Pin #4
led4 = 5, // Connect device 4 to Pin #5
led5 = 6; // Connect device 5 to Pin #6

// Function to turn on all devices simultaneously
void allon(){
     digitalWrite(led1, HIGH);
     digitalWrite(led2, HIGH);
     digitalWrite(led3, HIGH);
     digitalWrite(led4, HIGH);
     digitalWrite(led5, HIGH);
}

// Function to turn off all devices simultaneously
void alloff(){
     digitalWrite(led1, LOW);
     digitalWrite(led2, LOW);
     digitalWrite(led3, LOW);
     digitalWrite(led4, LOW);
     digitalWrite(led5, LOW);
}

void setup() {
  Serial.begin(9600); // Start Serial communication at Baud rate 9600
  pinMode(led1, OUTPUT);
  pinMode(led2, OUTPUT);
  pinMode(led3, OUTPUT);
  pinMode(led4, OUTPUT);
  pinMode(led5, OUTPUT);
}

void loop() {
  // Check if data is being sent via Bluetooth
  while (Serial.available()){
    delay(10); // Short delay to stabilize data in Buffer before reading
    char c = Serial.read();
    if (c == '#') {break;} // If '#' is found, stop reading (end of command)
    voice += c; // Append the read character to form a sentence
  }

  if (voice.length() > 0) {
    Serial.println(voice); // Display the received command on Serial Monitor for Debugging

    // Check voice command conditions
    if(voice == "*all on") {allon();}
    else if(voice == "*all off"){alloff();}

    // Individual device control (ON)
    else if(voice == "*TV on") {digitalWrite(led1, HIGH);}
    else if(voice == "*fan on") {digitalWrite(led2, HIGH);}
    else if(voice == "*computer on") {digitalWrite(led3, HIGH);}
    else if(voice == "*bedroom lights on") {digitalWrite(led4, HIGH);}
    else if(voice == "*bathroom lights on") {digitalWrite(led5, HIGH);}

    // Individual device control (OFF)
    else if(voice == "*TV off") {digitalWrite(led1, LOW);}
    else if(voice == "*fan off") {digitalWrite(led2, LOW);}
    else if(voice == "*computer off") {digitalWrite(led3, LOW);}
    else if(voice == "*bedroom lights off") {digitalWrite(led4, LOW);}
    else if(voice == "*bathroom lights off") {digitalWrite(led5, LOW);}

    voice=""; // Clear the variable to await new commands
  }
}
Technical Analysis:
- Serial Buffer: Using
delay(10)withinwhile(Serial.available())is very important for Bluetooth communication because signals may not arrive simultaneously for every Byte. This delay helps the board wait to receive the complete sentence. - Memory Management: After every processing cycle, the
voice = ""variable must be cleared to prevent old data from mixing with new commands.
Step 4: Application and Usage
Currently, we can readily use existing applications from the Store to send voice commands, which is easy for beginners who are not yet skilled in mobile app development.
Recommended App: BT Voice Control for Arduino developed by SimpleLabsIN: Download here
Working Video:
Experience firsthand how quickly this system responds to voice commands through the video below:
Conclusion and Next Steps
Currently, this system can accurately perform basic ON/OFF functions for devices, but its true potential does not stop here. You can apply this principle to more complex Natural Language Processing systems or connect it to cloud systems to control devices from outside the home.
Special Thanks:
- Hackster.io for providing a platform to share ideas and inspire new inventors.
- If this project is helpful, don't forget to like and subscribe to my channel for more exciting engineering projects in the future!
Follow for more projects at: Rahul Khanna - YouTube Channel
Thank you for reading to the end! Have fun building your smart world!