Please visit https://proteshea.com/arduino-uno-rev3-quick-start-guide/ for a complete list of all equipment required for this project.
Introduction: Getting to Know the Microcontroller World Standard
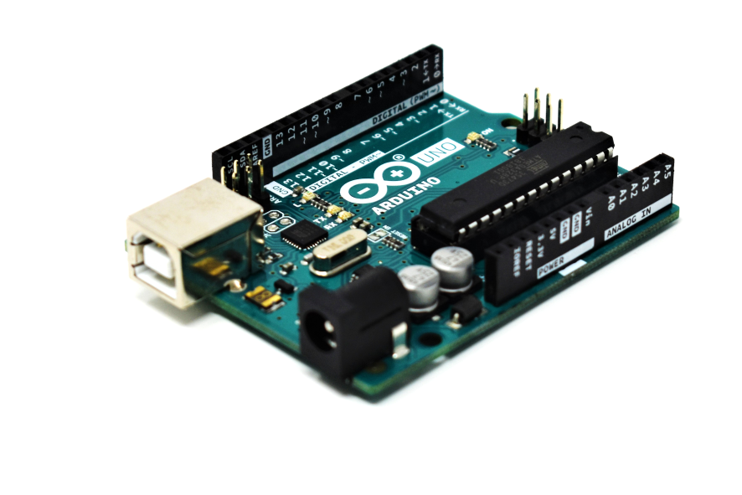
Arduino Uno Rev3 is the most popular embedded system Development Board in the world of engineering and education. The main reasons are not only its affordable price but also its strong Ecosystem, detailed documentation, countless example projects, and most importantly, its Open Source nature for both hardware and software. This means engineers can study the Schematics and further develop their own board designs without copyright restrictions.
Although the Uno Rev3 is designed to be beginner-friendly, its performance is sufficient for professional use, whether for Automation systems, Data Acquisition, Monitoring systems, or even IoT (Internet of Things) device prototypes.
What you need to get started:
- Arduino Uno Rev3
- Arduino IDE (software for programming)
- USB Type A to Type B cable (for power and program upload)
- A computer running Windows, MacOS, or Linux operating system
- FuelCan (power management accessory)
Understanding the Arduino Integrated Development Environment (IDE)
To make the hardware function, we need a "brain" that receives commands via software. The Arduino IDE is the main tool used to write code (Sketch), check for errors, and compile C/C++ into machine code that the microcontroller understands.
For installation, you have two options:
- Desktop IDE: Download and install it on your computer (file size approximately 482MB). The advantage is faster operation and no constant internet connection required.
- Arduino Web Editor: Write programs via a browser and store data on the Cloud. The advantage is no software installation needed and your code is always synced across devices.

Basic Program Structure (Sketch Structure): Every Arduino project must always have two main functions. If either part is missing, the program will not be able to run:
void setup(): This function runs only "once" when power is applied or the Reset button is pressed. It is used to initialize settings, such as configuring pins as Input or Output, or starting Serial communication.void loop(): This function runs "repeatedly" as long as the board is powered. This is where we put the main program logic.
Arduino also comes with a vast collection of Examples and Libraries. You can go to File -> Examples to instantly explore basic code.
In-Depth Hardware (Hardware Architecture)
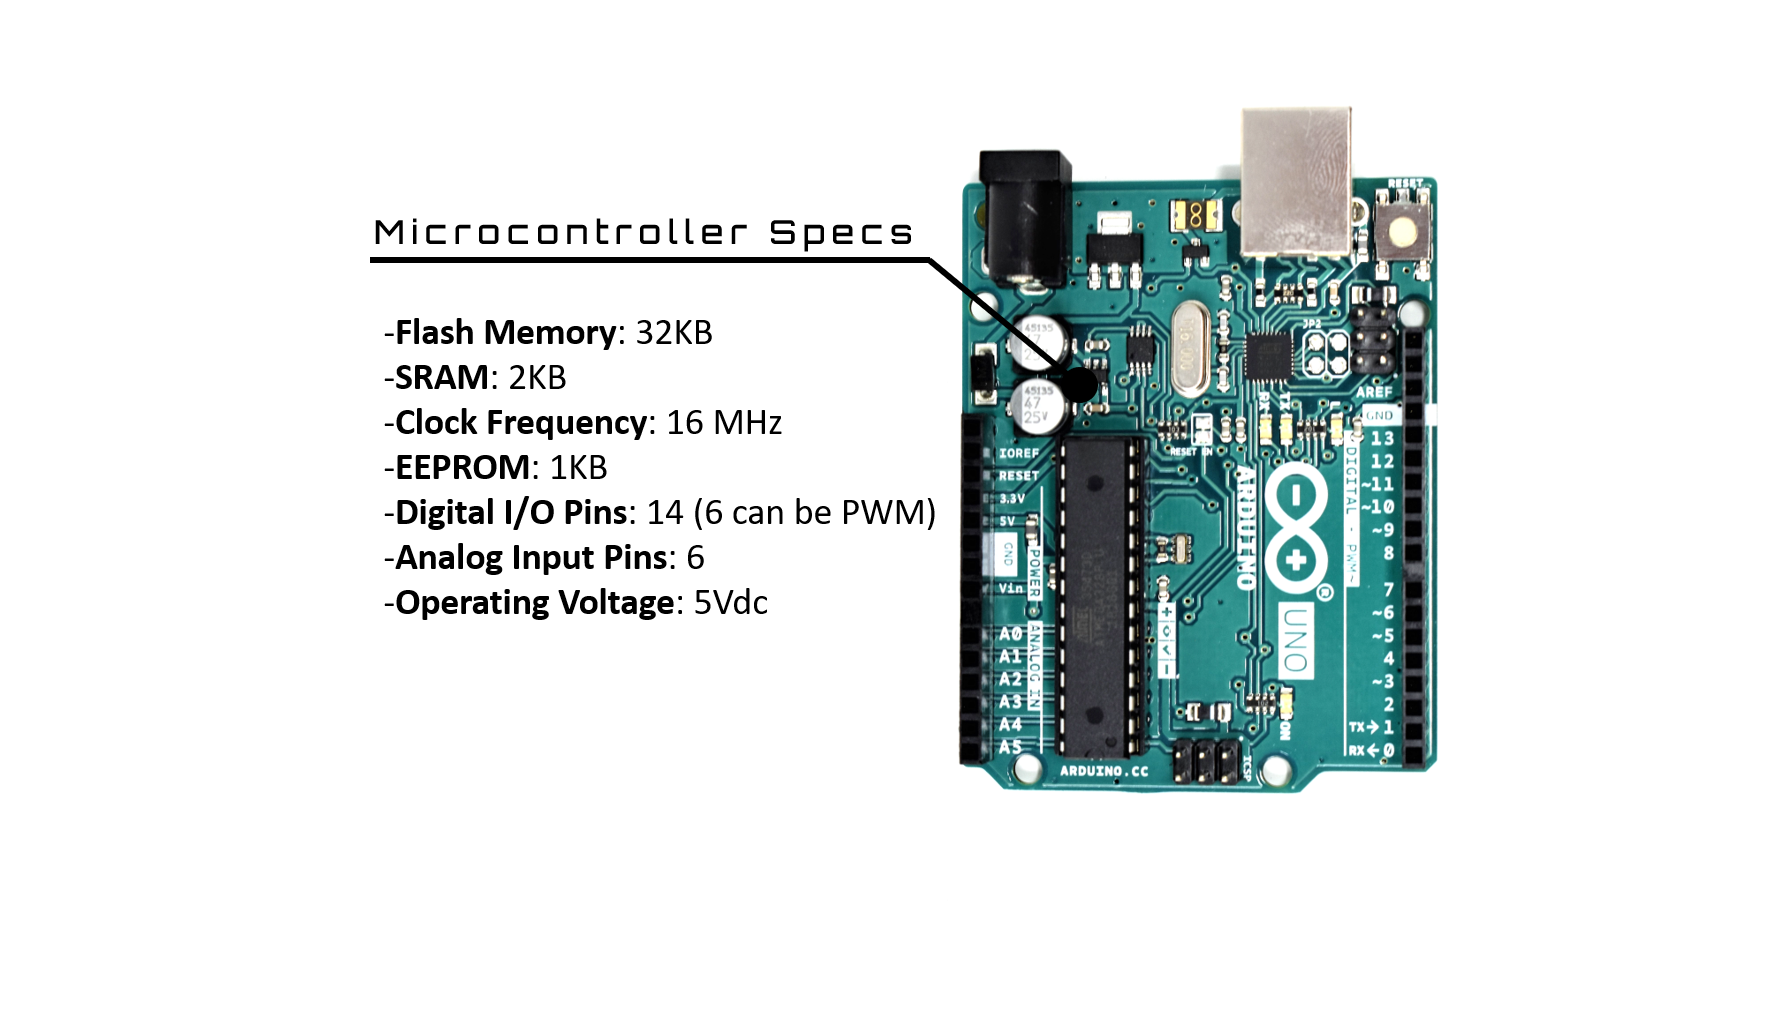
As an engineer, understanding hardware is crucial for writing efficient software. The Arduino Uno Rev3 is powered by the ATmega328P chip, an 8-bit RISC architecture microcontroller from Atmel (now Microchip).
Technical Specifications of ATmega328P:
- Digital I/O: 14 pins in total (6 of which support PWM signals for controlling load speed or brightness)
- Analog Input: 6 pins for receiving 0-5V voltage values (10-bit ADC)
- Clock Speed: 16 MHz (processing speed of 16 million instructions per second)
In addition to the main chip, this board also has other important components:
- Voltage Regulator: Reduces and maintains stable voltage levels at 5V and 3.3V.
- ATmega16U2: Communication chip that acts as a bridge between USB and Serial (UART), allowing the computer to recognize the board as a COM Port.
- 16MHz Quartz Crystal: Crystal oscillator that provides a precise clock signal for processing.
- Power Jack & USB Type B: Channels for power input and programming.

Power Management (Power Options)
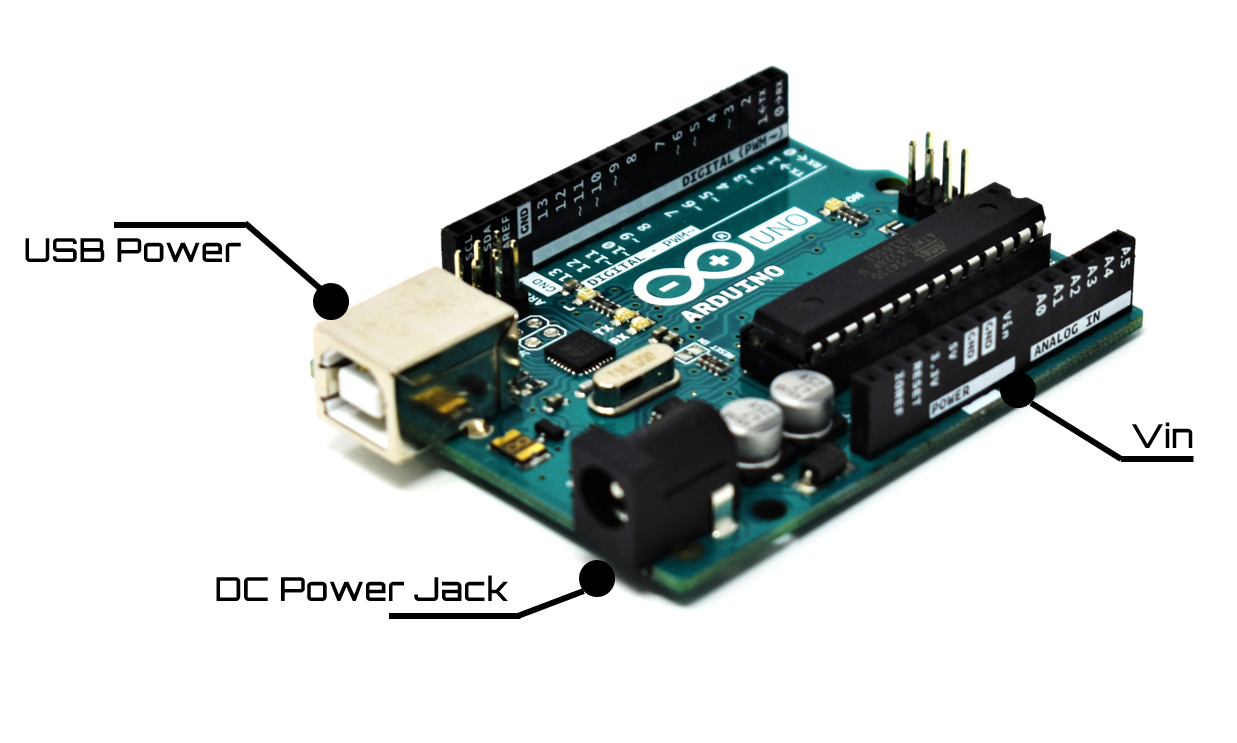
You can power the Arduino Uno through three main channels:
- USB Port: Most convenient for development, but has current limitations of 500mA (according to computer USB port standards). If you connect multiple motors, power may be insufficient.
- DC Power Jack: Supports 7 - 12V (9V recommended). Ideal for real-world applications not connected to a computer.
- Vin Pin: For direct power input to the board (7 - 12V).
Important Note: If you connect both USB and the DC Jack simultaneously, the board has an automatic power source selection circuit. It will select the higher voltage source (External Supply) for stability.
Your First Project: Making an LED Blink (Blink)
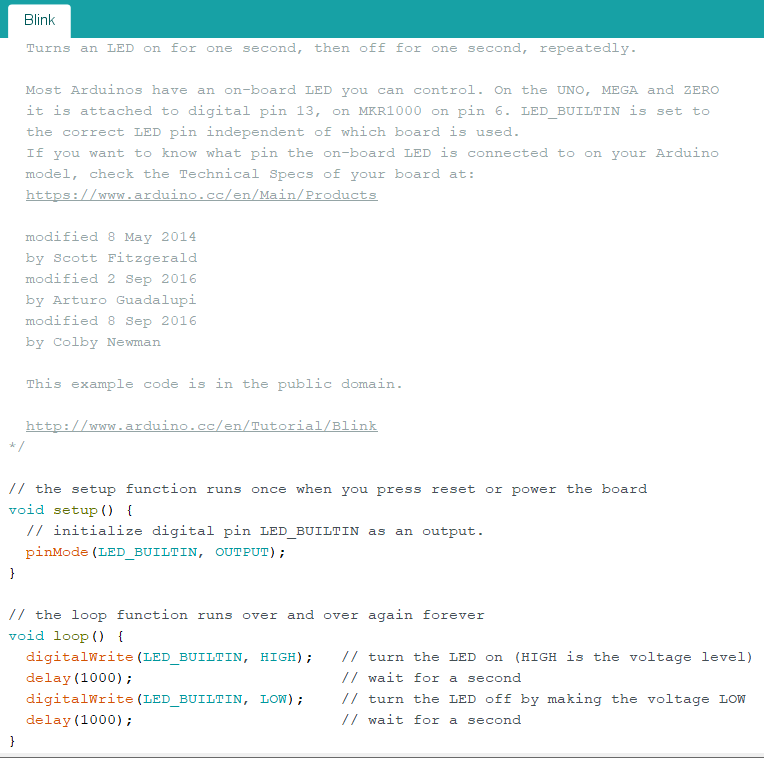
Let's analyze the Blink example code to understand its practical operation:
Code Analysis:
- In
setup(): The commandpinMode(LED_BUILTIN, OUTPUT);is used to tell the board that pin 13 (which has an onboard LED) will function as a voltage output. - In
loop():digitalWrite(LED_BUILTIN, HIGH);commands 5V to be supplied, turning the LED on.delay(1000);commands a pause for 1 second (1000 ms).digitalWrite(LED_BUILTIN, LOW);commands 0V, turning the LED off.delay(1000);pauses for another 1 second before starting the new cycle.
- In
Upload Steps:
- Connect the USB cable to the board and your computer.
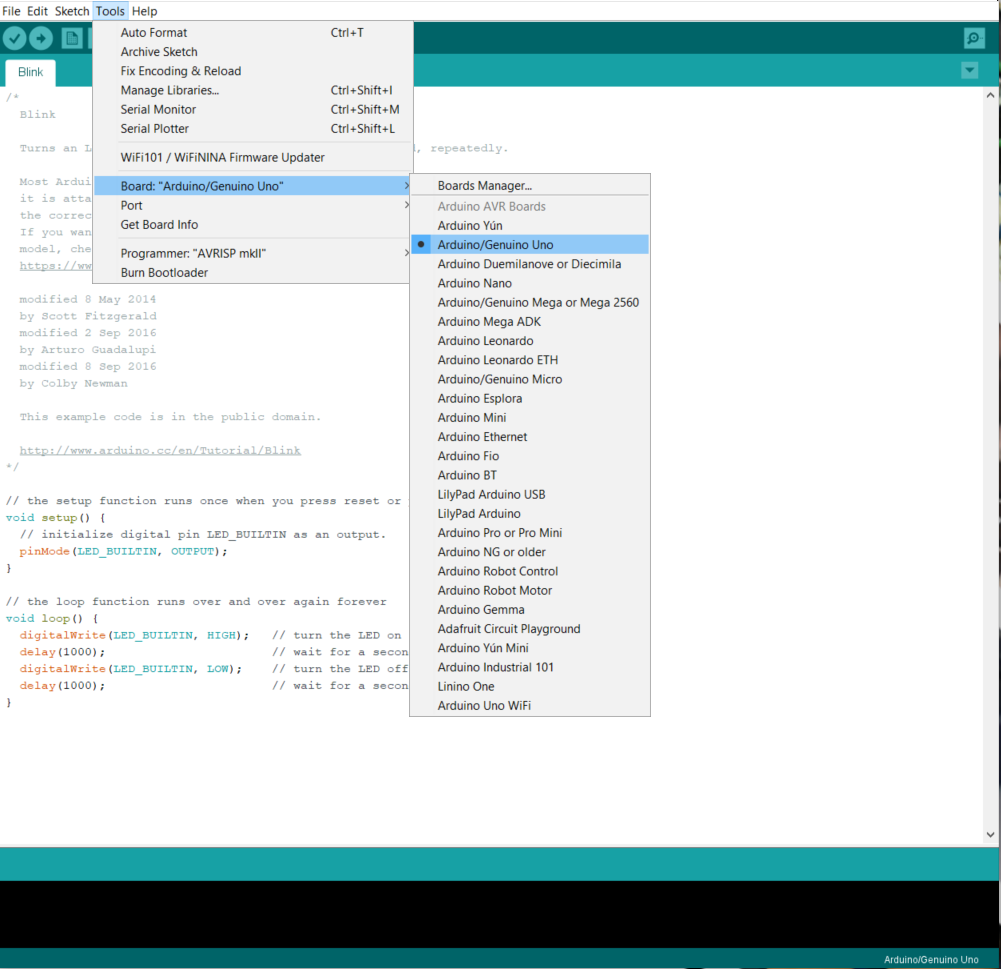
- Select the board at
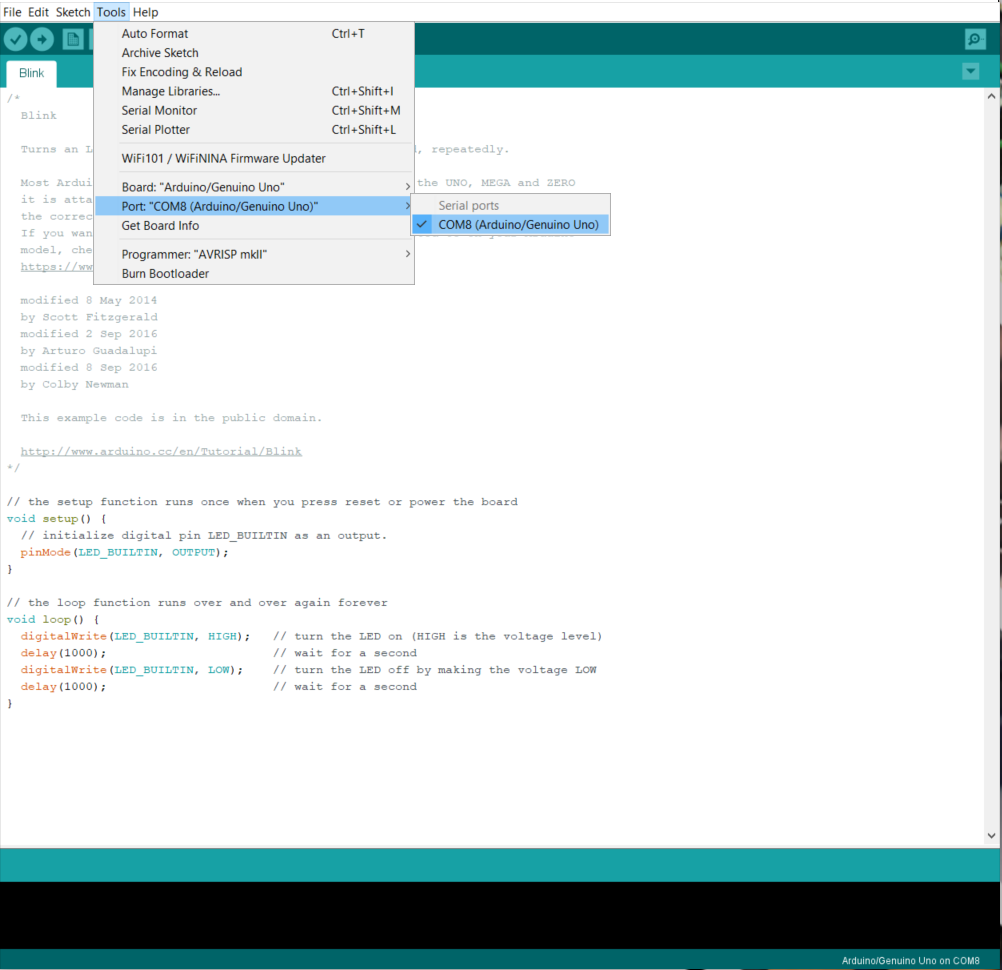
Tools -> Board -> Arduino/Genuino Uno. - Select the Port at
Tools -> Port(note the appearing COM Port name). - Click the Upload button (right-pointing arrow symbol).
If the upload is successful, you will see the message "Done uploading" and the orange LED on the board will start blinking according to the defined rhythm!
Additional Tips for New Engineers
Although the Blink project seems simple, from an engineering perspective, an LED is one of the most powerful Debugging tools:
- Operational Status: You can use an LED to confirm whether the program has entered a desired function by turning the light on upon entry and off upon exit.
- Data Monitoring: For deep-level communication like UART, TX/RX LEDs help you see if data transmission is actually occurring. If the light doesn't blink during data transmission, there might be a problem at the Hardware or Baud Rate level.
- Visual Feedback: Having status indicator lights helps users know if the system is operating normally (Heartbeat) or if an error has occurred (Error Code via blinking).
Starting with small changes, like modifying the numbers in the delay() function, will help you understand the fundamentals of Timing Control, which is a crucial aspect of Real-time Embedded systems in the future.