Revolutionizing Hardware Programming: Integrating the Power of WebUSB, Arduino, and a Web-Based Circuit Simulator
In the traditional world of Embedded Systems development, developers traditionally relied on specialized software (IDEs), complex Driver installations, and compilation processes disconnected from the User Interface (UI). However, modern web technologies have advanced to the point where the gap between "browser-based software" and "physical hardware" is being bridged by clever protocols. This article delves into the powerful synergy between the WebUSB API, Arduino, and a Web-Based Logic Simulator, which allows us to control and simulate digital circuit operations in Real-time directly through a web page, without any additional software installation.
WebUSB API: A Direct Gateway to Hardware from the Browser
Normally, web browsers are confined within a "Sandbox" for security, preventing direct access to computer resources. However, with the advent of the WebUSB API (which currently has excellent support on Google Chrome and Chromium-based browsers), this standard allows web applications to communicate directly with USB devices at a low Protocol level.
Once the user grants permission (User Consent), websites can immediately send read and write commands to hardware devices. This opens up new dimensions for creating Hardware Interoperability systems, such as Web-based Dashboards for monitoring sensors, firmware updates via the Cloud, or even developing electronic educational tools where learners can simply plug and play.
Hardware Used: The Power of Native USB in ATMega32U4
Crucially, not all Arduino models can perform this test. This is because WebUSB requires devices to have flexible USB Stack control (Native USB Support) for self-identification via specific Descriptors. Therefore, the devices used must be from the ATMega32U4 family of chips, unlike the Arduino Uno (ATMega328P) which uses a separate USB-to-Serial chip.
- Arduino Leonardo: A full-sized board using the 32U4 chip with complete Pin signals, suitable for prototyping.
- Arduino Micro: Has the same specifications as the Leonardo but is smaller, ideal for mounting on a Breadboard or embedding in small projects.
The special feature of the ATMega32U4 is its ability to emulate itself as any device, such as a keyboard, mouse, or in this case, a WebUSB device that can specify a Landing Page URL at the Hardware Descriptor level.
System Preparation and Core Customization (Technical Deep Dive)
Communication between the browser and hardware requires a common "language." During system preparation, there are critical technical points that engineers must pay attention to:
1. Upgrading the USB Stack to Version 2.1
According to the original standard, Arduino operates on USB 2.0. However, for WebUSB features to function completely, the device must identify itself as USB 2.1 to inform the Host (computer) that this device contains a set of data called the Binary Object Store (BOS) Descriptor, which is the mechanism used to transmit WebUSB URL and Microsoft OS Descriptor information to the operating system.
Modification Steps:
You must modify a system-level file in the Arduino SDK:
File: hardware/arduino/avr/cores/arduino/USBCore.h
Find the value:
#define USB_VERSION 0x200
Change to:
#define USB_VERSION 0x210
For macOS users: Right-click on the Arduino application and select "Show Package Contents" to navigate to the Path: Contents/Java/hardware/arduino/avr/cores/arduino/USBCore.h
Technical Insight for Windows users: If you modify
USBCore.hto 2.1, you must ensure that you always Include the "WebUSB" Library in your Code. Without a correct BOS Descriptor declaration, Windows will detect it as a faulty device and fail to Enum it, making subsequent Code Uploads difficult (requiring pressing the Reset button in sync with the upload).
2. WebUSB Library Installation
Download the WebUSB Library and place it in your libraries folder. This Library will manage all the necessary data structures (Descriptors) for communicating with Chrome.
In-depth Analysis of the Prototype Code (brainbox.ino)
The core of this project lies in creating a communication Object through the WebUSB class, with the following interesting operational Logic:
#include <WebUSB.h>

// การสร้าง Object WebUSB พร้อมระบุ Landing Page URL
WebUSB WebUSBSerial(1, "https://freegroup.github.io/brainbox/circuit/");

void setup() {
  while (!WebUSBSerial) {
    ; // รอจนกว่าจะมีการเชื่อมต่อกับเบราว์เซอร์
  }
  WebUSBSerial.begin(9600);
  WebUSBSerial.write("WebUSB Connected!");
}
Logic Explanation:
- WebUSB Constructor: Specifying the URL in the Code allows the operating system to detect that "this device has a website for control" as soon as the USB cable is plugged in (via the BOS Protocol).
- WebUSBSerial: Functions like the familiar normal
Serial, but the data does not flow to the Arduino IDE's Serial Monitor; instead, it flows to the browser Tab we have open. - The Loop: In the
loop()section, the program continuously receives Logic values (0 or 1) sent from the Web-Based Simulator. When the user drags wires or presses switches on the web page, that data is sent as Bytes via USB to the Arduino to commanddigitalWrite()to actual Pins. Conversely, the state of physical buttons on the board will bedigitalRead()and sent back to be displayed as beautiful graphics on the browser.
Access and User Experience (The Workflow)
Once the firmware is installed, the user experience differs completely from conventional programming:
- Plug in Device: As soon as Arduino is plugged into the computer, Google Chrome will display a pop-up Notification with the message "Go to [URL]", which is an operating system-level alert.
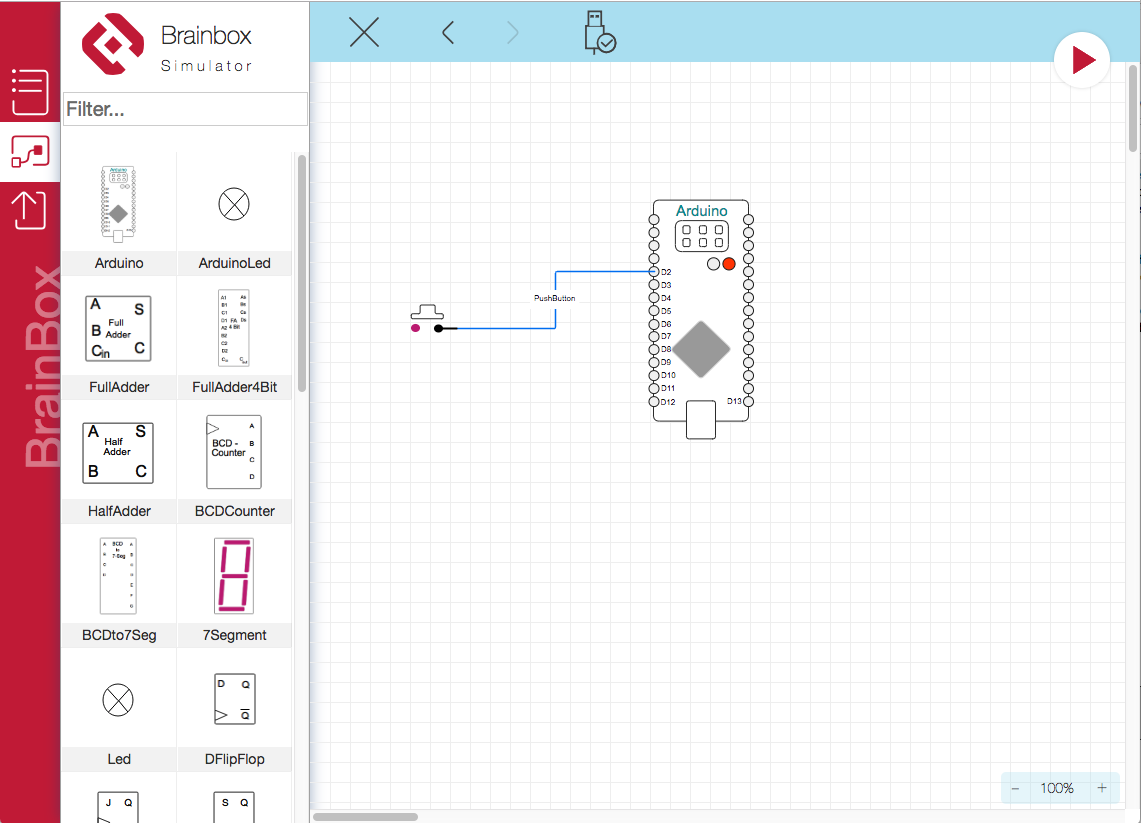
- Pairing: Upon entering the webpage https://freegroup.github.io/brainbox/circuit/, the user simply clicks the ‘device’ icon to select the detected Arduino device.
- Real-time Interaction: Users can design Logic Circuits in the Simulator on the web page. When the circuit is run, the processed results immediately appear on the actual hardware, such as commanding an LED to light up according to the created Logic Gate.
Conclusion
This project is not merely about controlling an LED via the web; it is a highly effective Proof of Concept for Remote Hardware-in-the-loop.
- Speed (Latency): Data transmission via WebUSB has very low Latency, allowing for immediate response to Logic state changes.
- Ease (UX): Reduces barriers for beginners who do not need to learn about Port, Driver, or Baud rate.
- Integration: We can combine the power of Web Technologies (such as CSS3, WebGL) to create beautiful Dashboards alongside low-level hardware control.
WebUSB technology is thus a significant step that will transform the landscape of IoT device development and computer engineering educational tools, making them more accessible and efficient than ever before.