Project: Creating Astronomia (Coffin Dance) Music with Arduino Uno
In this article, we will guide everyone through the enjoyable process of creating music from the famous meme "Coffin Dance", also known as Astronomia, using an Arduino Uno microcontroller board. This project not only provides entertainment but also serves as an excellent lesson in learning about Tone Generation and basic output device control in embedded engineering.
Demonstration Video
Watch a demonstration of the project's operation and the sound produced by the speaker in the video below:
Step 1: Components Required
The selection of components for this project is interesting from an electronics perspective, particularly the use of a Transistor for signal amplification.
- Arduino Uno / NodeMCU: Serves as the central processing unit to generate Pulse Width Modulation (PWM) signals at various frequencies.
- Jumper Wires: For connecting circuits on a Breadboard.
- Speaker or Buzzer: An 8-ohm Speaker will produce a softer sound, while a Buzzer is easier to install.
- BC547 Transistor (Optional): If using a small Speaker, this NPN transistor is necessary to act as a Switching Amplifier, as Arduino's I/O pins have limited current output (approximately 20-40mA). Connecting a Speaker directly might damage the board or result in very low volume.
- LED (Optional): To create blinking light effects in sync with the music.
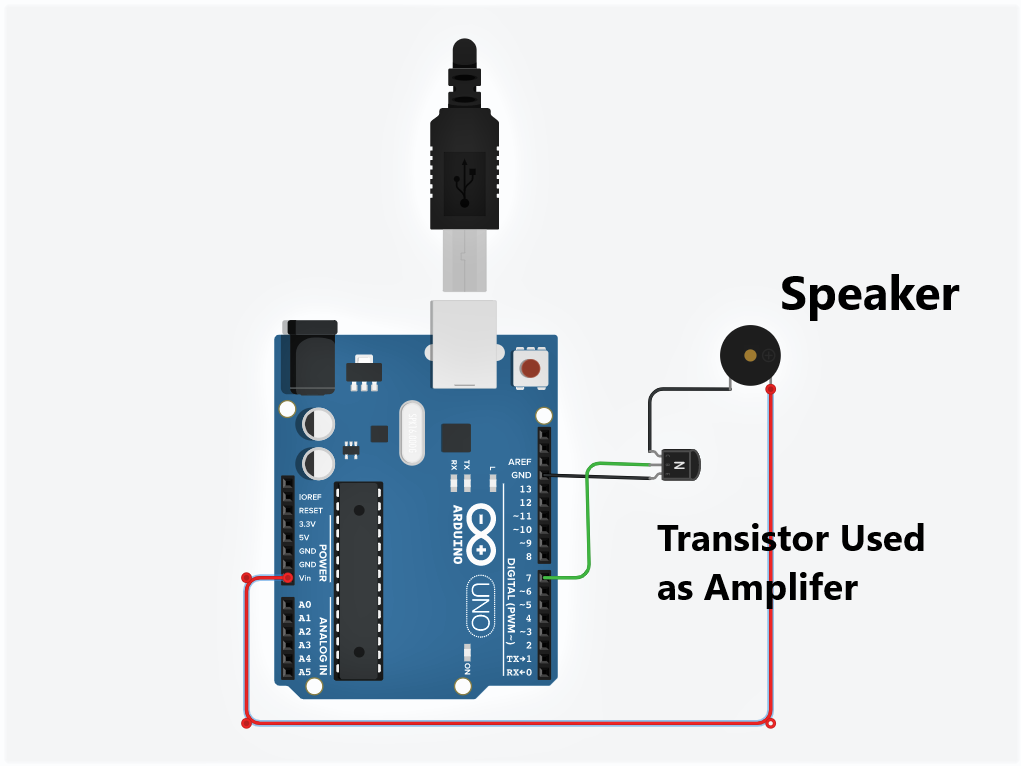
Step 2: Connecting Arduino to a Speaker (via an Amplifier Circuit)
To drive the Speaker, we will use a BC547 Transistor to amplify the current from the Arduino's digital port. This method ensures the Speaker receives sufficient power without drawing current directly from the microcontroller.
Principle of Operation: The signal from Digital Pin 7 is sent to the Base pin of the transistor, controlling the current flow from the power supply through the Speaker to Ground.
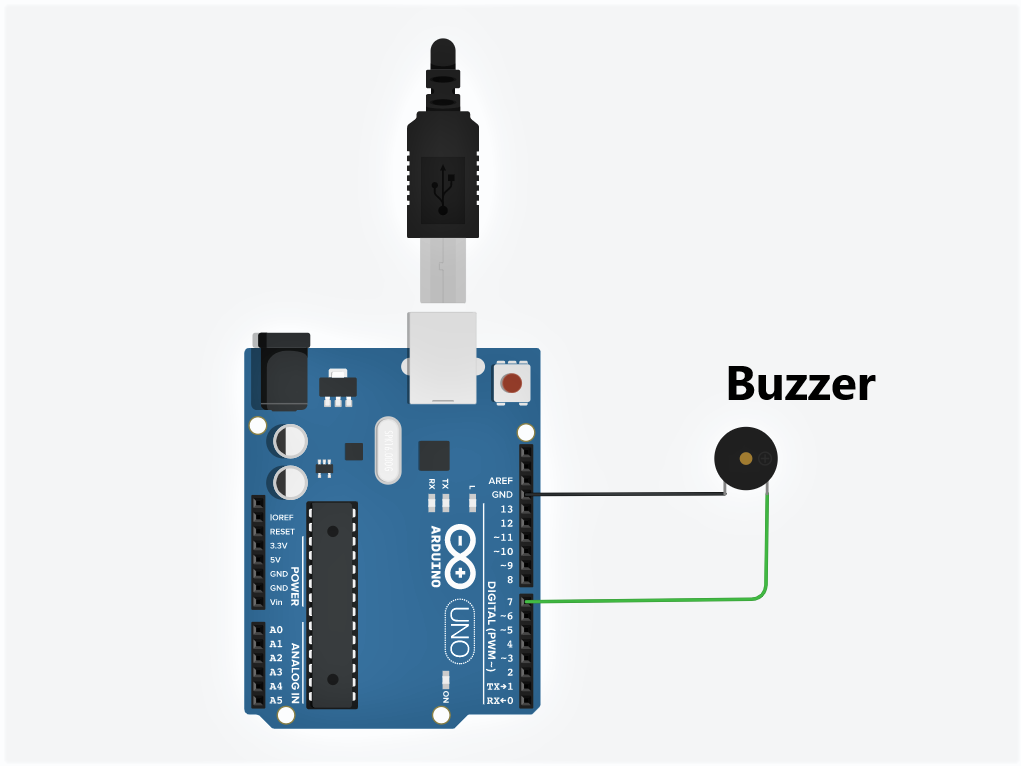
Step 3: Connecting Arduino to a Buzzer (Simple Method)
If you choose to use a Piezo Buzzer, which is a low-current device that operates by vibrating a ceramic plate, you can connect it directly to the Arduino board without needing a transistor for signal amplification.
Step 4: Programming (Arduino Code)
This source code uses Arduino's standard tone() function, which generates a Square Wave at a specified frequency (in Hertz) to send to the Speaker.
Program Logic Analysis:
- Note Frequency Definition (#define): The first part of the code maps musical note names (e.g.,
NOTE_A4) to their actual physical frequency values, simplifying music composition. - Melody Array: Stores the sequence of notes to be played, where 0 represents a Rest.
- NoteDurations Array: Defines the length of each note (4 = Quarter Note).
- setup() function: In this project, the song will be played only once upon power-on or Reset, using a loop that iterates 112 times, corresponding to the number of notes.
- Calculates
noteDurationbased on a constant value of 750ms divided by the note type. - Uses
tone(7, ...)to command Pin 7 to output a frequency. - Calculates
pauseBetweenNotes(multiplied by 1.30) to create gaps between notes, making the music sound smoother and less abrupt.
- Calculates
#define NOTE_B0  31
#define NOTE_C1  33
#define NOTE_CS1 35
#define NOTE_D1  37
#define NOTE_DS1 39
#define NOTE_E1  41
#define NOTE_F1  44
#define NOTE_FS1 46
#define NOTE_G1  49
#define NOTE_GS1 52
#define NOTE_A1  55
#define NOTE_AS1 58
#define NOTE_B1  62
#define NOTE_C2  65
#define NOTE_CS2 69
#define NOTE_D2  73
#define NOTE_DS2 78
#define NOTE_E2  82
#define NOTE_F2  87
#define NOTE_FS2 93
#define NOTE_G2  98
#define NOTE_GS2 104
#define NOTE_A2  110
#define NOTE_AS2 117
#define NOTE_B2  123
#define NOTE_C3  131
#define NOTE_CS3 139
#define NOTE_D3  147
#define NOTE_DS3 156
#define NOTE_E3  165
#define NOTE_F3  175
#define NOTE_FS3 185
#define NOTE_G3  196
#define NOTE_GS3 208
#define NOTE_A3  220
#define NOTE_AS3 233
#define NOTE_B3  247
#define NOTE_C4  262
#define NOTE_CS4 277
#define NOTE_D4  294
#define NOTE_DS4 311
#define NOTE_E4  330
#define NOTE_F4  349
#define NOTE_FS4 370
#define NOTE_G4  392
#define NOTE_GS4 415
#define NOTE_A4  440
#define NOTE_AS4 466
#define NOTE_B4  494
#define NOTE_C5  523
#define NOTE_CS5 554
#define NOTE_D5  587
#define NOTE_DS5 622
#define NOTE_E5  659
#define NOTE_F5  698
#define NOTE_FS5 740
#define NOTE_G5  784
#define NOTE_GS5 831
#define NOTE_A5  880
#define NOTE_AS5 932
#define NOTE_B5  988
#define NOTE_C6  1047
#define NOTE_CS6 1109
#define NOTE_D6  1175
#define NOTE_DS6 1245
#define NOTE_E6  1319
#define NOTE_F6  1397
#define NOTE_FS6 1480
#define NOTE_G6  1568
#define NOTE_GS6 1661
#define NOTE_A6  1760
#define NOTE_AS6 1865
#define NOTE_B6  1976
#define NOTE_C7  2093
#define NOTE_CS7 2217
#define NOTE_D7  2349
#define NOTE_DS7 2489
#define NOTE_E7  2637
#define NOTE_F7  2794
#define NOTE_FS7 2960
#define NOTE_G7  3136
#define NOTE_GS7 3322
#define NOTE_A7  3520
#define NOTE_AS7 3729
#define NOTE_B7  3951
#define NOTE_C8  4186
#define NOTE_CS8 4435
#define NOTE_D8  4699
#define NOTE_DS8 4978

int melody[] = {
  NOTE_A4, 0, NOTE_A4, NOTE_A4,
  NOTE_C5, 0, NOTE_AS4, NOTE_A4,
  NOTE_G4,0, NOTE_G4, NOTE_AS5,
  NOTE_A5, NOTE_AS5, NOTE_A5, NOTE_AS5,
  NOTE_G4,0, NOTE_G4, NOTE_AS5,
  NOTE_A5, NOTE_AS5, NOTE_A5, NOTE_AS5,
  NOTE_AS4, NOTE_AS4, NOTE_AS4, NOTE_AS4,
  NOTE_AS4, NOTE_AS4, NOTE_AS4, NOTE_AS4,
  NOTE_AS4, NOTE_AS4, NOTE_AS4, NOTE_AS4,
  NOTE_AS4, NOTE_AS4, NOTE_AS4, NOTE_AS4,
  NOTE_AS4, NOTE_AS4, NOTE_AS4, NOTE_AS4,
  NOTE_D5, NOTE_D5, NOTE_D5, NOTE_D5,
  NOTE_C5, NOTE_C5, NOTE_C5, NOTE_C5,
  NOTE_F5, NOTE_F5, NOTE_F5, NOTE_F5,
  NOTE_G5, NOTE_G5, NOTE_G5, NOTE_G5,
  NOTE_G5, NOTE_G5, NOTE_G5, NOTE_G5,
  NOTE_G5, NOTE_G5, NOTE_G5, NOTE_G5,
  NOTE_C5, NOTE_AS4, NOTE_A4, NOTE_F4,
  NOTE_G4, 0, NOTE_G4, NOTE_D5,
  NOTE_C5, 0, NOTE_AS4, 0,
  NOTE_A4, 0, NOTE_A4, NOTE_A4,
  NOTE_C5, 0, NOTE_AS4, NOTE_A4,
  NOTE_G4,0, NOTE_G4, NOTE_AS5,
  NOTE_A5, NOTE_AS5, NOTE_A5, NOTE_AS5,
  NOTE_G4,0, NOTE_G4, NOTE_AS5,
  NOTE_A5, NOTE_AS5, NOTE_A5, NOTE_AS5,
  NOTE_G4, 0, NOTE_G4, NOTE_D5,
  NOTE_C5, 0, NOTE_AS4, 0,
  NOTE_A4, 0, NOTE_A4, NOTE_A4,
  NOTE_C5, 0, NOTE_AS4, NOTE_A4,
  NOTE_G4,0, NOTE_G4, NOTE_AS5,
  NOTE_A5, NOTE_AS5, NOTE_A5, NOTE_AS5,
  NOTE_G4,0, NOTE_G4, NOTE_AS5,
  NOTE_A5, NOTE_AS5, NOTE_A5, NOTE_AS5
};

int noteDurations[] = {
  4,4,4,4, 4,4,4,4, 4,4,4,4, 4,4,4,4,
  4,4,4,4, 4,4,4,4, 4,4,4,4, 4,4,4,4,
  4,4,4,4, 4,4,4,4, 4,4,4,4, 4,4,4,4,
  4,4,4,4, 4,4,4,4, 4,4,4,4, 4,4,4,4,
  4,4,4,4, 4,4,4,4, 4,4,4,4, 4,4,4,4,
  4,4,4,4, 4,4,4,4, 4,4,4,4, 4,4,4,4,
  4,4,4,4, 4,4,4,4, 4,4,4,4, 4,4,4,4
};

void setup() {
  // Plays all 112 notes as defined in the Array
  for (int thisNote = 0; thisNote < 112; thisNote++) {
    // Calculates note duration (750ms is a base value that can adjust the tempo)
    int noteDuration = 750 / noteDurations[thisNote];
    tone(7, melody[thisNote], noteDuration);

    // Sets the gap between notes to make the sounds distinct
    int pauseBetweenNotes = noteDuration * 1.30;
    delay(pauseBetweenNotes);

    // Stops outputting the audio signal on Pin 7
    noTone(7);
  }
}

void loop() {
  // No operations in loop, so the song plays only once per boot.
}
Simply copy the code above into the Arduino IDE, select the correct board and port, then click Upload. You'll then have your very own Coffin Dance music player! This project can be expanded by adding buttons.