This is a little bit hard project. But I will explain it in a simple manner.
Project Perspective
The Automatic Water Pump Controller is a practical and fun layout for anyone looking to build their first home automation project. By utilizing an ultrasonic distance sensor and a relay module, you can build an automated system that turns a pump on or off based on the water level in a tank or container.
How It Works ?
The Arduino turns the water pump ON/OFF by calculating the data received from the Ultrasonic Distance Sensor. If the data is a particular distance (In Code - Inches) less from the sensor, then the Arduino turns the water pump ON. After turning it ON, it checks if the data is a particular distance (In Code - Inches) high from the sensor, the the Arduino turns the water pump OFF.
Technical Implementation
The Arduino Uno's built-in digital inputs and outputs are used to read the ultrasonic sensor and control the Relay Module. The relay acts as an electronic switch for the water pump, allowing the Arduino's low-voltage signal to control a higher-power device safely.
How I made this project
I was worried about the overflow of the water from my water tank. I loses a huge amount of water from it. So, I started thinking of a way to get rid of it. I came with an idea of making a system which controls the water pump.
I started to think practically and wrote the code logically. But, I came with a bad news - "NOT WORKING PROPERLY".
Then I took my phone and started searching for one like this. After a while of searching, I got the article. It was from You Tube. This is not my project. It is owned by : Kiyani's Lab
Channel link : https://www.youtube.com/Kiyani'sLab
His video gave me the code for this project.
Components Required :-
- Arduino Uno
- 16 x 2 LCD Display
- Ultrasonic Sensor (HCSR-04)
- Breadboard
- Potentiometer (10k)
- Jumper Wires (Female - Male)
- 1k Resistor
- Relay Module
- Push Button
- SPST Switch
Hardware Infrastructure
- Arduino Uno: The primary controller for the water pump logic and sensor data.
- Ultrasonic Sensor (HCSR-04): Provides distance data based on the water level in the container.
- Relay Module: Isolates the high-voltage/current pump circuit from the Arduino for safety and control.
- 16x2 LCD Display: Shows the system status and water level information.
- Jumper Wires: Connect all the components together.
Circuit Diagram
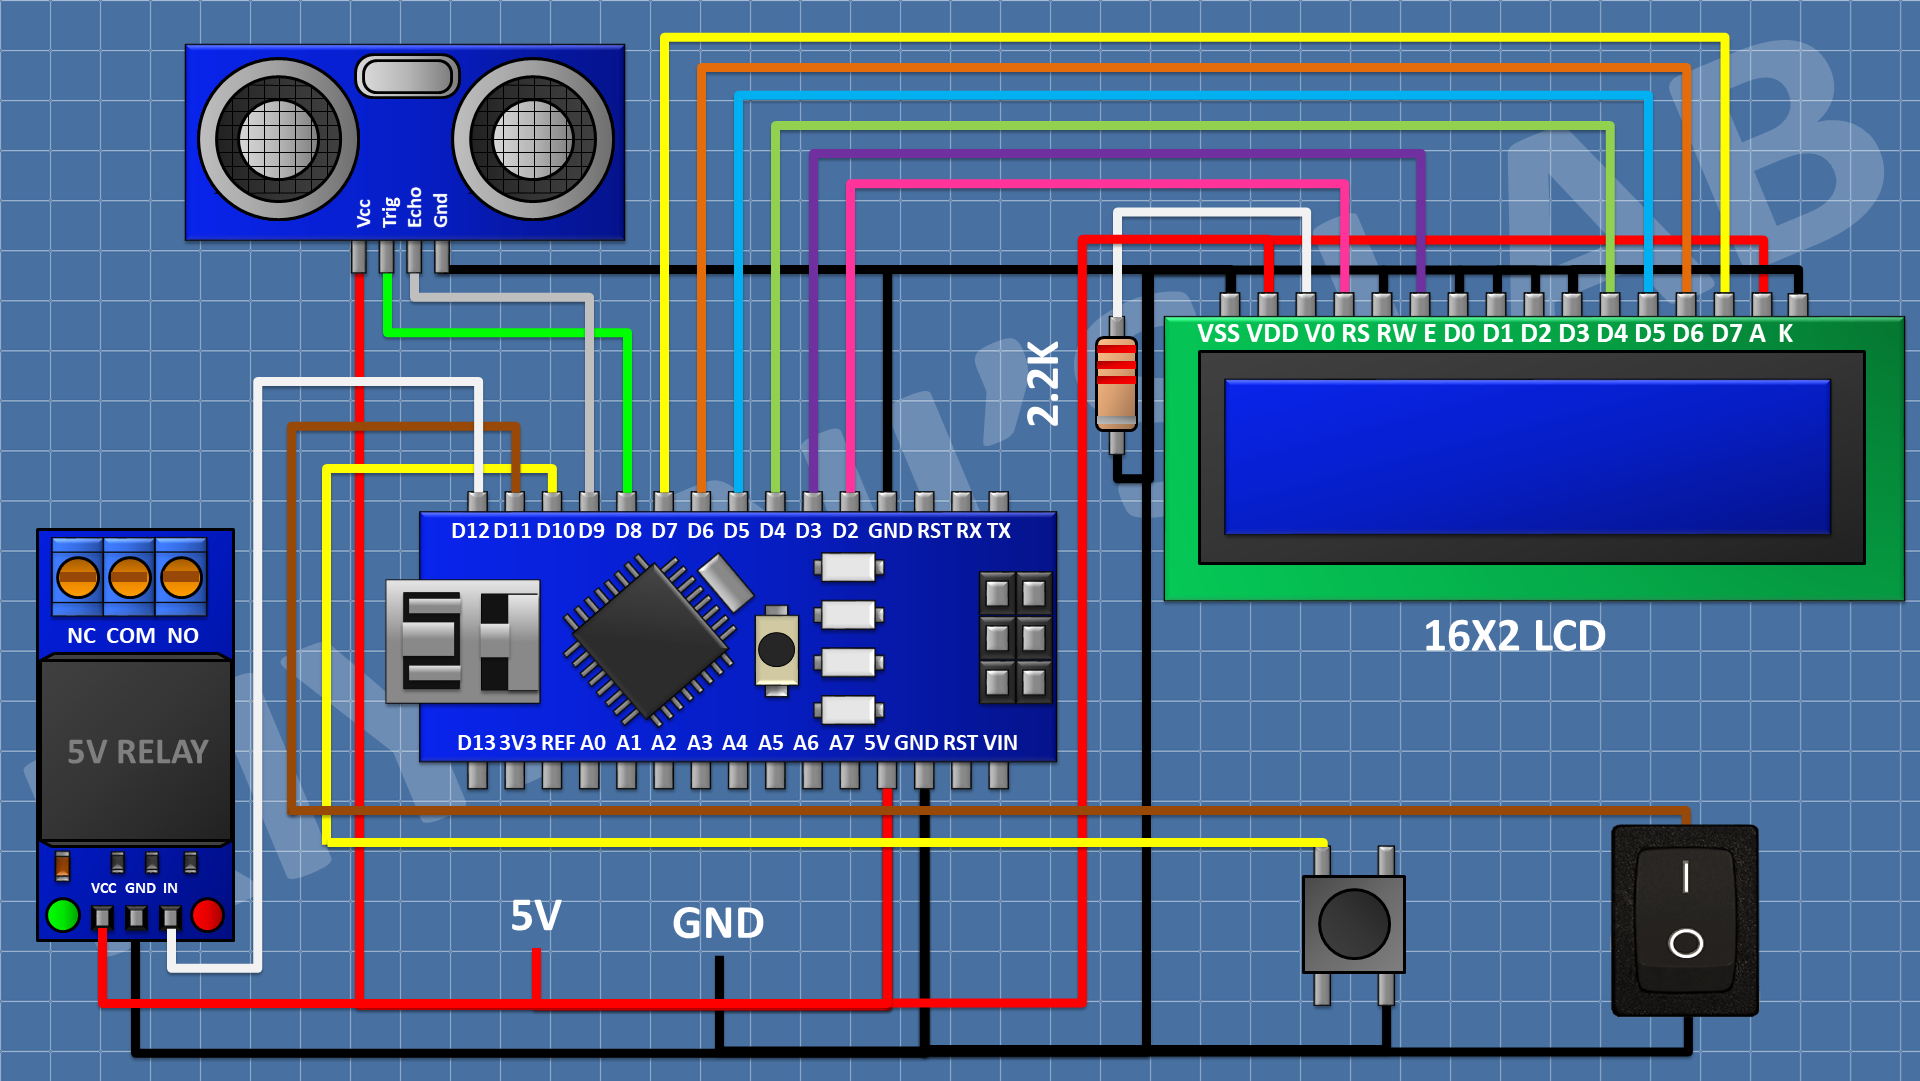
Here it is Arduino Nano. You can use any of the Arduino Boards.
Ultrasonic Sensor To Arduino Uno :-
Ultrasonic Sensor gnd(Ground/Cathode) to Arduino Uno's gnd pin. Its Vcc pin (5v/Anode) to Arduino Uno's 5v pin.
Its Trig(Input) pin to Arduino Uno's D8 pin and Echo(Output) pin to Arduino Uno's D9 pin.
LCD Screen To Arduino Uno :-
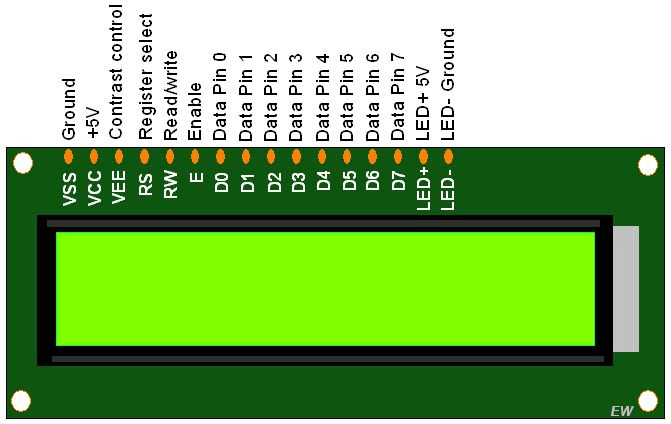
We are not connecting LCD Screen's (D0, D1, D2, D3) pins because we are using 4 bit mode to display the text.
D4 - D4 (Arduino Uno/Nano/Mega/Any Other Board) D5 - D5 (Arduino Uno/Nano/Mega/Any Other Board) D6 - D6 (Arduino Uno/Nano/Mega/Any Other Board) D7 - D7 (Arduino Uno/Nano/Mega/Any Other Board) Led Anode [ Short Form - A] / (LED +) - 5v (Arduino Uno)
NOTE: Use a resistor while connecting (I used 1k). Otherwise the led may burn due to high voltage ⚠.
Led Cathode [Short Form - K] / (LED -) - Gnd (Arduino Uno)
Relay To Arduino Uno :- Connect Relay modules IN (Signal/INPUT) to Arduino Uno's D12 pin. Relay's Gnd to Arduino Gnd. Its 5v pin to Arduino's 5v
MODE (AUTO/MANUAL) Switch To Arduino :- Connect the switch's one end to Gnd of Arduino and the other end to D11 of Arduino Uno.
PUMP (ON/OFF | DISTANCE SET) Switch To Arduino :- Connect the push button switch's one end to Gnd of Arduino and the other to its D10 pin.
Signal Control and Logic
The Arduino code uses the sensor's distance reading to check the water level. When the level is below a certain threshold, the code triggers the relay to turn the pump ON. Once the level reaches the desired height, the relay is deactivated, turning the pump OFF.
Display and Output
The system uses the 16x2 LCD to show the current water level and pump status, providing clear feedback for a highly intuitive and entertaining layout.
Future Expansion
- OLED Display Integration: Replace the LCD with a small OLED screen for a sharper display of the current water level and pump status.
- Wireless Connection: Add a Bluetooth or WiFi module to monitor and control the pump remotely from a smartphone.
- Dual Tank Monitoring: Use multiple sensors to monitor and control water flow between two tanks.
- Advanced Timing Integration: Add a timer to prevent the pump from running for too long and to conserve power.
Automatic Water Pump Controller Using Arduino Uno is a perfect project for any electronics enthusiast looking for a more interactive and engaging home automation tool!
Working Video:-
Please subscribe to my You Tube channel
Channel Name : J4 JEVINS
Link :- https://youtube.com/J4Jevins
Please help me to reach 1k Subscribes :D