In this project, we will transform an ordinary aftermarket car radio display (Aftermarket Head Unit) into an intelligent data display center (Digital Dash) by connecting a Raspberry Pi to the car's OBD-II port via Bluetooth to retrieve real-time engine status data and display it professionally.
Hardware Specifications
Choosing the correct equipment is crucial for the system to operate stably in a high-vibration and high-heat environment like a car interior.
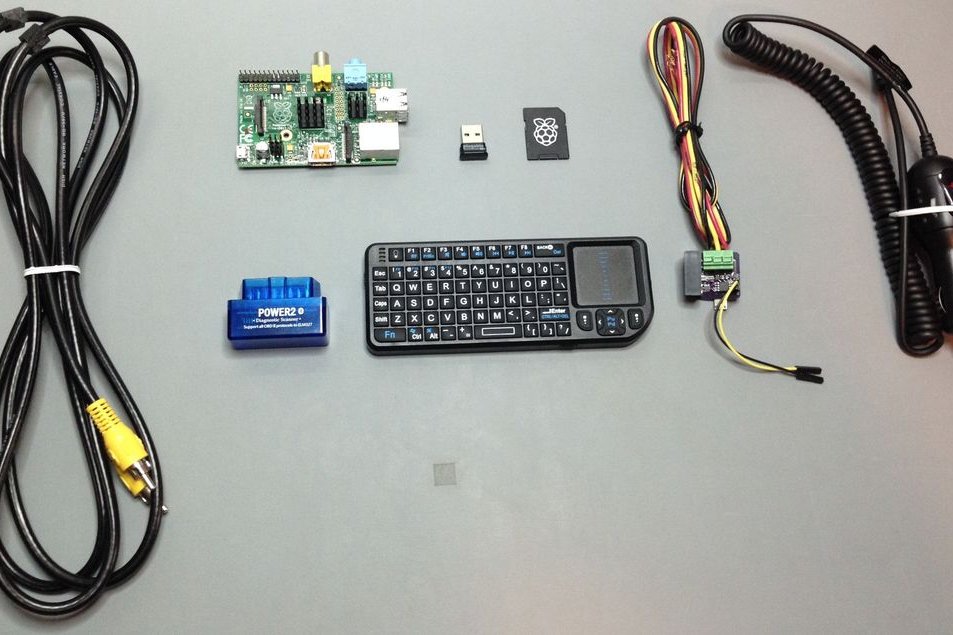
- Raspberry Pi Model B or B+: A small single-board computer with a built-in Composite Video (RCA) port, which is highly suitable for connecting to older car radio displays that lack an HDMI port.
- Aftermarket Head Unit: An aftermarket car radio display that must support an Auxiliary Input (AV-IN) channel to receive video signals from the Raspberry Pi.
- USB Bluetooth 4.0 Low Energy Adapter: The Plugable brand is recommended for stable Serial Port Profile (SPP) connectivity.
- 2A Car Supply: Car electrical systems are unstable. A quality Step-down Converter should be used to prevent board damage, or use a Micro USB Car Charger that provides at least a full 2 Amperes of current.
- ELM327 Bluetooth Adapter: A device that converts signals from the OBD-II port into Bluetooth signals to send data to the Raspberry Pi.
- RCA Cable: For connecting video and audio signals from the Pi to the display.
- Keyboard: (Optional) Used for initial software setup.
Deep Dive into OBD-II (On-Board Diagnostics): What is it?
OBD-II, short for On-Board Diagnostics Generation 2, is an international standard mandated in vehicles since 1996. This system acts as the car's "electronic brain," monitoring the engine (ECU), transmission, and emissions.
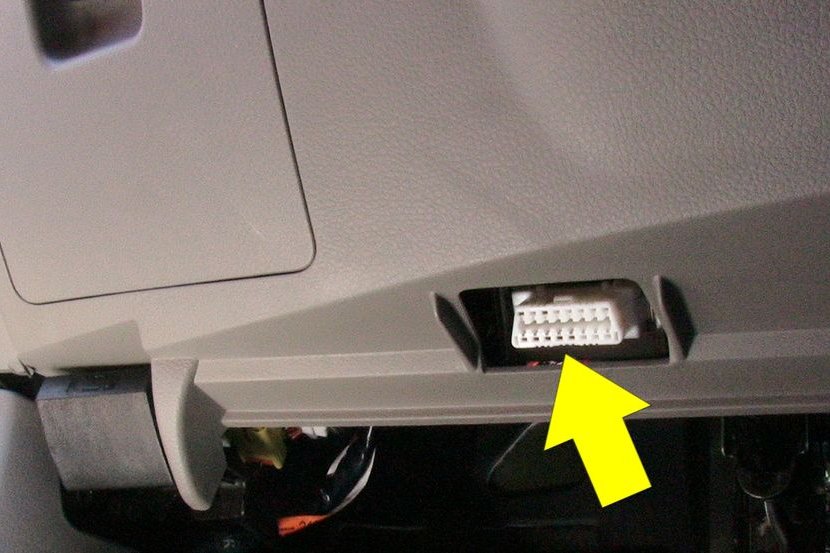
This standard connector port is called the SAE J1962 Diagnostic Connector, which has 16 pins and is typically installed within two feet of the steering wheel. Accessing this port allows us to directly read various sensor values such as engine speed (RPM), vehicle speed, coolant temperature, and Diagnostic Trouble Codes (DTC).
Introducing PyOBD: The Core of Data Retrieval
pyOBD (or pyOBD2) is an Open Source Scantool software written entirely in Python, specifically designed to communicate with ELM32x series chips.
This program sends "AT Commands" via a Serial Port to communicate with the car's ECU. It then processes the received numerical data and displays it through a beautiful graphical user interface (GUI) on your car radio screen. For this project, we have used Source Code from the sakurusurya2000/pyobd and peterh/pyobd repositories as a basis for development.
Software Installation
For the system to function, you need to install the Raspbian operating system and have an internet connection to download the necessary libraries.
- Update the system: Open Terminal and type the following commands (do not type the # symbol):
sudo apt-get update
sudo apt-get upgrade
sudo apt-get autoremove
sudo reboot
- Install Dependencies and Communication Tools: We need libraries for managing Serial port, Bluetooth, and GUI (wxPython):
sudo apt-get install python-serial
sudo apt-get install bluetooth bluez-utils blueman
sudo apt-get install python-wxgtk2.8 python-wxtools wx2.8-i18n libwxgtk2.8-dev
sudo apt-get install git-core
sudo reboot
Vehicle Installation
Once the software is ready, follow these hardware installation steps:
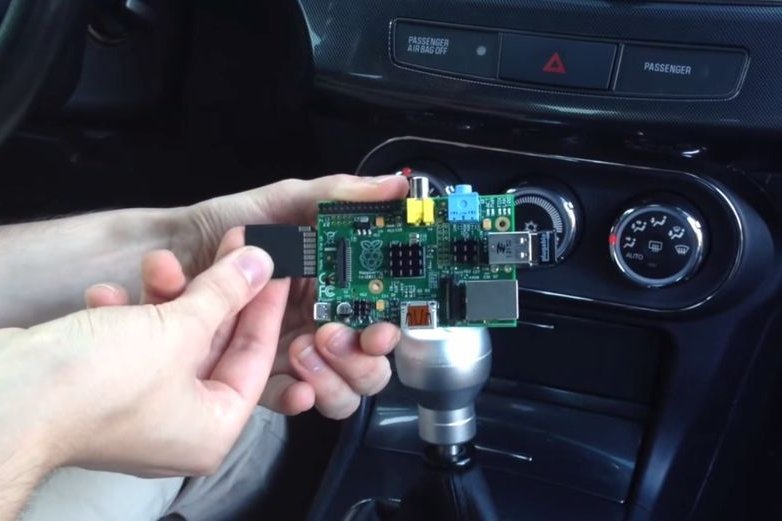
- Insert the USB Bluetooth Dongle and SD Card into the Raspberry Pi.
- Plug the ELM327 adapter into the car's OBD-II port (the status light on the adapter should turn on).
- Connect the RCA cable from the Pi's video output to the car radio's AV-IN input.
- Connect the 2A power supply to the Pi.
- Turn the car key to the ON position (or start the car) and select Auxiliary Input mode on the car radio screen.
- When you see the Login screen, log in and run the GUI:
startx
- Important Step: Open BlueZ (Bluetooth management tool), Pair and Trust the ELM327 adapter, then right-click on the device name and select "Connect To: SPP Dev". If successful, you will see a notification message "Serial port connected to /dev/rfcomm0"
- Open Terminal and run the main program:
cd pyobd-pi
sudo su
python obd_gui.py
Controls: Use the left-right arrow keys on the keyboard to switch between different gauge displays, and press Ctrl + C or Alt + Esc to exit the program.
Data Logging Feature
In addition to live display, the system can also record driving data into a file for later analysis.
To log data, use the command:
cd pyobd-pi
python obd_recorder.py
The recorded data files will be stored in the folder: /home/username/pyobd-pi/log/, which you can later use to plot graphs of speed or fuel consumption.
Code Logic Analysis
The obd_gui.py program operates based on an Event-driven Loop:
- Initialization: The program scans for a Serial Port (e.g.,
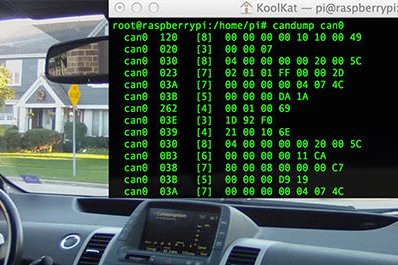
/dev/rfcomm0) to communicate with the ELM327. - Protocol Handshaking: It sends commands to query the car about which communication protocol it uses (CAN, ISO9141, etc.).
- Data Fetching: It loops, sending Request PIDs (Parameter IDs) such as
010Cfor engine speed (RPM). - Parsing: It receives the hexadecimal values returned by the car and applies calculation formulas, such as
((A*256)+B)/4, to convert them into understandable RPM values. - Rendering: The obtained values are then drawn onto the GUI screen using the
wxPythonlibrary to create needle or digital gauges.
Step-by-Step Demonstration Video
Safety Warning: Please exercise caution when using this system while driving. Avoid staring at the screen for extended periods, and ensure all wiring is neatly installed so as not to interfere with vehicle control. Have fun with your in-car technology creation!