You already know what we are gonna do today…so lets get started !
Things you’ll need :-
- Arduino board
- Breadboard
- Bluetooth module/sensor – HC05
- Couple of jumpers/single stranded wires
- LEDs
- An ANDROID(obviously 😛 )
Video tutorial down below↓
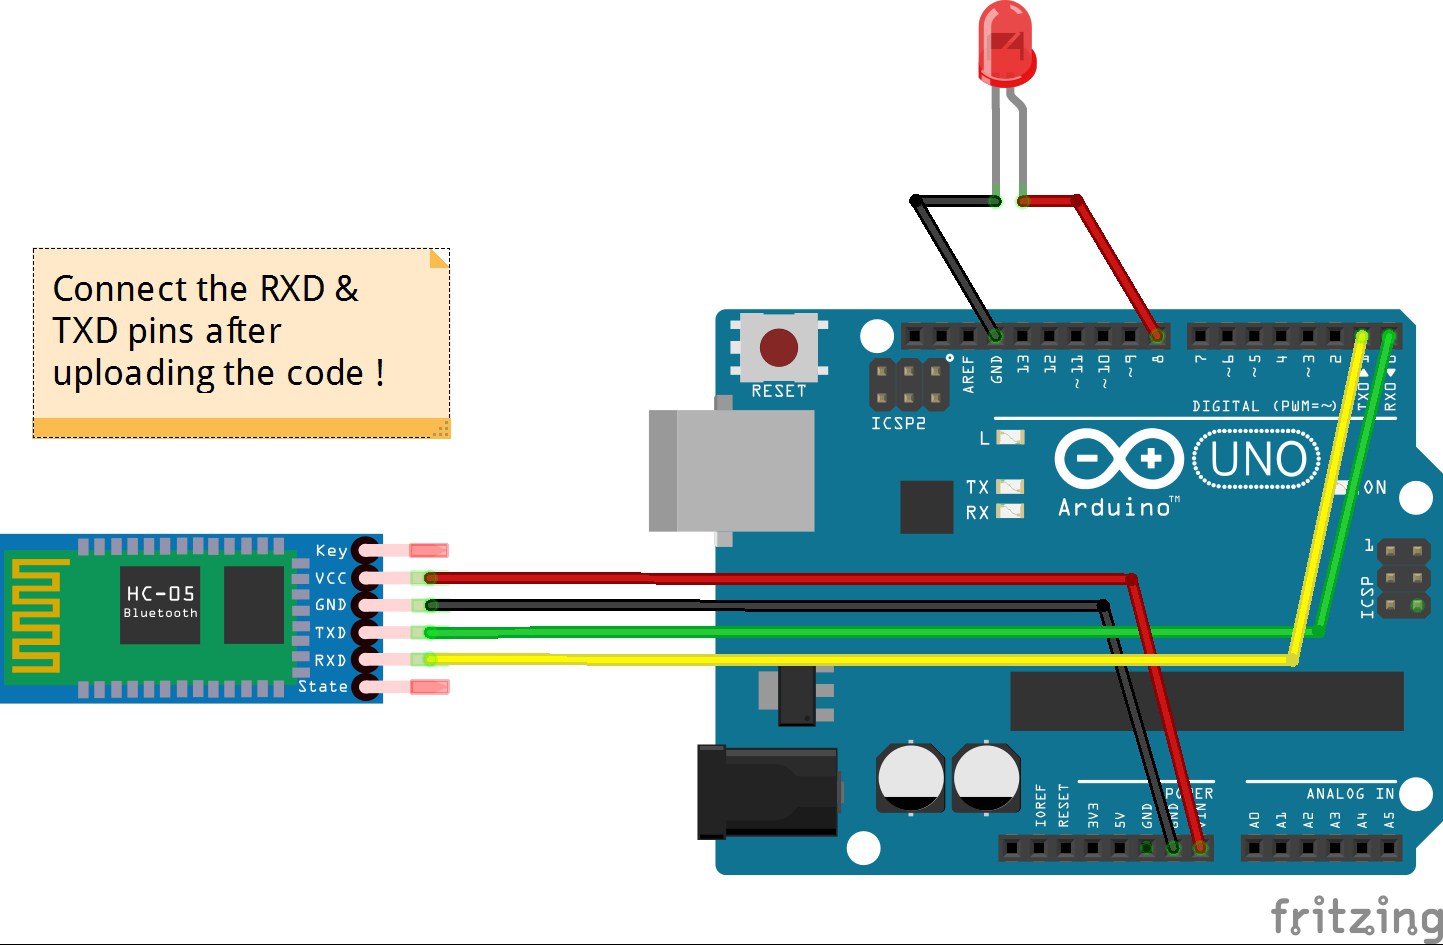
Connections Of Bluetooth module HC05 :-
VCC – to VCC of Arduino.
GND – to GND of Arduino.
RX – to digital pin 0(TX pin) of Arduino.
TX – to digital pin 1(RX pin) of Arduino. (connect RX & TX pin after uploading the code)
Of LED – Positive terminal – to pin 8 of Arduino.
Negative terminal – GND of Arduino.
Procedure :-
Download the app called BlueControl (It’s free). Here is the linkOpen the app Blue control (It will automatically turn on the device’s Bluetooth). Go to options. Click on “Connect to Robot”. Choose the device – HC 05.
- Make the connections as shown in the above image. Don’t connect the RX & TX pins WHILE/BEFORE uploading the code !
- Copy the code given below.
- When you are connecting to the Bluetooth module for the first time, it will ask you the password. Enter 0000 OR 1234.
- When the device gets successfully paired with the sensor, the LED lights on sensor will start blinking at a slower rate than usual.
- DONE. Copy the code given below & test it out !
Code :-
Code for BLuetooth sensor HC-05:
void setup() {
Serial.begin(9600);
 pinMode(8, OUTPUT); // put your setup code here, to run once:
 }

void loop() {
  // put your main code here, to run repeatedly:
 if(Serial.available()>0)
   {
      char data= Serial.read(); // reading the data received from the bluetooth module
      switch(data)
      {
        case 'a': digitalWrite(8, HIGH);break; // when a is pressed on the app on your smart phone
        case 'd': digitalWrite(8, LOW);break; // when d is pressed on the app on your smart phone
        default : break;
      }
      Serial.println(data);
   }
   delay(50);
}
You may like it –
Control LEDs with Voice command (in 2 mins, just change code)
Here’s a video tutorial which will surely make your job easy… 🙂
You may like –
Make an Obstacle avoiding robot using Ultrasonic sensor (in 10 mins)
Comment below if you face any difficulties. I’ll solve them for you ASAP
Tutorialsandroid, Arduino, bluetooth module, code, connections, diy, how to, philips hue, program, sensor, smartphone, testing
EXPANDED TECHNICAL DETAILS
Bluetooth Low Energy (BLE) Interaction
This project focuses on the low-power pairing between modern smartphones and Arduino-controlled lighting.
- BLE Service/Characteristic Architecture: (If using HM-10 or Nano 33 BLE) The Arduino advertises a custom Lighting Service. The phone updates a specific "Characteristic" to send new RGB values.
- PWM Duty Cycle modulation: The Arduino converts the 0-255 brightness values received via Bluetooth into PWM signals, providing a smooth, dimmable ambient light experience.
App Integration
- Custom UI: Demonstrates how to use apps like Blynk or LightBlue to create a personalized remote control for your room's LED environment.