Please watch the video for a short introduction and some expressions :
[dropbox link to video : https://www.dropbox.com/s/6d0p0y16j1kb6az/20180220_CARDUINO_System.mp4?dl=0 ]
The Professional Maker: Industrial-Grade Automation
Most smart home projects stay on breadboards, but Chris' Arduino Smart Home Solution is designed for permanent installation in an electrical distribution panel. This modular system provides a robust alternative to expensive proprietary standards like KNX or Loxone. By utilizing custom DIN-rail mounted PCBs and the Arduino Ethernet, it bridges the gap between DIY tinkerers and electrical engineering professionals.
This project shows a home automation solution based on an Arduino Ethernet (A000068) and openHAB2. The goal was to develop a solution ready for implementation in my own house, focusing on hardware scalability and professional-grade installation standards.
Following skills were identified for a "standard" room
Switch:
- lightning ( Relays )
- one switch to control the servomotor of the underfloor heating (Relays)
- two Relays per window to control the electric shutter ( max 2 windows per room).
Button :
- control light
- control shutter
- tbd, for example control sockets
Sensors:
- Temperature (DHT 22)
- Humidity (DHT 22)
- Brightness
- Motion Detection (especially in corridors, HC-SR501)
- window status ( open, closed, tilted)
- optionally a IR receiver
After some investigations on the net the following hardware solution is implemented :
- one main board (working with Arduino (Arduino Ethernet without PoE, Code: A000068)) to handle the sensor and button data and to switch the Relays ( placed in the electrical distribution panel packed in one 6 sub-units case.
- one sensor board locally deployed to each room connected by Ethernet cable
- one 6 times push button per room connected by Ethernet cable
- 8 Relays per room
After some more investigations for software and some prototyping the openHAB2 environment in combination with the MQTT protocol were identified as the network infrastructure for easy controlling and publishing data (even with a modern look and feel for mobile devices).
System Architecture: Decentralized Power
The solution follows a highly scalable "Motherboard-Daughterboard" architecture:
- The Mainboard Hub: Each room is managed by a dedicated Arduino Ethernet mounted on a custom motherboard. This board handles 8 high-power industrial relays (for lights and heating) and features two MCP23017 I/O expanders to interface with sensors and buttons.
- The Sensor Nodes: Connected via standard RJ45 Ethernet cables, each room has a decentralized sensor board. These nodes monitor Temperature and Humidity (DHT22), Brightness, and Motion (PIR), sending data back to the central hub without the interference typical of long analog wires.
- The Piggyback Extension: If a room requires more control (e.g., dual electric shutters and multiple light zones), a Piggyback board can be added to the stack, providing another 8 relay outputs and 6 additional button inputs.
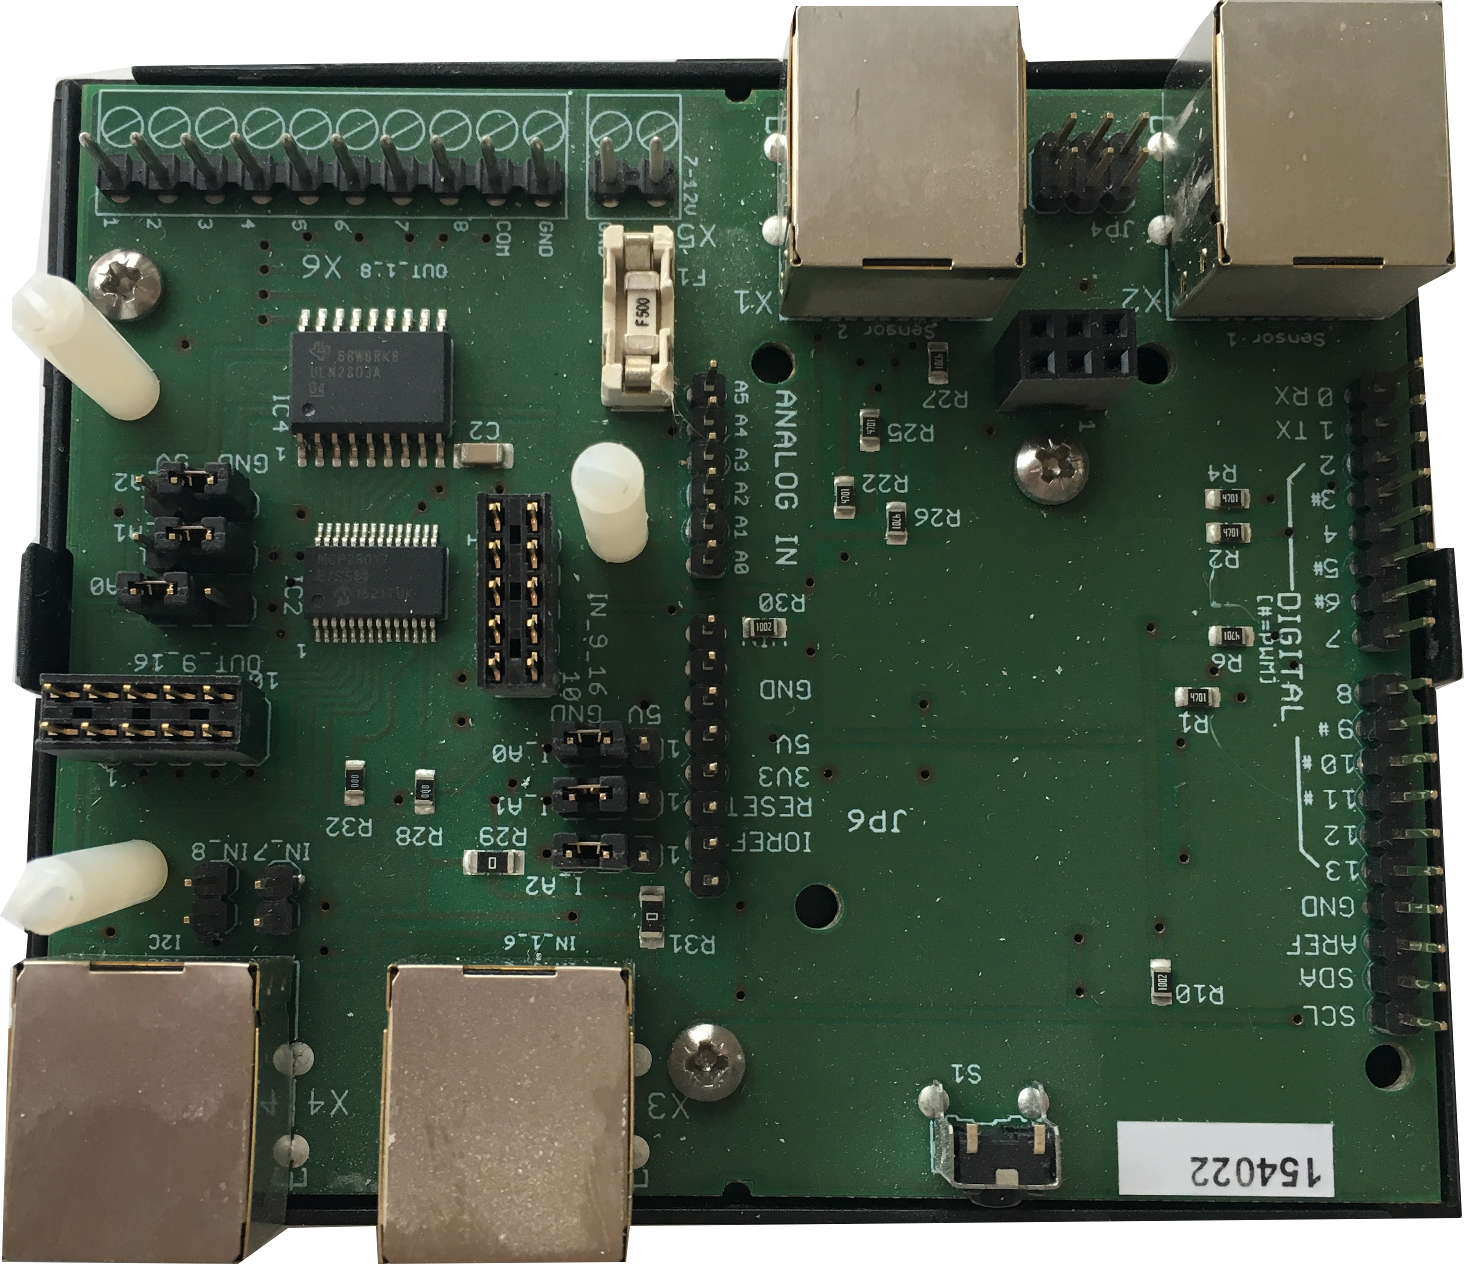
The Mainboard :
- professional look an feel to ensure operation license for my electronic distribution panel
- trimmed on space
- easy to replace in case of an error
- good placement of reset button and programming port
- power input (7-12V) with additional fuse
- extensible and scalable
- trimmed on price by using some standard devices ( ca. 40 € @ German board producers - completely assembled ! )
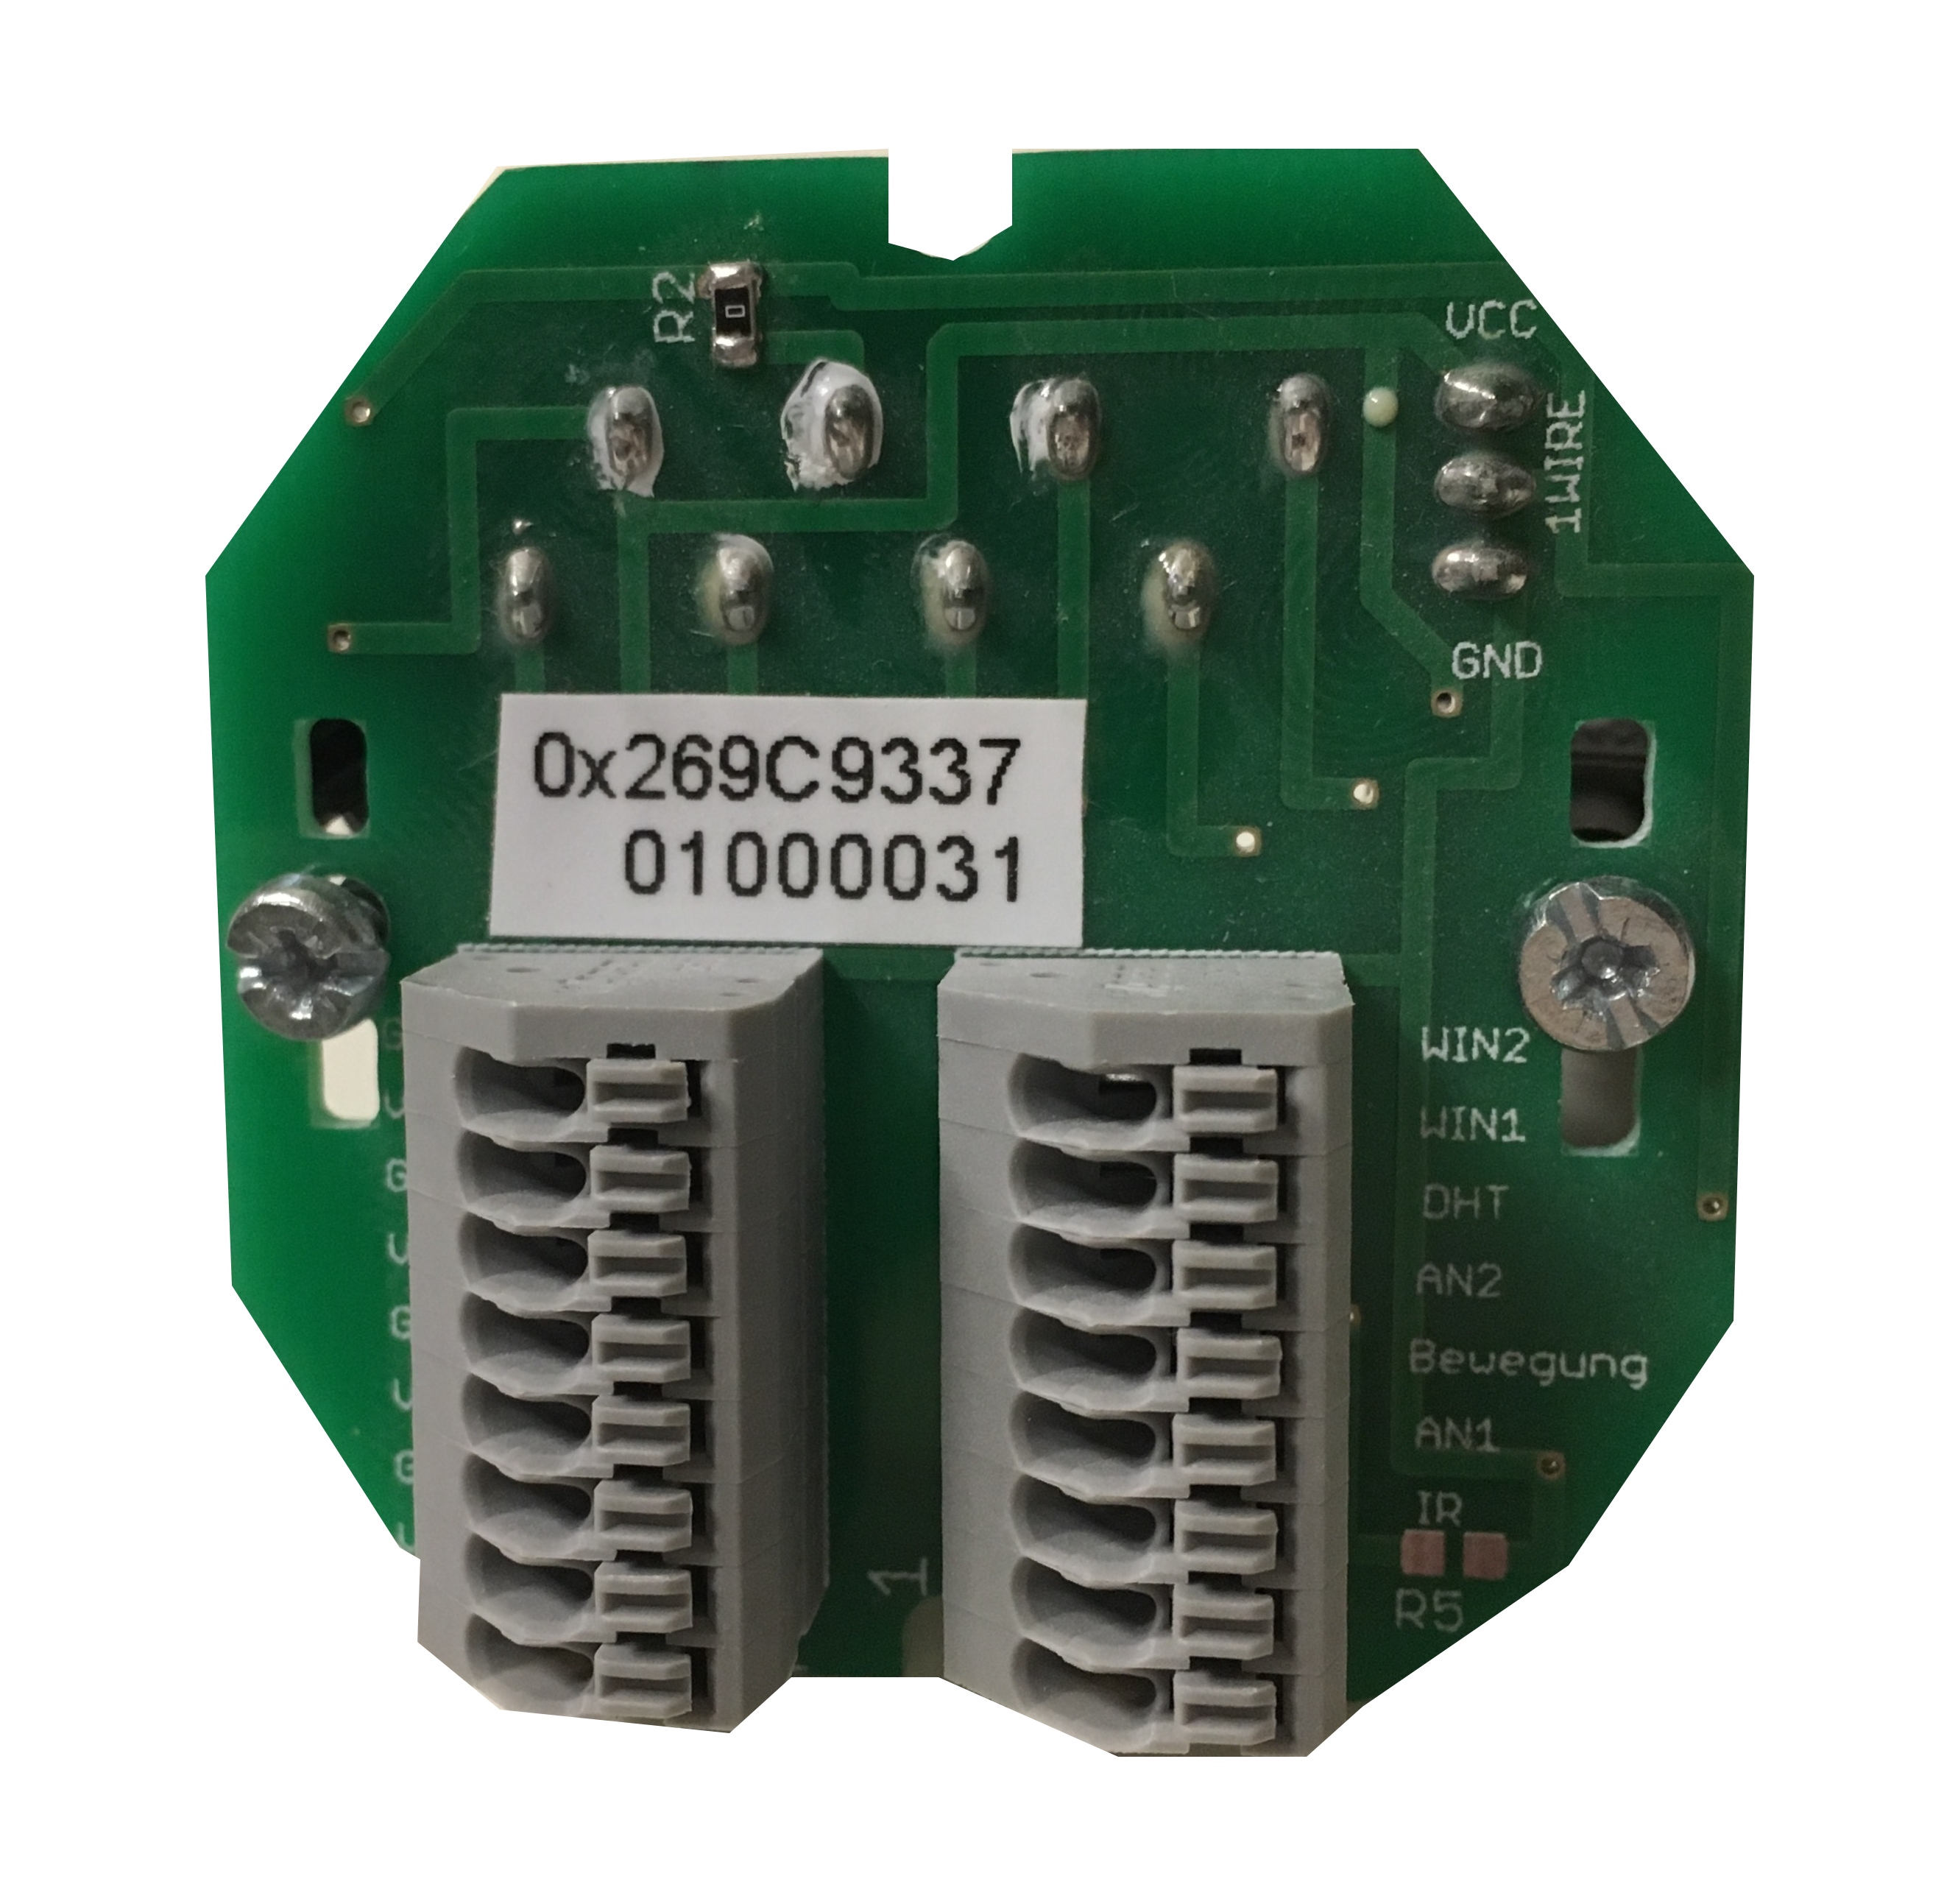
The Sensor Board :
- flush mounted
- DHT 22 ( to control underfloor heating)
- 1 wire device DS2438 as temperature monitor and supporting two ADC.
- 1 wire connector to add other devices (for example DS18B20 temperature sensor)
- brightness sensor ( connected to ADC of battery monitor DS2438)
- two TTL Inputs ( Window status : open, closed, tilted)
- one TTL input for a motion detector
- IR Receiver
- easy to build (for example home made soldering possible )
other used devices :
- raspberry pi running openhabian
- sps push buttons ( jung, gira)
- industry relays ( wago 788-30??, 24 V)
- power supplies
The connection between all Arduino Boards and Alexa is done by the openHAB cloud connector and the Alexa openHAB skill.
Now I would like to give you some hardware details.
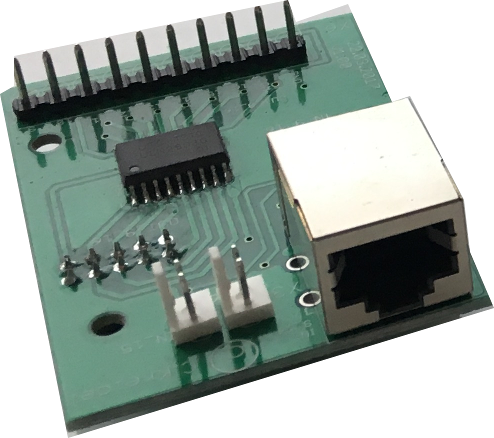
The main components and interfaces of the mainboard are shown in the next figure. The Arduino is put on the mainboard. The mainboard itself supports :
- two I2C 16 I/O port expanders, one used for 8 relays (in combination wit a ULN) and a pin header to the piggy back board. The other one is used for 6 inputs, two i/o ports connected to and a pin header to the piggy back board. The interface for the six inputs, Vcc and GND is a RJ 45 jack. Two additional ports are connected to pinheader directly on the mainboard. The relays are connected by an pluggable screw terminal.
- input power 7-12 V by a pluggable screw terminal ( secured by a smd fuse
- two RJ45 jacks for two sensor boards
- I2C output on RJ45 jack
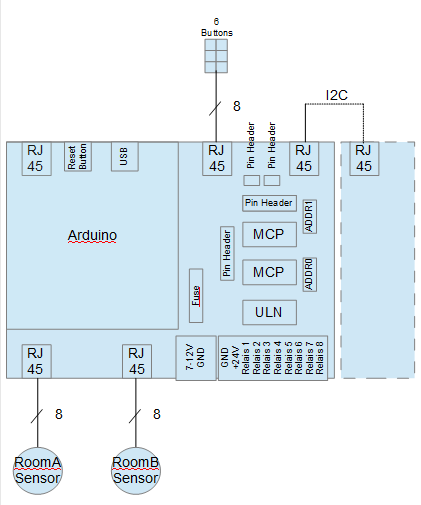
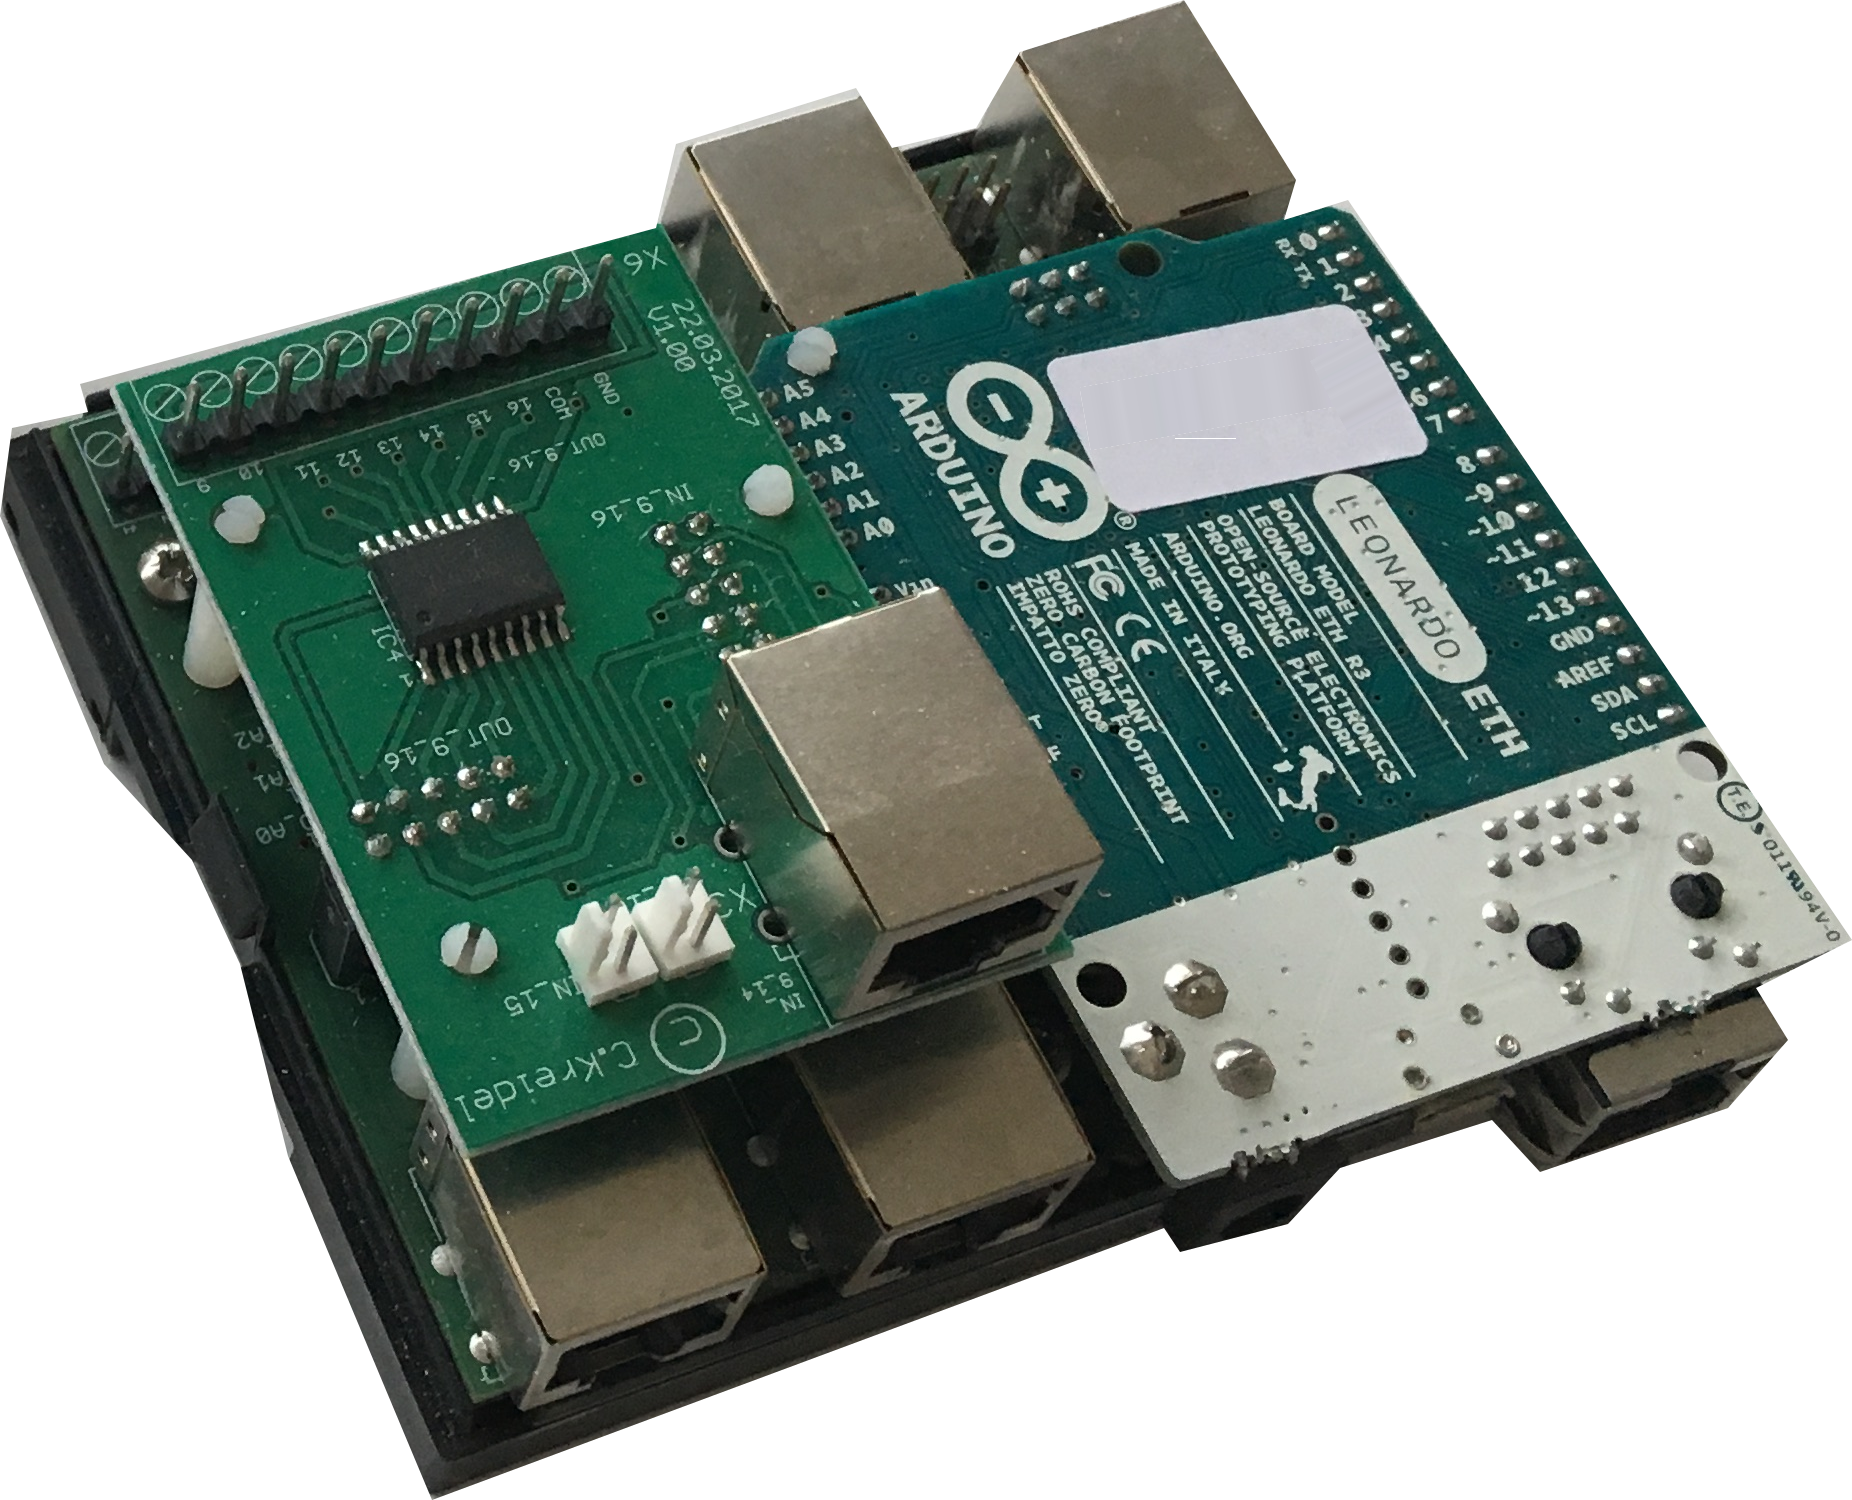
The mainboard can be extended by an extension board piggy backed. The piggy back board adds 8 relays outputs and a rj45 jack for another 6 inputs connected to a 6 times sps button in a room. The other two I/O pins of one i/o port expander are locally connected to a pin header for example to be used as a status output led or a button to send a test message to the MQTT server.
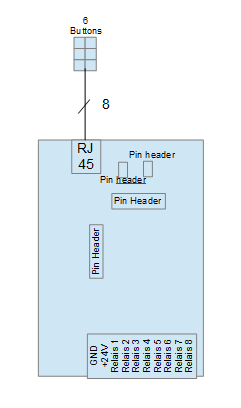
By the way you can develop your own extension board version e.g supporting 16 Relays or two RJ 45 jacks for two push button sensors.
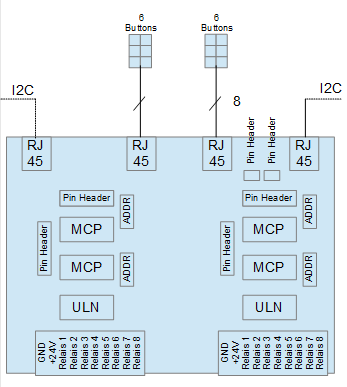
If the extension board offers not enough push button inputs or relays outputs it would be possible to connect another mainboard by I2C working without Arduino . That board version is not developed by me yet. You will find a suggestion below also a piggy back board for that extension could be developed to your special needs.
Here some expressions of the real hardware.
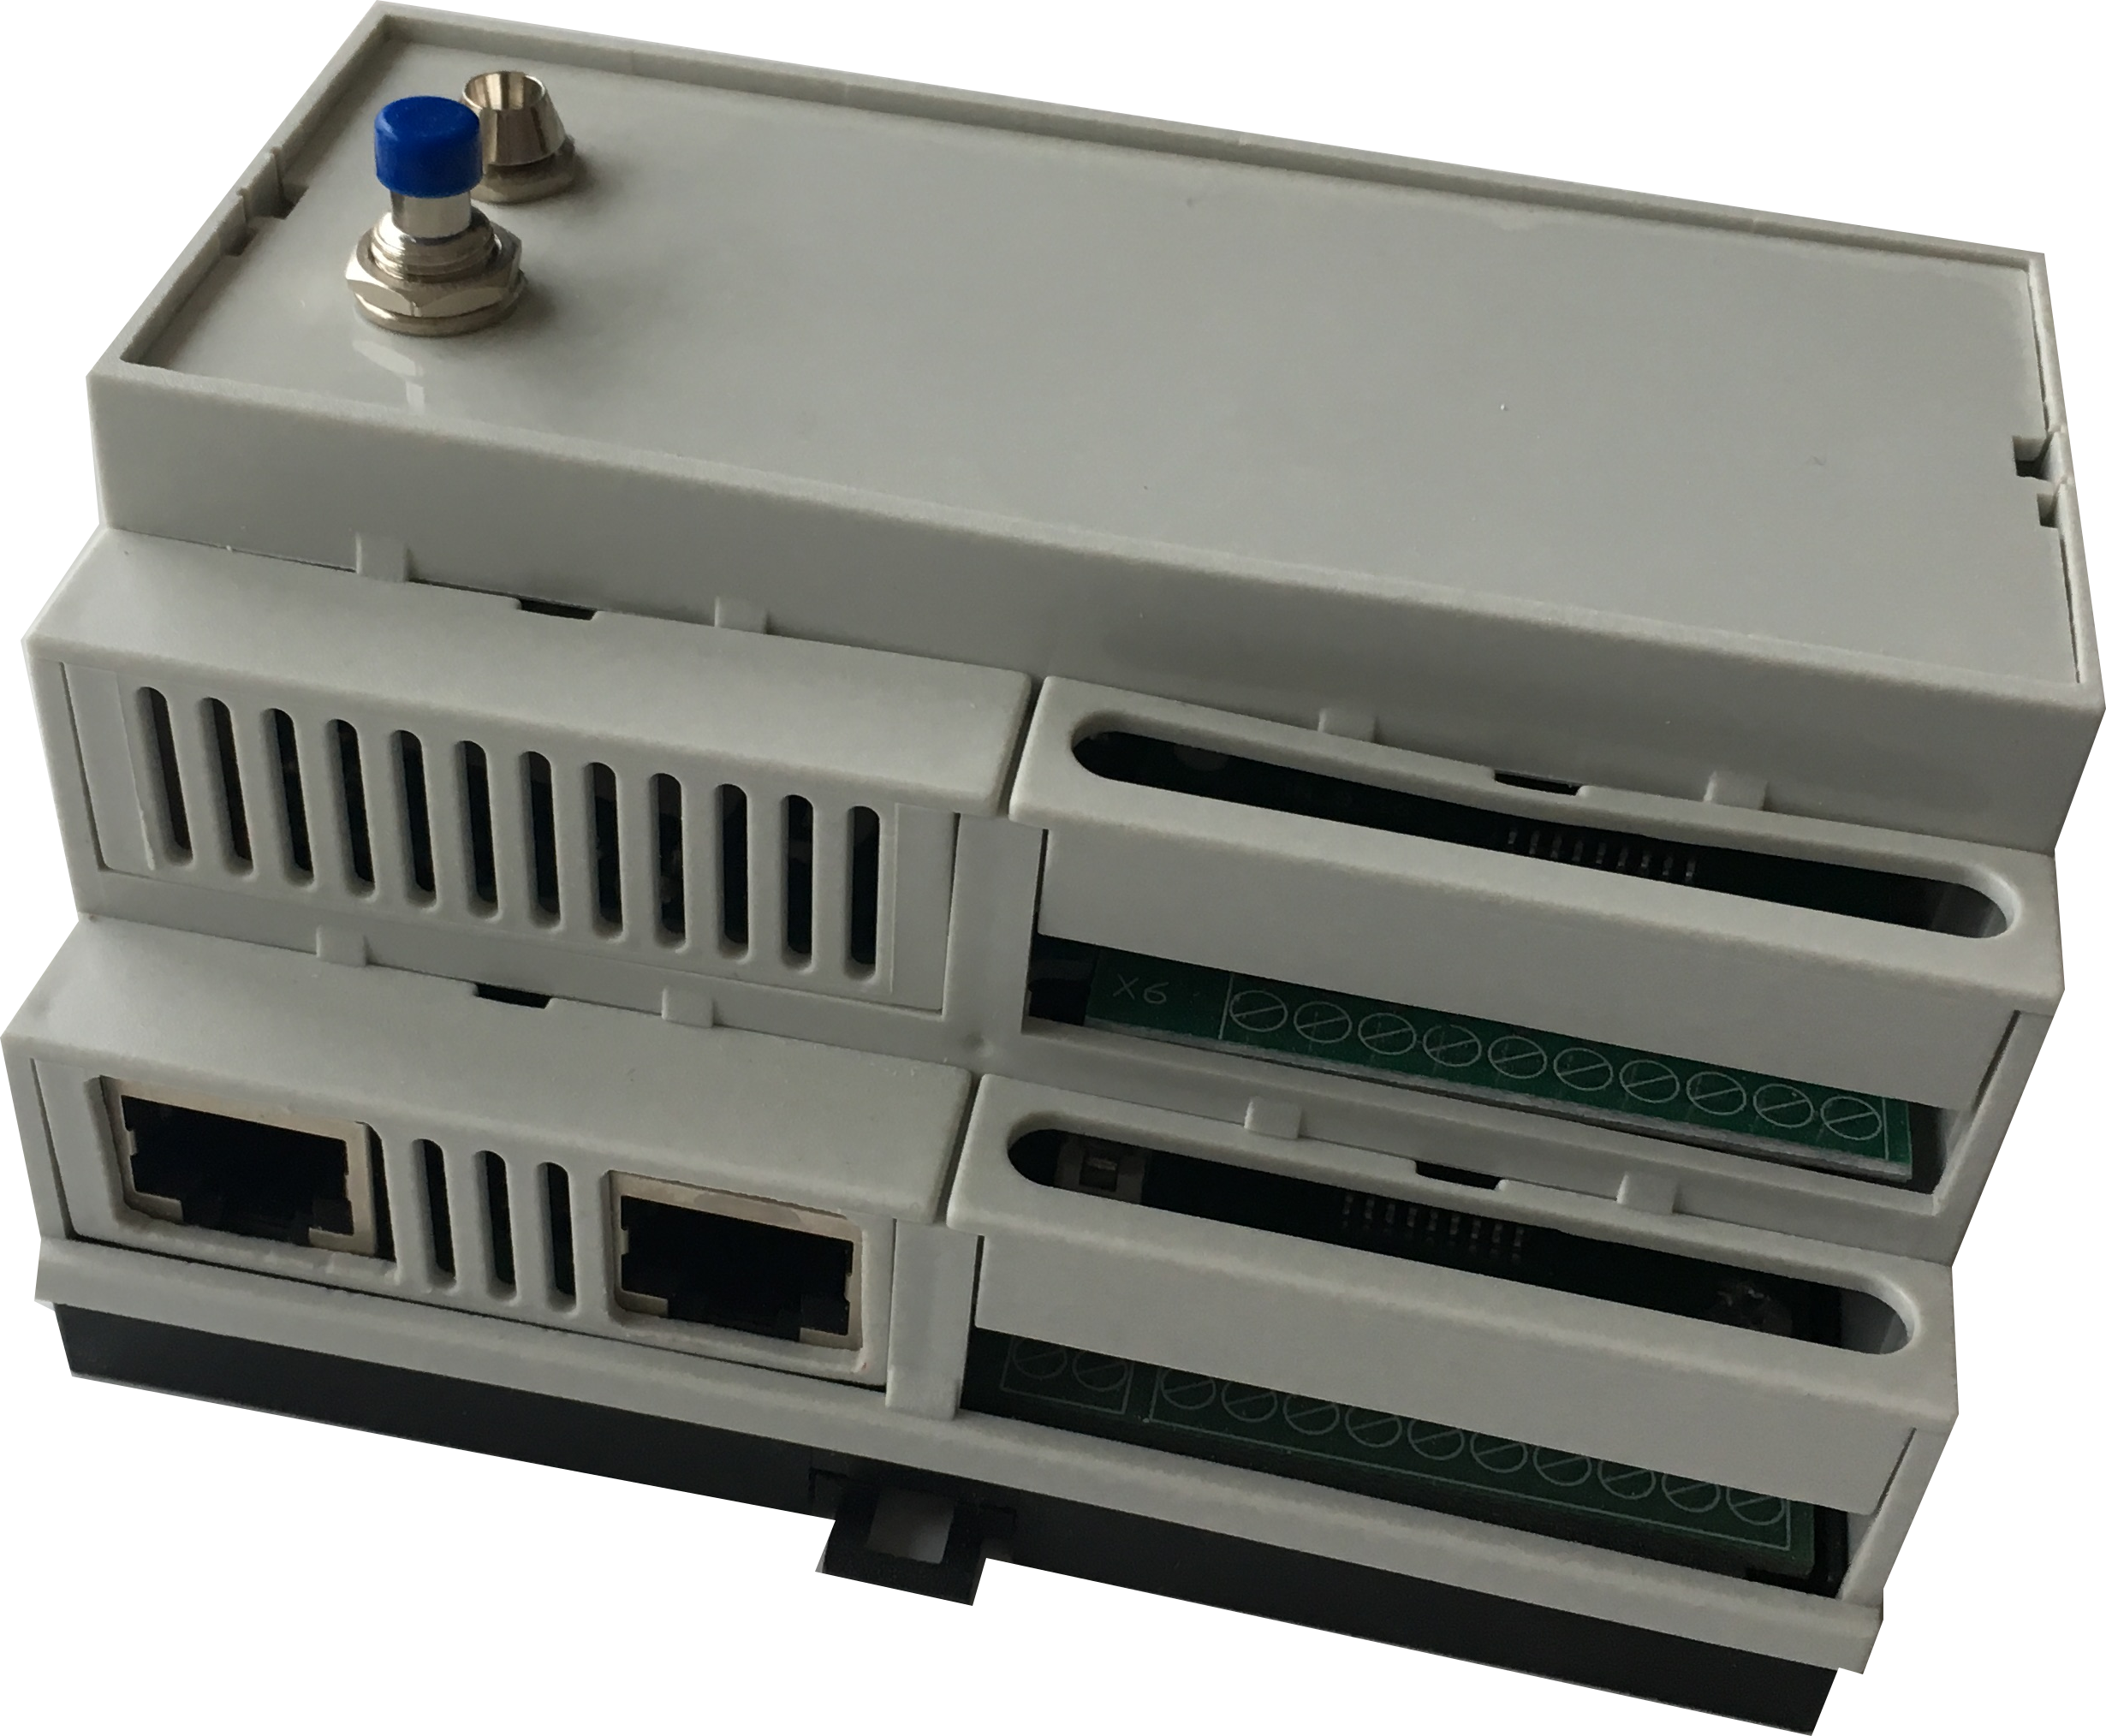
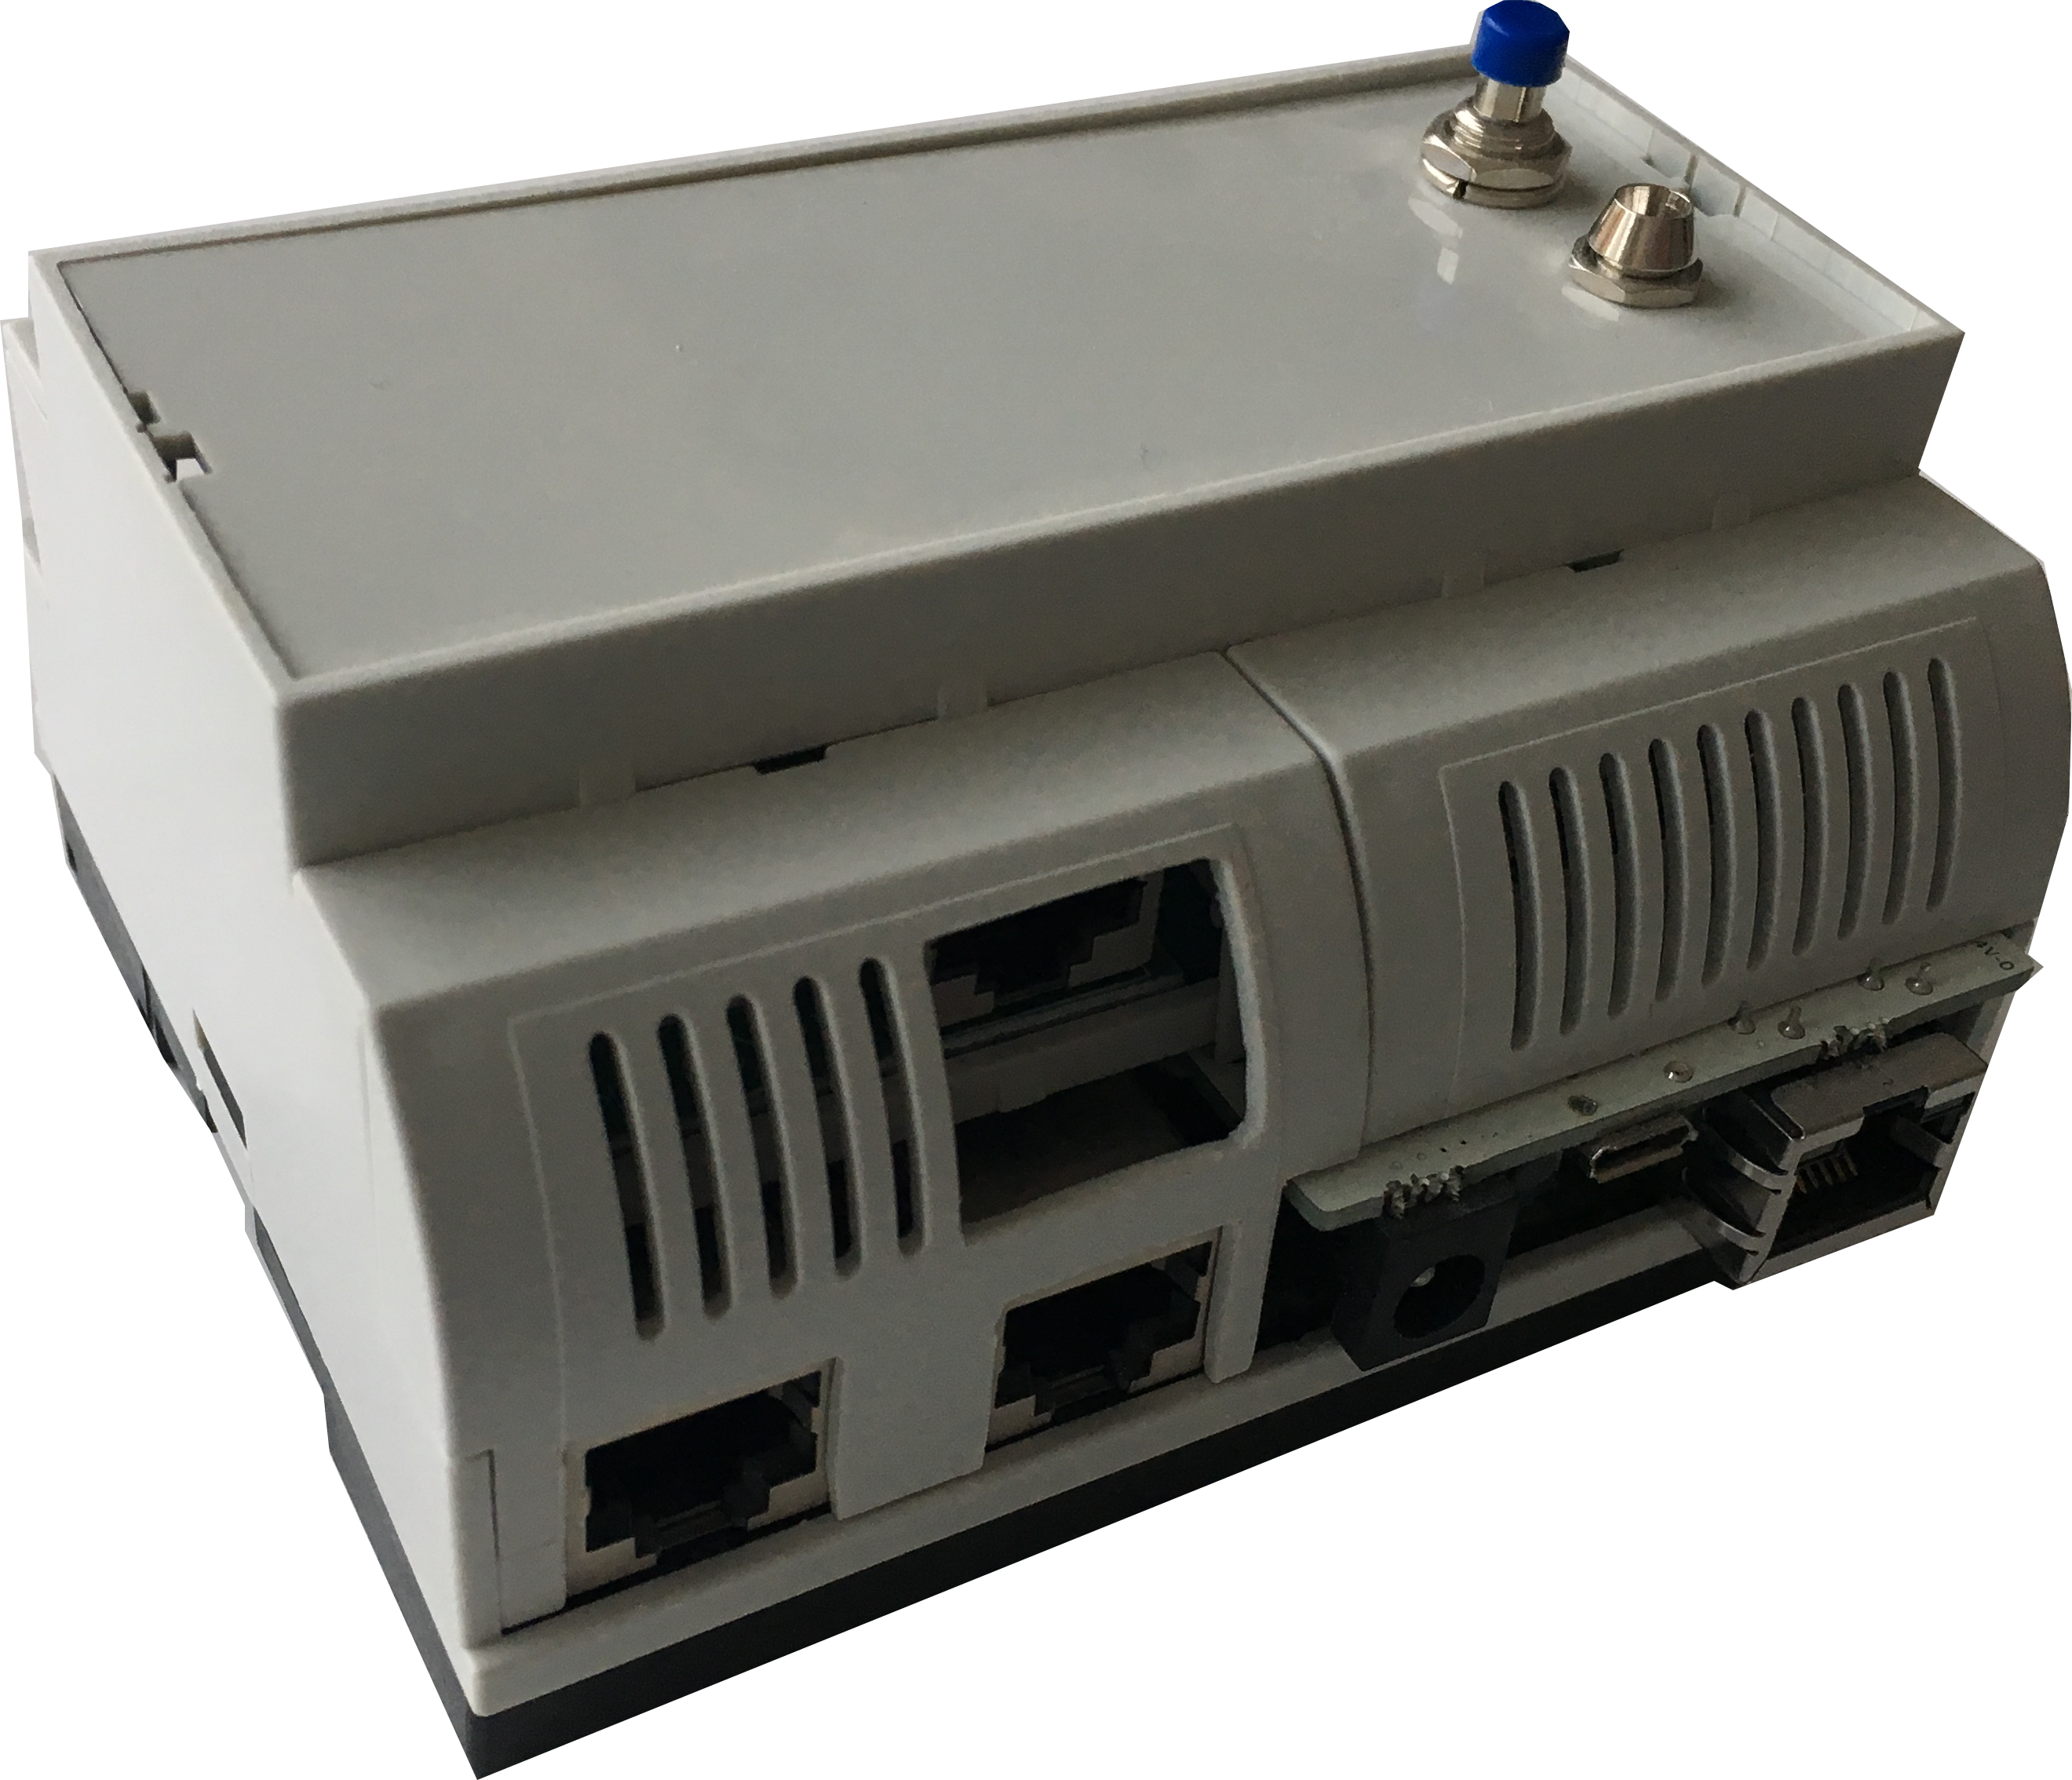


Two standard LAN cables are laid from the mainbaord (in the distribution panel) to a room to connect a (6 times) push button and a sensor board. So all in all a mainbaord with an extension board can support two standard rooms using two 6 times push buttons, two sensor boards and up to 16 relays to control light, shutter and so on.
The Software Heart: MQTT + OpenHAB 2
The "intelligence" of the house lives in a Raspberry Pi running OpenHAB 2 (Openhabian):
- MQTT Protocol: The Arduinos act as MQTT Clients, publishing sensor data to the Mosquitto Broker and subscribing to command topics for relay triggers. This ensures extremely low latency—when you press a button, the light turns on instantly.
- Voice Integration: Through the OpenHAB Cloud Connector, the entire system is synced with Amazon Alexa. You can ask your house to change lighting "scenes," adjust underfloor heating, or check the humidity level of the guest room via voice commands.
- UI/UX: The system features a modern web dashboard and mobile app interface, allowing for manual overrides and scheduling from anywhere in the world.
Now let's have a look to the software. Openhabian running on a Raspberry Pi is the heart of the software infrastructure. The main software components are:
- openHAB 2
- Mosquitto Server ( MQTT Server, already included in openhabian installation)
- openhab cloud connector ( add-ons->, misc )
- MQTT actions ( add-ons-> actions )
- MQTT binding ( add-ons-> bindings )
- item file (your personal items file , you can find some examples here)
TUTORIAL :
Install Openhabian and configure openHAB
Raspberry Pi ( + Accessories)
- Install Openhbian (https://docs.openhab.org/installation/openhabian.html)
- Download SD Card Image
- Use for example Etcher to Flash the image to a SD Card
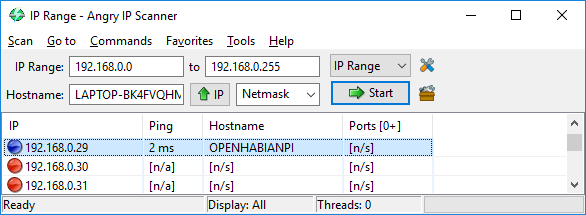
- plug in SD card to Raspberry Pi and connect your Raspberry Pi by LAN ( to a Router where a DHCP Server is running)
- Wait (this could take a while) and check your DHCP Client List until the Raspberry Pi receives an IP Address ( or use a IP Scanner like Angry IP Scanner to detect your raspberry.)
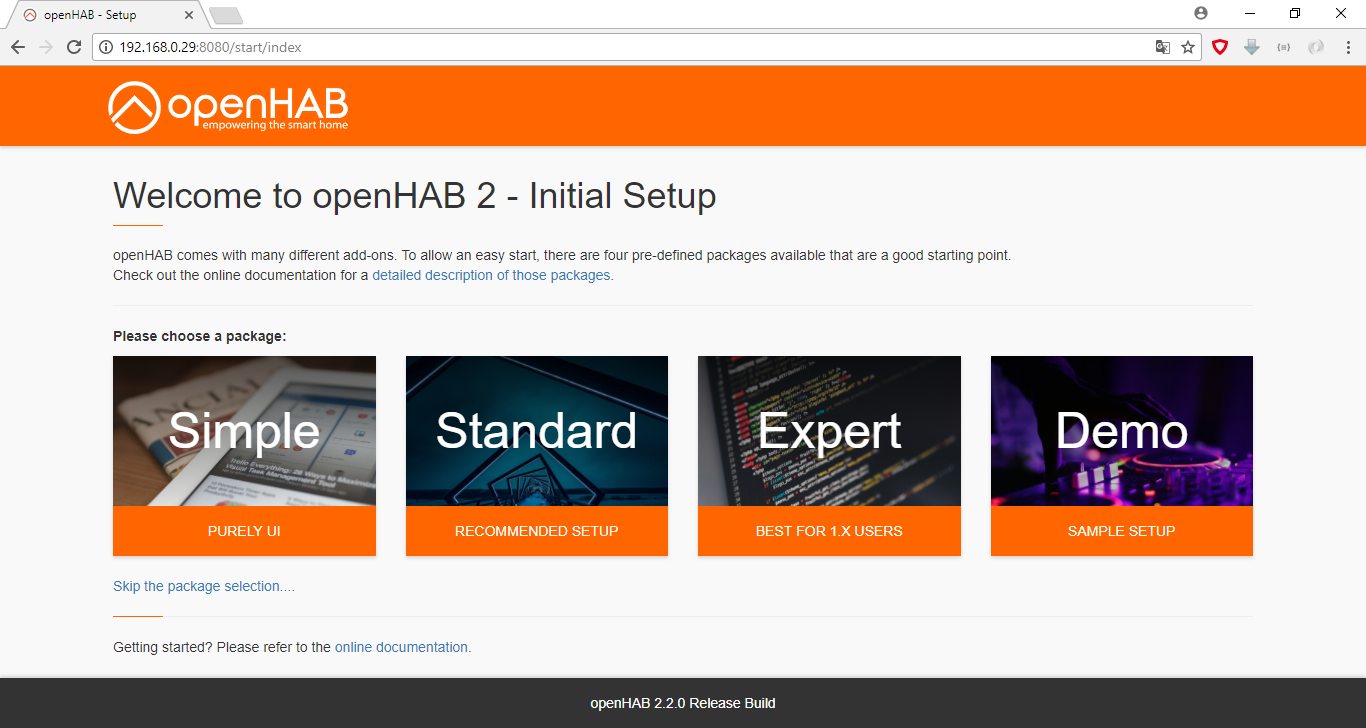
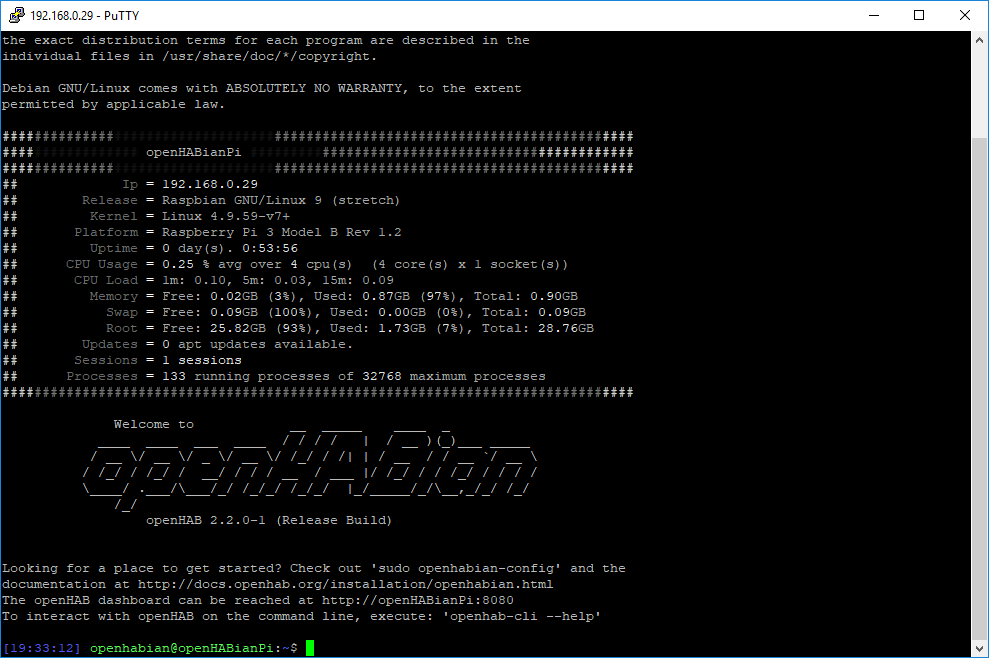
If the raspberry pi is available as openhabian then start you browser and type : ( the default port is 8080 to reach following page)
I used the Standard installation :
Then you can chose openhab log viewer to follow the installation status.
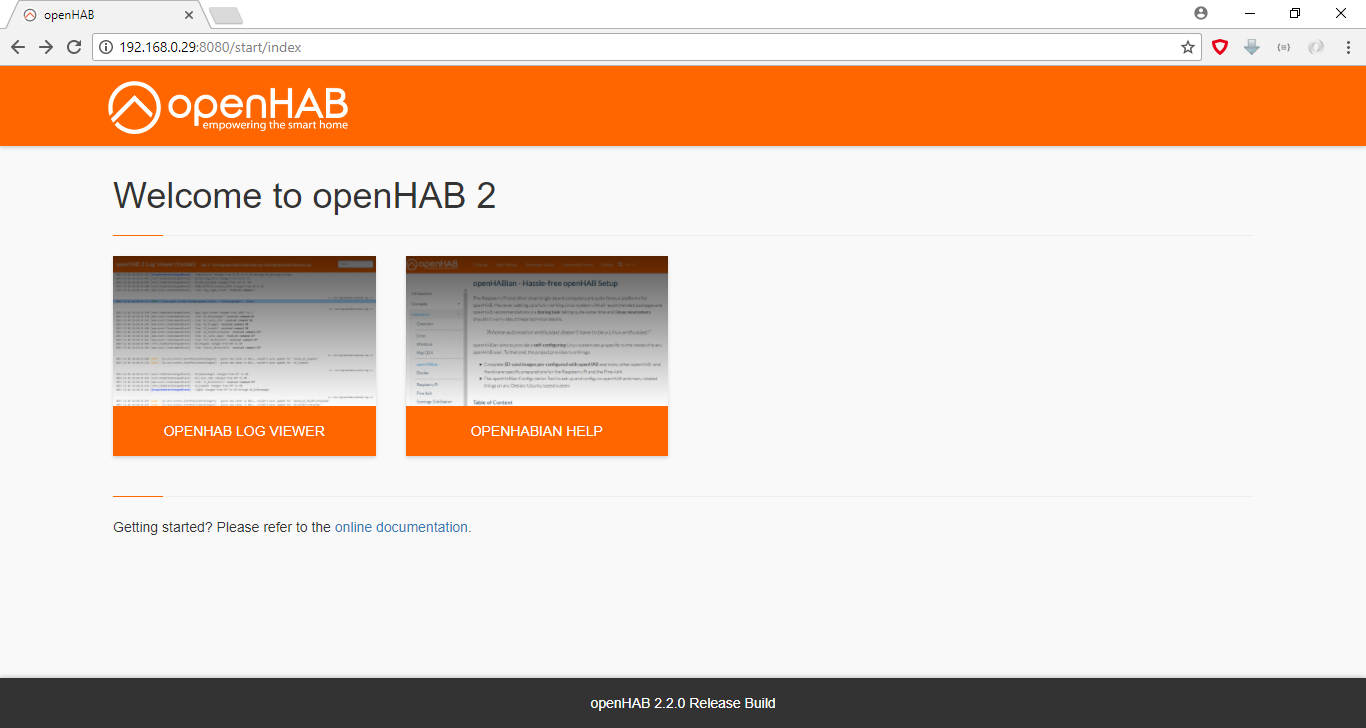
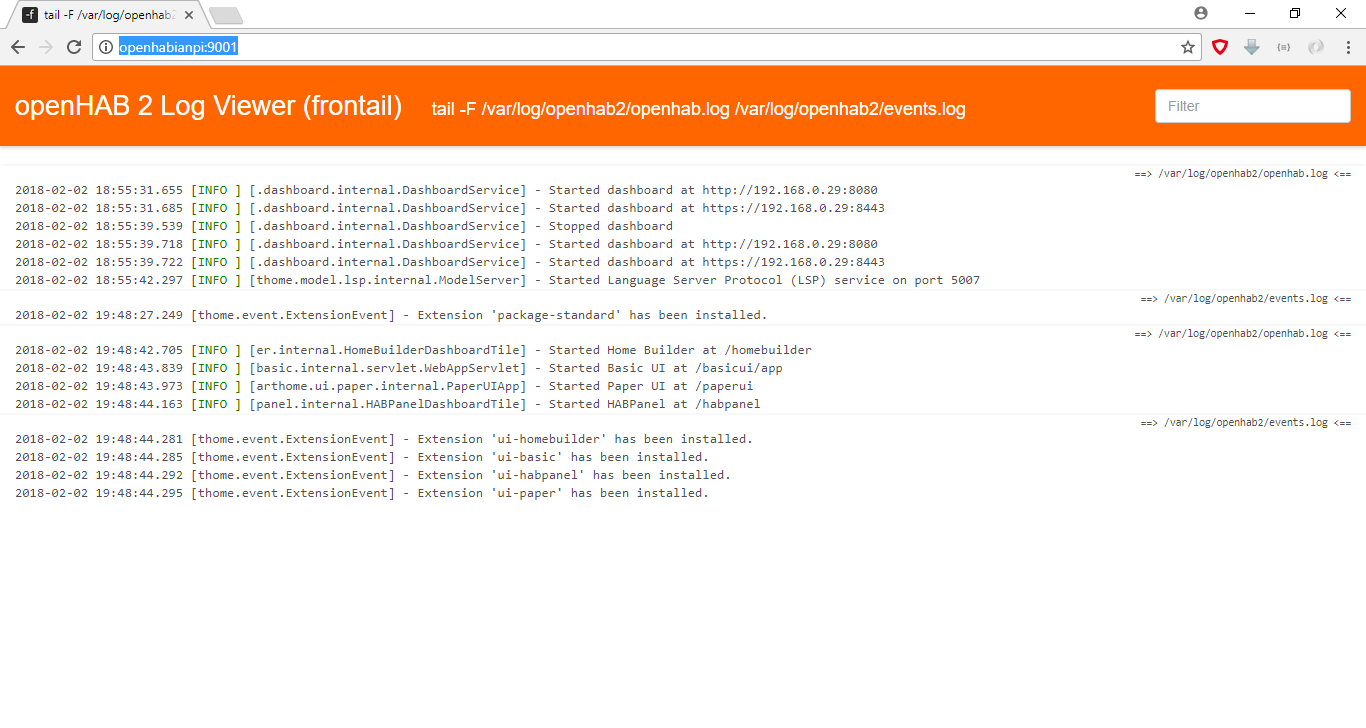
See above the output of the openhab log viewer ( you can see the port of the log viewer is 9001)
If you run "IpOfYourRaspberryPi:8080" again you see the following :
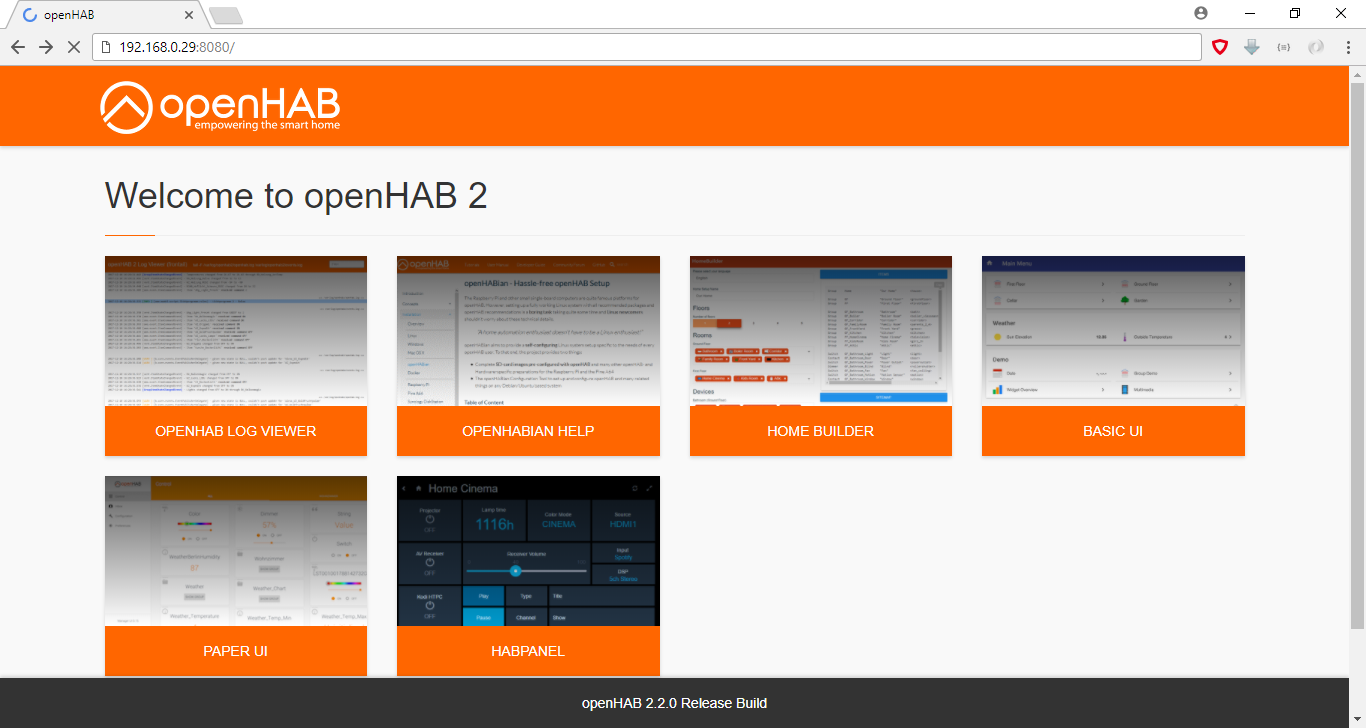
Chose the Paper IU Dialog
In the following page select add-ons and misc and search for cloud
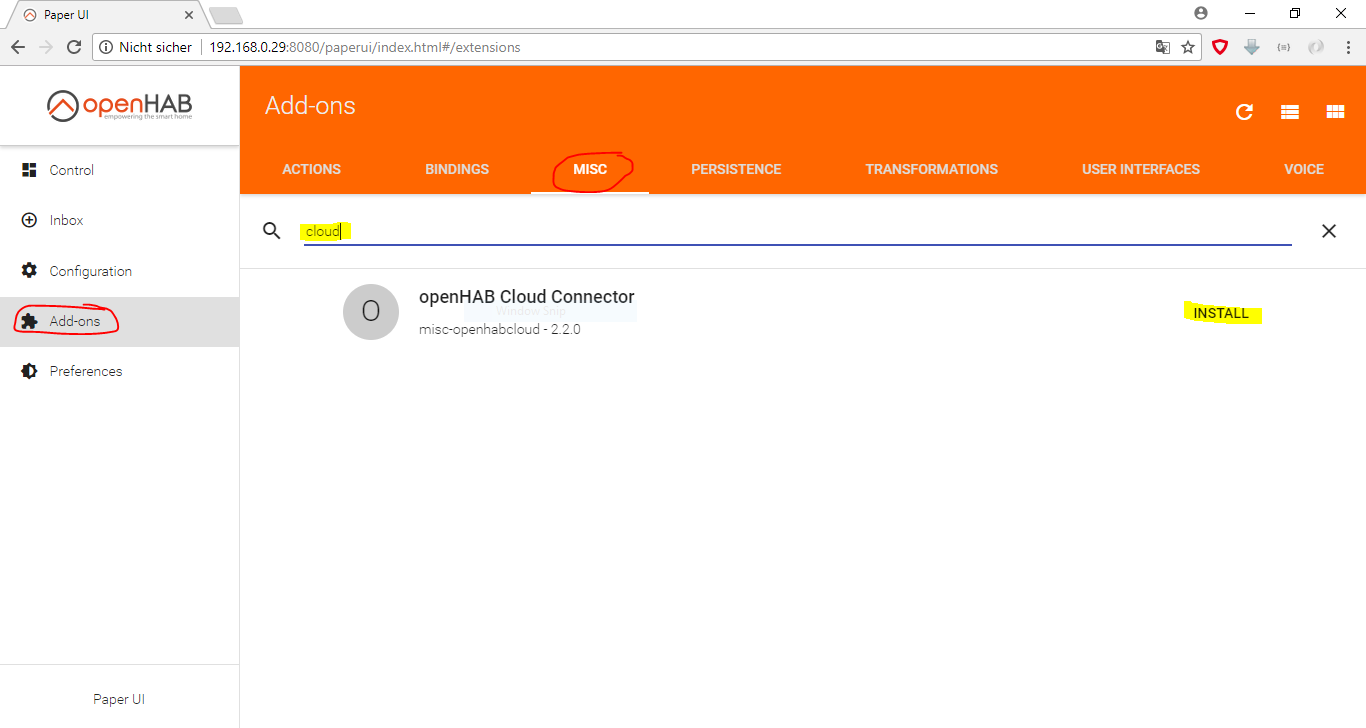
install the openHAB cloud add-on
For MQTT communication install the following add-ons the same way as above -Add-Ons -> Bindings -> MQTT Binding -Add-Ons -> Actions -> MQTT Action
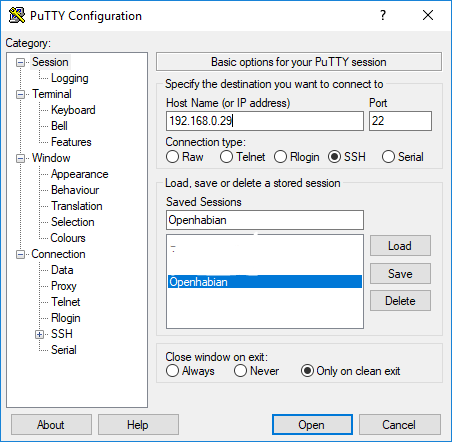
**Openhabian and Putty **
confirm the following dialog with yes - after the connection is established use „openhabian“ as username and „openhabian“ as password then you see the following start screen
use : „sudo openhabian-config“ and confirm with the standard password „openhabian“
you see the following screen
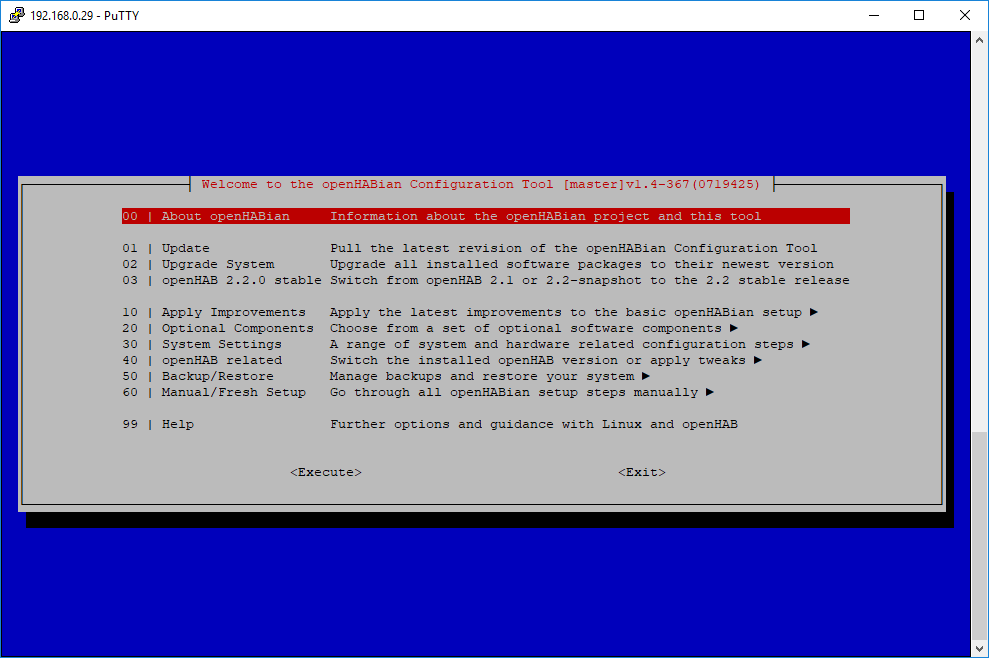
chose optional components :
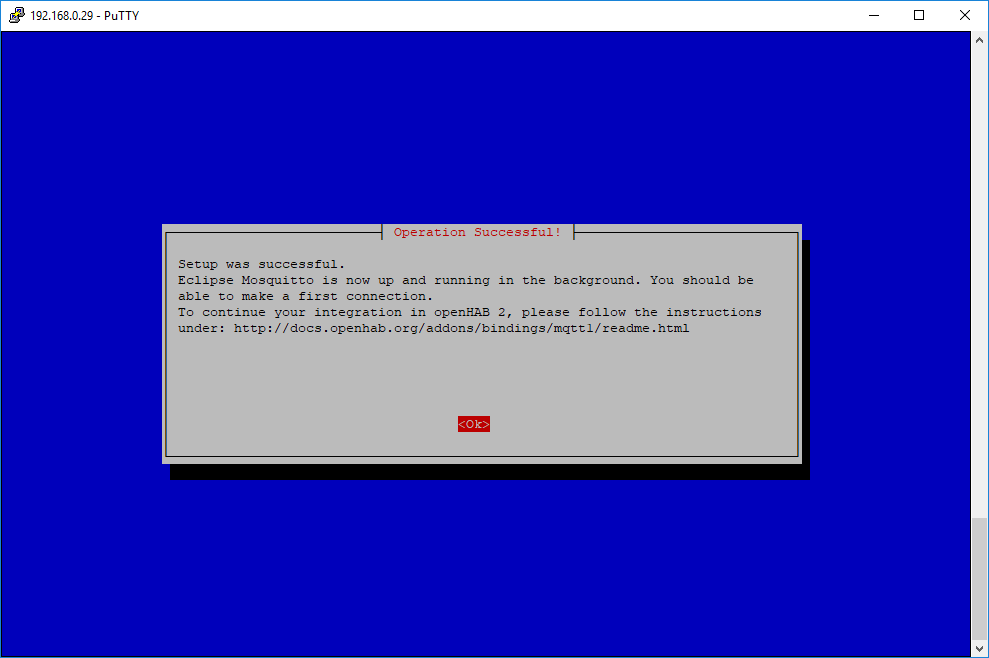
chose mosquitto and „continue“ on the next screen
you will be asked for a password ( the login username of the mosquitto server is openhabian)
after choosing a password the installation will be finished automatically.
(Note: use System Settings to change the standard passwords )
I think it is useful to have a static ip address of the openhabian system. Follow the steps to change it to static (this procedure is working for Raspberry Pi 3 )
run "sudo nano /etc/dhcpcd.conf" on putty console
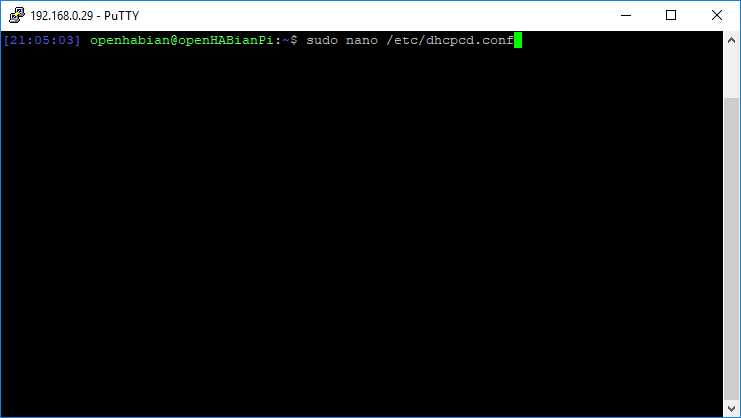
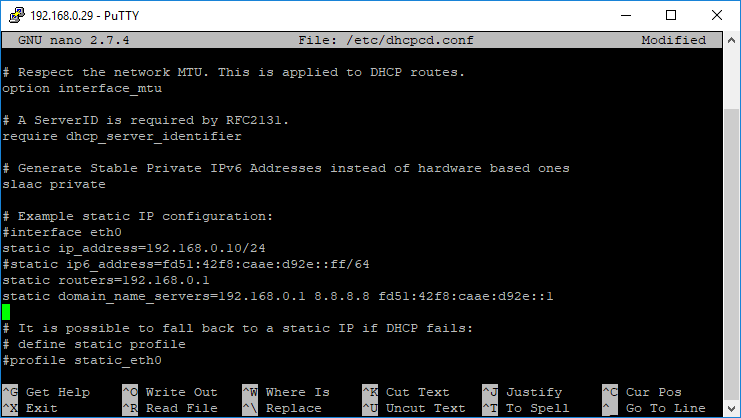
delete the comment sign from the lines and add your specified ip addresses static ip_address=XXXXXXXXXX static_ routers = XXXXXXXXXX static domain_name_server=XXXXXXXXXXXXXXXXX and restart the network service with the command sudo /etc/init.d/networking restart
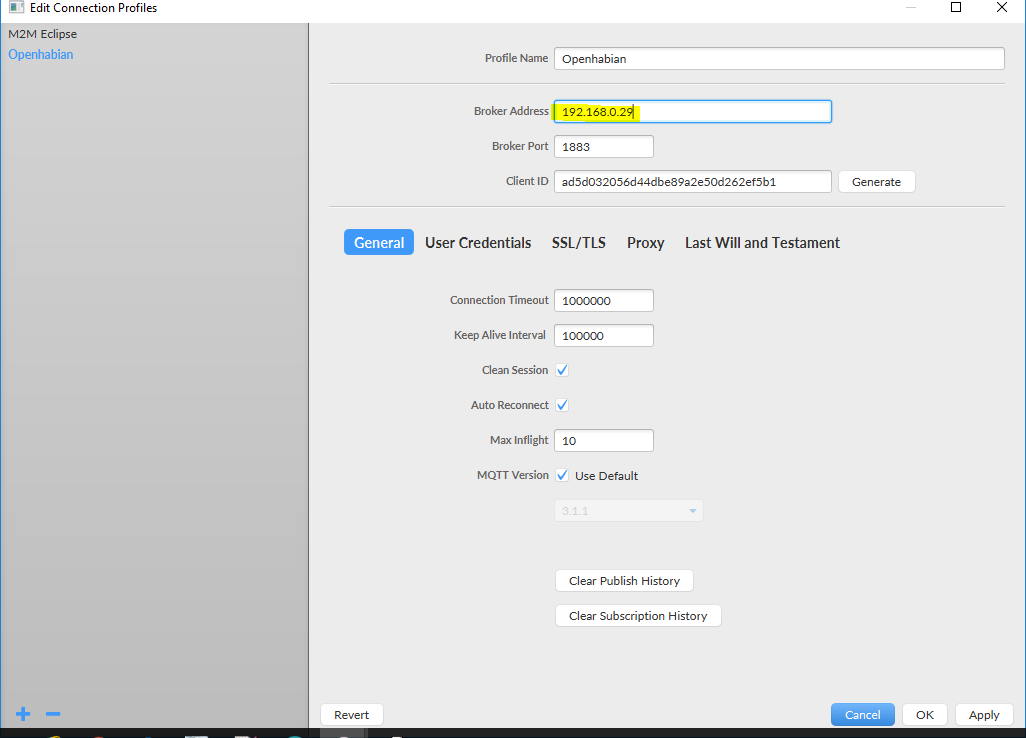
You can use a MQTT client like mqttfx to test the mosquitto server .
mgttfx configuration to connect to openhabian mosquitto server :
Configure MQTT binding on OH2: /etc/openhab2/services/mqtt.cfg
mqtt:broker.url=tcp://localhost:1883
mqtt:broker.clientId=openhab
mqtt:broker.retain=true
mqtt:broker.async=false
Restart OH2 sudo /etc/init.d/openhab2 restart
Now we are ready to generate the items definiton.
Keep in mind that your raspberry pi is reachable as a network drive. Open windows Explorer . Click Right mouse button on network and chose map network drive and input the following \\IPAddressOfYourRaspberryPi\openhab-conf and select „log in with different credentials“
ข้อมูล Frontmatter ดั้งเดิม
apps:
  - "1x OpenHAB 2 Smart Home Platform"
  - "1x Mosquitto MQTT Broker"
  - "1x Amazon Alexa"
author: "SaschaK"
category: "Home Automation"
components:
  - "1x piggyback for mainboard"
  - "1x DIN Rail B6504121"
  - "1x Arduino Ethernet Rev. 3"
  - "1x Raspberry Pi 3 Model B"
  - "1x Housing for Sensor board GH02KS030/010 Größe 1"
  - "1x sensor board"
  - "1x RGB Shield for Arduino"
  - "1x Soldering iron (generic)"
  - "1x DHT22 Temperature Sensor"
  - "1x Echo Dot"
  - "1x JUNG LS5236TSM  - Pushbutton sensor  ( alternative to gira)"
  - "1x PIR Motion Sensor (generic)"
  - "1x Mainboard"
  - "1x drilling machine"
  - "1x saw"
  - "1x 24 V Relais ( e.g. WAGO 788-304)"
  - "1x Arduino Ethernet Rev. 3"
  - "1x Pushbutton sensor 2, 3-gang 24 V zero-voltage with inscription space"
description: "A Modular Smart Home Solution as an alternative to KNX and Loxone! close to series-production readiness and already working in my own house"
difficulty: "Intermediate"
documentationLinks: []
downloadableFiles:
  - "https://projects.arduinocontent.cc/ecd07b07-dd59-4389-bc45-198316b95557.json"
  - "https://projects.arduinocontent.cc/28c53a2f-cca9-4f4a-83bc-4b9092b4f325.rules"
  - "https://projects.arduinocontent.cc/ecd07b07-dd59-4389-bc45-198316b95557.json"
  - "https://projects.arduinocontent.cc/f41527e0-5020-4c0c-8858-2ed296649435.items"
  - "https://projects.arduinocontent.cc/584b93b0-833f-4c0b-86ee-82ea34ec673a.rules"
  - "https://projects.arduinocontent.cc/584b93b0-833f-4c0b-86ee-82ea34ec673a.rules"
  - "https://projects.arduinocontent.cc/f41527e0-5020-4c0c-8858-2ed296649435.items"
  - "https://projects.arduinocontent.cc/28c53a2f-cca9-4f4a-83bc-4b9092b4f325.rules"
encryptedPayload: "U2FsdGVkX19R3PqBN6DeM6OXAGW+wot2xRuByc3/vXe4jgOTqPZWmwh6vr0zVQCrGgIIFDtG6sUYTaRM4lnp5Eedg0xBVhsaehY95oRT7mkapzxlZzH9874ddA/eA4wiZleTKv5S9y6Xy77jElv3PQ=="
heroImage: "https://cdn.jsdelivr.net/gh/bigboxthailand/arduino-assets@main/images/projects/chris-arduino-smart-home-solution-working-in-my-own-house-f24a1e_cover.gif"
lang: "en"
likes: 1
passwordHash: "456071000b77a26cb2acdce74b3e3f84d0a23c3710ef0d386691393042856ca3"
price: 2450
seoDescription: "Industrial-grade Smart Home Solution with Arduino Ethernet. Learn to build a scalable MQTT-based system for lighting, shutter control, and climate management using OpenHAB 2."
tags:
  - "smart-home"
  - "openhab"
  - "mqtt"
  - "industrial-automation"
  - "ethernet"
title: "Chris' Arduino Smart Home Solution working in my own house"
tools:
  - "1x EAGLE PCB Designer"
  - "1x Soldering Station"
videoLinks:
  - "https://www.youtube.com/embed/9Nh8-3gT5PU"
views: 944