In this tutorial you will learn how to set up a weather station based on ESP32, and how to monitor its readings remotely, via the Blynk app as well as via a website. This station can not only measure environmental data in real-time but also send the information to the cloud, allowing you to monitor it from anywhere in the world.
Supplies:
The core of this project is the integration of a microcontroller with built-in Wi-Fi and high-performance sensors.
- ESP32 Development Board: A 32-bit microcontroller board with built-in Wi-Fi and Bluetooth, ideal for IoT applications.
- DHT11 Sensor: A sensor for measuring ambient temperature and relative humidity.
- Light Sensor (LDR): A photoresistor used for measuring light intensity.
- Resistor 10k Ohm: For creating a Voltage Divider circuit in conjunction with the LDR.
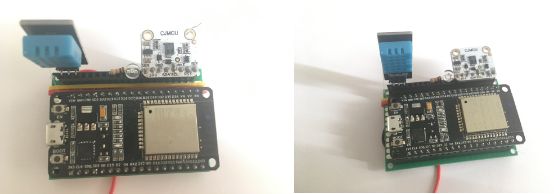
- CJMCU CCS811 Sensor: An advanced air quality sensor (Digital Gas Sensor) for detecting carbon dioxide equivalent (eCO2) and total volatile organic compounds (TVOC).
- Jumper Wires: For circuit connections.
- Breadboard or PCB: For prototyping circuits or soldering for permanent assembly.
- USB Cable: For power supply and program uploading.
Step 1: Setting Up the Weather Station
Connecting each sensor requires different communication protocols, including Analog, Digital, and I2C, to ensure the ESP32 processes data accurately.
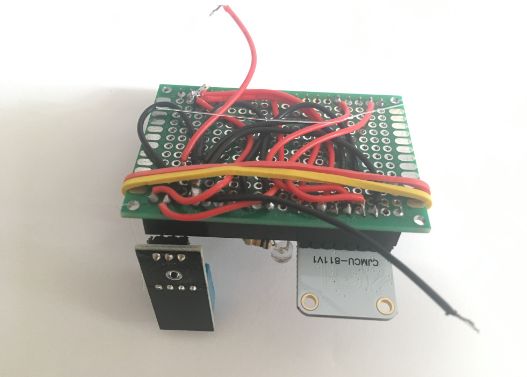
Wiring up the components
Connect the sensors as follows:
Light sensor (LDR):
- Utilizes the Voltage Divider principle. Connect one leg of the LDR to 3.3V and the other leg to a 10k Ohm resistor connected to GND.
- The connection point between the LDR and the resistor should be connected to pin D34 of the ESP32 (an Analog Input pin) to read the voltage changes according to light intensity.
CJMCU CCS811 (Air Quality Sensor):
- Connects via the I2C protocol:
- 3V → 3.3V on the ESP32 board
- GND → GND
- SDA → D21 pin on ESP32
- SCL → D22 pin on ESP32
- WAKE → GND (to keep the sensor continuously active).
DHT11 (Temperature and Humidity Sensor):
- GND → GND on ESP32
- VCC → 3.3V on ESP32
- OUT → D15 on ESP32 (Note: A Digital pin is used for single-bus data transmission).
Step 2: Program the ESP32 Board
In this step, we will use the Arduino IDE to program the logic for reading data from various sensors.
Operational Steps:
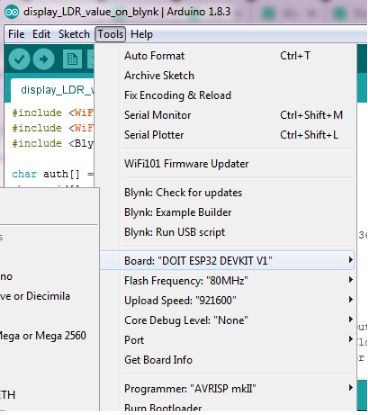
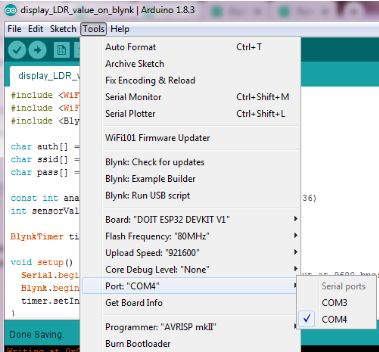
- Launch Arduino IDE.
- Select your ESP32 board from the Tools > Board menu (e.g., ESP32 Dev Module).
- Make sure you’ve also selected the correct Port.
- Upload this code onto the board.
Code Functionality Analysis:
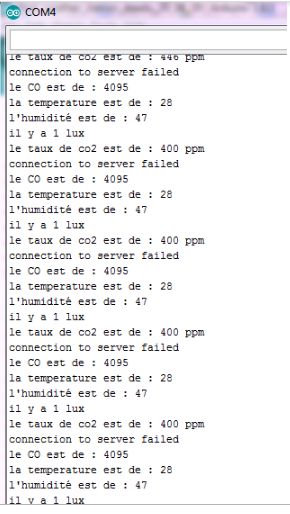
The program initializes the CCS811 sensor via I2C and sets the DHT11 to a ready state. In the loop() section, the board reads the analog value from pin D34 to calculate light intensity, and retrieves digital values from the DHT11 and CCS811. If you open the serial monitor (set the baud rate to 9600), you should be able to view the values recorded by the different sensors for initial data verification.
Step 3: Monitor the Weather Station Remotely Via Blynk App
Blynk is an IoT platform that enables us to monitor the values recorded by the weather station remotely, directly on our smartphone, regardless of our distance from the station. All we need is the Blynk app and an internet connection. In this project you’ll learn how to monitor the values recorded by the LDR sensor and the DHT11 sensor only.
Blynk Application Setup:
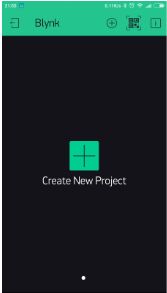
Create a new project in the Blynk app: After you’ve downloaded the app and logged into your account, start by creating a new project.
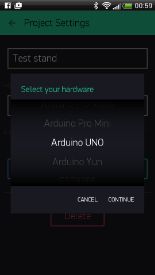
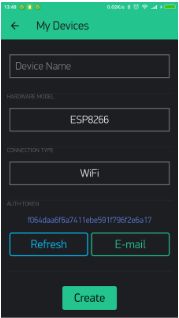
Choose your hardware: Select the hardware model you will use. If you are following this tutorial you'll probably be using an ESP32 board.
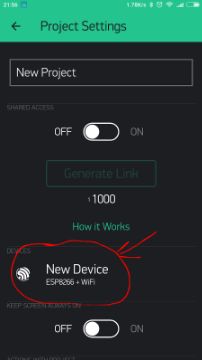
Auth Token: Auth Token is a unique identifier which is needed to connect your hardware to your smartphone. Every new project you create will have its own Auth Token. You’ll get Auth Token automatically on your email after project creation. You can also copy it manually. Click on devices section and selected required device, and you’ll see the token. This token acts as a "key" allowing the ESP32 board to connect to the app.
Set up the Blynk app / Design the Dashboard: You will need to create a project on Blynk tailored for monitoring the parameters. Add 3 Value Display Widgets and configure them one by one:
- The first will receive V6 as input (for displaying Humidity).
- The second V5 (for displaying Temperature).
- The third V0 (for displaying Light Intensity). You’ll notice that they’re all set to Push mode for the board to send data at specified intervals.
Program the ESP32 board for Cloud Connection: Launch Arduino IDE and open this program. Select the board you're using from the Tools menu, as well as the correct Port. Upload the code.
Blynk Code Logic:
This code utilizes the BlynkSimpleEsp32.h library. You need to enter your Wi-Fi name (SSID), password, and the received Auth Token. Functions like Blynk.virtualWrite(V5, temperature) are called to send sensor values from the ESP32 to the Blynk Server.

If upload is successful, you should be able to see a connection confirmation message from Blynk on the serial monitor, and the weather data will continuously appear on your mobile phone!
This tutorial has been produced as part of the DEEDU project, co-financed by the Erasmus + Programme of the European commission. Project n°: 2018-1-FR02-KA205-014144.
The content of this publication does not reflect the official opinion of the European Union. Responsibility for the information and views expressed therein lies entirely with the authors. For more information, email us at info@digijeunes.com.