Hello Everyone,
This Controller can be used as gaming controller for playing games. I was thinking to make something from MPU6050 and then I decided to make this project.
So Let's see how it works
In this project ardiono uno reads the button state of the throttle button, brake button and the data provide by the MPU6050 sensor then prints a character on the serial monitor and then a python program reads the character to simulate a keyboard input to a program(Game).
So How to make this thing ?
Step 1
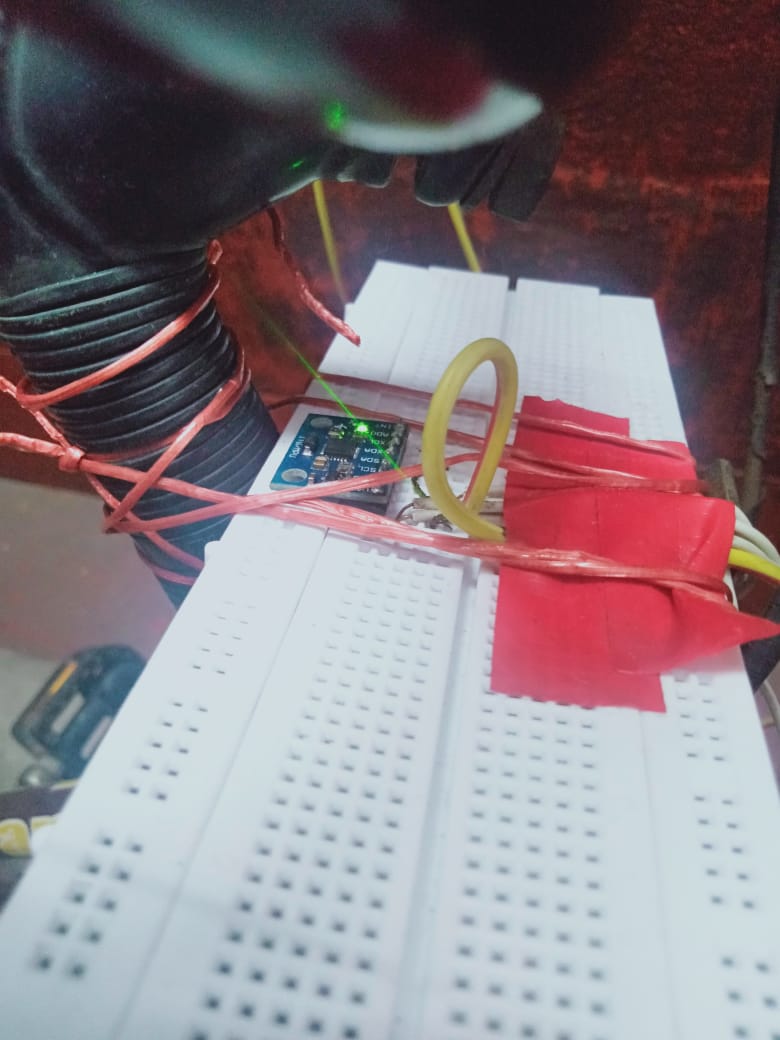
Initially you have to do some basic wiring to connect the arduino with the mpu6050 and two Buttons one for throttle another for brake.
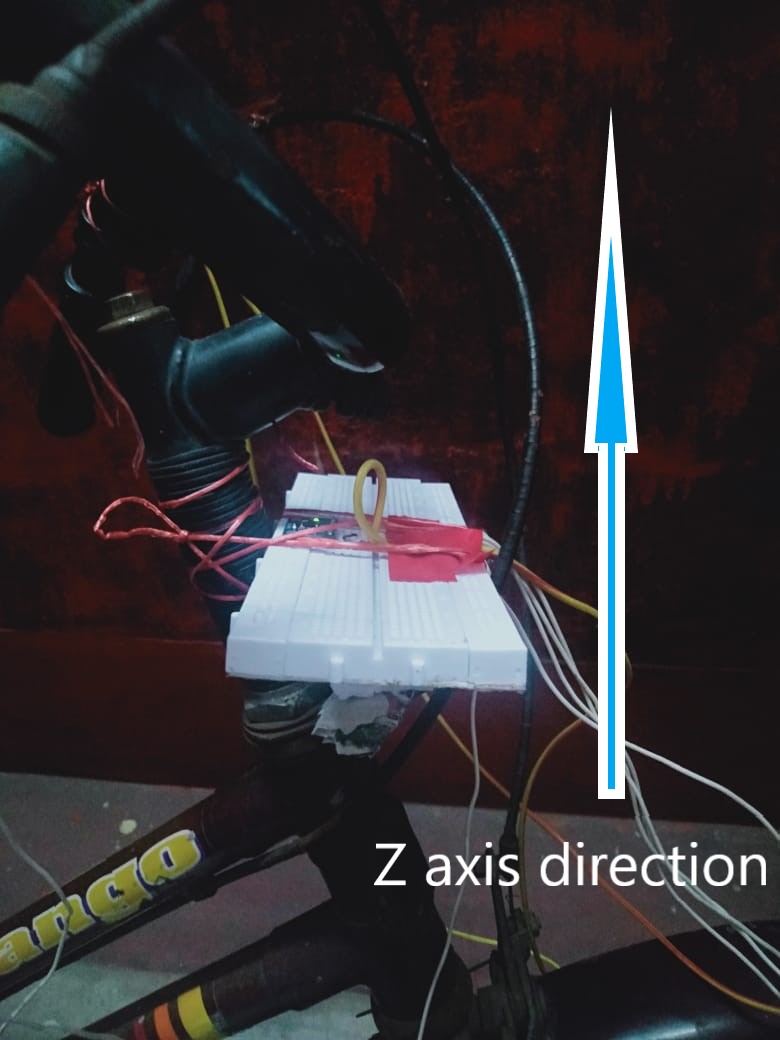
Now you have to set the hardware on bicycle so that it feels more real(you may skip this or install where you want)
Install the MPU6050 sensor tightly. place its Z axis similar to my setup(you may change but then you have do some changes in the code)
Step 3
Now in the Software portion, I am using a library <MPU6050_tockn.h> and <wire.h>.
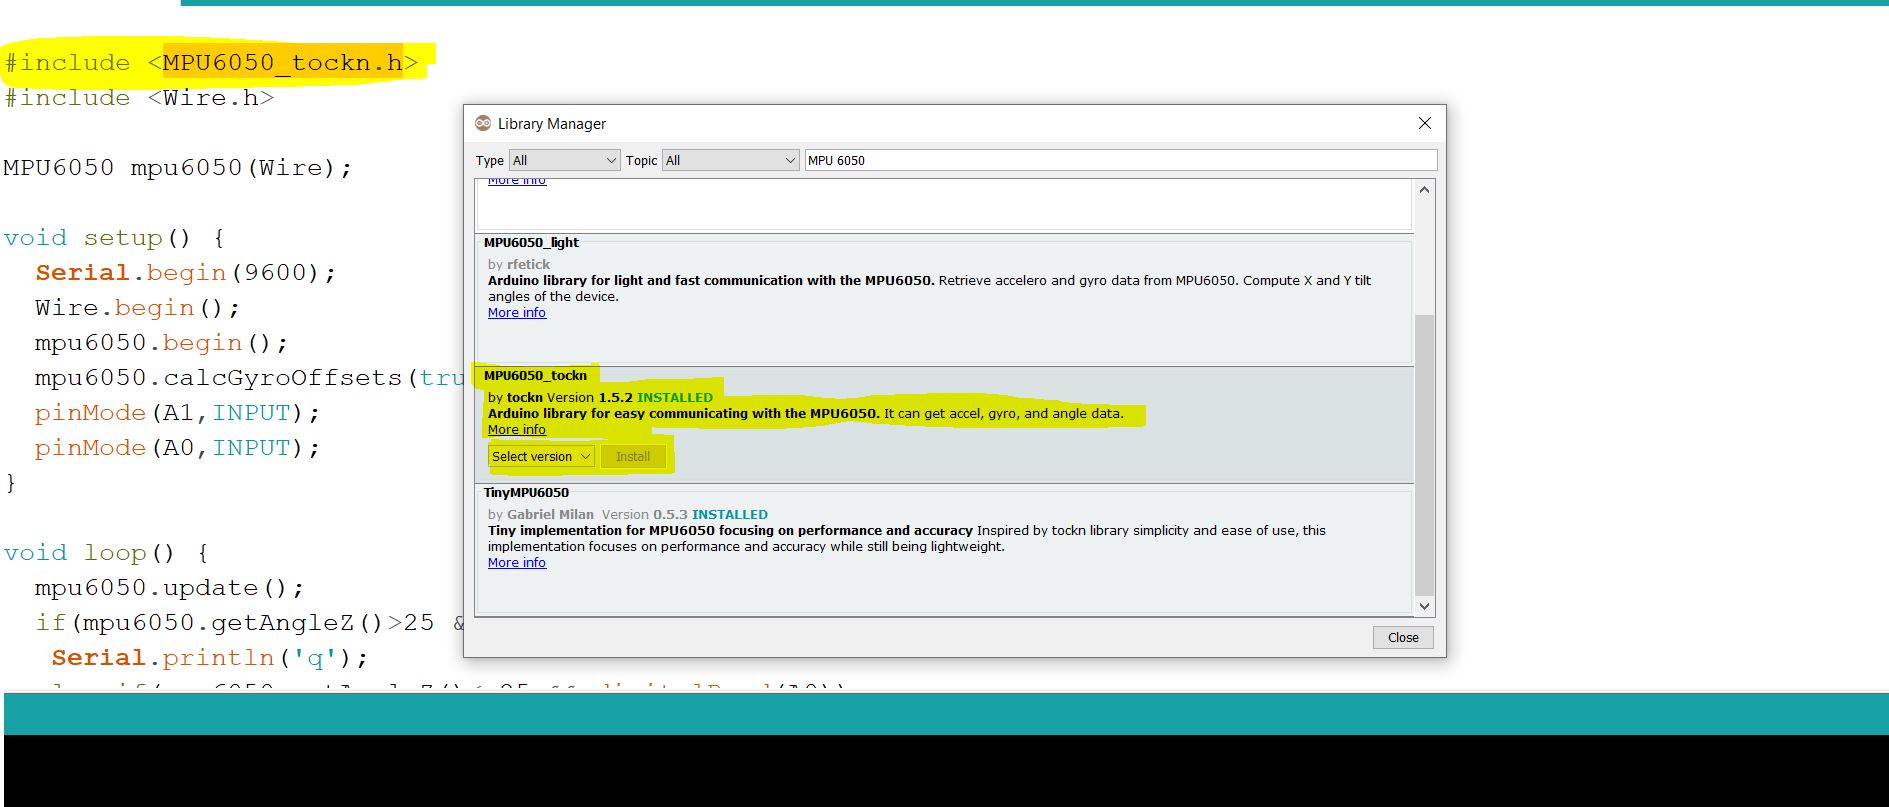 Install MPU6050_tockn.h
Now I am using some key code for every motion.
Event Action If throttle button is pressed write 'w' on the Serial port if brake button is pressed write 's' on the Serial port if right position observed write 'd' on the Serial port if left position is observed write 'a' on the Serial port if throttle button is pressed and right position observed write 'e' on the Serial port If throttle button is pressed and left position is observed write 'q' on the Serial port if brake button is pressed and right position observed write 'c' on the Serial port if brake button is pressed and left position observed write 'z' on the Serial port
so for doing this we have to use the following code
if(mpu6050.getAngleZ()>25 && digitalRead(A0))
  Serial.println('q');
 else if(mpu6050.getAngleZ()<-25 && digitalRead(A0))
  Serial.println('e');
 else if(mpu6050.getAngleZ()>25 && digitalRead(A1))
  Serial.println('z');
 else if(mpu6050.getAngleZ()<-25 && digitalRead(A1))
  Serial.println('c');
 else if(digitalRead(A0))
  Serial.println('w');
 else if(digitalRead(A1))
  Serial.println('s');
 else if(mpu6050.getAngleZ()>25)
 Serial.println('a');
 else if(mpu6050.getAngleZ()<-25)
 Serial.println('d');
EXPANDED TECHNICAL DETAILS
Sensor Fusion & Data Processing
The MPU6050 contains a 3-axis accelerometer and a 3-axis gyroscope. The project uses the MPU6050_tockn library to simplify the data retrieval through I2C. The library handles the complex integration of raw gyro data into stable angles. Steering is calculated via the Z-axis (Yaw) angle, with a threshold of +/- 25 degrees to distinguish between dead-zone and actual turning.
Hardware Architecture
- Inertial Measurement Unit (IMU): Mounted on the handlebars to detect tilt and rotation.
- Physical Controls: Buttons on the grips handle binary inputs like throttle and braking.
- Serial Protocol: Character-based communication ('w', 'a', 's', 'd', 'q', 'e', 'z', 'c') allows for multi-key combinations (e.g., 'q' for throttle + left turn).
Python Bridge (Middleware)
The accompanying Python script uses the pyserial library to listen to the COM port. Once a character is received, it uses a library like pyautogui or pydirectinput to inject virtual keystrokes into the OS.
- Low-Latency Tip: Using
pydirectinputis recommended for Direct-X games (like Asphalt 8) because it mimics Scancodes at a lower level than standard Windows API calls, which are often ignored by full-screen game engines.
Note - if you are using another axis then you can use mpu6050.getAngleX() or mpu6050.getAngleY().
mpu6050.getAngleZ()>25
here I will consider the left move when the mpu6050.getAngleZ() gives value greater than 25(threshold point), you can change and set you own threshold point, for finding your own threshold point you can use this example code of getAngle to check the value your sensor at every position then you can select Sthe value at your desired position.
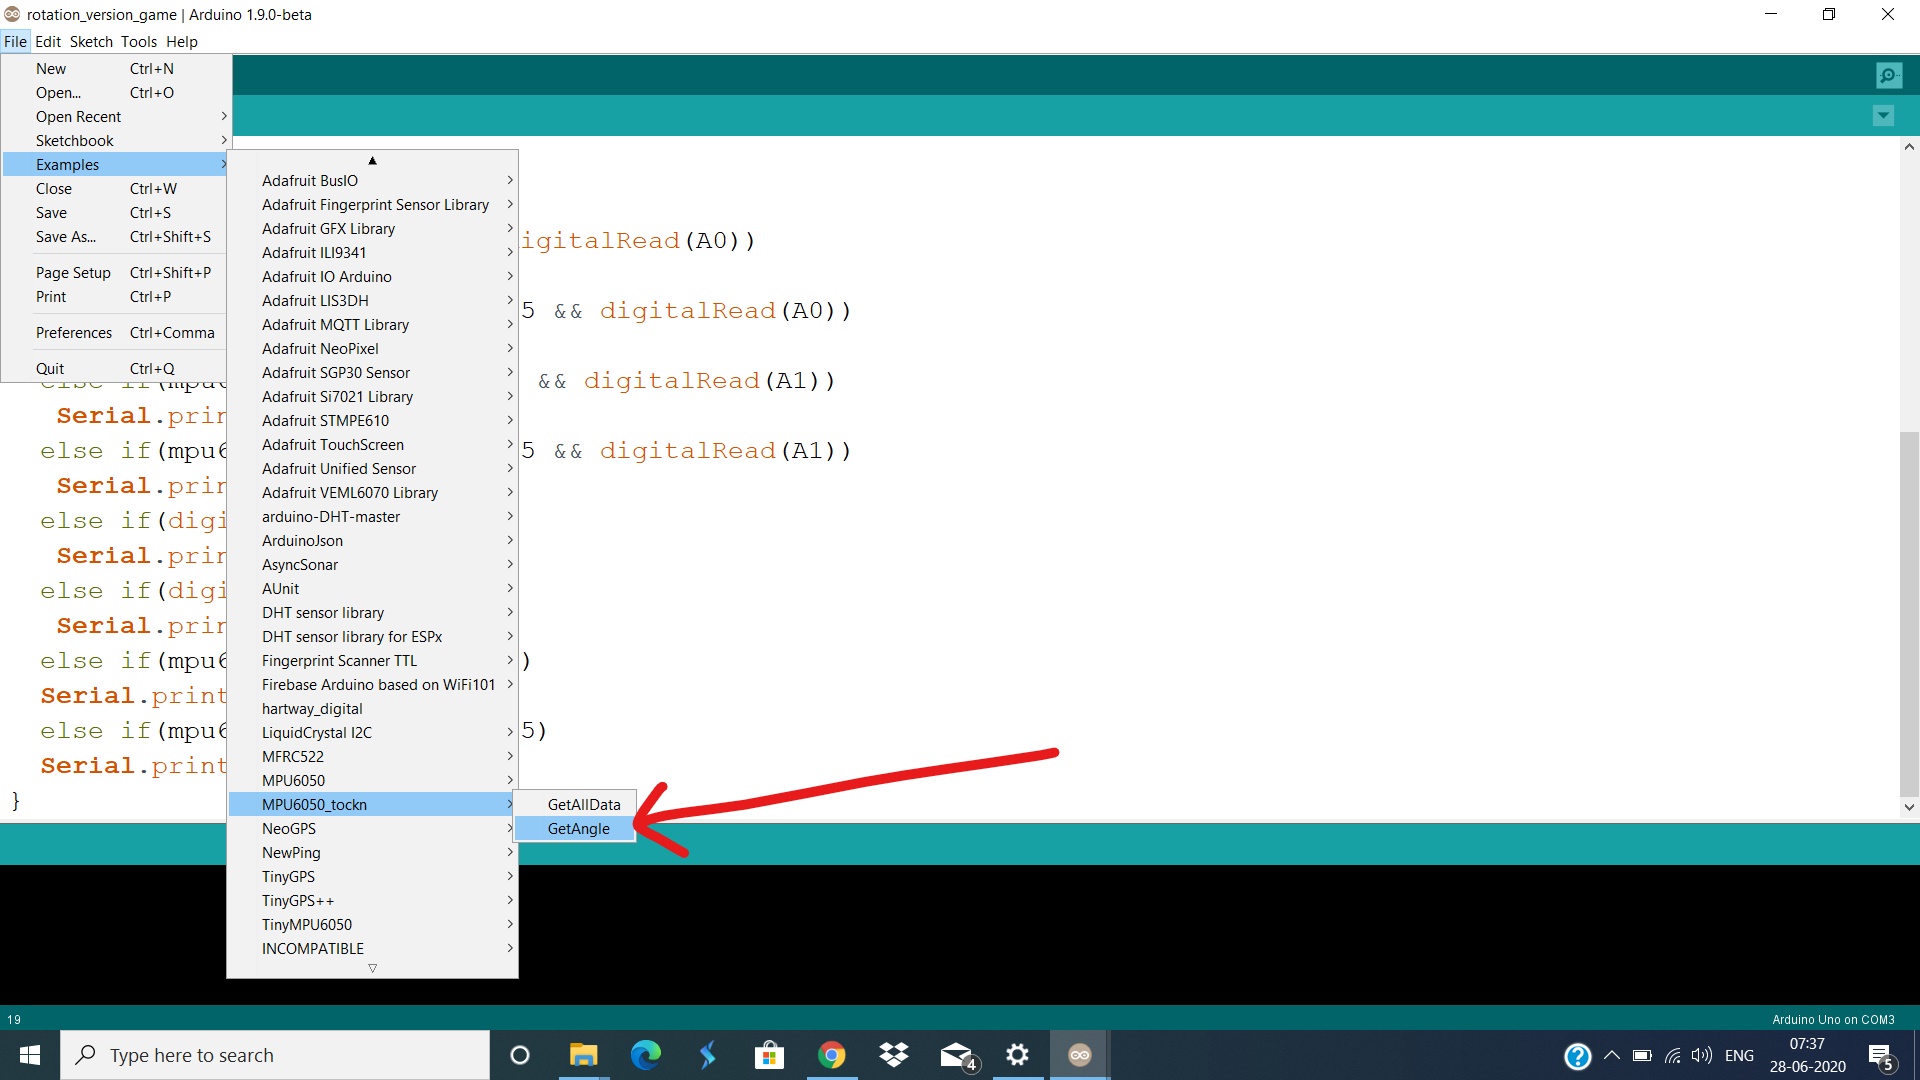 Use this example to check the value of you sensor at every position
See my Serial monitor
Till now we are getting our value at serial port, now we will scan the serial port using python and then simulate the input, in this I will give two python code one of them generate input using pyautogui But sometime this will not work on Direct X games so I will also give the second python code(port2.py) that will hopefully work, So try both the python codes (port1.py and port2.py) one by one and see which works. you can also select an notepad after running the python program an if you see it prints w on notepad on pressing the throttle button or giving any other moves, then everything is fine from this hardware and arduino side.
I have given the complete code below. [Note- inside python program change port name to your arduino port, for me this is 'COM3']
Step 4- running it
1st- At first connect the arduino open serial monitor if everything is working fine you are seeing the correct output in serial monitor then close the serial monitor
2nd - open the game
3rd - run the python script go to the gaming window
4th - Enjoy, now you are done
Now see how this work on real-time I am using this in asphalt 8 - Airborne
*See how this controller work, ignore my driving skill inside the game I am not a pro in games*So Hope you Like it.