This project shows how to interact with the Raspberry Pi GPIOs from a dashboard created using Arduino Cloud with an application programmed in Node-RED. It can serve as an example to create your own applications that require access to RPI GPIOs and that can be ultimately controlled using a dashboard.
The setup
In this project I have used a Raspberry Pi 5 connected to an LED and a push button, both inserted in a breadboard. This is the diagram
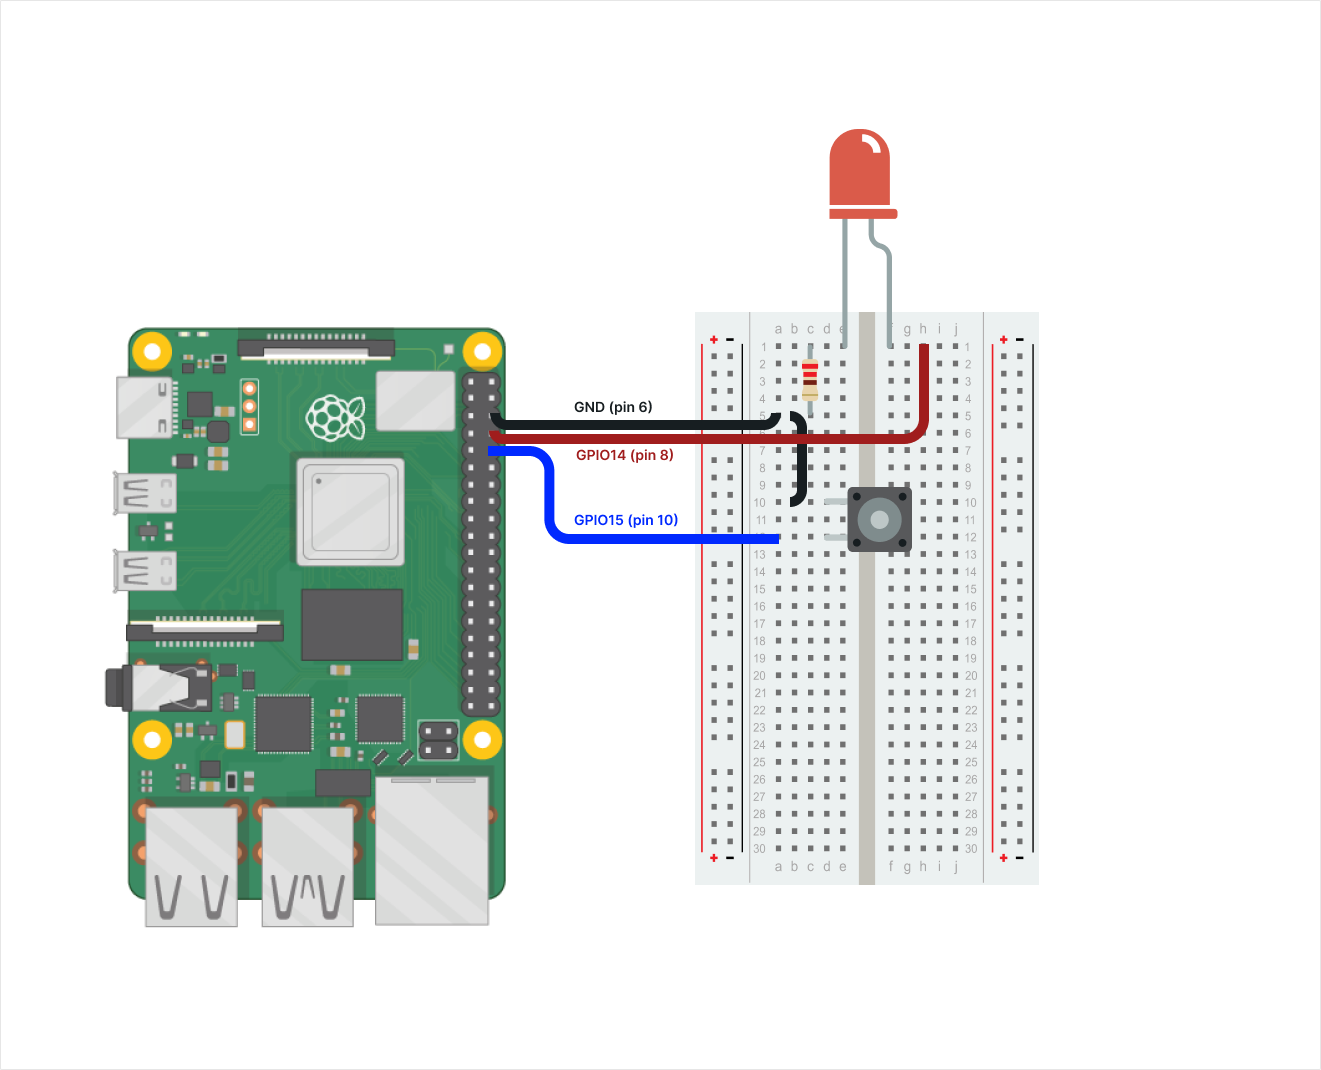
Note: This project should work with any Raspberry Pi version and actually with any Linux-based machine that supports libgpiod. Please, leave your comments if it does not work with your board in order to review it.
How to create your project
The process to use this project is very straighforward:
- Create the Device and Thing in the Arduino Cloud and get the Arduino Cloud API Key
- Install Node-RED and required nodes
- Develop the Node-RED application
- Create the Arduino Cloud dashboard
- Test everything
1. Create the Device and Thing in the Arduino Cloud
Note: Before getting started, make sure that you have an Arduino Cloud account
Create the Device
Go to the Devices section of the Arduino IoT Cloud and click on + DEVICE.
Select "Any Device" and follow the instructions on the wizard.
Note: Save your
Device IDandSecret Keyas they will be used in your python code.
Create the Thing
In your recently created device page, go to the Associated Thing section, click on "Create Thing" and rename it.
Note: You can also create the Thing from the Things list and associate it later.
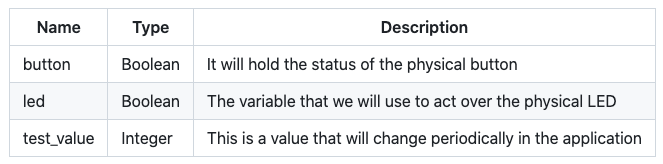
Create the Variables
Add the variables by clicking on the ADD button. At the end of the process, your list of variables should look like this.
Get an Arduino Cloud API key
The process to get an Arduino Cloud API key is very straightforward:
- Go to https://cloud.arduino.cc/home/api-keys.
- Click on CREATE API KEY and enter a name.
- Note down the
Client IDandClient Secretor download the PDF. We will use these credentials in the Node-RED node later.
2. Install Node-RED and required nodes
How to install Node-RED
There are many ways to install Node-RED in a Raspberry Pi or any other machine. Typically, you can use: docker, snap, apt, native node.js installation.
The tricky point is that we want our Node-RED instance to have access to the GPIOs and host system. This can be achieved with all the installation methods but for most of them it is quite difficult to achieve and many conflicts and issues need to be solved. So, the easiest and recommended way in this project would be to do a native installation using NPM.
These are the instructions:
- Node-RED Installation
Install Node-RED with the following command
sudo npm install -g --unsafe-perm node-red
- Manage the service
There are many tools that can be used to manage the service, but I recommend using pm2 to manage the service and make it start on boot.
Install pm2
sudo npm install -g pm2
Edit the pm2.json file and set the full path to your gpio-basic folder
{
	 "apps": [
	   {
	     "name": "node-red",
	     "script": "<FULL_PATH_TO_YOUR FOLDER>/pm2-node-red-start.sh"
	   }
	 ]
}
Launch the service, save it and enable pm2 to start on boot:
sudo pm2 start pm2.json
sudo pm2 save
sudo env PATH=$PATH:/usr/bin $(which pm2) startup systemd
The service will be launched automatically on boot.
You can manually start or stop the service with sudo pm2 start node-red or sudo pm2 stop node-red.
Open Node-RED
Open a browser a introduce the URL: http://<IP_ADDRESS>:1880, replacing <IP_ADDRESS> with the IP Address of your Raspberry Pi.
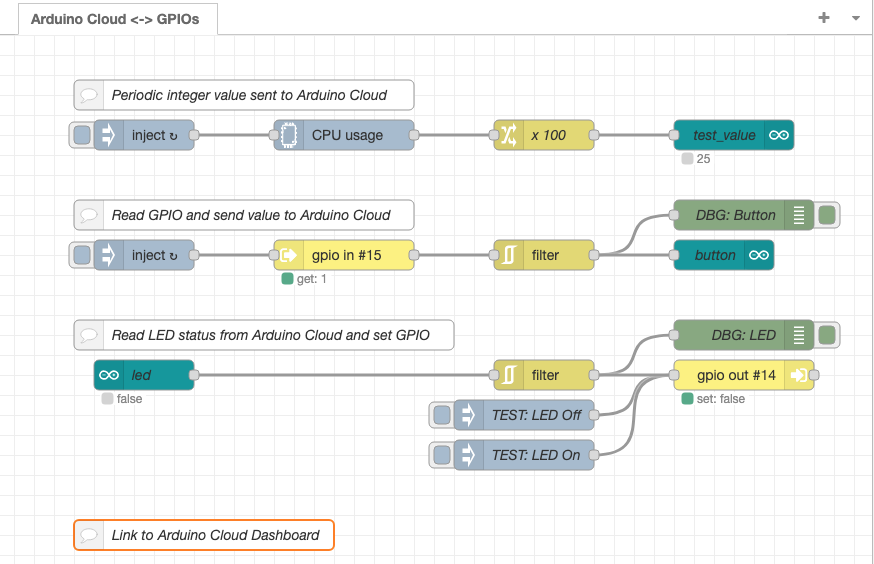
Your Node-RED environment will be opened. If everything was properly configured, you should see the flow
Note: If you can't see the flow and there's just an empty screen, you can either review the configuration (maybe the folder is not set properly) or you could also import the flow.json pasting the content directly using Menu-->Import
Install the required nodes
The first time, you will probably get some messages indicating that there are nodes missing. It is because the application requires the following nodes:
- node-red-contrib-libgpiod: The nodes needed to interact with the GPIOs
- @arduino/node-red-contrib-arduino-iot-cloud: The nodes to communicate with Arduino Cloud
- node-red-contrib-cpu: I have used this node to generate an integer value that is sent to the Cloud. In this case I send the CPU load.
In order to install the nodes, you just have to click on Menu-->Manage Palette on the menu.
Then go to the Install tab, search for the modules listed above and install them.
3. Develop your Node-RED application
If everything worked correctly, you should see the picture shown above.
Now, it's time to configure the nodes.
Configure the Arduino Cloud nodes
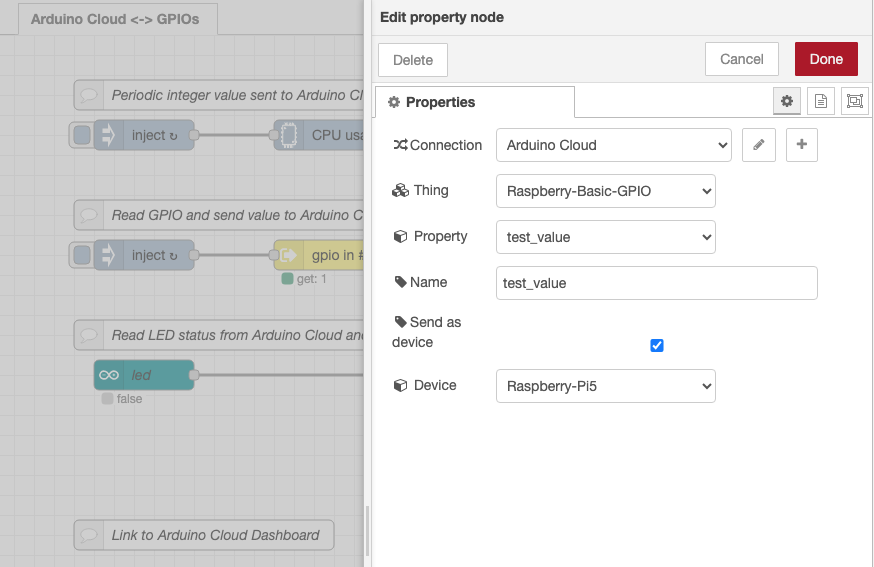
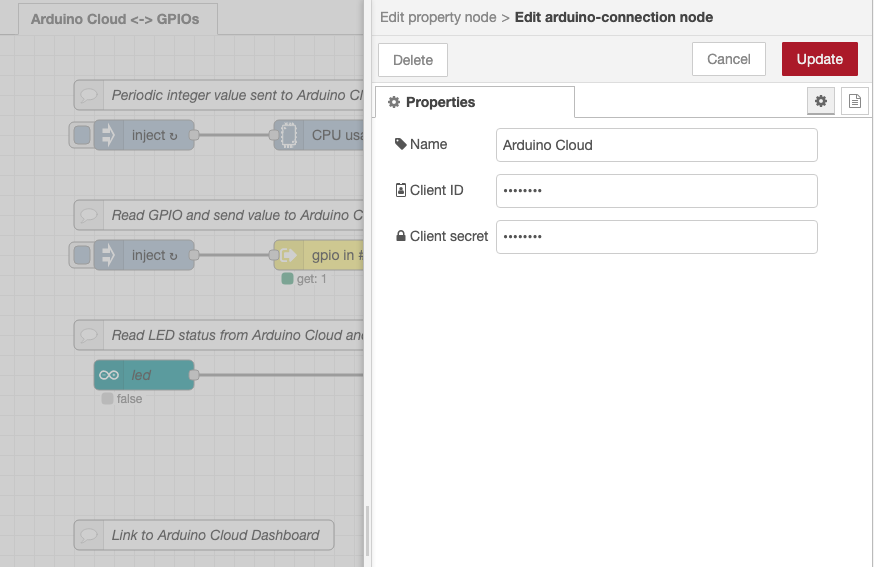
First, let's configure the Arduino Cloud nodes. For each node, you have to do the following:
- Select the Connection
Note: The first time, you will have to set up the Connection and introduce the API secrets
Client IDandClient Secret.
- Select the
Thingfrom the dropdown menu - Select the
Property(the variable) from the dropdown menu - Check the
Send as devicebox - Select the
Devicefrom the dropdown menu
As a reference, you can see the full process in action for one node in the animated GIF in the github project.
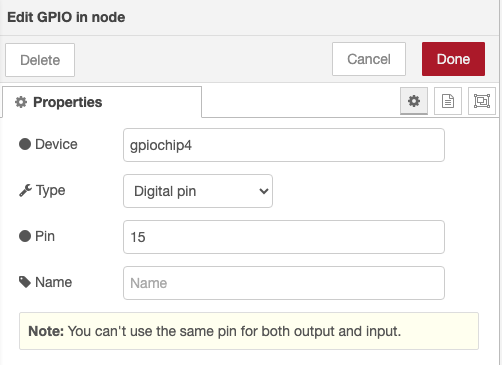
Configure the GPIO nodes
First, let's configure the GPIO IN node. Double click on the node and set:
- Device --> Set your
gpiochipX(gpiochip4 in the example) - Type: Digital pin
- Pin --> Set your pin number
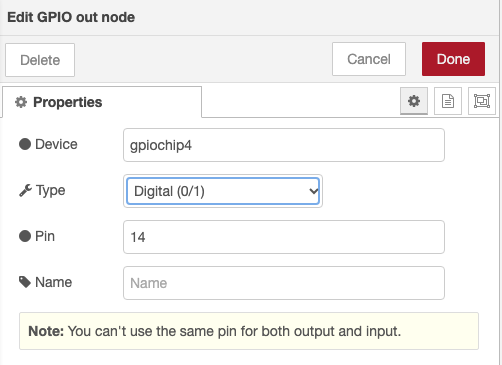
Next, let's configure the GPIO OUT node. Double click on the node and set:
- Device --> Set your
gpiochipX(gpiochip4 in the example) - Type: Digital (0/1)
- Pin --> Set your pin number
Deploy
Deploy the flow by clicking on the Deploy button on the top-right corner.
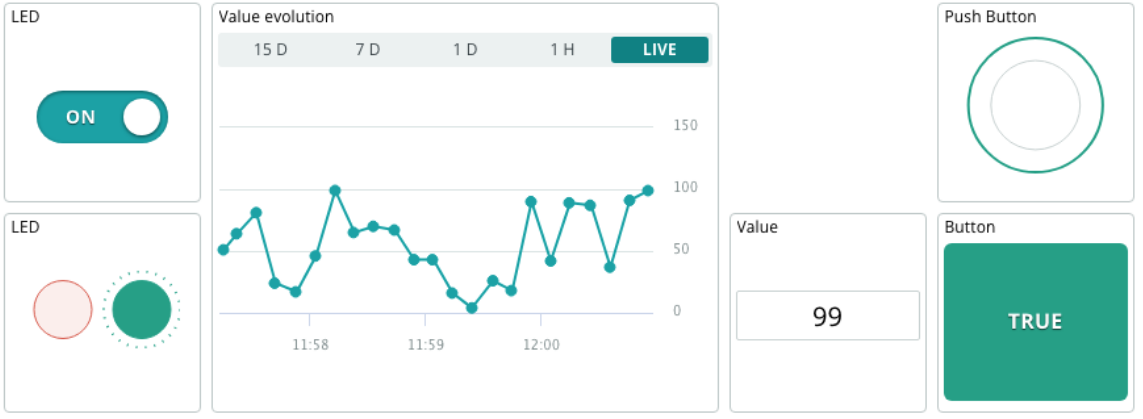
4. Create the Arduino Cloud dashboard
The dashboard that we are going to build will look like this
There are 2 ways to create the dashboard:
- Create it manually. Replicate the one shown above following the instructions in this guide.
- The LED widgets should be linked to the variable
led - The Value widgets should be linked to the variable
test_value - The Button widgets should be linked to the variable
button
- The LED widgets should be linked to the variable
- Clone the one provided by this tutorial following the instructions in this Annex of the github project.
5. Test everything
You should now see the following:
- Every time push the physical button, the button widget should be updated
- Every time you change the LED widget in the dashboard, the physical LED should switch to ON or OFF
- The value of
test_valueshould reflect the Raspberry PI CPU load updated every 5s, and you can see the evolution on the dashboard
Enjoy!
System Interoperability: Arduino Cloud to RasPi
The Arduino IoT Cloud is designed to manage ESP32s and MKR boards natively. Raspberry Pi is a completely different Linux-based ecosystem. The Arduino Cloud Node-RED Bridge project teaches advanced "broker architecture". Instead of forcing the two systems to fight, you build a Node-RED translation layer, allowing a beautiful Arduino Cloud graphical dashboard to instantly actuate the physical GPIO pins of a Linux microcomputer.
The Node-RED Canvas Architecture
You do not write C++ or Python to solve this; you use Visual Flow-Based Programming.
- The Raspberry Pi boots up its Linux OS. You install Node-RED (a powerful, IBM-developed server software environment).
- You open the Node-RED canvas in your desktop browser. It looks like a giant flowchart.
- You install the specialized
node-red-contrib-arduino-iot-cloudplugin nodes. - The Translation Flow:
- You drag the
Arduino Propertyblock onto the canvas. You authenticate it with your Arduino Cloud API key. It actively listens to your cloud dashboard dashboard button ("Turn on Pump"). - You drag standard
Raspberry Pi GPIO Outblock onto the canvas, mapping it specifically to Physical Pin 12 on the Pi. - You drag a physical connection line between the two blocks!
- You drag the
Bypassing the Microcontroller
This project represents the ultimate abstraction of hardware.
- You have completely eliminated the need for an actual Arduino board!
- When you tap the button on the Arduino IoT Cloud app while sitting in a coffee shop in Tokyo...
- The command hits the Arduino Azure servers. The Node-RED software running inside your house in London catches the API webhook instantly. Node-RED translates the payload through your flowchart and executes a low-level Python command natively inside the Raspberry Pi's processor, slamming Pin 12 to 3.3V, firing a relay to start your coffee machine!
Cloud Infrastructure Setup
- Raspberry Pi (3 or 4) running Raspberry Pi OS.
- Node-RED Server Package installed on the Pi.
- Arduino IoT Cloud Account and generated API credentials.
- Relay Modules or LEDs connected to the Pi's GPIO pins to visualize the outputs.