This application shows a dosing application using 2 peristaltic pumps (PWM driven via solid state relays), 1 digital weight transducer (using a HX711), a LED traffic light and an Arduino Mega2560 with an Ethernet shield.
First the vessel on the scale is filled in 15 ml steps up to 100ml and then it is emptied. Commands to start and stop are issued via Ethernet using WawiLib to read and write sketch variables. The state changes of the state machine are reflected to the output window of WawiLib.
There are 3 movies documenting the application:
Technologies used and explained in detail:
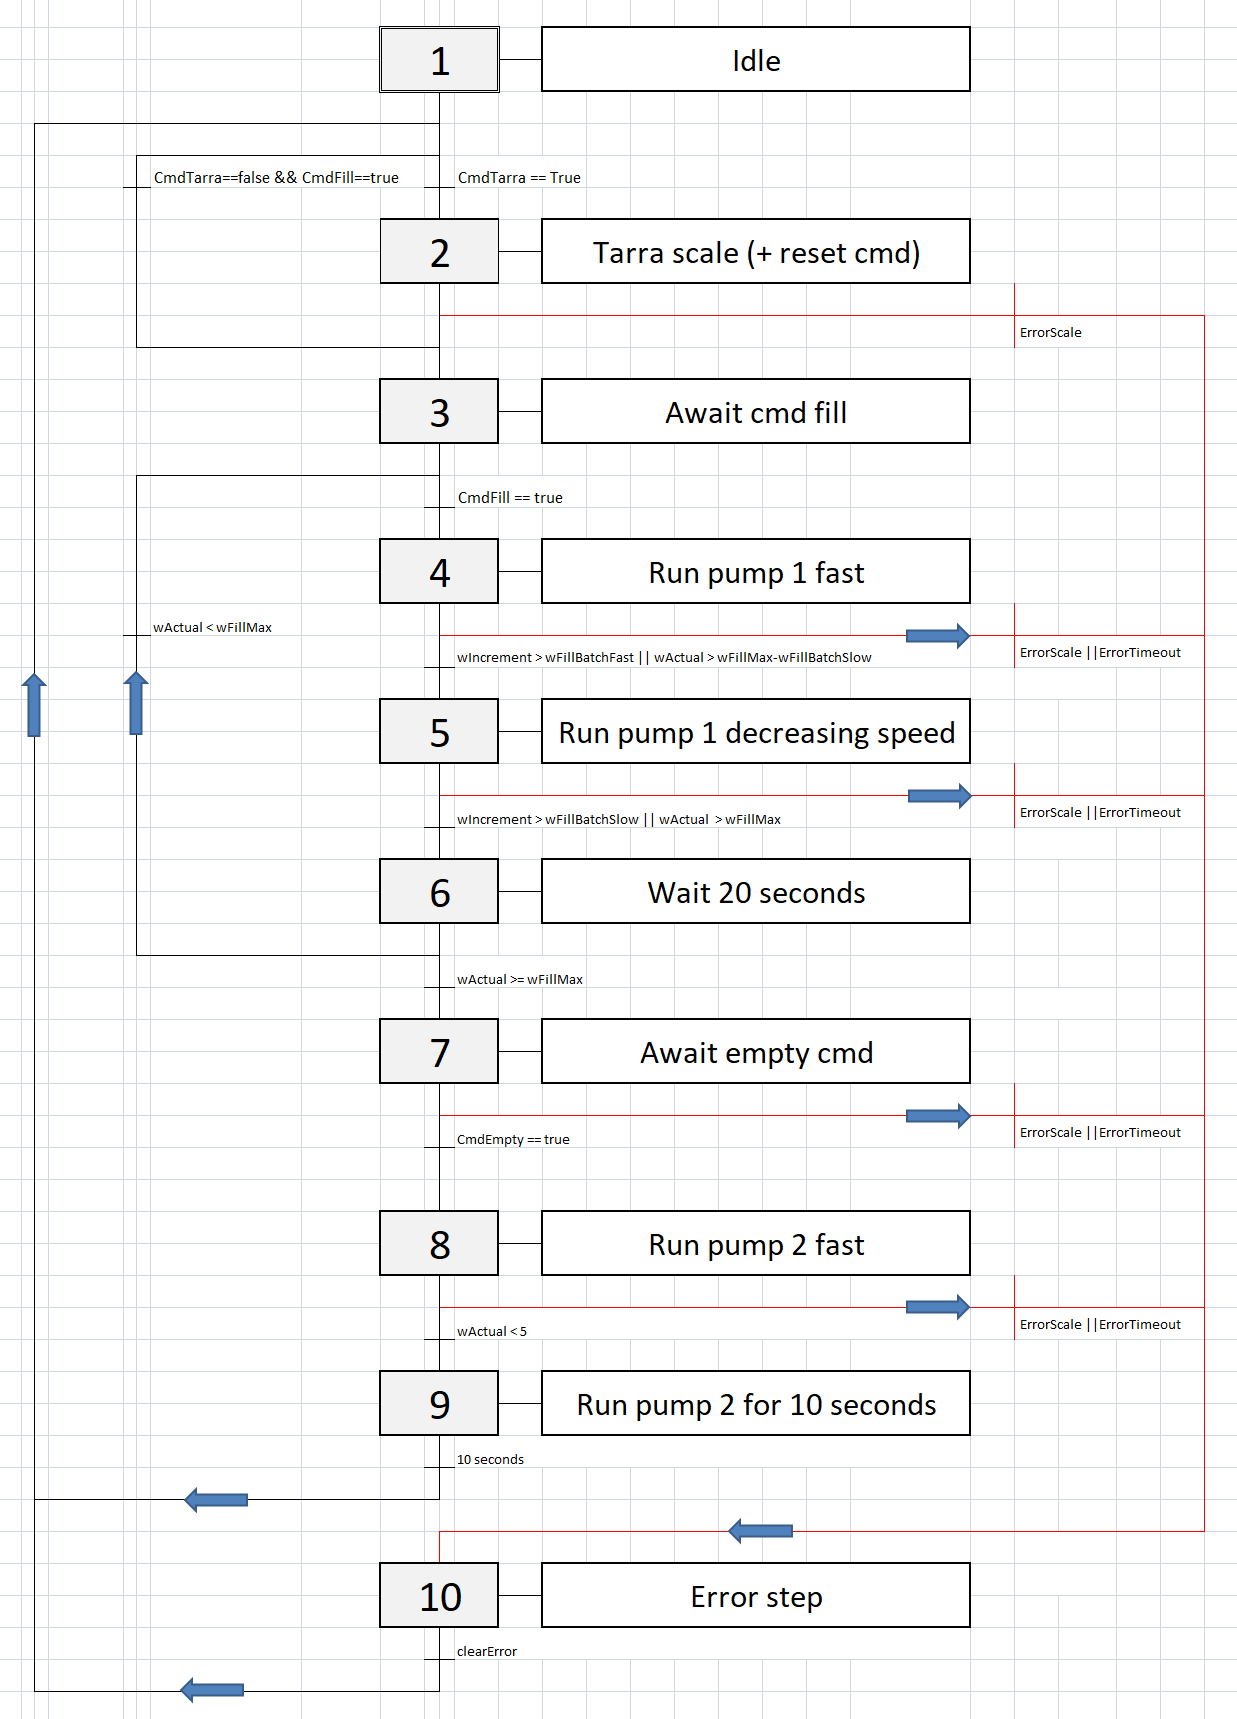
The Finite State Machine (FSM) Logic
A linear delay() program crashes when implementing emergency stops. This engine uses an explicit Finite State Machine (FSM). The logic for a precision dosing application typically follows these states:
- State
IDLE: Waiting for target input (e.g., 50g requested). - State
DOSING_FAST: The SSR blasts 100% PWM power to the 12V Peristaltic pump. - State
DOSING_SLOW: When weight approaches the target (e.g., 5g remaining), the Arduino drops the SSR PWM to a slow, controlled pulse. - State
DOSING_DONE: The load cell hits the exact target weight, shutting off power instantly.
This state-based approach ensures reliable, interruptible operation. The state diagrams below illustrate this flow.

Here is a code example from the implementation:
// Finite state machine code example:
   //+++++++++++++++++++++++++++++++++++++++
   case FsmState::STEP3_WAIT_CMD_FILL:
   {
     if (cmdFill)
       FsmGoTo(FsmState::STEP4_P_FILL_FAST);
   }
   break;
A more generic example of the FSM logic for precision dosing could be structured as follows:
switch (currentState) {
  case DOSING_FAST:
    analogWrite(SSR_PIN, 255); // Full power
    if (currentWeight >= (targetWeight - 5.0)) { // Approach threshold!
      currentState = DOSING_SLOW; // Shift to fine control
    }
    break;

  case DOSING_SLOW:
    analogWrite(SSR_PIN, 80); // Reduced power for drop-by-drop control
    if (currentWeight >= targetWeight) {
      analogWrite(SSR_PIN, 0); // Exact weight achieved! Hard stop!
      currentState = DOSING_DONE;
    }
    break;
}
Arduino "millis()" based software timers
Arduino "millis()" based software timers (as a C++ object in a separate file in the sketch). The use is different from what you normally see (millis() is encapsulated in the C++ object and the object is added in a separate file to the ide). All is explained step by step in the.pdf that can be downloaded from sylvestersolutions.com/documentation.
// blinking 2 timers at the same time with variable time period:
#include "WawiTimer.h"
// blinker bit helper timers(software timers):
WawiTimer tBlink250; // 250 ms on
WawiTimer tBlink500; // 500 ms
// blinking bits that toggle:
bool blink250;
bool blink500;
//------------------------------------------------------------
// create blinkbits:
void Loop()
{
  if (tBlink250.isZero())
  {
      tBlink250.setMs(250);
      blink250 = !blink250;
  }
  if
  {
      tBlink500.setMs(500);
      blink500 = !blink500;
   }
   tBlink250.loop(); // 250 ms
   tBlink500.loop(); // 500 ms
}
Forget about millis()! Add your C++ timer object that is counts down so your loop is not interrupted: the only thing you need to do is add 2 files to your sketch! (The documentation explains in detail how.)
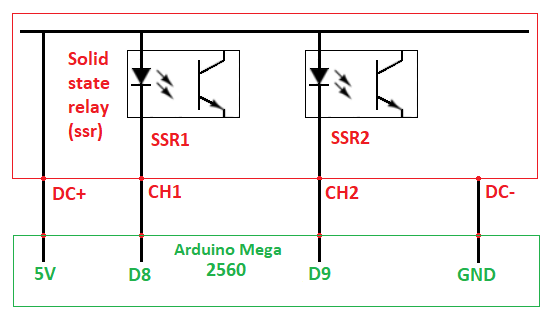
PWM (Pulse Width Modulation) via SSR (Solid State Relay)
Pulse width modulation is a technique used to control (e.g.) the speed of an DC motor. Some of the Arduino outputs can switch on and of very fast (hardware based) at multiple kHz. If you use this function to regulate the current to a DC motor you can make it run at variable speed. The movie and documents explain in detail how to do this.
The Solid State Relay (SSR) PWM Challenge
You CANNOT send PWM signals (fast pulsing) to a standard mechanical clicky relay! It will physically buzz and melt in seconds due to contact arcing. You must use a DC-to-DC Solid State Relay (SSR) (e.g., Fotek or a heavy-duty MOSFET board). The SSR has zero moving parts, allowing the Arduino to rapidly switch high current hundreds of times per second (analogWrite()), smoothly throttling the DC peristaltic motor speed!
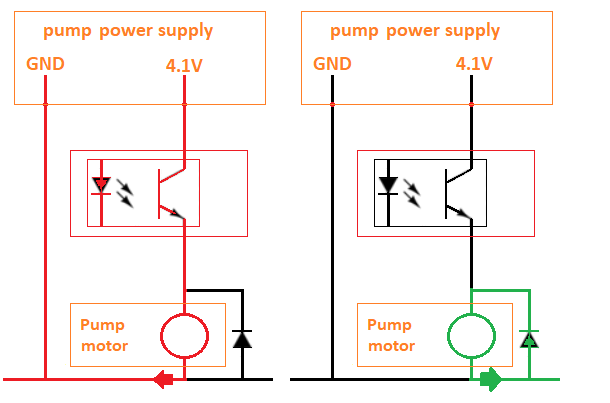
The diagrams below show the basic setup and connection.

Flywheel Diode Protection
A DC motor contains a coil, which is an inductance. You must make sure that its current flow is not interrupted when the relay opens, as this causes a large voltage spike that can damage components. A diode is the ideal component to do this. This tutorial explains the concept of a flywheel diode in detail.
Hardware & System Architecture
In pharmaceutical labs or hydroponic chemical dosing, achieving precise liquid delivery using timing alone is unreliable. Viscosity changes and voltage drop cause massive errors. This Dosing Peristaltic Pump system relies on a closed-loop mass feedback controller. The Arduino constantly evaluates the absolute weight of the target beaker using an HX711 Load Cell amplifier, proportionally throttling the Solid State Relay (SSR) over PWM to smoothly ramp down the peristaltic pump right before hitting the exact target weight!
Hardware Chemical Infrastructure
- Arduino Mega2560 with Ethernet Shield (or Nano/Uno for simpler setups).
- 12V Peristaltic Pump (Silicone tubing ensures the liquid never touches metal parts, perfect for sterile bio-fluids or harsh fertilizers).
- HX711 Amplifier & Load Cell (Provides extreme sub-gram mass resolution).
- DC-to-DC SSR (Solid State Relay) or high-power Logic Level MOSFET (e.g., IRLZ44N).
- Heavy 12V Power Supply (To drive the torque of the peristaltic roller assembly).
- LED Traffic Light for visual state indication.
Monitoring and Control with WawiLib
Commands to start and stop are issued via Ethernet using WawiLib to read and write sketch variables. The state changes of the state machine are reflected to the output window of WawiLib.

- The AppNotePeriPump.pdf detailed tutorial can be downloaded from www.sylvestersolutions.com explaining the details step by step. Go to the documentation page of the Sylvester Solutions website.
If you do not know how to program an automation task properly (i.e. without delay statements). Look at this tutorial and you will learn a lot. All concepts are in detail explained in the pdf and the.ino source code is also included.
The code can be used as a framework for many other applications as it is structured like the pro's do.
Have fun and learn!