Live music gigs are always a very special thing, but to produce it, you need humans, and humans are not always available. I occasionally play gigs equipped by my guitar and my voice, but music generally features many others instruments, like percussion, and these instruments tend to only sound when played by humans. This problem could be solved by just using a recording and playing over it, but that would somehow feel against the idea of the “live” concept.
So, I decided to get rid of the human element entirely, and build a robot drummer... The idea would be to make something portable, which could move and play sounds in different rhythms with no use of samples/recordings, that could be played or stopped at will, and that its sound could be amplified in a gig/band situation.
The General Idea
In first place, it is necessary to define what the drumkit elements will be. Following the logic of the frequency range, the standard drum-kit is usually conformed by three basic elements; the kick (low frequency range), the snare (mid range), and the hi-hat (high range). After a couple weeks of experimentation, I decided to replicate this sounds with the following arrangements:
Kick/LowRange: 2 piezos, covered with a small piece of sponge material, which are hit by a servo controlled stick with a soft rubber end.
Snare/MidRange: A can of pringles, with a small square sheet of tin for resonation, which is also hit by servo controlled sticks with a rubber end. The sound is then captured by an electret microphone.
HiHat/HighRange: A transistor-based white noise generator circuit, which is controlled directly by the Arduino.
All of the above mentioned systems are set in time by the Arduino board, and the audio signal generated by them is then amplified to an instrument level signal by three simple amplifier circuits for each one of them.
The Kick Drum
This works by taking advantage of the low frequency sound which is produced when a piezo pickup is directly touched or hit with a soft object. To make this work, first we need to automatise the hitting of the piezo, and secondly, we need to amplify the audio signal generated by said piezo.
As I mentioned above, I used a servo controlled stick to hit two different piezos located at each end of the servo's movement range (in order to make use of all the movement). To help damp high frequencies, the piezos are covered with sponges and the stick has a soft rubber end.
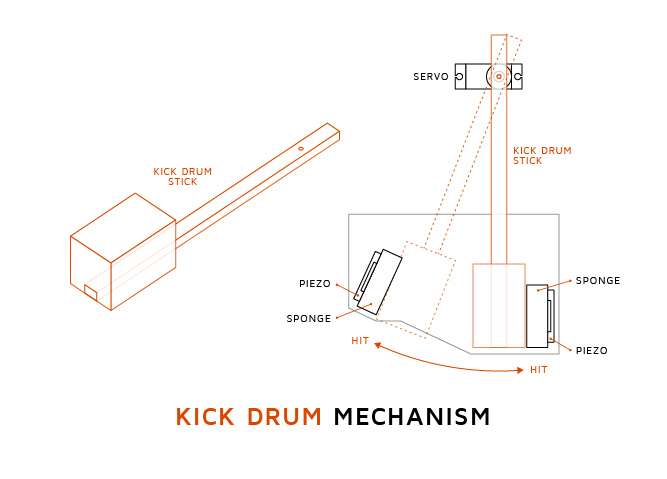
It is important, at this point, to define the angle at which the servo will be when it is hitting each end of its range of movement. This information will be necessary later, and It can be easily obtained using a basic piece of Arduino code (like the one described here) and the Serial.print(); command.

The audio signal from the piezos is then amplified by the circuit described on the image above, powered by 5v - 7v from a voltage regulator, which is fed from the main power supply (not the Arduino board). This is important because, although the amplifier itself would be able to work with the 5v provided by the Arduino, it is ideal to maintain the analog audio signal as separated as possible from the digital circuitry, in order to avoid any digital noise interference making its way into the final audio signal.
Again, I have no formal (or any lol) electronics education, and I've struggle a lot with this last problem. Noise is virtually impossible to get absolutely rid of in any audio application, but I've found that the filtering in the voltage regulator (as well as the analogue and digital separation, and a proper electrical shielding of the project) reduces noise to very acceptable levels.
The Snare
This is a very complicated sound to replicate, even now I'm still not absolutely happy with the sound I’ve achieved. To pickup this sound, I decided to use an electret microphone, as they're usually more sensitive, and the unique acoustic nature of a snare sound makes this necessary.
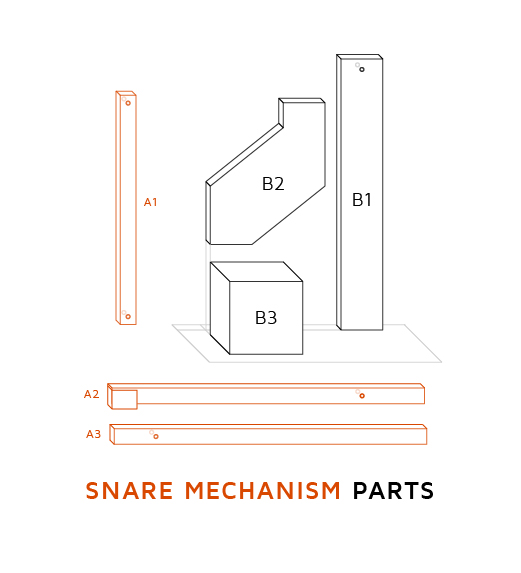
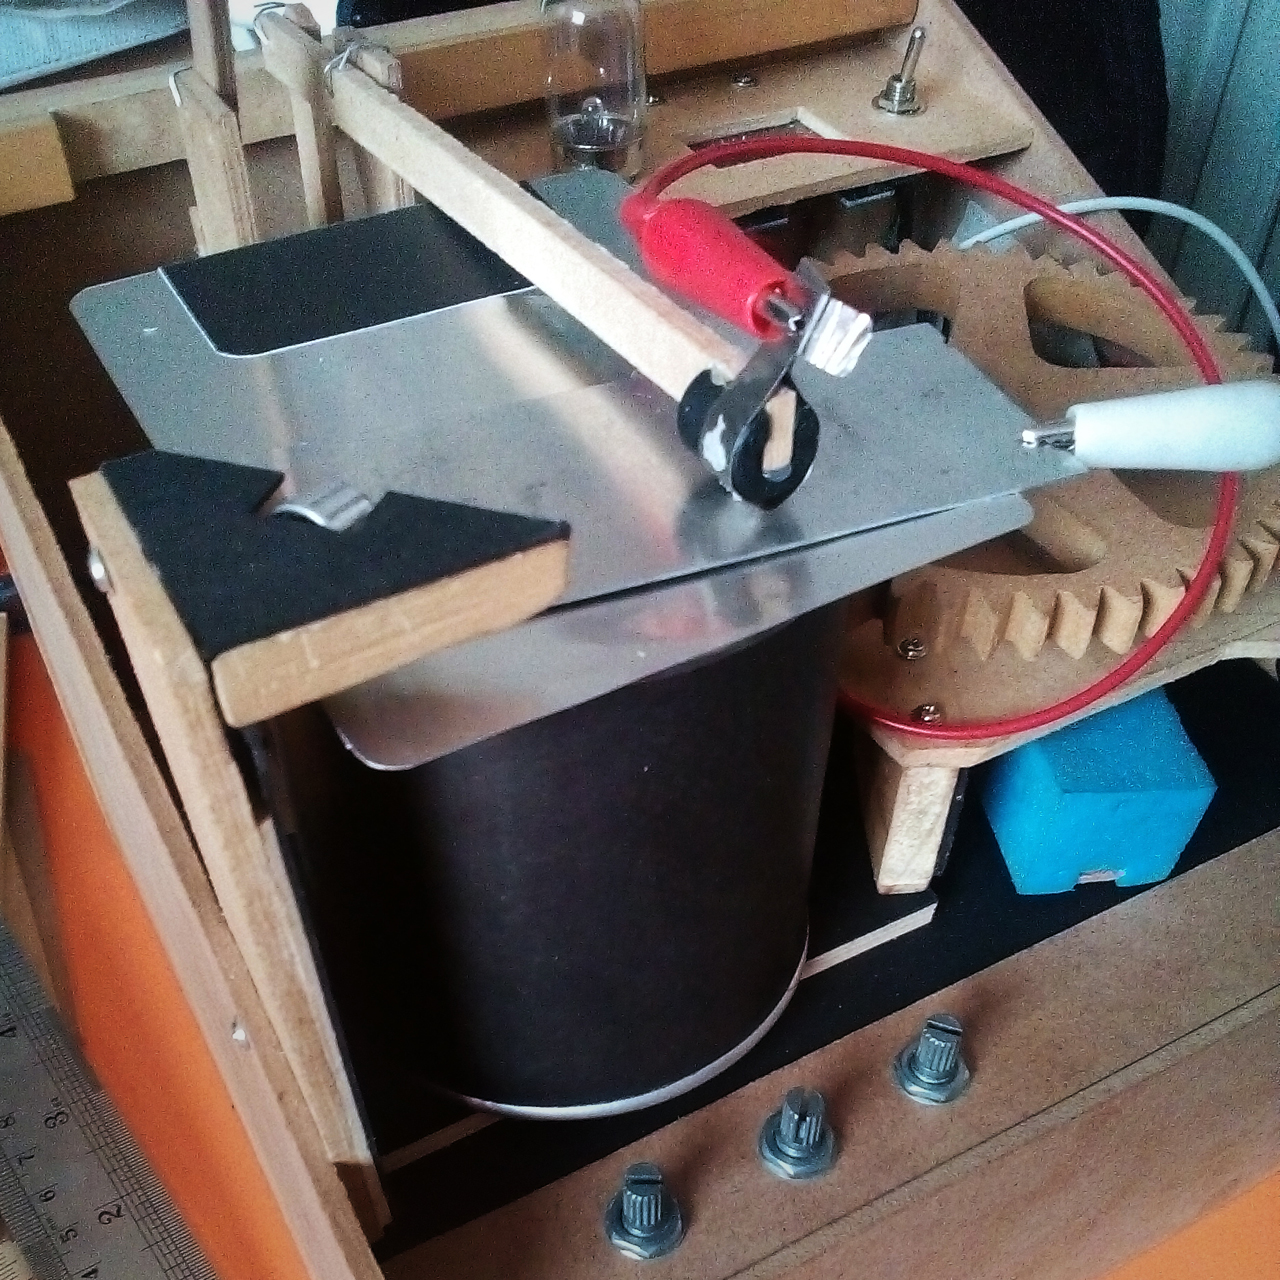
As we did with the kick system, we need a mechanical part, and an audio one. I've attached a drawing of the mechanical system I designed. Yes, I used a Pringles can upside down, it was the perfect shape, had the best sound I could find, and the crisps were delicious.
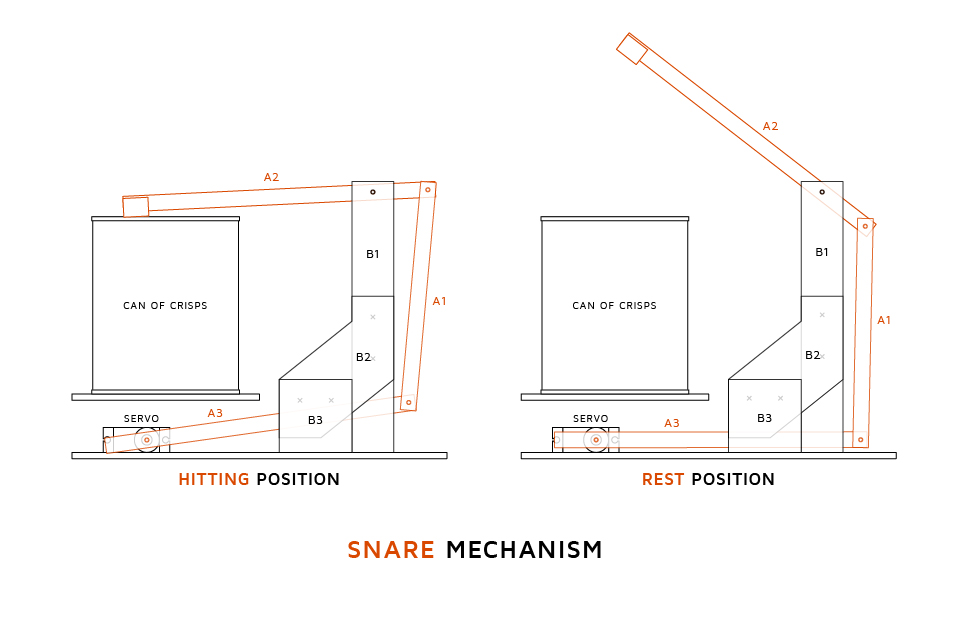
Just like we did with the kick, we need to get the angle at which each servo will be when resting and when hitting. Again, tinkering with the Potentiometer+Servo tutorial, we can get that information.
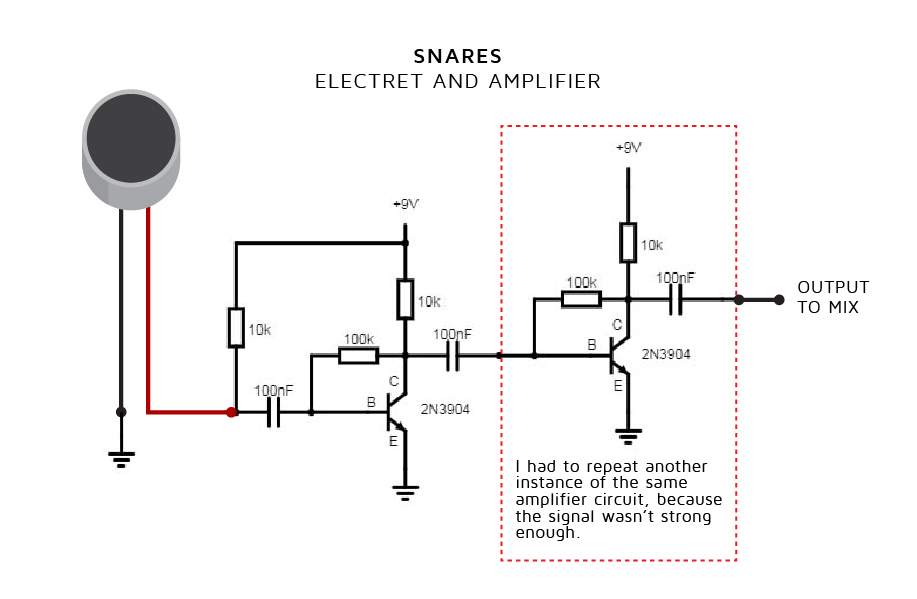
The audio signal from the electret is amplified by another instance of the same circuit used in the kick's amplifier, although in this case with a few modifications to power the electret microphone, and without the low-pass filter used in the kick.
The HiHat
I used a different approach to this sound, a transistor-based white noise generator circuit, and a led indicator, are activated by the Arduino when it is required. White noise is a random signal with equal intensity at different frequencies. Roughly speaking, just as white light contains all colours, white noise contains all frequencies, and it sound like a nonexistent radio station (static). This is a noise commonly used in electronic music and audio synthesis, I read that it was even used to make the classic sound of the 80's snares and cymbals.
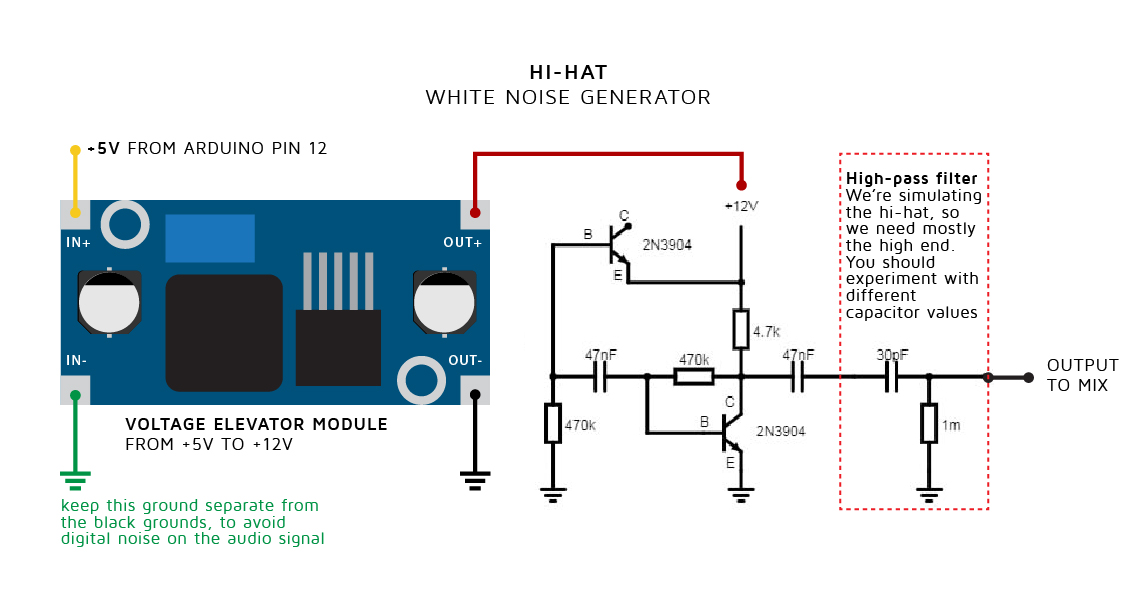
As the diagram shows, after the noise is generated, it then goes through a high-pass filter to eliminate the unwanted frequencies and to accentuate the drum cymbal sensation.
The white noise generator needs 12v or higher to function, that are provided by a step up voltage elevator, which itself is powered directly by an Arduino pin. This is the only instance in which an audio system is attached directly to the Arduino, because noise has to be generated only in certain times, and noise seems not to be an issue in a circuit that generates noise. You can't make white more white can you?
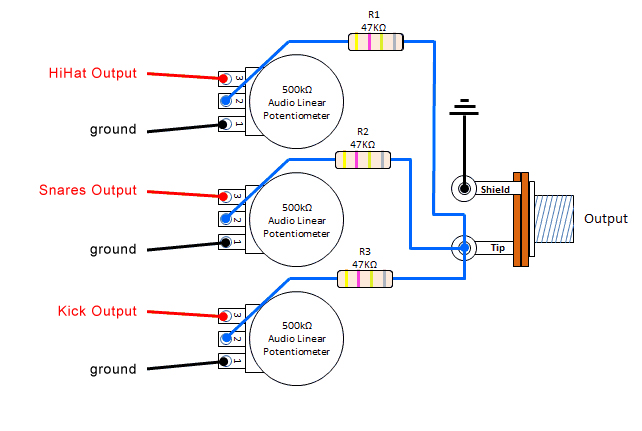
The Signal Mix & Complete Diagram
After all of three drum-kit sounds are generated, each signal goes through a potentiometer and a basic passive mixer circuit, which mixes the final audio signal.
We also need a way to select what drumbeat to play and when to start and finish playing. For this tutorial, we will use a tact button connected and a simple switch for each function respectively (connected to the Arduino pins 2 and 3, as the image above shows)

Robotic Acoustic Component Base
The core hardware for the DrumCube Robot Drummer is relatively accessible. You will need:
- Arduino Uno/Nano: The central brain for controlling timing, servo movements, and triggering the hi-hat circuit.
- SG90 Micro Servos (x2 or x4): These provide the precise physical motion to strike the kick and snare elements. For the snare, using two servos (as shown in the mechanical drawing) allows for faster, alternating hits.
- Popsicle Sticks or Aluminum linkages: Used as the "drumsticks" attached to the servo horns to strike the targets.
- Physical Cardboard Drum Objects: Found objects like the Pringles can for the snare provide the acoustic body. The kick uses piezo elements mounted on a surface.
Explaining the Code I - Servo Time Calibration
Now, given that this project is a musical instrument, it needs to generate sound in the right time. So, before we start coding different rhythms and functionalities, specially in the case of the kick and the snare, we need to program the movement of the servos to start some milliseconds before their turn to sound, in order to compensate the time the stick takes to go from resting to hitting, and make the sticks hit their destination just in time.
To solve this problem, I improvised a simple system to measure the time it took every servo to go from its resting position to the exact point of hitting its destination. I covered the sticks and the areas where they hit with aluminum foil, and attached alligator clips to the foil, creating a connection only measurable by the arduino when the stick hits its target. Then I wrote a simple bit of code, which did two things: firstly, make the servo sticks hit repeatedly their target, going from resting angle, to hitting angle. And secondly, print the time when the servo command was sent, and the time when the stick close the connection with its target. Subtracting this two values will give us the time it takes the sticks to make a sound, from resting to hitting.
After doing this enough times, you'll end up with a lot of roughly similar numbers, which you can then average, and obtain a pretty much usable time of anticipation for every servo.
Battling Micro-Servo Resonance Disruption
When servos move and stop abruptly, they can vibrate or "ring," causing unwanted mechanical noise and potentially affecting timing. To mitigate this:
- Mechanical Damping: Use rubber grommets or foam to mount the servos. Adding a small piece of soft material (like the sponge on the piezos) to the end of the striking stick also helps dampen impact vibration.
- Velocity Management: Instead of using the standard
Servo.hlibrary which moves servos at maximum speed, consider using a library likeVarSpeedServo.h. This allows you to program slower, smoother acceleration and deceleration profiles for the servo movement. This reduces mechanical shock and resonance, leading to quieter operation and potentially more consistent striking force.
Explaining the Code II - Drum Combinations
Now, we define a number code for every combination of kick, snare, and hihat in a beat. We assign the first odd numbers to each of our three drumkit elements:
Kick\tSnare\tHiHat
1\t3\t5
And then, if we need to play more than one element at the same time, we simply add the numbers of each element. Kick and snare would be 4, kick and HiHat 6, and so on. Nought/zero is a silence. Now we have a number for every possible drum elements combination, and we can store them in a variable (cycleNumber variable).
5 HiHat\t\tx \t-\tx\tx
3 Snare\t\t-\tx\tx\tx
1 Kick\t\tx\tx\t-\tx
_________________________________________
COMBINATION:\t6\t4\t8\t9
Explaining the Code III - Semiquaver Cycle (Hitting on Time)
We now know that is necessary to anticipate the commands for the kick and snare servos, but we also have to play the hi-hat on time, which is a circuit that work almost instantly.
To approach this problem, which might get a bit confusing down the road, I decided to establish a system of checkpoints inside every semiquaver (or sixteenth note) of every bar. I chose a sixteenth because in the tempo of most common rhythms, a sixteenth of a note last about 100 to 150 milliseconds, which is also the speed at which the slower servo (in my case) can go from rest to hitting, or vice verse. We can change the speed of the tempo by simply changing the amount of milliseconds assigned to the timeTotalCycle variable. Here Is a useful table of tempo, notes, and milliseconds equivalence. If we tried to play something faster, and we reduce the total time of the cycle lower than the time the slower servo takes to move, this servo might be unable to reach hitting position from rest, and therefore no sound would be produced. A more detailed look at the diagram I've posted, will explain this better.
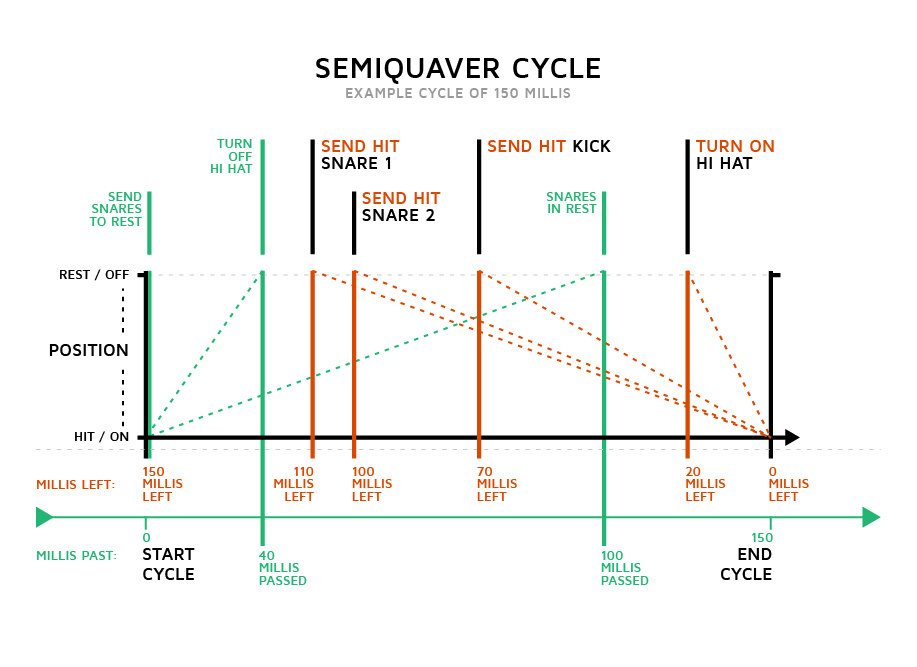
As shown in the diagram, at the start of what I called the semiquaver-cycle we send the command for positioning the snare servos on their rest position, in case that they had been commanded to hit in a previous cycle. Also at this point, we begin counting the milliseconds that has been set for the duration of the entire semiquaver cycle.
After that, the Arduino will start checking if the amount of time left for the cycle to end, is equal to any of the times that each servo needs to produce sound. The idea here, is to detect the point in time at which we have to send the hitting command so that every servo reach and hit their target (and make their sound) at the exact end of the cycle. Every element will therefore have to start its movement at different checkpoints in the cycle, depending on how fast the servo and its mechanism are. The hihat white noise circuit, on the other hand, can be just turned on at the very end of the cycle or a few milliseconds earlier (20 recommended). Its ending will be commanded on the next cycle in a checkpoint defined by you, how long after the start of the cycle you set it, will be how long the hihat sound is (I set mine between 30 and 40 milliseconds, but that is up to you).
Every time one of these checkpoints are met, the Arduino will check if its corresponding element is intended to action, by comparing it with the drum combination number stored on the cycleNumber variable (the number code system explained earlier). Example, if the snare's checkpoint is met, the snare's number is 3, so the hitting command will only be sent if the drum combination has the numbers 3, 4 (3+1), 8 (3+5) or 9 (3+1+5).
5 HiHat\t\tx \t-\tx\tx
3 Snare\t\t-\tx\tx\tx
1 Kick\t\tx\tx\t-\tx
_________________________________________
COMBINATION:\t6\t4\t8\t9
Why using two sets of sticks and servo in the snare mechanism?
Well, if you think about it, if only one servo would have been used, and lets say its rest-to-hitting time was 100 milliseconds, the shortest amount of time that our semiquaver cycle could last would be 200 milliseconds. 100 to allow going back from hitting to rest, and then 100 more from rest to hiting. 200 millisecond for each sixteenth note equals to a tempo of around 75 bpm (“dream on” by aerosmith), which is pretty slow and limiting in terms of possible rhythms.
ข้อมูล Frontmatter ดั้งเดิม
apps:
  - "1x Arduino IDE"
author: "FrancoMolina"
category: "Gaming & Entertainment"
components:
  - "1x Arduino UNO"
  - "1x SparkFun Electret Microphone Breakout"
  - "1x Soldering iron (generic)"
  - "3x Rotary potentiometer (generic)"
  - "2x Piezo Element"
  - "5x Transistor - NPN, 60V 200mA (2N3904)"
  - "1x Mastech MS8217 Autorange Digital Multimeter"
  - "1x Slide Switch"
  - "1x Ultra-small LM2596 Power Supply Module DC / DC BUCK 3A adjustable buck Module Regulator Ultra LM2596S Compatible With Arduino by Atomic Market"
  - "3x SG90 Micro-servo motor"
  - "1x Tactile Switch, Top Actuated"
  - "1x Breadboard (generic)"
  - "1x LAOMAO DC-DC Step-up Boost Power Supply Module Adjustable Power Apply 3V-32V to 5V-35V XL6009 400KHz 4A Max"
description: "Acoustic percussive kinetics! Synchronize deep sequential heavy algorithmic chronological arrays physically manipulating massive dual micro-servo sticks natively exactly replicating incredibly complex real-world polyrhythmic syncopations."
difficulty: "Intermediate"
documentationLinks: []
downloadableFiles: []
encryptedPayload: "U2FsdGVkX18sDGQdDebCIgzWDYS0FxIdCpyajuxQDSK4EfCTN0/B+PIRya5MMJEn4Zlam7gFxfPEcADPAkXz+EpFinF44CnE3ziYqcidXLM="
heroImage: "https://cdn.jsdelivr.net/gh/bigboxthailand/arduino-assets@main/images/projects/drumcube-an-arduino-robot-drummer-7e698b_cover.jpg"
lang: "en"
likes: 46
passwordHash: "83b5f66aa488999637157b66a183a67f55e1095ce76c06c9433724841ef196d4"
price: 2450
seoDescription: "Build DrumCube, an Arduino Robot Drummer using a transistor noise-generator, servos, a can, and piezos for automated drumming."
tags:
  - "audio"
  - "art"
  - "music"
title: "DrumCube, an Arduino Robot Drummer"
tools: []
videoLinks:
  - "https://www.youtube.com/embed/15xTtqxIOfM"
views: 28219