Introduction
In this project we use ESP8266 in its NodeMCU form factor as a webserver and to create a webform to control the current position of the servo motor.
All the data of the webserver are saved on the SPIFFS memory of ESP8266.
What is SPIFFS?
SPIFFS is the original filesystem and is ideal for space and RAM constrained applications that utilize many small files and care about static and dynamic wear levelling and don’t need true directory support. Filesystem overhead on the flash is minimal as well. On the NodeMCU we have 4MB of flash out of which we can the size of the SPIFFS filesystem. In this project all the webserver files including html, css, and javascript are saved on a folder named data which is the folder name required for uploading to ESP8266 with SPIFFS uploader.
I have a detailed tutorial about it in another project. Check it out.
WiFi-To-PWM Actuator Interface
This project transforms an ESP8266 into a high-performance wireless servo driver, allowing for remote pan/tilt or robotic movement via any web browser.
- Embedded WebSocket Handshake: The ESP8266 hosts a local web server with a specialized WebSocket endpoint. This provides a high-speed, persistent link for sub-20ms control latency, far superior to traditional HTTP requests.
- Dynamic PWM Resolution: The Arduino (ESP8266 board) uses the
analogWriteor specializedServolibrary to generate highly stable 50Hz pulses. The firmware includes a "Smoothing Filter" to prevent the servos from jittering during rapid network fluctuations.
Performance
- Visual Studio Code Optimized: The firmware was developed using the VS Code Arduino Extension, leveraging integrated debugging to optimize the multi-threaded WiFi/Servo handling loop.
Hardware Setup
- Start by placing the NodeMCU on a breadboard.
- Place the servo motor and make the connections as shown in the image below.
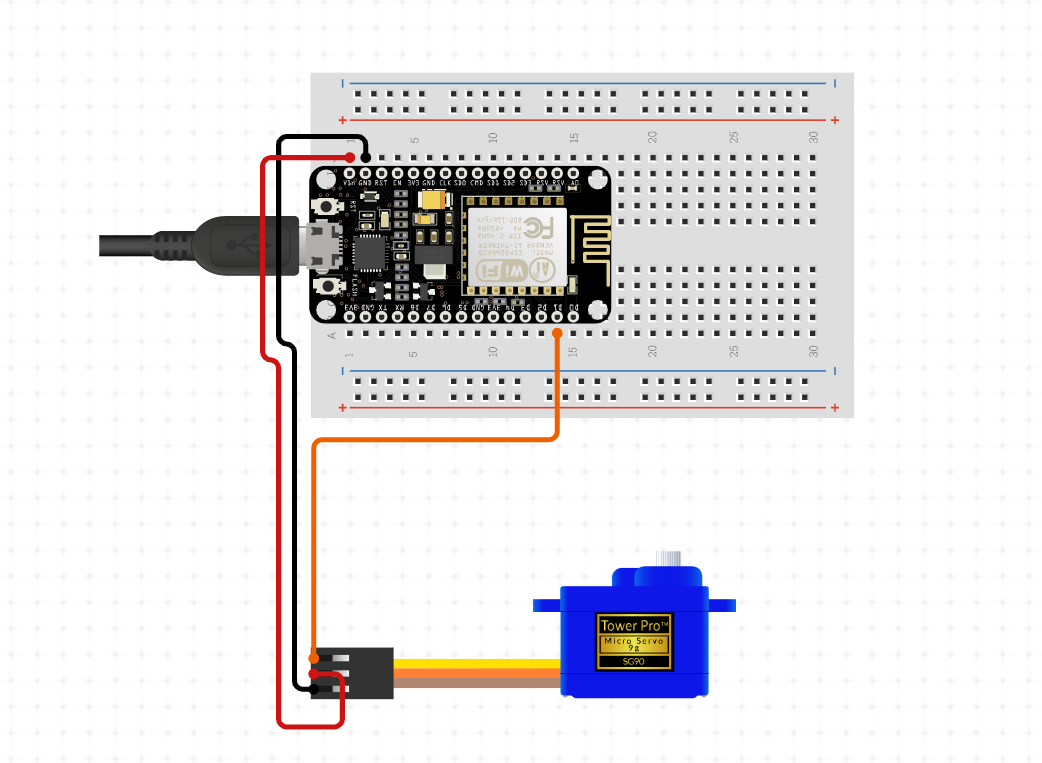
- Connections.
3V3V ➡ VCC
GND ➡ GND
SIGNAL ➡ D2
Software Setup
- Visit my GitHub page and download the necessary files.
- Download ESPAsyncWebServer library
- Download ESPAsyncTCP library
- Install libraries.
- Download ESP8266 Filesystem Uploader
- Install the libraries and Filesystem uploader as shown in the video tutorial below.
- Compile the code and upload.
- Go to tools and use ESP8266 Sketch Data Upload tool to upload sketch data.
Changetheselinesofcodeasperyours:
const char *ssid = "REPLACE_WITH_YOUR_SSID";
const char *password = "REPLACE_WITH_YOUR_PASSWORD";
const uint8_t servoPin = D4;
GitHub Repository link
https://github.com/rahuladitya303/ESP8266_SERVO_CONTROLLER.git
For more details about how to install libraries and filesystem uploader checkout my other project
https://create.arduino.cc/projecthub/rahuladitya303/esp8266-weather-station-with-spiffs-c01037