Introduction
In this video, we’re going to create a smart home network that builds upon our previous example. We again hack an Arduino Uno using JavaScript, but this time to create the simplest smart bulb. Because by “smart bulb,” we really just mean an LED.
This tutorial was developed by Tomomi from PubNub and also uses Johnny-Five. No, not the robot from the movie Short Circuit. It is an open-source JavaScript robotics framework that lets you program an Arduino with Node.js easily. The bulb itself is remotely controlled via a web portal.
To establish the real time communication between the Arduino and a web browser, we use the PubNub Data Stream Network (DSN). PubNub provides global infrastructure and allows you to build and scale real-time apps and IoT devices quite easily.
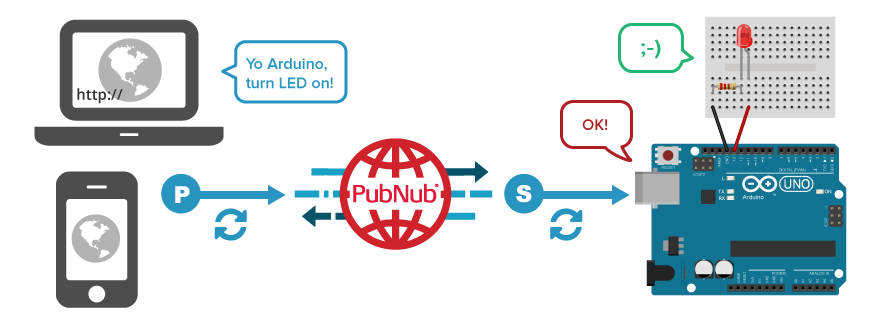
The remote controller (web app) is written in JavaScript. This is a simple user interface that includes only one button. While a completed code sample is available on CodePen, we use a simplified version in this tutorial so that it’s easier to follow along.
Enjoy the tutorial!
Note: at 5:40, where I am installing PubNub with npm, please do install v3.x.x to make the tutorial works. This is not compatible with PubNub Node SDK v4, which will be released soon!
$ npm install pubnub@3.15.2 --save
EXPANDED TECHNICAL DETAILS
JavaScript-Driven Hardware Orchestration
Part 2 of this series dives deep into advanced IoT patterns using the Johnny-Five framework and Node.js to control Arduinos over the web.
- PubNub Real-Time Bridge: The Arduino (running Firmata) is controlled by a Node.js server. The server uses the PubNub API to create a Publish/Subscribe channel, allowing the user to toggle hardware from a web-browser anywhere in the world.
- Event-Driven Sensor Polling: Instead of manual loops, Johnny-Five uses an event-emitter pattern (e.g.,
sensor.on("change", ...)) to push data to the web UI only when a significant change occurs, drastically reducing network traffic.
Performance
- High-Speed Firmata Link: Optimized for 115200 baud serial communication, providing a low-latency "Cloud-to-Hardware" response that feels instantaneous to the end-user.