Hi everyone!
I wrote just another library for creation of graphic menu for Arduino (ain't there plenty of them already?). It's good enough for me, so might as well be useful to somebody else=)
GEM (a.k.a. Good Enough Menu) - Arduino library for creation of graphic multi-level menu with editable menu items, such as variables (supports int, byte, float, double, boolean, char[17] data types) and option selects. User-defined callback function can be specified to invoke when menu item is saved.
Supports buttons that can invoke user-defined actions and create action-specific context, which can have its own enter (setup) and exit callbacks as well as loop function.
Supports AltSerialGraphicLCD, U8g2 and Adafruit GFX graphics libraries.
The library is provided with all necessary documentation and annotated examples, as well as Wiki section on GitHub that features additional guides for the supplied examples and How To's.
When to use
If you want to equip your project with graphic LCD display and let user choose different options and settings to configure its operation. Whether it is control panel of smart home or simple configurable LED strip, GEM will provide all necessary controls for editing variables and navigating through submenus, as well as running user-defined functions.
Structure
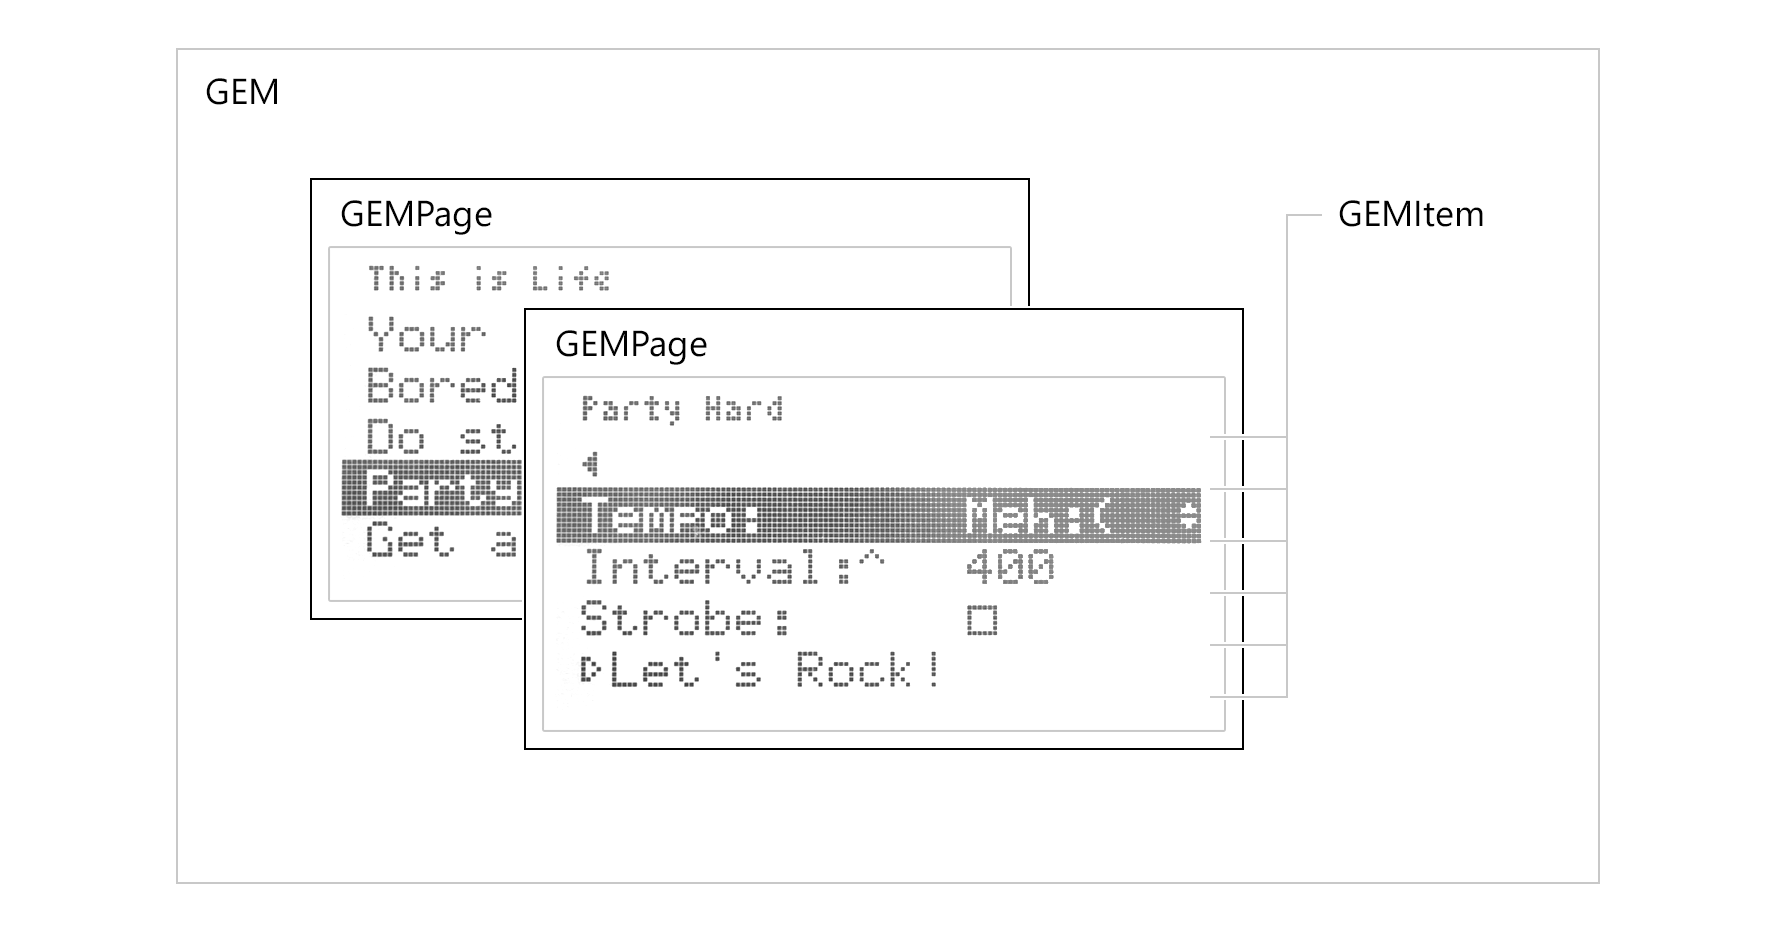
Menu created with GEM library comprises of three base elements:
- menu item (
GEMItemclass) - represents associated variable, button, or link to the next menu level (menu page); - menu page (
GEMPageclass) - consists of list of menu items and represents menu level; - menu object itself (
GEM, orGEM_u8g2, orGEM_adafruit_gfxclass) - can have multiple menu pages (linked to each other) with multiple menu items each.
Deep UI Software Architecture: Good Enough Menu (GEM)
Making an LCD display a temperature is easy. Making an elaborate "Settings Menu" with 12 nested pages (e.g., Settings -> Advanced -> Calibrate -> Confirm) using standard if/else logic is an absolute nightmare that will ruin thousands of lines of code. The Good Enough Menu (GEM) project completely revolutionizes UI engineering! It introduces explicit C++ Data Structures (Linked Lists and Pointers) specifically designed to automate the painful generation of massive hardware multi-level menus!
Instantiating Page Structs (`GEM_Adafruit_GFX`)
The GEM library uses deeply advanced C++ Object-Oriented principles.
- You do not manually write
if (button == UP) { lcd.print("Settings"); } - You create massive structural UI objects globally!
// Create the explicit Menu Objects! GEMPage menuPageMain("Main Menu"); // The Root! GEMItem menuItemTemp("Set Temp", tempVariable); // Creates an editable number UI physically linked to the CPU variable! GEMItem menuItemRun("Start Motor", triggerMotorFunction); // Links to a function!// Link them together! menuPageMain.addMenuItem(menuItemTemp); menuPageMain.addMenuItem(menuItemRun);
- The GEM library automatically calculates where they are drawn on the OLED screen, handles the little
->selection cursor scrolling, and flawlessly handles the "Next Page" math automatically!
Linking Rotary Encoders Seamlessly
Navigating a massive 50-item deep list with two Push Buttons (Up/Down) is physically exhausting.
- The software structure brilliantly integrates instantly with Rotary Encoders.
- By tracking the
A and BQuadrature interrupt logic of the Encoder spinning infinitely left or right!if (encoderSpunRight) { gem.setMenuDirection(GEM_KEY_DOWN); } if (buttonPressed) { gem.setMenuDirection(GEM_KEY_OK); } - Pushing the Encoder button instantly triggers the execution callback
triggerMotorFunction(), launching the C++ script identically to a professional commercial 3D printer graphical interface!
UI Integration Arsenal
- Arduino Uno/Mega (Mega is vastly preferred if the menus are extremely deep, as the C++ Struct definitions consume a lot of SRAM memory, which an Uno lacks natively).
- Large I2C 128x64 OLED (SSD1306) or 2.8" SPI TFT.
- Rotary Encoder (KY-040) with built-in push-switches (Completely mandatory for an elegant UI experience over standard buttons).
- *The GEM Library Installed directly from the IDE Library Manager.*
Example of usage
Let's dive in one of the examples, Example 03: Party Hard!, that comes with the library (feel free to check it out as well as others that come with GEM library).
Installation
Library format is compatible with Arduino IDE 1.5.x+. There are two ways to install the library:
- Download ZIP-archive directly from Releases section of the GitHub repository and extract it into GEM folder inside your Library folder.
- Using Library Manager (since Arduino IDE 1.6.2): navigate to
Sketch > Include Library > Manage Librariesinside your Arduino IDE and search for GEM library, then clickInstall. (Alternatively you can add previously downloaded ZIP throughSketch > Include Library > Add .ZIP Librarymenu).
Whichever option you choose you may need to reload IDE afterwards.
Each of AltSerialGraphicLCD,U8g2 and Adafruit GFX libraries are required to be installed by default as well. However, it is possible to exclude support for not used ones. See Configuration section of Readme for details.
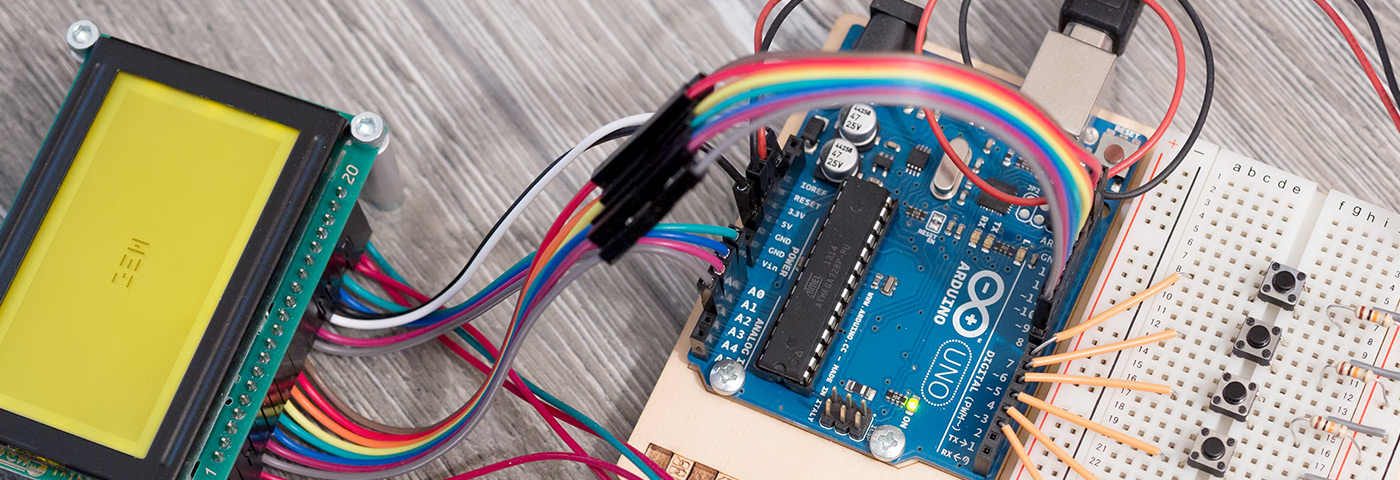
Hardware setup
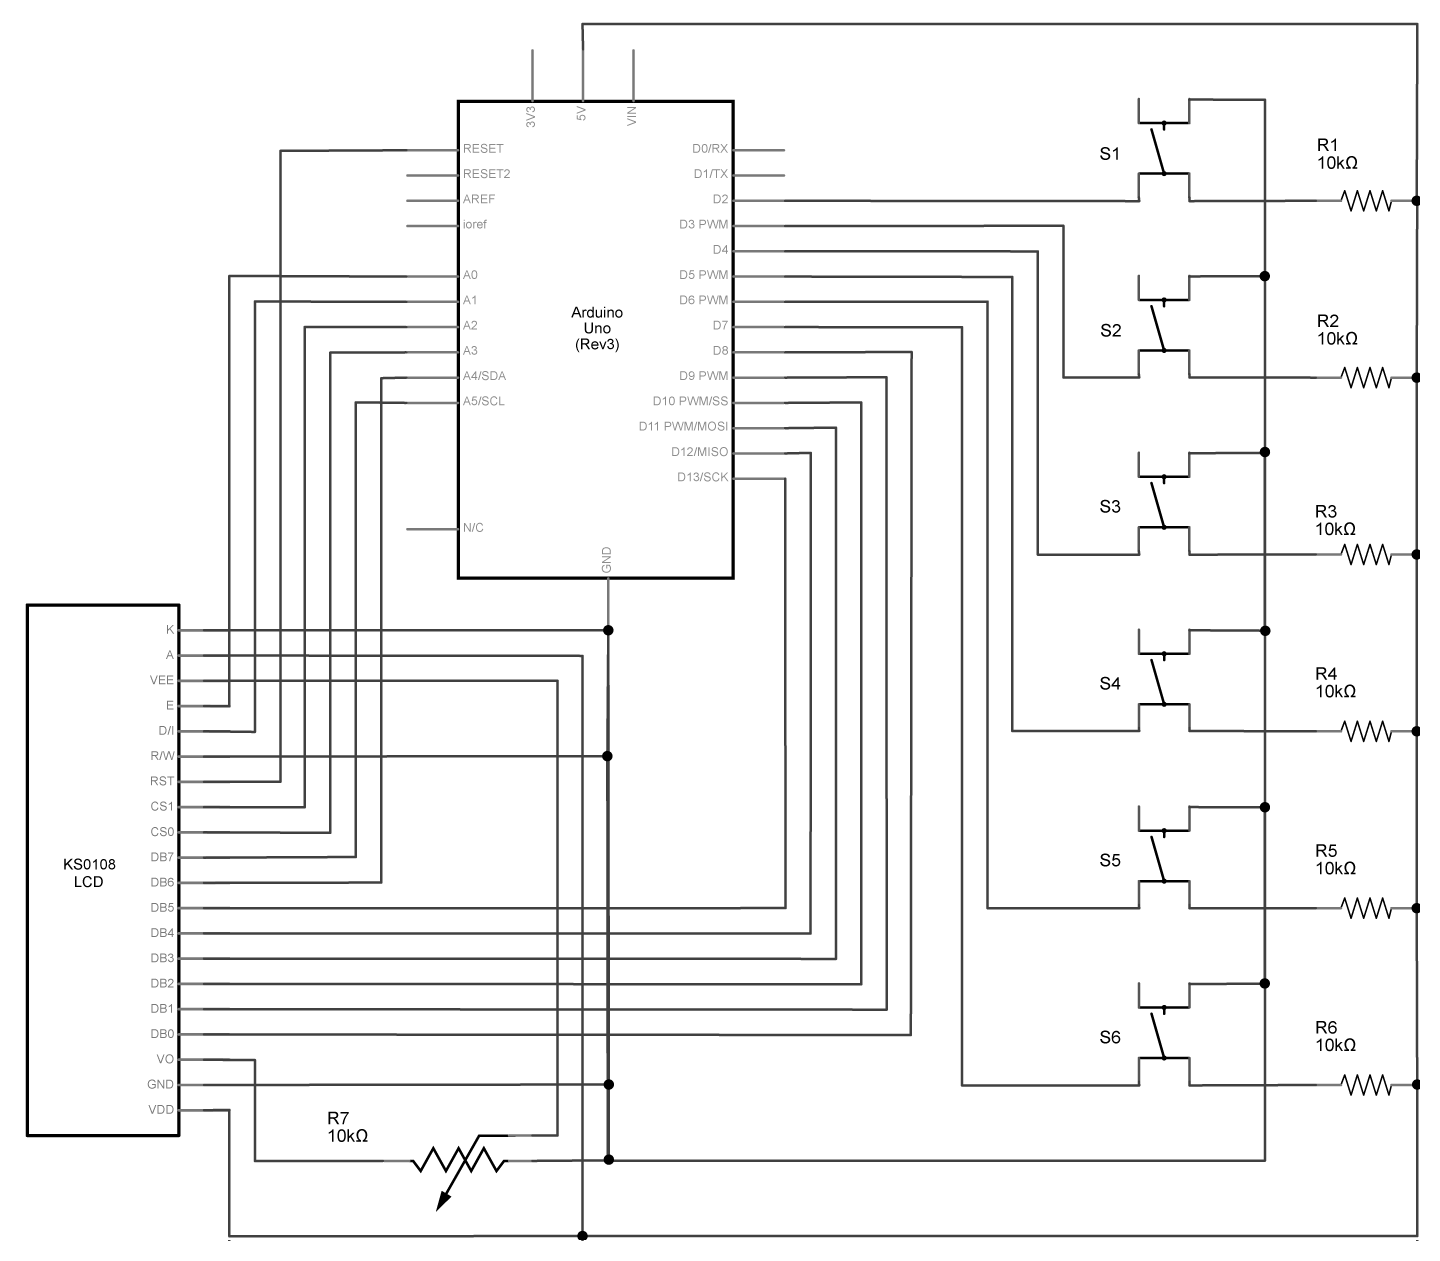
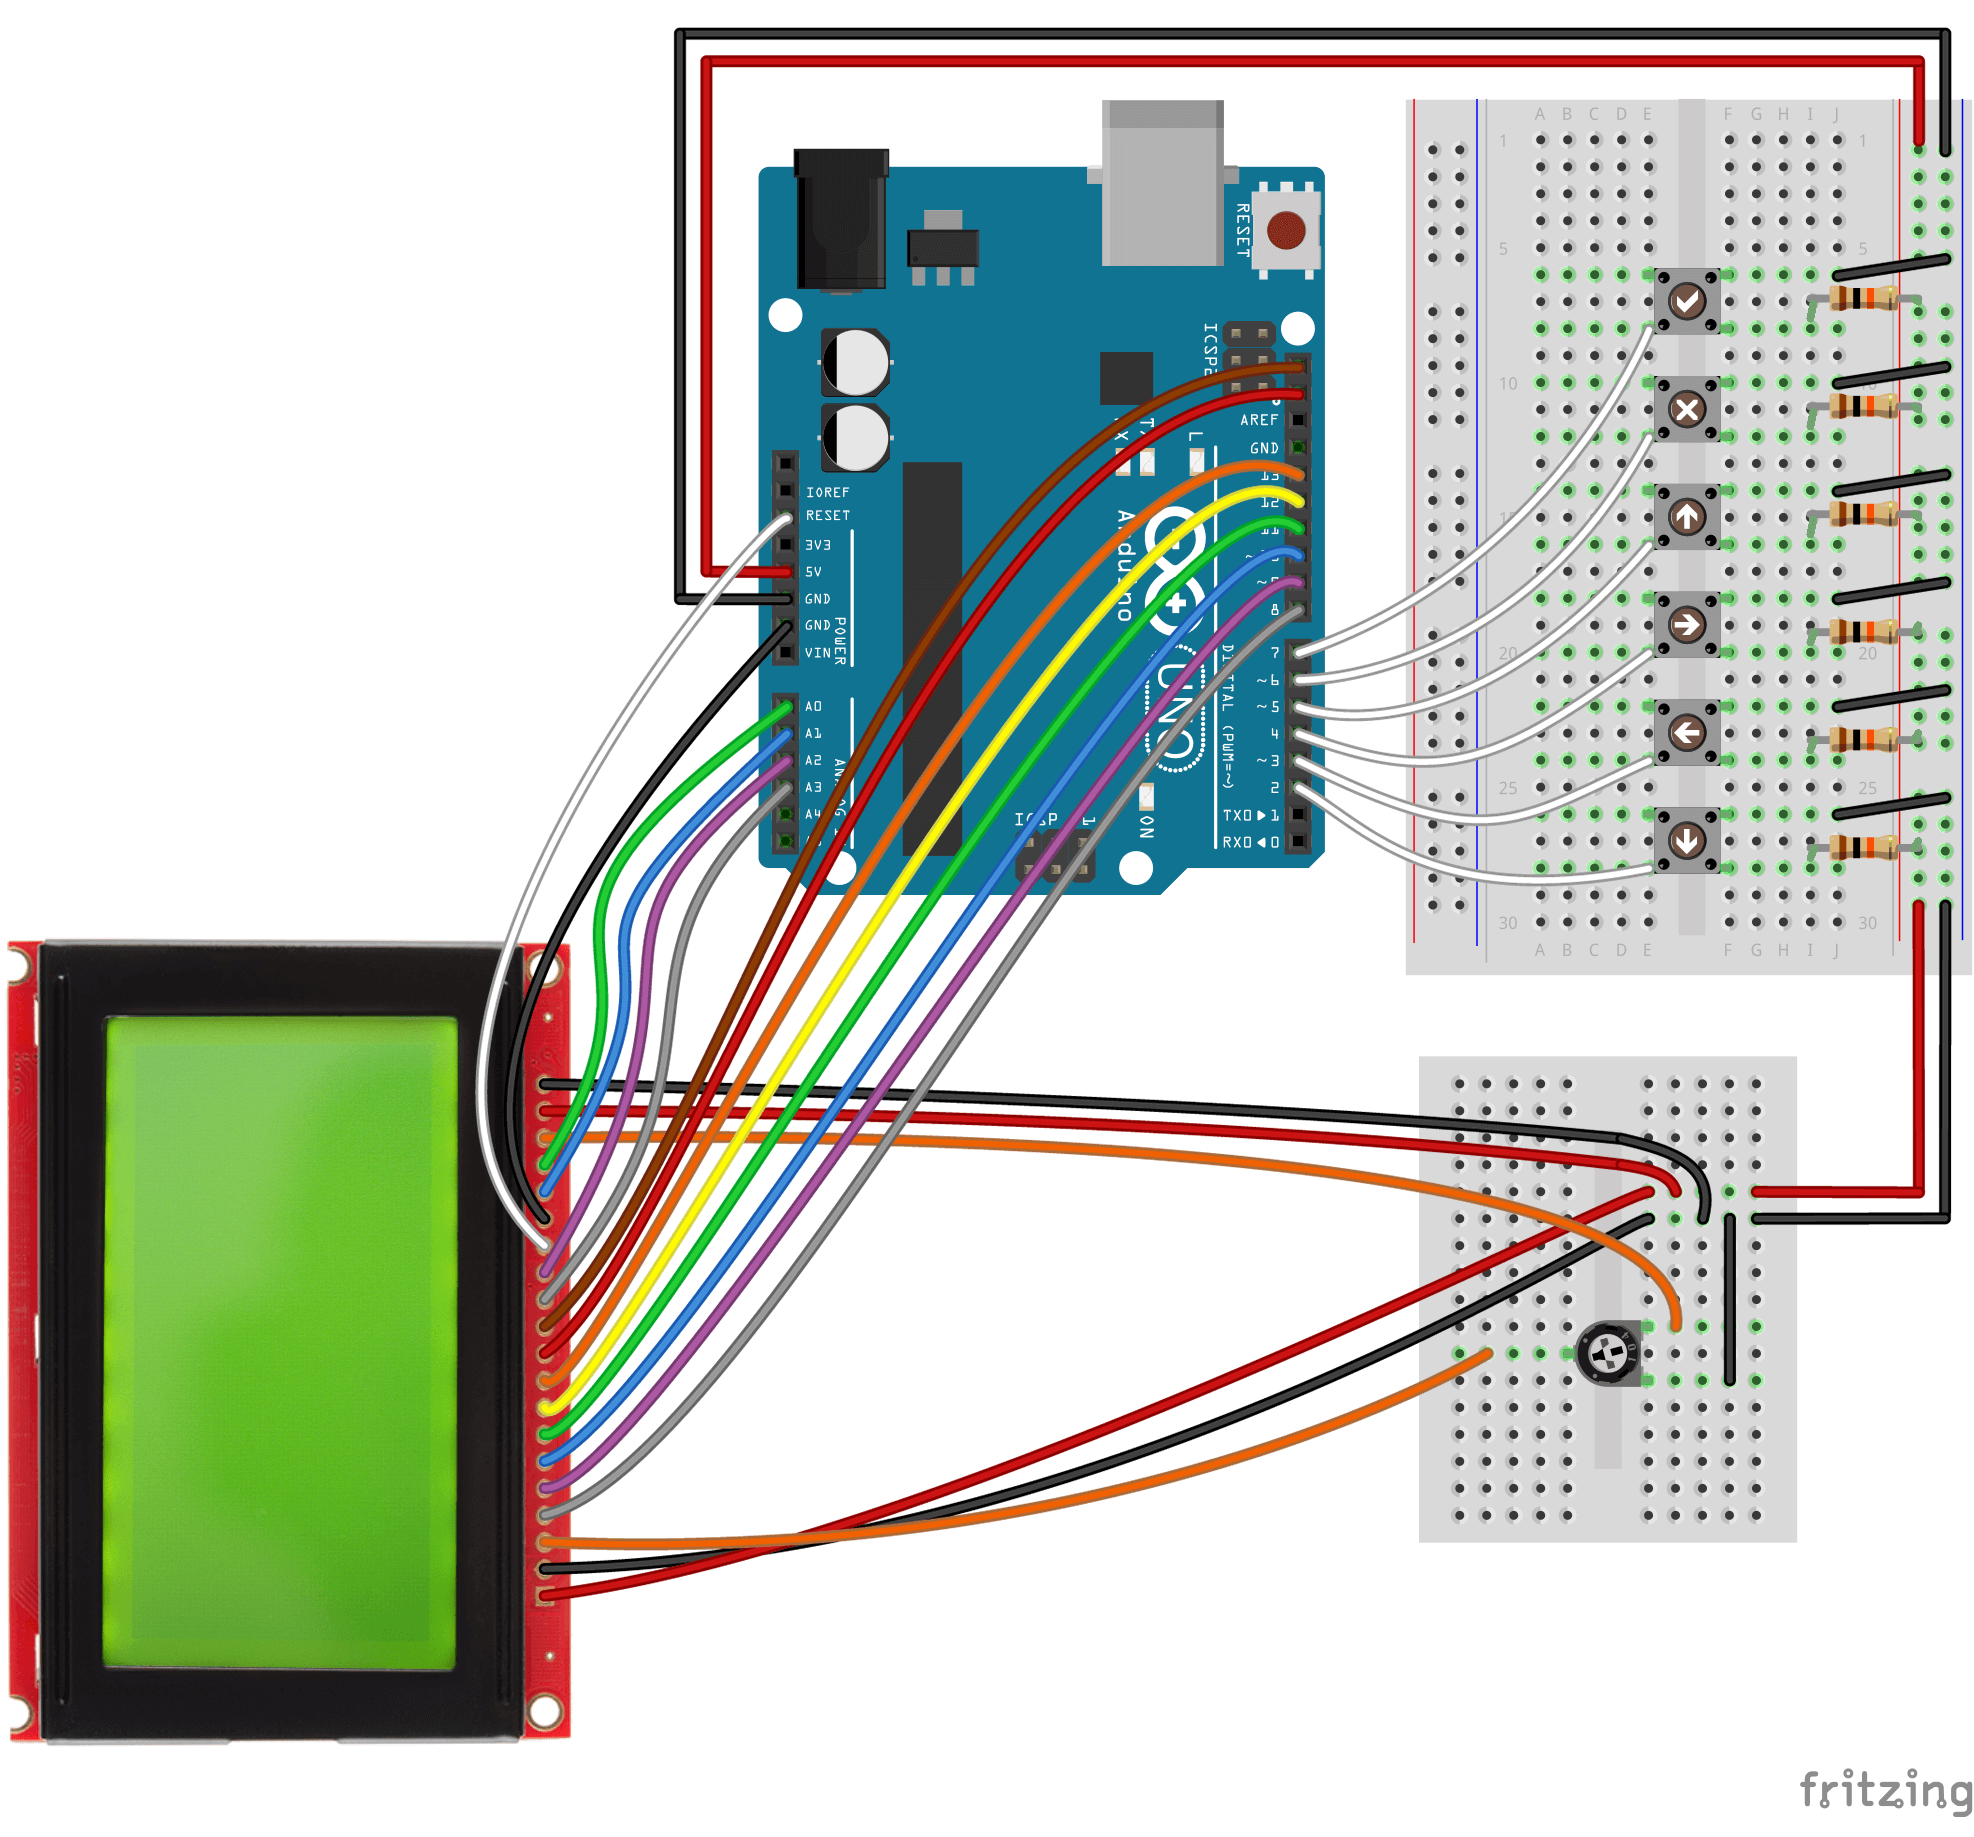
Test bench for U8g2 version of library consists of 128x64 Graphic LCD screen (with addition of one potentiometer to control contrast of the screen) and 6 push-buttons (momentary switches) used to navigate through the menu: four directional controls, one Cancel, and one Ok.
Schematic
Each switch is connected to the input pin 2 to 7 of Arduino using pullup resistor (so the LOW means that the button is pressed). You may wish to implement additional debounce filtering to minify chances of false readings at the moment of button press.
Breadboard
Connect one terminal of each momentary switch both to its corresponding Arduino input pin (2, 3, 4, 5, 6, 7) and to 5V through 10kOhm pullup resistor. Connect the opposite terminal to ground.
Connect LCD screen to an Arduino board as shown in the schematic above (with one terminal of 10kOhm potentiometer connected to Vo pin of LCD screen and the other two to Vee and ground).
Use
This test bench is compatible with the U8g2 examples supplied with the GEM library (if not stated otherwise). After compiling and uploading sketch to Arduino, wait while LCD screen boots and menu is being initialized and drawn to the screen. You now may use push-buttons to navigate and interact with the menu. See the following description of the Party Hard! example for details.
About Party Hard! Example
This example demonstrates creation of one page menu with one editable menu item associated with int variable, one with boolean variable, one option select, and a button, pressing of which will result in launch of animation sequence drawn to the screen. Delay between frames is determined by value of int variable, setting of which to 0 will enable manual control of the frames through navigation push-buttons.
Callback function is attached to option select to control the other variables based on selected option (thus creating sort of preset selector).
Another callback function is attached to menu item linked to int variable, making sure that variable is within allowable range.
Highlights
In this example it is shown how to:
- create editable menu item associated with
intvariable; - create editable menu item associated with
booleanvariable; - create
byteoption select; - add menu item callback;
- make menu item readonly;
- create button with context-based action.
Sketch
Annotated sketch (as well as additional file containing animation sprites) is supplied with the library and also is attached here.
Run
After compiling and uploading sketch to Arduino, wait while LCD screen boots and menu is being initialized and drawn to the screen. Then start pressing the push-buttons and navigate through the menu. Pressing "Ok" button (attached to pin 7) will trigger edit mode of the "Tempo" preset selector, or the "Interval" variable, or change state of "Strobe" option, or invoke action associated with "Let's Rock!" menu button.
Setting "Tempo" select to one of the available options will update the other variables accordingly (setting value and readonly mode of "Interval" variable as well as state of "Strobe" checkbox). Selecting "Custom" option will result in readonly mode of "Interval" disabled, thus allowing user to adjust its value directly. "Manual" mode will set "Interval" to 0, thus enabling manual navigation through animation frames (see below).
Setting "Interval" variable to the negative value (in "Custom" mode of the "Tempo" select) will result in it set to the value of 0 automatically.
Pressing "Let's Rock!" button will launch animation loop, consisting of 5 sprites consequently drawn to the screen with delay determined by the value of "Interval" variable (in ms). Setting "Interval" to 0 (or selecting "Manual" option from "Tempo" select) will enable manual navigation through animation frames by using "Left" and "Right" push-buttons (attached to pins 3 and 4 respectively).
Enabling "Strobe" mode will result in 2nd and 4th frames of the animation being drawn in inversed mode.
To exit animation loop press "Cancel" button (attached to pin 6).
More Information
Feel free to check out GEM GitHub and Wiki for documentation and more examples. Hope you'll find this library useful!