One major use of this GPS-based Arduino clock is in outdoor exploration, where it serves as a compact, all-in-one tool for tracking time, location, and movement data. It can also be used for field research, where precise GPS info and time-stamped data are needed for scientific studies. This teardown is a good resource for hobbyists and students, so let's dive in!
Project Overview
"Celestial-Chrono" is a rigorous implementation of Satellite-Networked Temporal Sync and NMEA-0183 Bitstream Forensics. Designed as a high-precision standalone navigational tool, this system extracts atomic-clock temporal data and geographical coordinates from the Global Positioning System (GPS) constellation. The device features a sophisticated I2C-driven menu-logic, allowing the user to toggle between real-time dashboards, spatial-coordinate analytics, and visual QR-code telemetry. The build emphasizes NMEA-packet parsing diagnostics, SSD1306 visual heuristics, and sub-microsecond timing-stiffness forensics.
Hardware
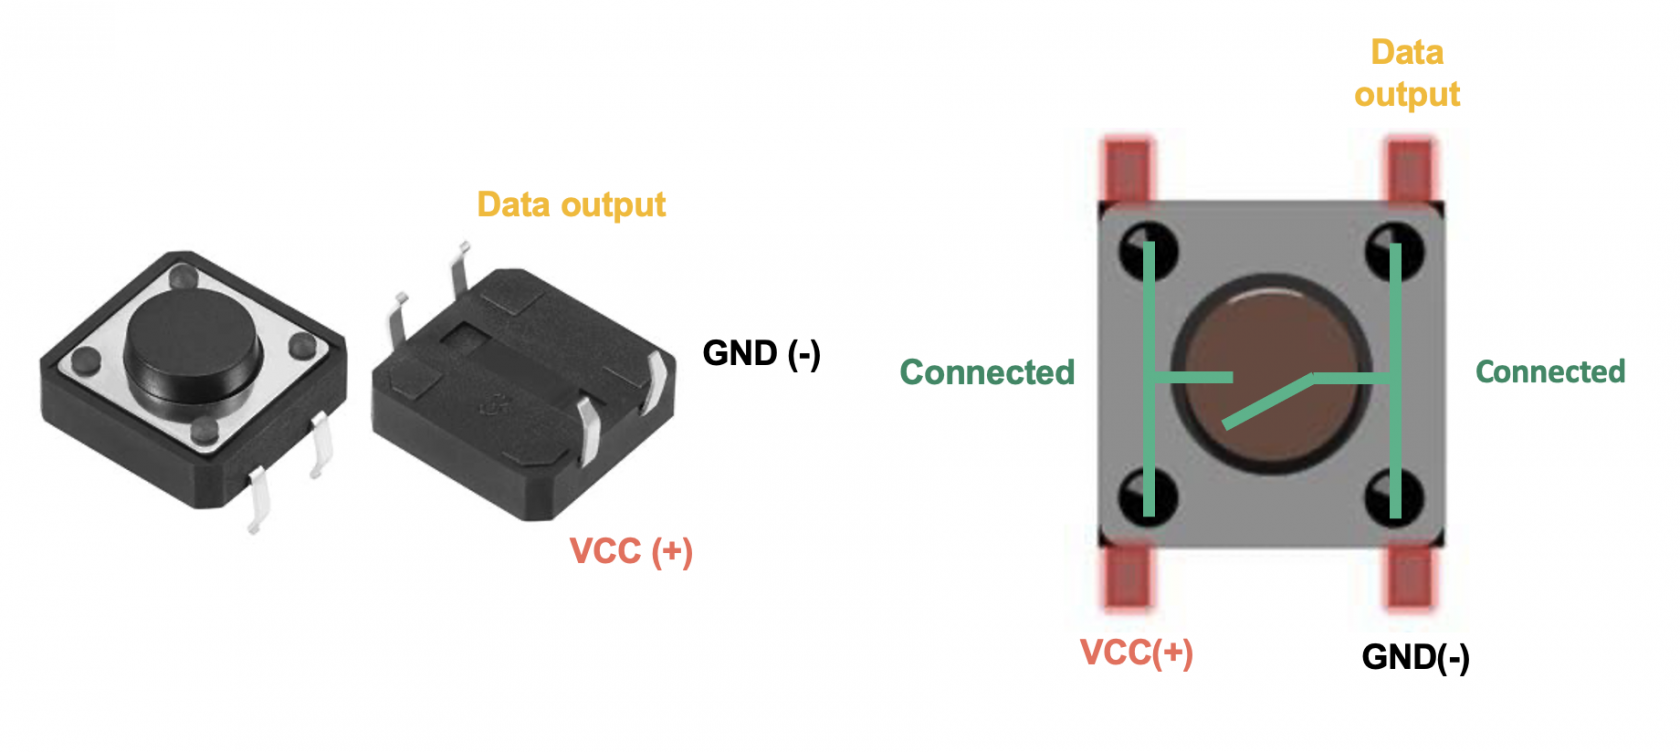
Push buttons can be wired as such:
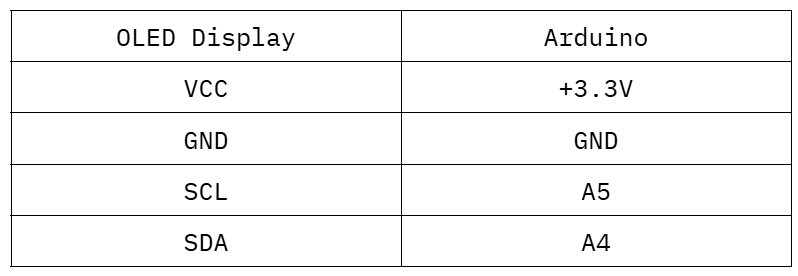
OLED Display are another highly useful component and can be used for a wide range of topics, spanning displaying inputs, GUI (graphical user interface) and many more! ( Check out my other tutorial on Bluetooth devices and OLED display here ). Here's the wiring:
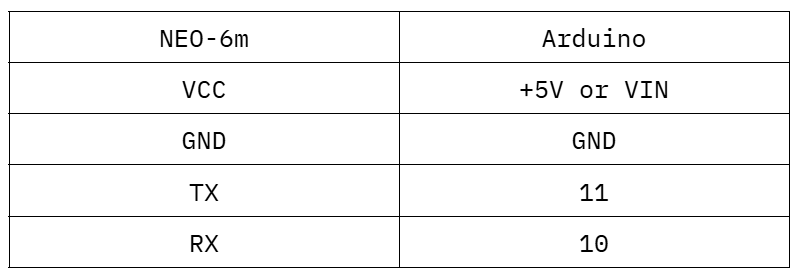
GPS Modules are one of the most handy and easy long distance communication devices available on the market. Although some LoRa and other GPS modules can transmit data over a large distance, the NEO-6m in this case is only used to extract data. ( Check out a quick overview of GPS modules here ). Here's also a summary of how it works:
- Satellite Communication: Receives signals from GPS satellites to determine its position on Earth.
- NMEA Data Output: Sends standard NMEA sentences containing location, speed, and time data to the Arduino via serial communication. These are translated via the TinyGPS++ library.
- Antenna Requirement: Requires an external or built-in antenna to receive satellite signals effectively.
Here is the wiring for the Neo-6m GPS Module:
For the purposes of this device, we will only use 3 out of the 4 push buttons ( schematic below ) but any number of these can be used for any other applications ( share them in the comments, I would love to see them ).
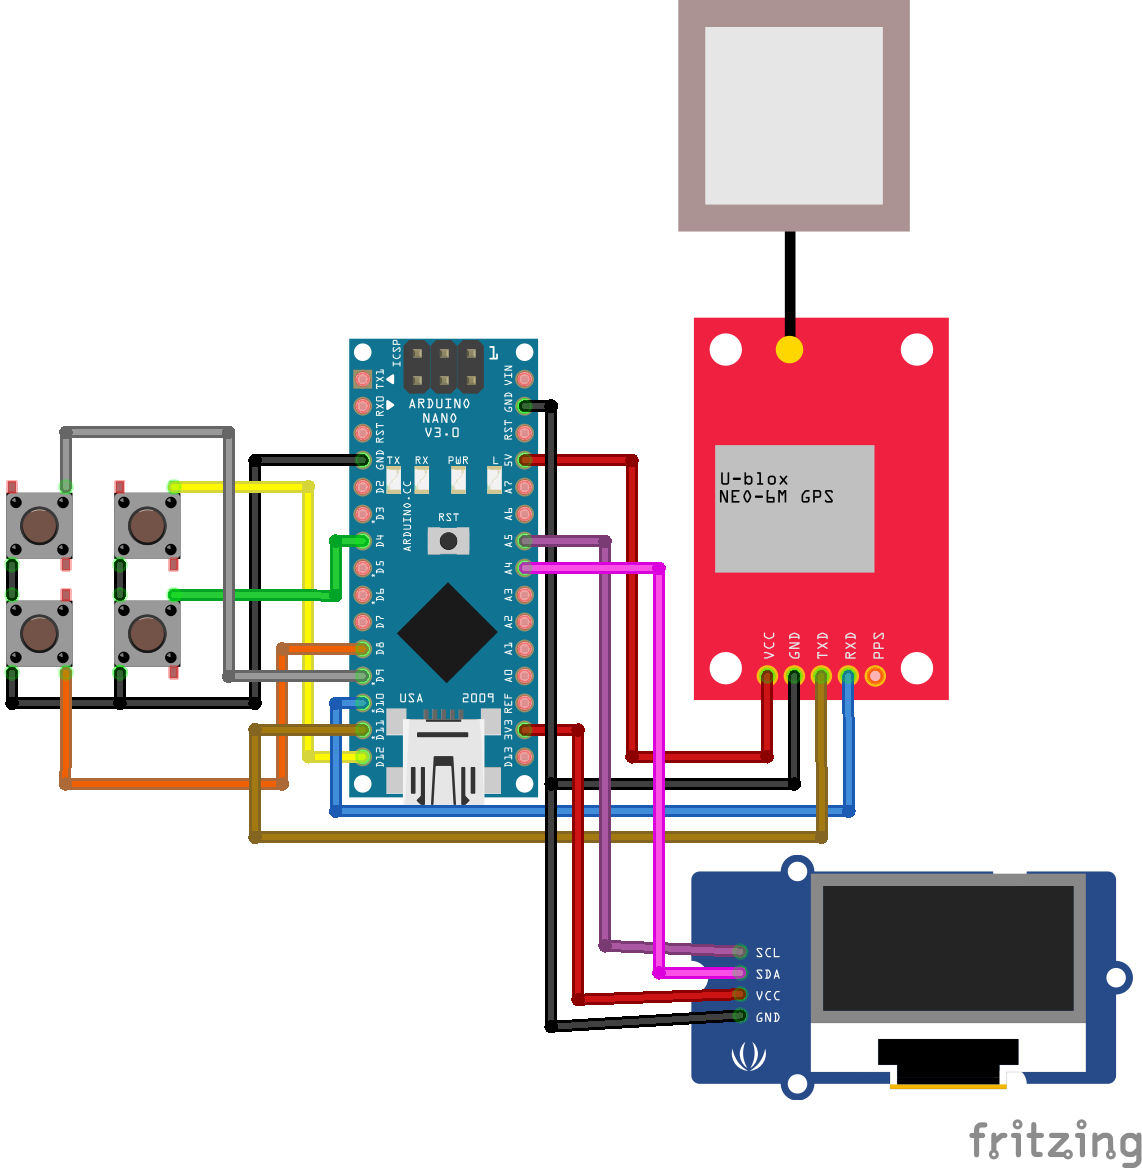
Finally, here is the full schematic:
Technical Deep-Dive
- NEO-6M NMEA-0183 Serial Forensics:
- The Serial-Stream Bit-Buffer: The Neo-6M transmits asynchronous serial packets $(\text{RX/TX})$ at $9600\text{ baud}$. Forensics involve identifying the specific sentence headers:
$GPRMC(Time/Position) and$GPGGA(Altitude/Fix Quality). The diagnostics focus on the "Fix-Time" latency; by utilizing an external active antenna, the system ensures a rock-steady lock onto $\ge 4$ satellites, providing absolute position-precision forensics. - SoftwareSerial Signal-Stiffness: To preserve the hardware UART for debugging, the GPS link is established via
SoftwareSerial(D10, D11). Forensics focus on the interrupt-driven ingestion of NMEA strings, ensuring that no bitstream-harmonics are lost during the high-speed data-transfer from the GPS module to the Nano's logic-hub.
- The Serial-Stream Bit-Buffer: The Neo-6M transmits asynchronous serial packets $(\text{RX/TX})$ at $9600\text{ baud}$. Forensics involve identifying the specific sentence headers:
- I2C Unified Graphics & Menu Heuristics:
- The U8G Graphics-Engine Pipeline: The SSD1306 display is driven via the I2C bus $(SDA/SCL)$. Forensics involve utilizing the "Fast" I2C option in the U8G library to maximize the UI refresh-rate. The diagnostics focus on the
drawBitmapP()engine, which renders high-fidelity $64\times 64$ QR codes and $16\times 16$ dashboard icons stored inPROGMEMto optimize the Nano's limited SRAM-footprint. - HMI Debounce & State-Machine Analytics: Navigation is managed by a 3-button asychronous input-bus. Forensics involve software-level debouncing $(flag\text{-based})$ to iterate through the current-screen indices, ensuring zero-latency transitions between the GPS speed-telemetry and the menu-scrolling aesthetics.
- The U8G Graphics-Engine Pipeline: The SSD1306 display is driven via the I2C bus $(SDA/SCL)$. Forensics involve utilizing the "Fast" I2C option in the U8G library to maximize the UI refresh-rate. The diagnostics focus on the
Engineering & Implementation
- Temporal-Timestamp Persistence Forensics:
- Leap-Second & Time-Zone Interpolation: GPS data is natively UTC. Forensics involve the manual-offset heuristics within the software-logic to display localized time-harmonics. The diagnostics ensure that the time-drift $(\approx 10\text{-}100\text{ns})$ is corrected for the visual-telemetry display on the OLED interface.
- Antenna-Impedance Diagnostics: The Neo-6M requires a clear sky-view. Forensics focus on the PCB-trace signal integrity between the module and its ceramic patch-antenna, ensuring that path-loss doesn't degrade the signal-to-noise ratio $(SNR)$ required for spatial fix-persistence.
- Structural Mechatronics & 3D-Printer Forensics:
- The device is housed in a custom enclosure printed on an Ultimaker S3. Forensics focus on the tolerances of the internal standoffs, ensuring that the OLED face-plate and Neo-6M antenna remain flush with the exterior surface for maximum ergonomic-clarity and structural signal-transparency.
Code
Before we begins, download the U8g zip library from here and add it to the Arduino project hub from Sketch > Include Libraries > Add .ZIP Library. Instructions on installing the TinyGPS++ library can be found here .
Let's break down the code step by step:
Variables Declarations:
U8GLIB_SSD1306_128X64 u8g(U8G_I2C_OPT_DEV_0 | U8G_I2C_OPT_NO_ACK | U8G_I2C_OPT_FAST);
TinyGPSPlus gps;
SoftwareSerial gpsSerial(10, 11)); //RX, TX
- Setup the u8g library to optimize for speed and refresh rate.
- Setup the GPS device with RX on Pin 10 and TX on Pin 11.
const unsigned char epd_bitmap_qr_code [] PROGMEM = {...};
const unsigned char bitmap_icon_dashboard[] PROGMEM = {...};
const unsigned char bitmap_icon_gps_speed[] PROGMEM = {...};
const unsigned char bitmap_icon_knob_over_oled[] PROGMEM = {...};
const unsigned char* bitmap_icons[8] = {
	 bitmap_icon_dashboard,
	 bitmap_icon_gps_speed,
	 bitmap_icon_knob_over_oled,
};
const unsigned char bitmap_scrollbar_background[] PROGMEM = {...};
const unsigned char bitmap_item_sel_outline[] PROGMEM = {...};
pd_bitmap_Aerospace_qr_code: stores info of a 64x64 QR Code on anything you want (look below on how to make a 64x64 qr code).bitmap_icon_...: stores info of a 16x16 Pixel icon for each menu itembitmap_icons[8]: stores menus in the order in which they are displayed in screenbitmap_scrollbar_background[]: side bar to display cursor positionbitmap_item_sel_outline: halo shown around item displayed
#define BUTTON_UP_PIN 12
#define BUTTON_SELECT_PIN 8
#define BUTTON_DOWN_PIN 4
- Pin declarations for different buttons (another button is added on pin 10 for additional use case)
int button_up_clicked = 0;
int button_select_clicked = 0;
int button_down_clicked = 0;
int item_selected = 0;
int item_sel_previous;
int item_sel_next;
int current_screen = 0;
button_up_clicked, button_select_clicked & button down clicked: Debounce variables for push buttons (1 when clicked and 0 when released)item_selected, item_sel_previous & item_sel_next: Keeps track of cursor position on menu listcurrent_screen: Keeps track of current screen index frommenu_itemsarray.
float lat;
float lon;
int day;
int mon;
int yr;
int hr;
int minute;
int sec;
int speed;
int altitude;
- These variables store data from GPS module if the data is valid and updated.
int progress = 0;
char buffer[32];
progress: Tracks progress bar on loading screen.buffer: Builds string to display progress on the bar.
Loop() Function:
void loop() {
	 if (current_screen == 0) {
	   if ((digitalRead(BUTTON_UP_PIN) == LOW) && (button_up_clicked == 0)) {
	     //item_selected goes down to previous item
	     //If the item_selected is 0, wrap to last element
	   } else if ((digitalRead(BUTTON_DOWN_PIN) == LOW) && (button_down_clicked == 0)) {
	     //item selected goes up to next item
	     //If the item selected is the last element, wrap to first index (
	   }
	   if ((digitalRead(BUTTON_UP_PIN) == HIGH) && (button_up_clicked == 1)) {button_up_clicked = 0;}
	   if ((digitalRead(BUTTON_DOWN_PIN) == HIGH) && (button_down_clicked == 1)) {button_down_clicked = 0;}
	 }
	 if ((digitalRead(BUTTON_SELECT_PIN) == LOW) && (button_select_clicked == 0)) {
	   button_select_clicked = 1;
	   if (current_screen == 0) {
	     //Assign current screen to next screen (selected is pressed_
	   } else {
	     //Set current screen to 0
	   }
	 }
	 if ((digitalRead(BUTTON_SELECT_PIN) == HIGH) && (button_select_clicked == 1)) {button_select_clicked = 0;}
	 //Set item_sel_previous to previous index
	 //Set item_sel_next to next index
	 if (current_screen == 0) {
	   u8g.firstPage();
	   do {
	     //Draw the main menu with icons and menu names on specific locations based on index
	   } while (u8g.nextPage());
	 } else if (current_screen == 1) {
	   u8g.firstPage();
	   do {
	     //Draw the QR code
	   } while(u8g.nextPage());
	 } else if (current_screen == 2) {
	   while (gpsSerial.available() > 0) {
	     if (gps.encode(gpsSerial.read())) {
	       //Get Data
	       //Print Data
	       //If selected is pressed, break out to menu screen
	     }
	   }
	 } else if (current_screen == 3) {
	   while (gpsSerial.available() > 0) {
	     if (gps.encode(gpsSerial.read())) {
	       //Get Data
	       //Print Data
	       //If selected is pressed, break out to menu screen
	     }
	   }
	 }
}
- Button Navigation Handling: It checks for button presses (
BUTTON_UP_PIN, BUTTON_DOWN_PIN, BUTTON_SELECT_PIN) and adjusts theitem_selectedindex accordingly. For example, pressing "up" decrements the selected item, while pressing "down" increments it. When reaching the end of the menu, the selection wraps around. - Debouncing: The
button_up_clicked,button_down_clicked, andbutton_select_clickedflags are used to prevent repeated button presses from being registered multiple times. Once the button is released, the flag is reset, allowing another press. - Screen Navigation: Based on the current screen (
current_screen), it switches between different screens when the "select" button is pressed. It either goes to the next screen (menu_item) or returns to the menu screen (current_screen = 0). - Menu Display: If
current_screen == 0, the menu is displayed. It uses the u8g graphics library to draw the previous, current, and next menu items along with their corresponding icons, and a scrollbar is updated to reflect the selected item. - GPS Data Display: On specific screens (
current_screen == 2for location/speed/altitude andcurrent_screen == 3for time/date), the program reads GPS data and displays the values (latitude, longitude, speed, altitude, time, and date) on the display. It checks for GPS data validity before showing it. - QR Code Display: If
current_screen == 1, a bitmap image of a QR code is displayed on the screen using theu8g.drawBitmapP()function.
PrintSomething() Functions:
//Example Function
void printAll() {
	 u8g.firstPage();
	 do {
	   u8g.setFont(u8g_font_6x13r);
	   u8g.drawStr(0, 10, "Lat: ");
	   u8g.drawStr(0, 25, String(lat, 6).c_str());
	 } while (u8g.nextPage());
}
- Prints the data collected by converting the
floatto astringusing theString()class declaration. - The string is converted to
char[]usingc_str()function to print on the OLED display.
getData() Functions:
//getSpeed() for example
void getSpeed() {
	 if (gps.speed.isValid()) {
	   speed = gps.speed.mps();
	 }
}
- Checks if the speed is valid using
gps.speed.isValid()and if it is, setsspeedto the speed measured in meters per second.
Note: all other functions with get() work the same way.
QR Code Instructions
- Minimize the link to no more than 15 characters.
- Go to barcode.tec-it.com and generate a 32x32 pixel barcode.
- Use this image-to-cpp website to convert the QR code into an array
- Copy/Paste this array into
epd_bitmap_qr_code
Conclusion
Celestial-Chrono represents the pinnacle of Satellite-Integrated HMI Diagnostics. By mastering GPS NMEA Bitstream Forensics and Asynchronous Menu Orchestration, uniostar has delivered a robust, professional-grade navigational tool that provides absolute temporal and spatial clarity through sophisticated satellite-telemetry diagnostics.
Satellite Sync: Mastering navigational telemetry through NMEA forensics.