In this tutorial we will collect microphone data to get chunks of songs and use NanoEdge AI Studio (a free tool) to automatically create an AI model able to classify our songs.
Do not worry, you don't need knowledge in AI to follow this tutorial :)
Here is the plan:
- Step 1: Setup
- Step 2: Collect microphone data
- Step 3: Create the classification model
- Step 4: Add the model in our Arduino code
- Step 5: Use the LED matrix to display the song detected
Let's go!
Step 1: Setup

First, we need to connect the microphone to the Arduino board.
Use jumper wires to connect:
- OUT (mic) to A0 (board)
- GND to one of the GND on the board
- VCC to 3.3v
Make sure that you have a USB data cable connecting the board to the pc.
In Arduino IDE:
Make sure you selected the right COM port: Tools > Port and select the right one.
Select the right board:
- Tools > Boards > Arduino Renesas UNO R4 boards > Arduino UNO R4 WIFI
- If you don't find it, click on Tools > Boards > Boards Manager..., look for the UNO R4 and install the package
Step 2: Logging Data With Microphone
We use a digital microphone that has a very high data rate.
We will collect chucks of the music by collecting buffers of values from the microphone and also reduce the data rate by keeping only 1 value every 32 collected.
We collect buffers of music and note single notes to classify them. Even for a human it is impossible to recognize a song with one random note taken from the song.
To accomplish this:
- Define the AMP_PIN to A0 as our microphone use the A0 pin to send data
- We define a buffer called neai_buffer to stock the value collected
- In our case, the buffer is of size 1024 (SENSOR_SAMPLE)
- We initialize the serial in the setup()
- We create a get_microphone_data() to collect buffers of data from the microphone. We get only 1/32 values
- We print the buffer to send it via serial.
The code:
/* Defines ----------------------------------------------------------*/
#define SENSOR_SAMPLES 1024 //buffer size
#define AXIS 1 //microphone is 1 axis
#define DOWNSAMPLE 32 //microphone as a very high data rate, we downsample it
/* Prototypes ----------------------------------------------------------*/
void get_microphone_data(); //function to collect buffer of sound
/* Global variables ----------------------------------------------------------*/
static uint16_t neai_ptr = 0; //pointers to fill for sound buffer
static float neai_buffer[SENSOR_SAMPLES * AXIS] = {0.0}; //souhnd buffer
int const AMP_PIN = A0; // Preamp output pin connected to A0
/* Setup function ----------------------------------------------------------*/
void setup() {
Serial.begin(115200);
delay(10);
}
/* Infinite loop ----------------------------------------------------------*/
void loop() {
get_microphone_data();
}
/* Functions declaration ----------------------------------------------------------*/
void get_microphone_data()
{
static uint16_t temp = 0; //stock values
int sub = 0; //increment to downsample
//while the buffer is not full
while (neai_ptr < SENSOR_SAMPLES) {
//we only get a value every DOWNSAMPLE (32 in this case)
if (sub > DOWNSAMPLE) {
/* Fill neai buffer with new accel data */
neai_buffer[neai_ptr] = analogRead(AMP_PIN);
/* Increment neai pointer */
neai_ptr++;
sub = 0; //reset increment
}
else {
//we read the sample even if we don't use it
//else it is instantaneous and we don't downsample
temp = analogRead(AMP_PIN);
}
sub ++;
}
//print the buffer values to send them via serial
for (uint16_t i = 0; i < SENSOR_SAMPLES; i++) {
Serial.print(neai_buffer[i]);
Serial.print(" ");
}
Serial.print("\n");
neai_ptr = 0; //reset the beginning position
}
To use this code, copy and paste it in Arduino IDE. If you have followed the setup part, you only need to click on UPLOAD (little arrow on the top).
In the next step, we will use this code to collect data in NanoEdge AI Studio and create an AI library to classify songs.
Step 3: Classification Model
With the code in the previous step, we can use NanoEdge to collect datasets of data for each of the music that we want to classify:
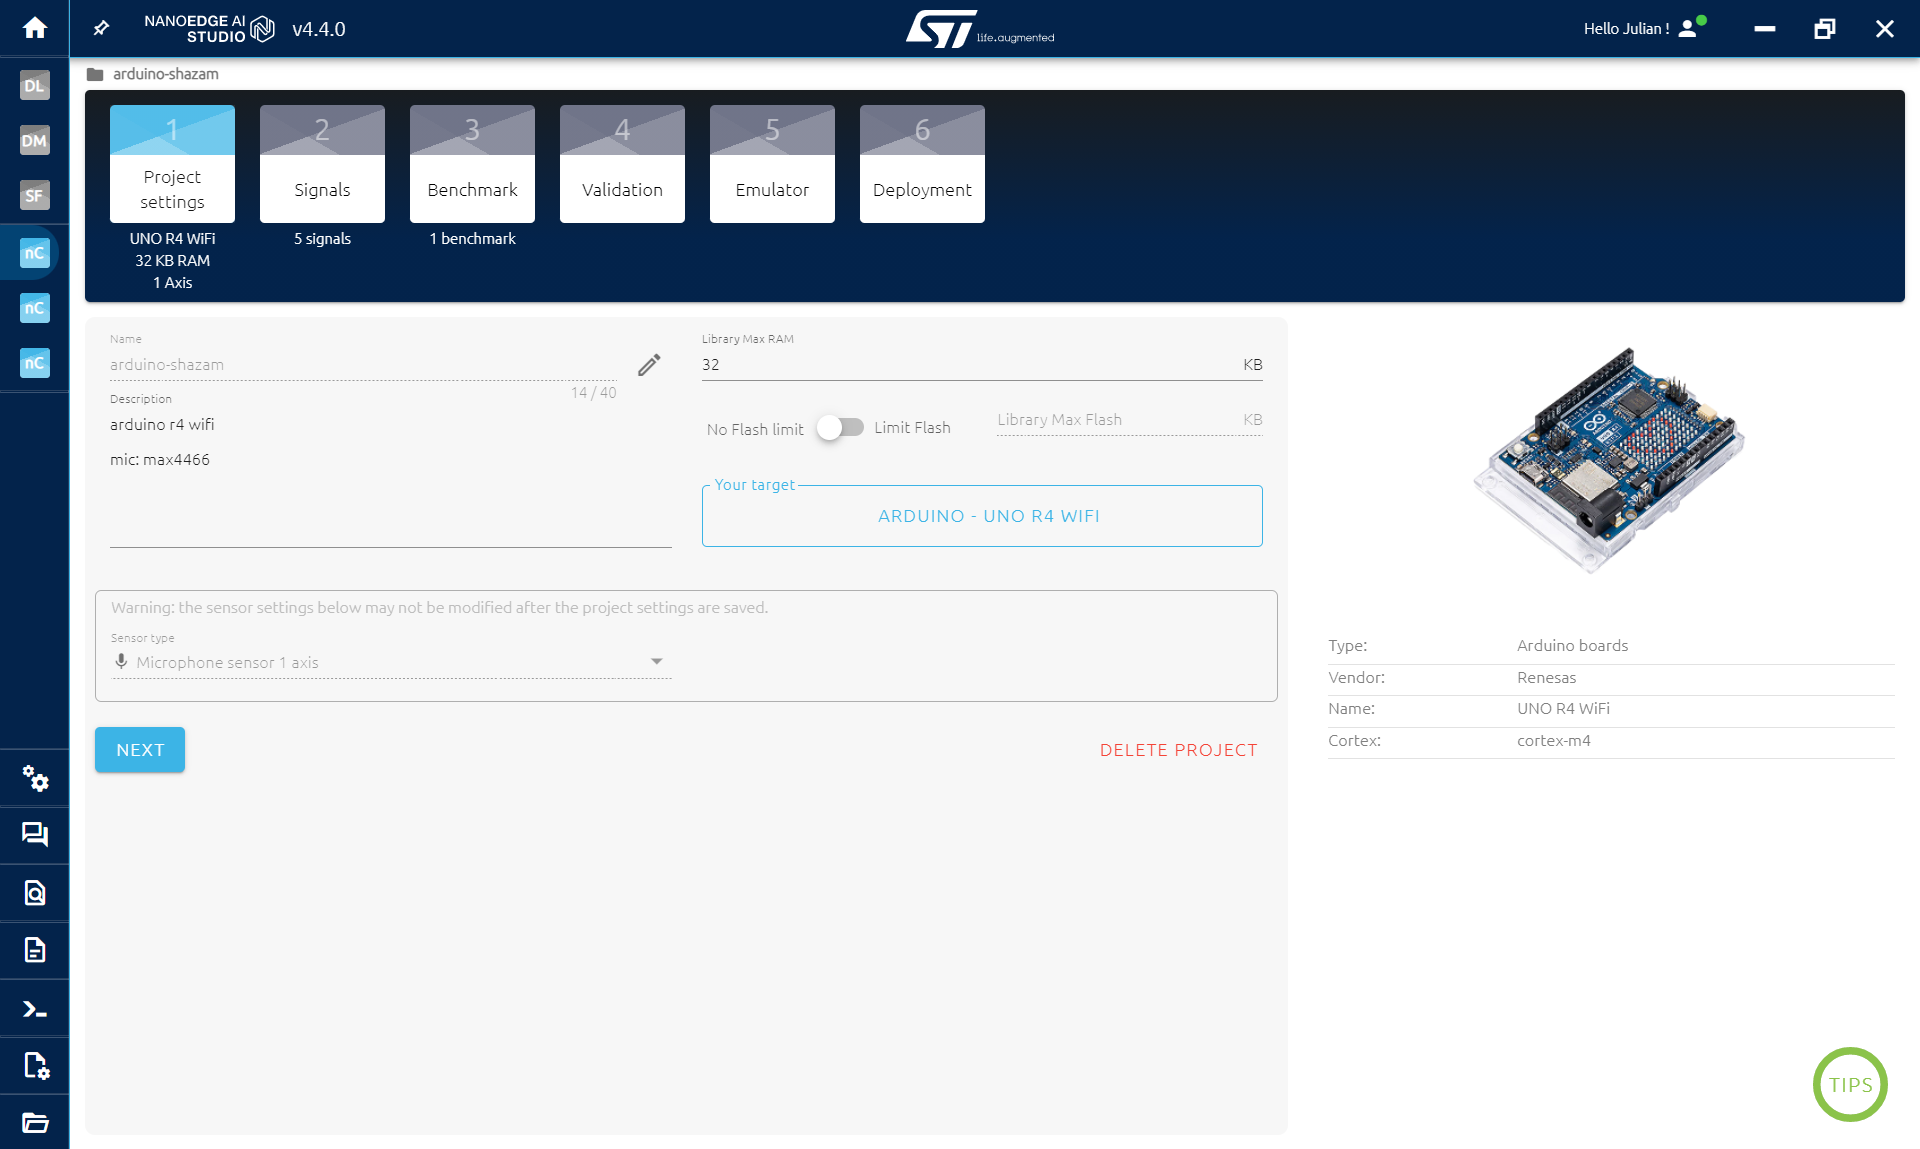
- Open NanoEdge
- Create a N-class classification project
- Select the Arduino R4 WIFI board as target (other boards are compatible)
- Select Microphone 1axis as sensor
- Click Next
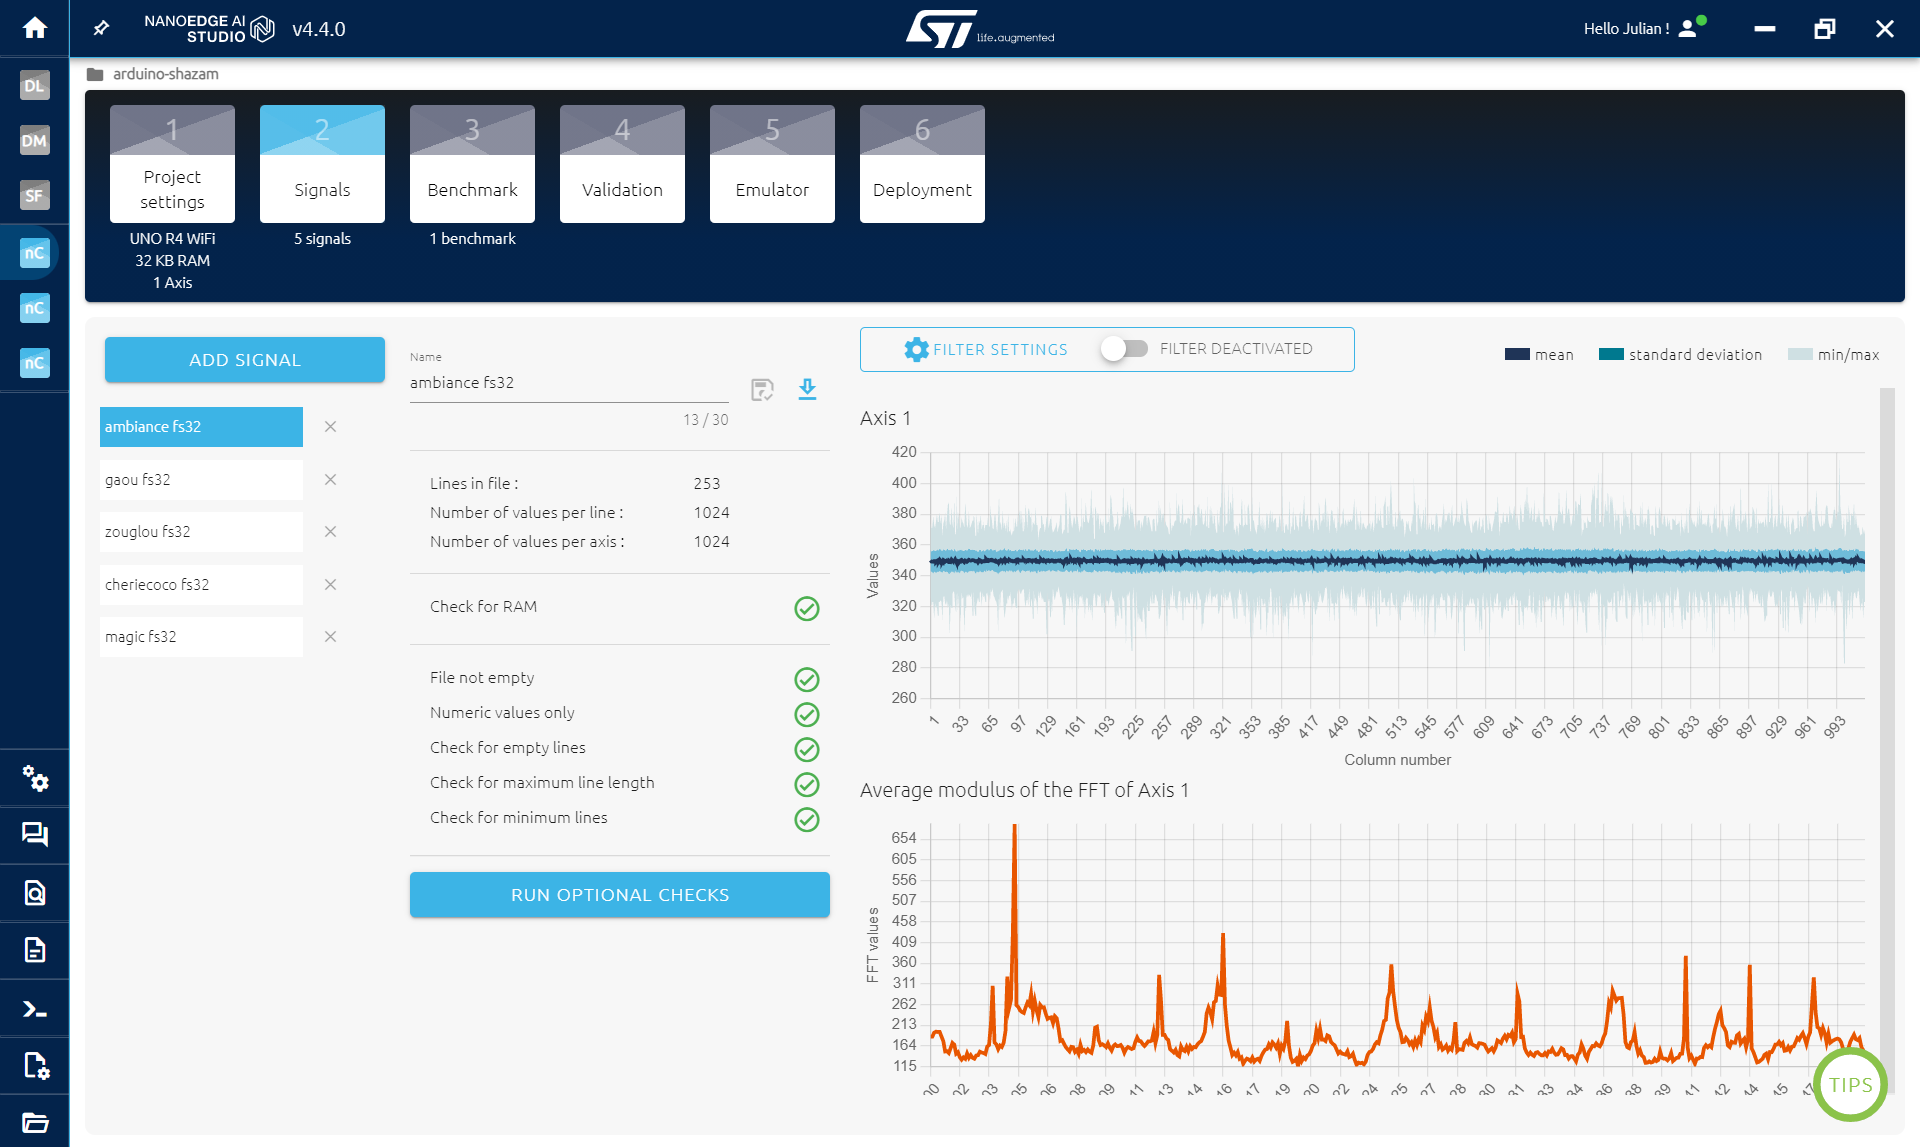
Then we will collect data for every music. In the SIGNAL STEP:
- Click ADD SIGNAL
- then FROM SERIAL (USB)
- First launch the music (on a phone for example)
- Then click START/STOP to collect data (make sure the right COM port is selected)
- Collect the buffers while playing the song at least two times. Avoid empty buffers (pause if you need)
- Click CONTINUE then IMPORT
- Rename the file if you want
- repeat for each song
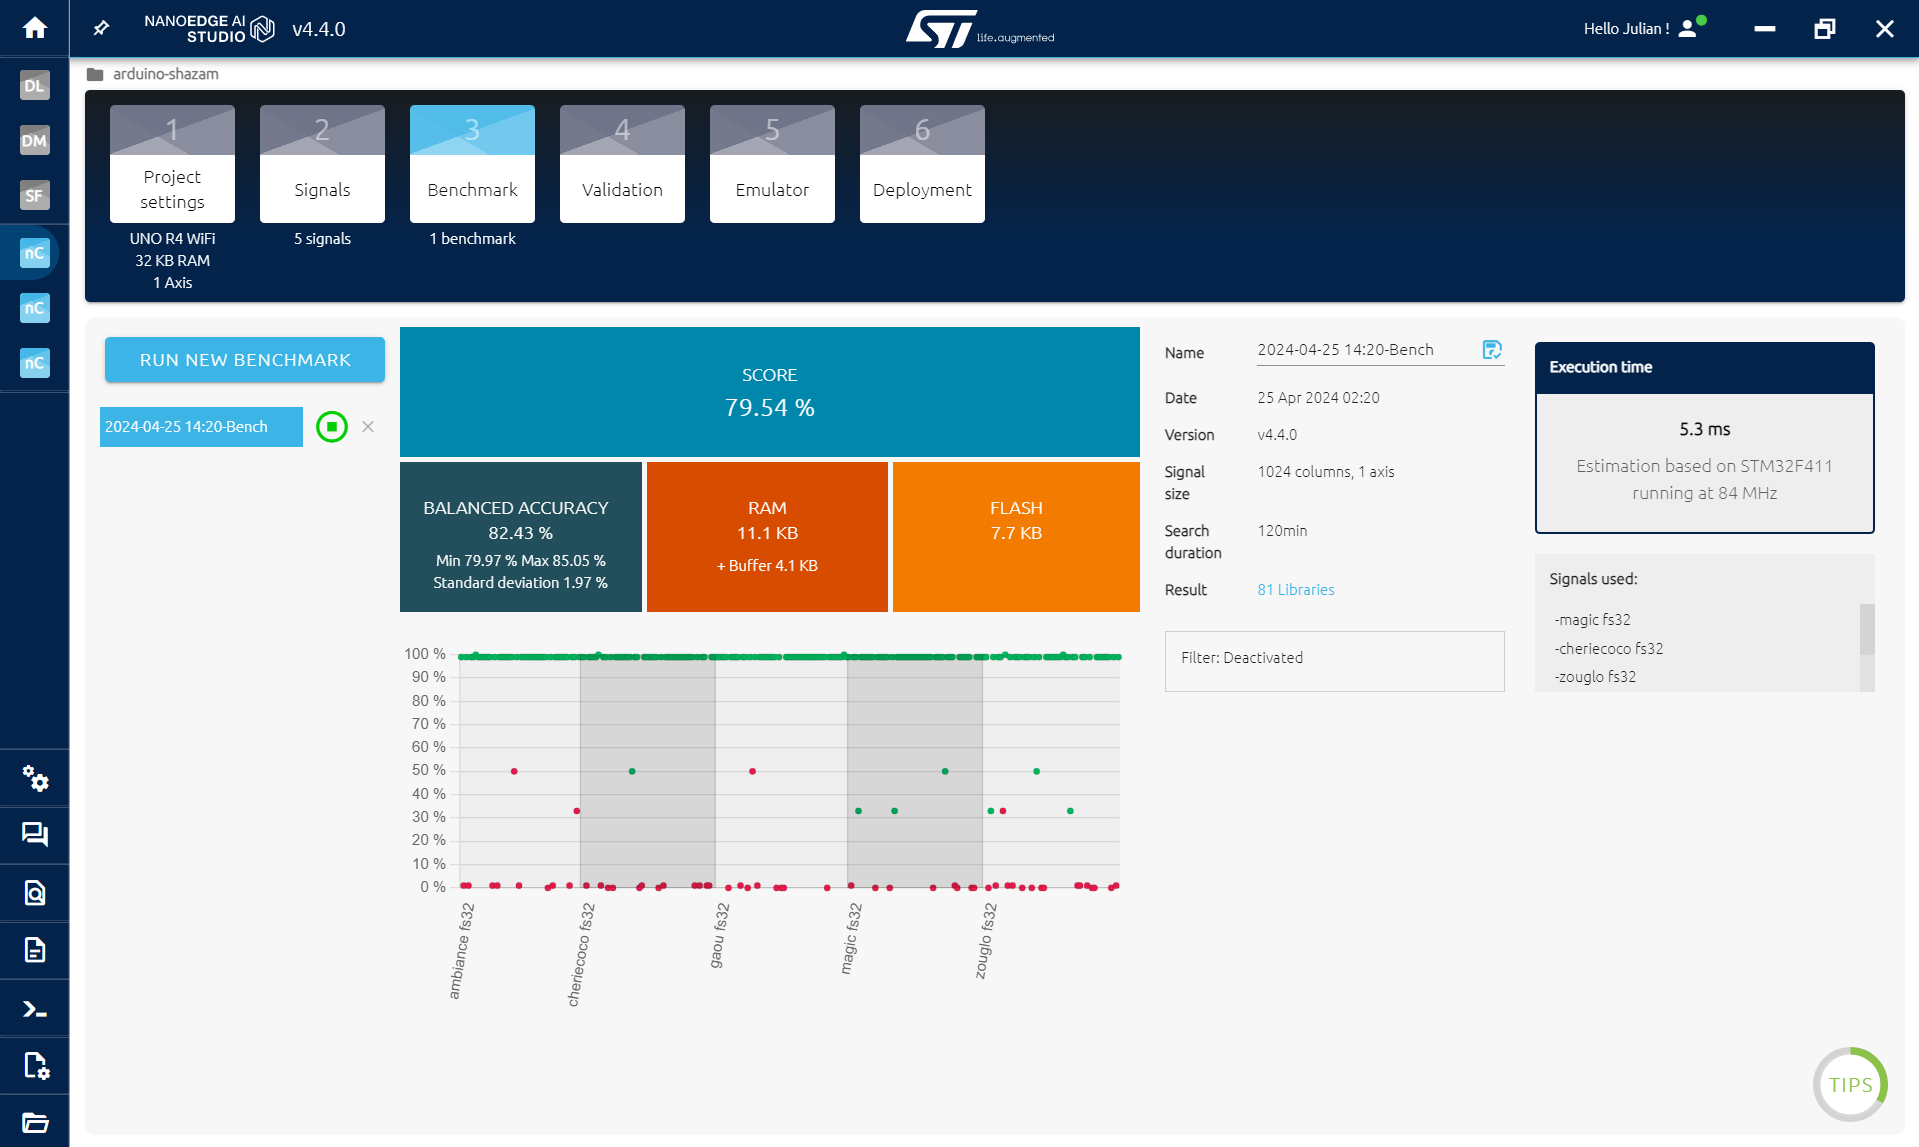
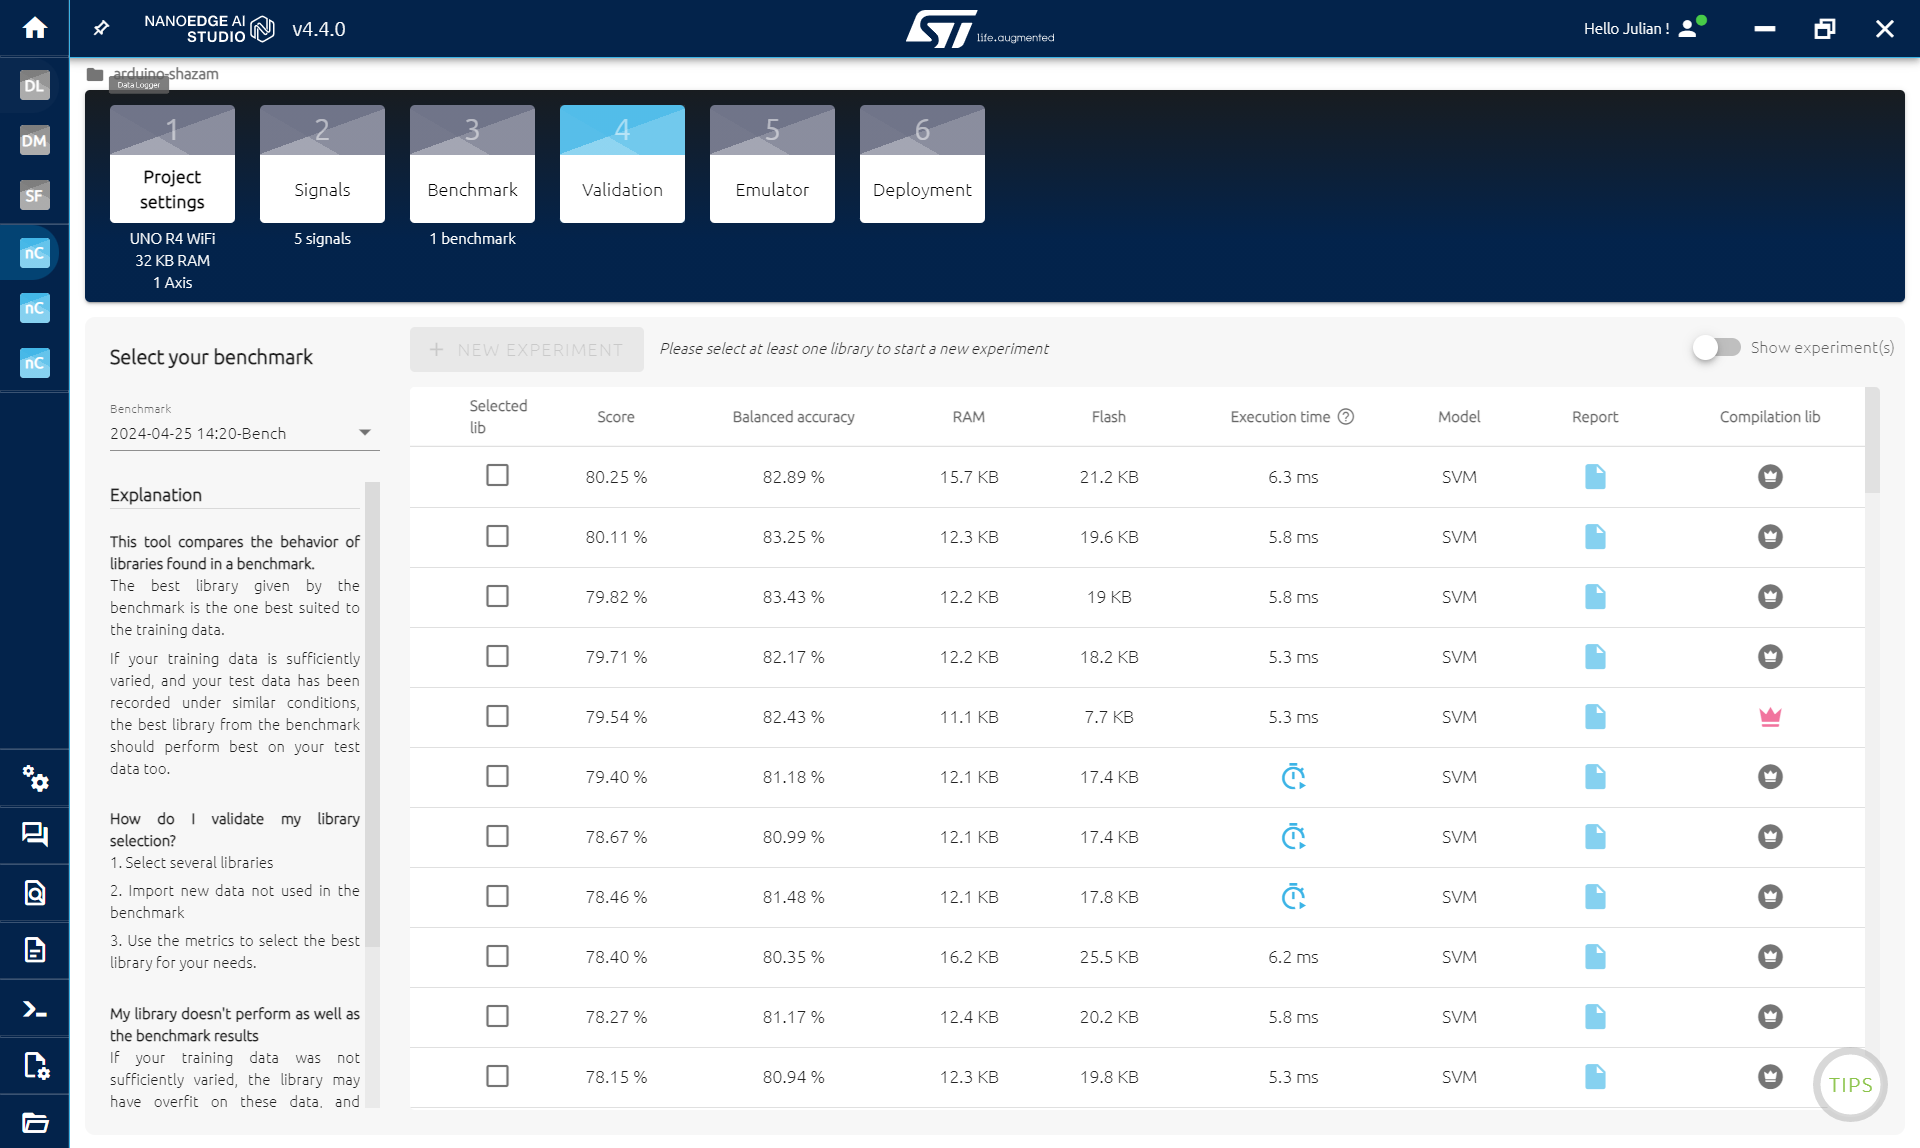
Once you have everything that you want, go to the BENCHMARK STEP.
The more song you have, the harder it will get, so start simple.
- Click on NEW BENCHMARK
- Select all the song and click START
The benchmark will look for the best model and preprocessing of your data to find a model that is able to classify the songs.
In few tenths of minutes, you should have a score > 80%. Else, you may need to go the previous step and collect new data with longer buffer or a bigger downsample. Something like this:
/* Defines ----------------------------------------------------------*/
#define SENSOR_SAMPLES 2048 //buffer size
#define DOWNSAMPLE 64 //microphone as a very high data rate, we downsample it
Then repeat the whole process.
OPTIONAL:
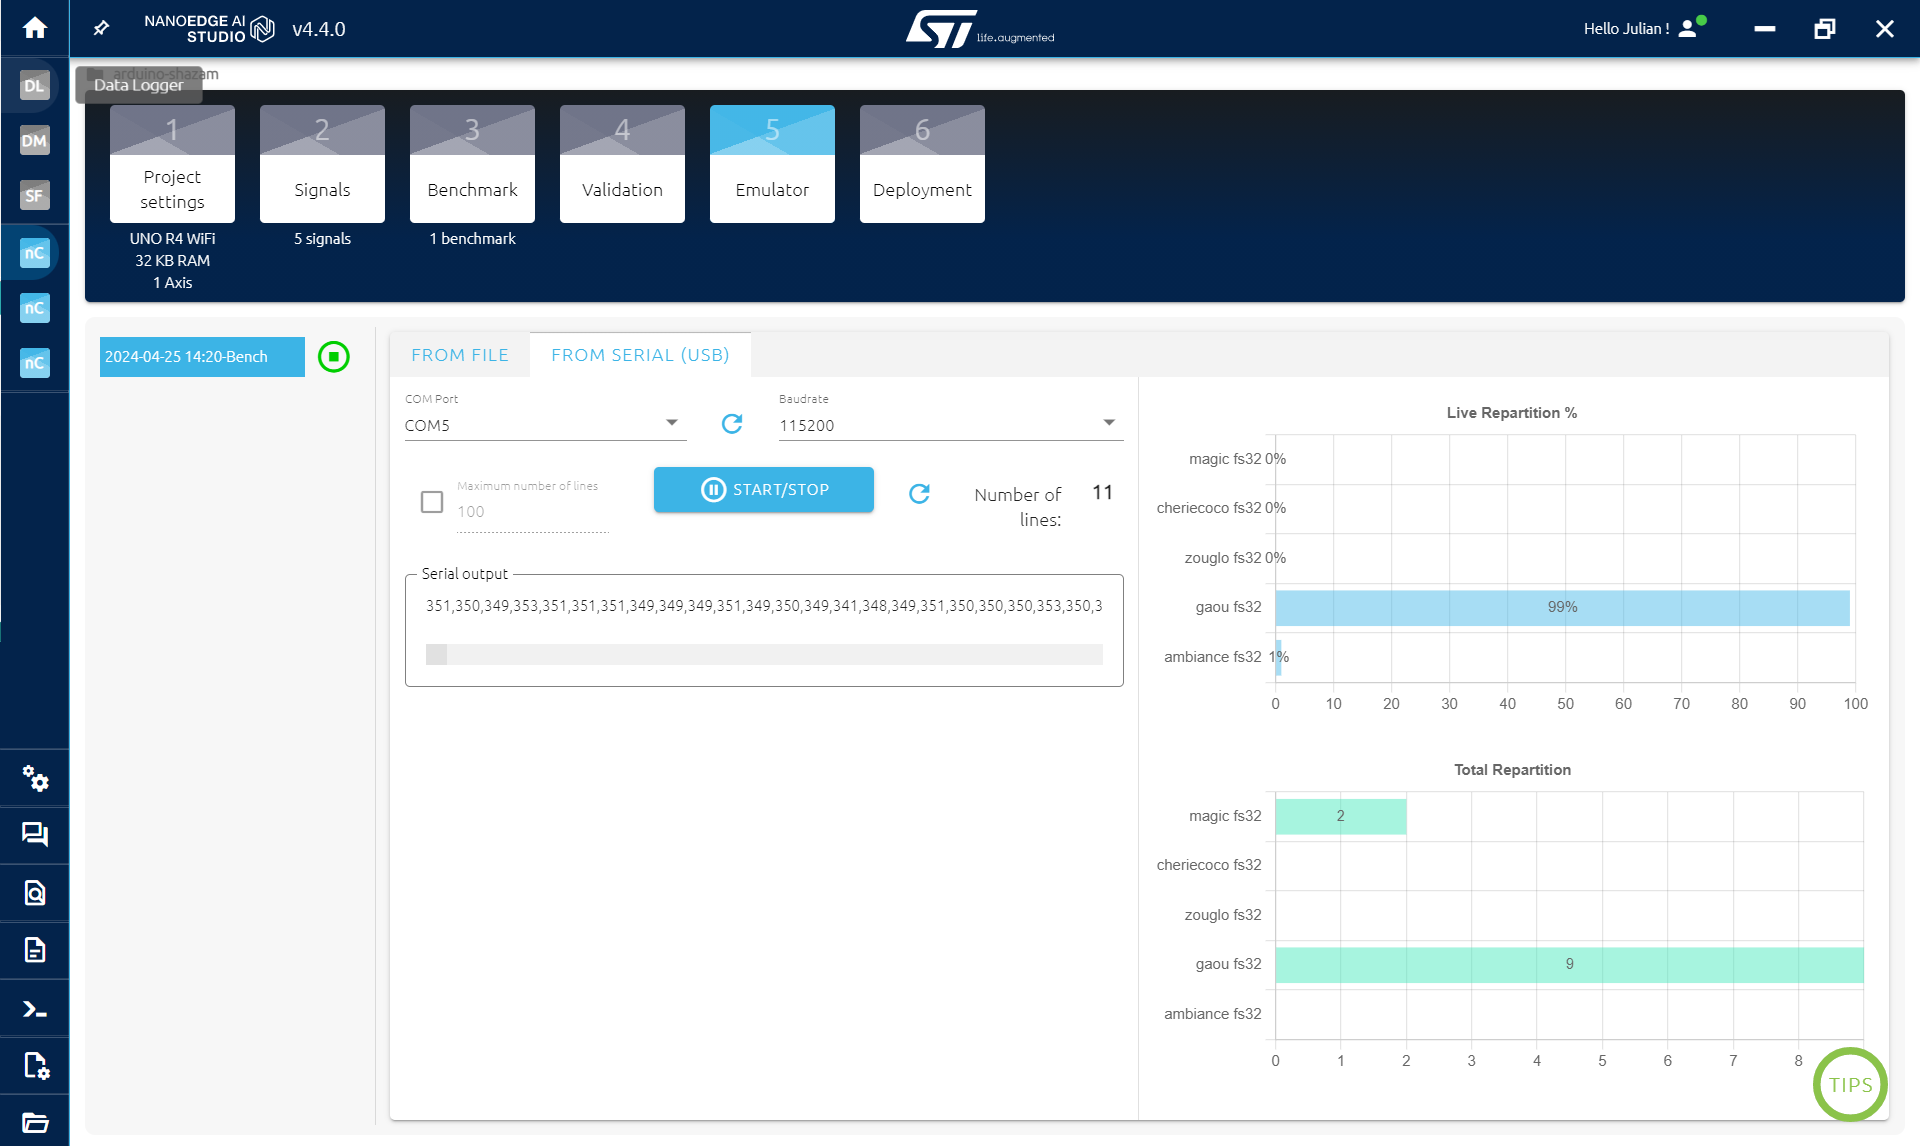
Go to the EMULATOR STEP to make sure your model is working:
- Click INIATILIZE EMULATOR
- Click on SERIAL (USB)
- Click on START/STOP while playing a song
What you see on the up right is the probability to be of each class. If your model works, the highest probability should be the one corresponding to the song that you are playing. It may alternate a bit with other class at some times.
On the bottom right is just a count of the classes that were detected (the maximum probability in the up right is selected as the detected class).
Then go to the COMPILATION STEP:
Click compile, fill the little form and save your AI library (.zip).
In the next step, we will add this library into Arduino IDE to classify song directly on the board.
EXPANDED TECHNICAL DETAILS: The TinyML Process
The Automatic Song Classification project pushes microcontrollers into the realm of Artificial Intelligence. Unlike a simple spectrum analyzer that just measures bass, this system uses a pre-trained Neural Network (TinyML) to identify patterns in the audio, distinguishing one song from another.
You cannot write standard `if/else` logic to determine a song. You must train a model. This process involves collecting a dataset, training, and deploying the model for real-time inference.
1. Collecting the Audio Data (The Dataset)
- The Hardware: For optimal results, a highly sensitive I2S digital microphone (e.g., INMP441) connected to a board like an ESP32 or Arduino Nano 33 BLE Sense is recommended for higher-fidelity data capture. However, the analog microphone setup shown in the tutorial image works for the Arduino UNO R4 WiFi with the NanoEdge AI Studio workflow.
- The Sampling: You play each song you want to classify into the microphone. The microcontroller converts the raw acoustic waveforms into a stream of numerical data (or, in more advanced pipelines, into features like Mel-Frequency Cepstral Coefficients (MFCCs) – a compact visual representation of the frequencies over time).
2. Training with NanoEdge AI Studio
You upload the collected numerical buffers to NanoEdge AI Studio, as shown in the gallery images above.
- The platform's benchmark algorithm automatically analyzes the data from each song class. It searches for the best signal preprocessing and machine learning model (like a neural network) to learn the unique patterns that differentiate one song's audio signature from another.
- Once trained, NanoEdge AI Studio gives you a compiled C/C++ library (`NanoEdgeAI.h` and `knowledge.h`) tailored specifically for your Arduino board!
3. Real-Time Inference
- The Brain: You import the generated library into your Arduino IDE and upload the final sketch to your board.
- When you play a song in the room, the microphone records a short audio snippet (a buffer).
- The onboard AI library executes the classification math locally (no internet required) and outputs the result, for example, to the Serial Monitor or an LED matrix. The Arduino has classified the song mathematically using TinyML!
Step 4: Classification Integration
Now that we have the classification library, we need to add it to our Arduino code:
- Open the .zip obtained, there is an Arduino folder containing another zip
- Import the library in Arduino IDE: Sketch > Include library > Add .ZIP library... and select the .zip in the Arduino folder
IF YOU ALREADY USE A NANOEDGE AI LIBRARY IN ARDUINO IDE:
go to document/arduino/library and delete the nanoedge one. Then follow the instruction above to import the new library.
IMPORTANT:
If you get an error because of RAM, it may be because of the library in NanoEdge. Go back to the VALIDATION STEP in NanoEdge and select a smaller library (click on the crown on the right), then compile it and replace it in Arduino IDE.
Copy the code below and paste it in Arduino IDE, it contain the previous code but also everything needed for Nanoedge:
- The library
- Some NanoEdge varialbe
- The initialization of the library in the setup
- The classification after collecting sound data
- The output class
/* Libraries ----------------------------------------------------------*/
#include "NanoEdgeAI.h"
#include "knowledge.h"
/* Defines ----------------------------------------------------------*/
#define SENSOR_SAMPLES 1024 //buffer size
#define AXIS 1 //microphone is 1 axis
#define DOWNSAMPLE 32 //microphone as a very high data rate, we downsample it
/* Prototypes ----------------------------------------------------------*/
void get_microphone_data(); //function to collect buffer of sound
/* Global variables ----------------------------------------------------------*/
static uint16_t neai_ptr = 0; //pointers to fill for sound buffer
static