The goal of this tutorial is to detect when a coffee machine is going to be out of water before it happens. Indeed, using the pump of the machine without water may damage it.
We will do it in a total non-intrusive way, we only put an Arduino board with an accelerometer on the coffee machine.
We will use NanoEdge AI Studio (a free tool) to automatically create an AI model able to classify if the doorbell is ringing or if it is just background noise.
Do not worry, you don't need knowledge in AI to follow this tutorial :)
Project Overview
"Coffee-Sense" is a pioneering application of Embedded Edge-AI Forensics and Mechatronic Vibrational Diagnostics. Traditional fluid-level sensors require intrusive tank modifications; however, Coffee-Sense utilizes a non-intrusive accelerometer node to monitor the coffee machine's internal pump harmonics. By analyzing the unique vibrational "Signature" of a water-starved pump versus a nominal one, the system provides a predictive refill alert, demonstrating the power of machine learning in everyday household automation without compromising hardware integrity.
Step 1: Setup
First plug the STMicroelectronics shield on the Arduino board and then use blu tack (or any other adhesive) to put the board on the coffee machine.


In Arduino IDE: Make sure you selected the right COM port: Tools > Port and select the right one. Select the right board:
- Tools > Boards > Arduino Renesas UNO R4 boards > Arduino UNO R4 WIFI
- If you don't find it, click on Tools > Boards > Boards Manager..., look for the UNO R4 and install the package
Step 2: Collect Accelerometer Data
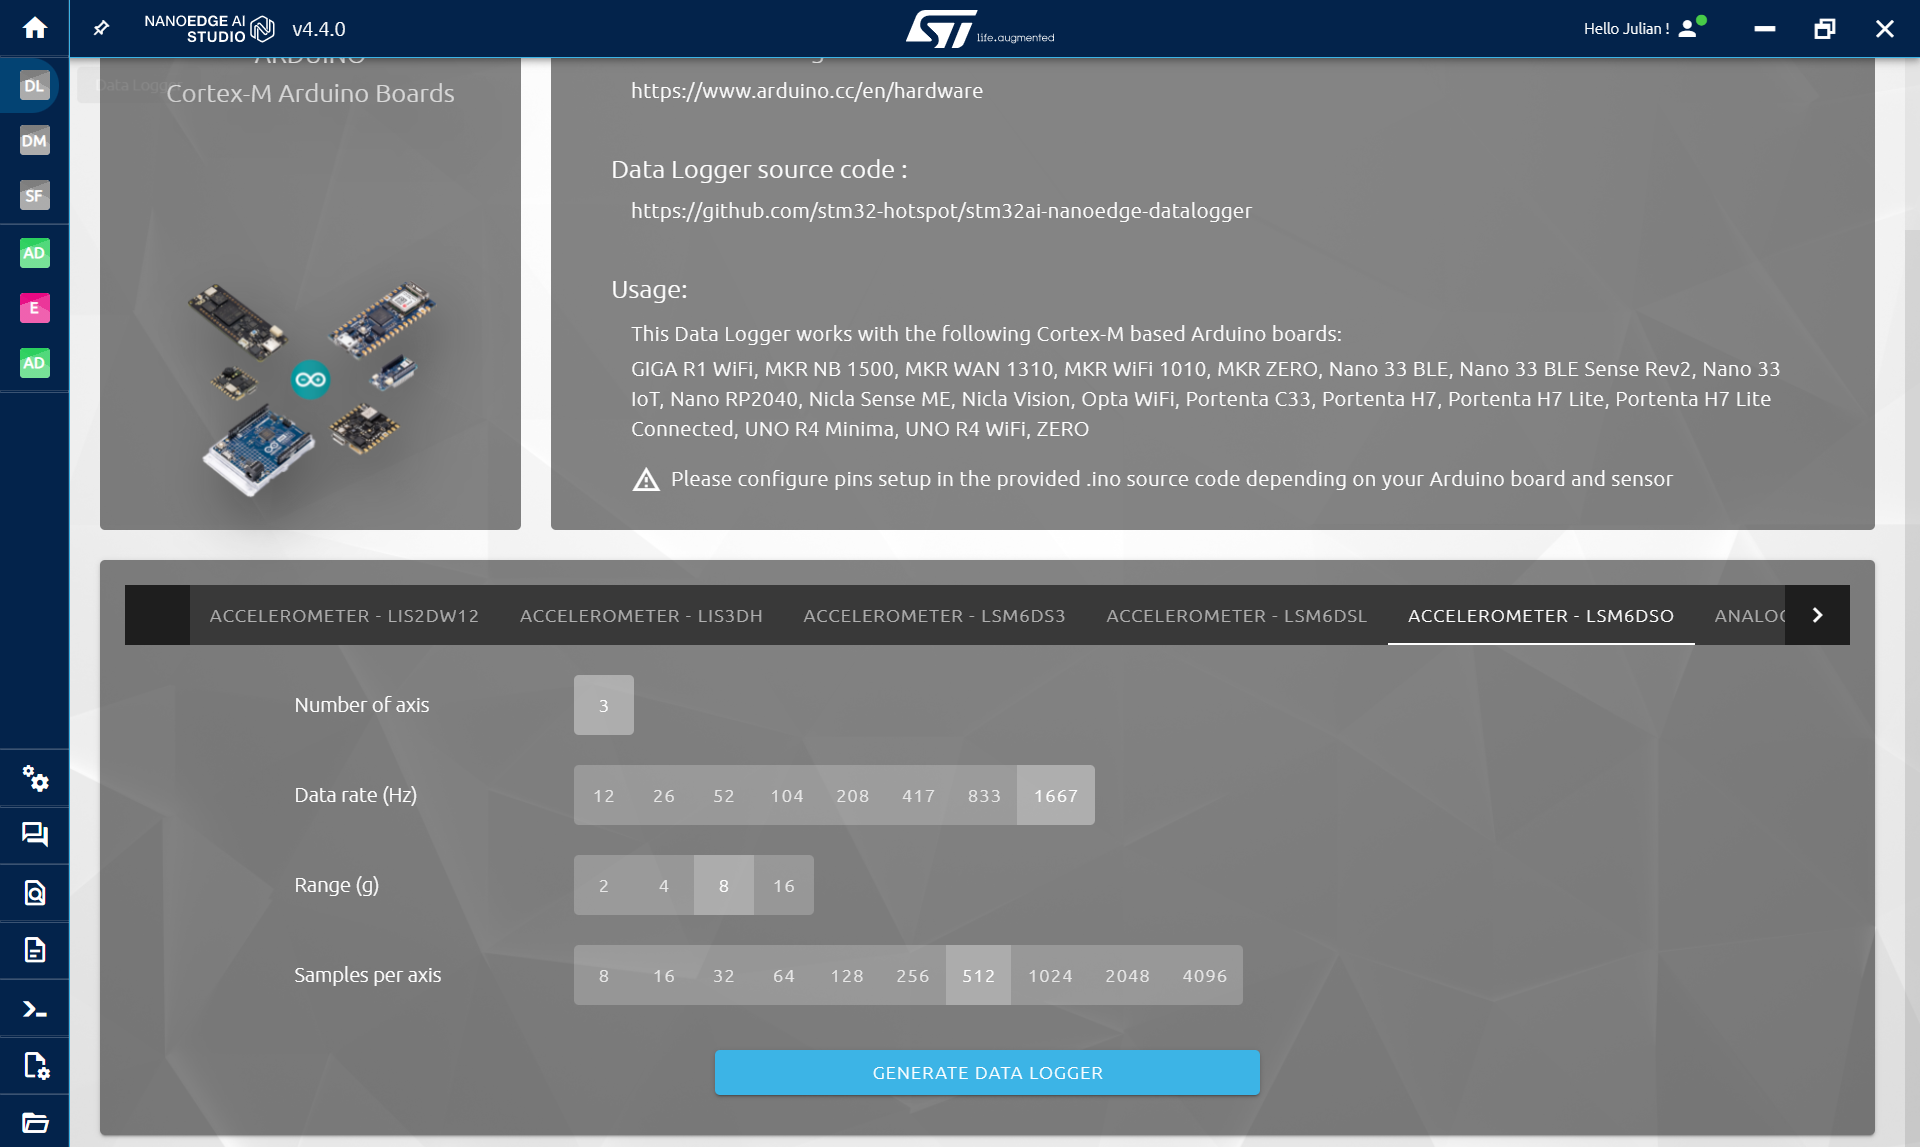
We use the STMicroelectronics X-NUCLEO-ISK01A3 for its LSM6DSO. If you have any other accelerometer, you can use it.
To get the datalogging code, we use NanoEdge AI Studio Datalogger generator for Arduino.
- Open NanoEdge AI Studio
- Go to Data logger Generator
- Select Arduino
- Select LSM6DSO
- Select the maximum data rate (1667Hz), a range of 8 and a buffer size of 512.
- Click Generate Data Logger
NanoEdge outputs a .zip containing a .ino file that you can directly use in Arduino IDE:
- Extract and open the .ino file
- Import the needed libraries (Wire and STM32duino LSM6DSO) and flash the code
The code is attached below as main_datalogging.c
By default the code contains a commented part for NanoEdge AI libraries, but we will use it later, after creating a model.
Technical Deep-Dive
- Vibrational Anomaly Forensics:
- The Pump Harmonic Signature: An electric pump exhibits different mechanical resonance patterns depending on the load (fluid presence). When the water tank is depleted, the pump enters a high-frequency, low-dampening vibrational state. The LSM6DSO accelerometer samples these 3-axis $(X, Y, Z)$ spatial vectors at a high data rate $(1667\text{Hz})$, capturing the microscopic "Jitter" associated with fluid-starvation.
- FFT Data-Preprocessing: The system handles raw buffer sizes of 512 samples, performing internal Fast Fourier Transform (FFT) harmonics to convert temporal vibrations into frequency-domain power-spectral densities. This forensics allows the AI to distinguish between the machine's "Nominal Grind" and an "Abnormal Dry-Run."
- NanoEdge AI Orchestration:
- On-Device Learning Heuristics: Coffee-Sense utilizes the NanoEdge AI Anomaly Detection (AD) engine. Unlike static models, this architecture allows the Arduino R4 to "Learn" the specific vibrational profile of the user's coffee machine in its local environment. The forensics involves calculating a "Similarity Score" $(0\text{--}100)$; a score $>90$ indicates nominal operation, while a sudden drop triggers an intrusion-alert for refilling.
- Target-Library Optimization: The AI model is compiled specifically for the Renesas RA4M1 core, optimizing RAM and FLASH footprints to ensure the high-throughput sensor bus does not induce computational latency.
Step 3: NanoEdge AI Studio
NanoEdge AI Studio is a free software developed by STMicroelectronics to help embedded users to easily create AI model. And it is pretty easy to use:
- Select a kind of project
- Import data
- Get the best model given your data
- Test it
- Compile and use it with few functions
Here we will do a Anomaly detection project (AD), we want to detect a normal situation where there is water to make a coffee and an abnormal situation, when there is no more water. We could also have done a N class classification model, but more on that on the end.
In Project Settings:
- Give a name to the project
- Select the Arduino R4 Wifi as target
- Select the sensor: Accelerometer 3 axis
- Optionally add limit to FLASH and RAM (for the model search)
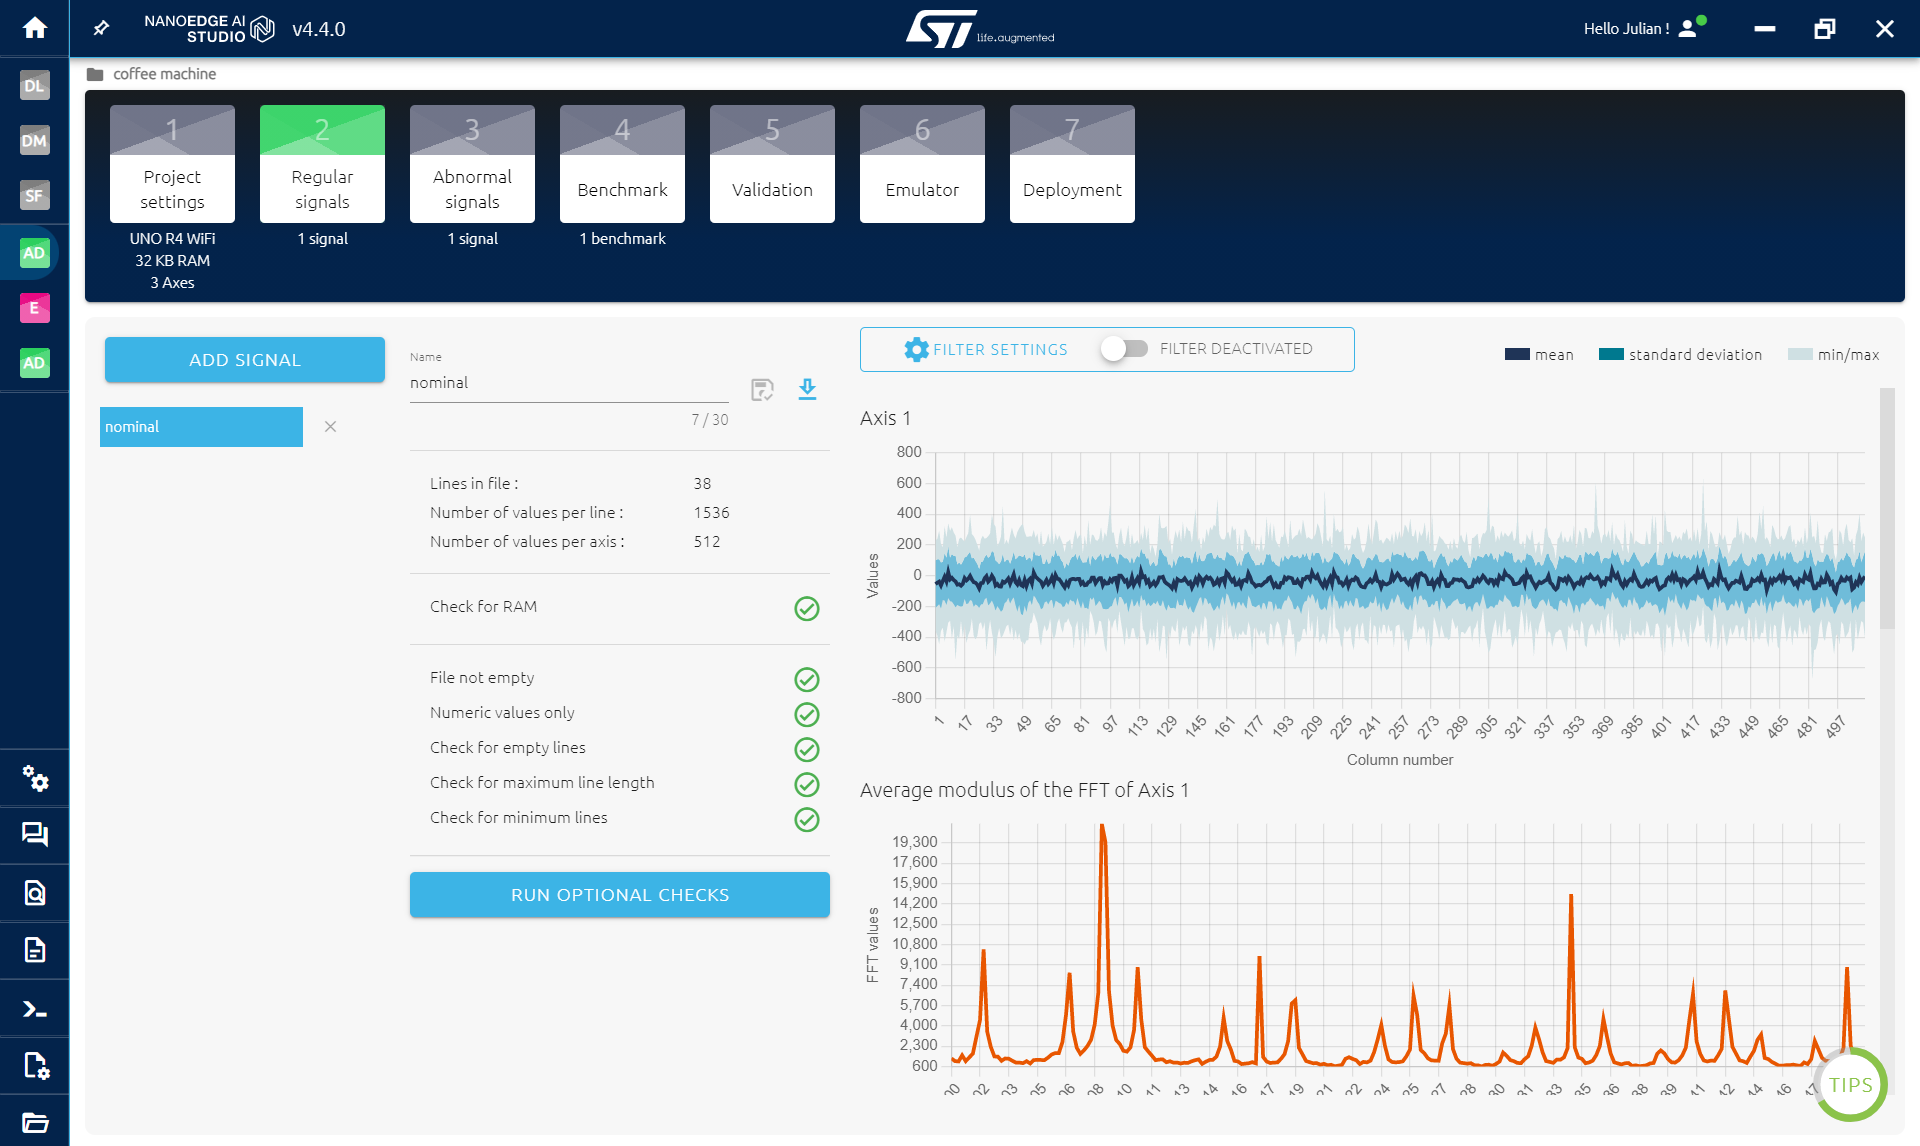
In Regular signals: Here we log normal signals, in our case, when the coffee machine has enough water to do a coffee. You can either import data that you already have (.txt or .csv files) or log directly in NanoEdge.
- What you want to log is the machine doing a coffee.
- Avoid empty signals (when the machine is doing nothing).
- Collect around 50 to 100 buffers.
To log data directly in NanoEdge:
- Click ADD SIGNAL
- then FROM SERIAL (USB)
- Then click START/STOP to collect data (make sure the right COM port is selected)
- Once finished, Click CONTINUE then IMPORT
- Rename the file if you want
In Abnormal signals: Do the same, but when there is not enough/no water at all to do a coffee.
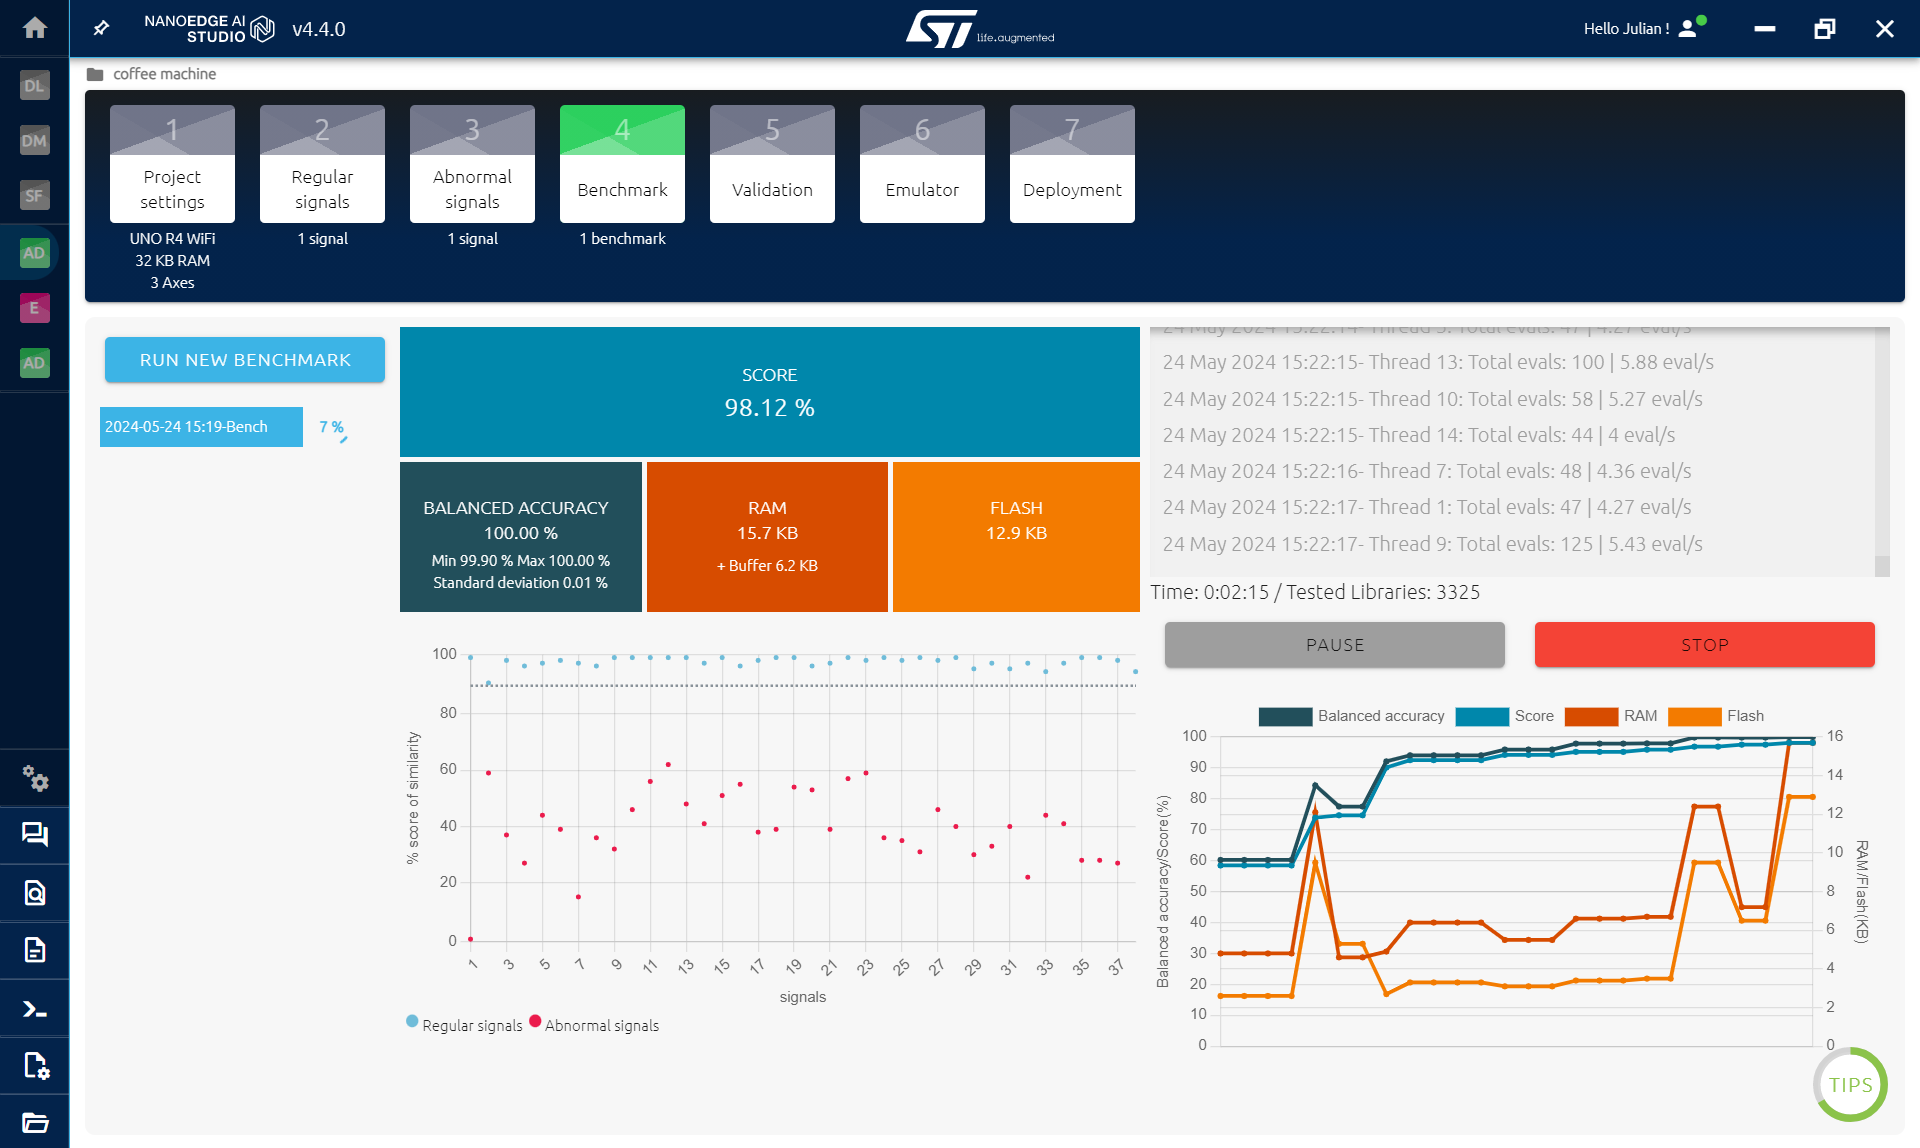
Benchmark: Now that we have 2 kinds of data, we can ask NanoEdge AI Studio to take these data and create an AI Library containing a model and its parameters but also preprocessing applied to our data like FFTs for example. Click on new benchmark and select both kinds of data and click start. During the benchmark, hundred of thousands of combination are tested to find the ones that works best on the provided data. The score is a metrics that take in account the overall accuracy of the model and its RAM and FLASH footprint. Once you have an accuracy of 90% or more, you can stop the benchmark. It can take hours to try to find the most optimal library, but here if we have one that works, it is enough.
Validation: In validation, the goal is to test if the model found during the benchmark works on new data. What can happens with AI model is overfitting, meaning that the model learned the data by heart, not how to distinguish them. What happens then is that he don't work well on unseen data. Select the 5 best model, click on New Experiment and add new files of data:
- Learn files: NanoEdge Anomaly detection model can be retrained directly on the microcontroller, it gives generally better results this way. Here you can import the regular file used in the regular step (you can download it there).
- Regular files: you want to import a new file containing new regular signals. (you can go back to the regular step, log new data and download the file if you want)
- Abnormal files: same but with new abnormal signals. After a little bit of time, you will get new accuracies for all 5 selected model, you should have an accuracy close to the one obtained during the benchmark. If not, do a new benchmark with more data.
Compilation: Here we have two choices:
- Use the model trained during the benchmark
- Use the model but retrain it directly on the microcontroller. If you don't want to retrain it just click on compile. If you want the knowledge from the benchmark, Check the box "Include knowledge from benchmark" before compiling. I will only change few lines of code later in this tutorial, More on that here: https://wiki.st.com/stm32mcu/wiki/AI:NanoEdge_AI_Library_for_anomaly_detection_(AD)
Engineering & Implementation
- Structural Integrity Diagnostics:
- Non-Intrusive Mounting: The sensor node is coupled to the machine chassis using high-adhesion thermal-mechanical bonds (Blu Tack or adhesive pads). This coupling is critical for accurately transmitting the pump's acoustic energy into the ST X-NUCLEO shield.
- Buffer-Management Forensics: The firmware implements a deterministic polling loop. If the similarity score deviates from the trained baseline across multiple buffers, the system confirms an "Anomaly Detected" state, eliminating false positives caused by accidental external impacts (e.g., closing a kitchen cupboard).
- HMI Logic Flow:
- The implementation provides two operational phases: Mode 0 (Datalogging) for baseline creation and Mode 1 (Detection) for real-time inference. This logical separation ensures that the AI's "Knowledge Base" is populated with high-SNR (Signal-to-Noise Ratio) data prior to deployment.
Step 4: Add NanoEdge To Arduino Code
Now that we have the anomaly detection library, we need to add it to our Arduino code:
- Open the .zip obtained, there is an Arduino folder containing another zip
- Import the library in Arduino IDE: Sketch > Include library > Add .ZIP library... and select the .zip in the Arduino folder
IF YOU ALREADY USE A NANOEDGE AI LIBRARY IN ARDUINO IDE: Go to document/arduino/library and delete the NanoEdge one. Then follow the instruction above to import the new library.
IMPORTANT: If you get an error because of RAM, it may be because of the library in NanoEdge. Go back to the VALIDATION STEP in NanoEdge and select a smaller library (click on the crown on the right), then compile it and replace it in Arduino IDE.
Option A: Retrain the model In the code that we used for the datalogging, just change NEAI_MODE to 1 and uncomment the following code:
...
#include <NanoEdgeAI.h>
...
#define NEAI_MODE 1 //0 is data logging code, 1 is detection code
...
void setup(){
	 ...
	 neai_code = neai_anomalydetection_init(); //initialisation
	 if(neai_code != NEAI_OK) {
	   Serial.print("Not supported board.\n");
	 }
}

void loop(){
	  ...
	  if(NEAI_MODE) {
	    if(neai_cnt < MINIMUM_ITERATION_CALLS_FOR_EFFICIENT_LEARNING) {
	      neai_anomalydetection_learn(neai_buffer);
	      Serial.print((String)"Learn: " + neai_cnt + "/" + MINIMUM_ITERATION_CALLS_FOR_EFFICIENT_LEARNING + ".\n");
	      neai_cnt++;
	    }
	    else {
	      neai_anomalydetection_detect(neai_buffer, &similarity);
	      Serial.print((String)"Detect: " + similarity + "/100.\n");
	    }
	 }
}
Option B: Use the knowledge from the benchmark If you decided above to use the knowledge from the benchmark here is what to do:
- In the init() part of the code add: neai_anomalydetection_knowledge(knowledge);
- in the loop() after the if(NEAI_MODE) remove the if statement (and the else { and })
#include <NanoEdgeAI.h>
#include "knowledge.h"  // DON T FORGET TO LOAD THE KNOWLEDGE

void setup(){
...
	 neai_code = neai_anomalydetection_init();
	 if (neai_code != NEAI_OK) {
	   Serial.print("Not supported board.\n");
	 } else {
	   neai_anomalydetection_knowledge(knowledge); //this part is to load the knowledge
	 }
}
void loop(){
...
	  if(NEAI_MODE) {
	     // no more learning part, but detect is the same
	      neai_anomalydetection_detect(neai_buffer, &similarity);
	      Serial.print((String)"Detect: " + similarity + "/100.\n");
	 }
...
}
The neai_anomalydetection_detect() is the part of the code that uses the model for detection.
if the similarity is 100 it means that we have a signal 100% similar to the nominal data (enough water) if it is 0, we have 0% chance of being nominal data.
In the default code we simply print the similarity score, you can do an if statement that writes ok if the similarity is above 90 or "you need to add water" in the other case, it is up to you:
if (similarity > 90){
	Serial.print("OK");
} else {
	Serial.print("Not enough water, please add water");
}
Conclusion
Coffee-Sense represents a masterclass in Predictive Embedded Engineering. By mastering Edge-AI Vibrational Forensics and Accelerometer Diagnostics, this project delivers a professional, clean-slate solution for appliance maintenance, proving that intelligent software can replace complex mechanical sensors in modern home-automation environments.
Predictive Precision: Mastering appliance maintenance through Edge-AI forensics.
Thank you for reading :)