Hello and welcome to this tutorial! This time, we will learn how to use a Time-of-Flight sensor in combination with Edge AI to play a game using keyboard inputs. This project, "ToF-Gaming," is a rigorous implementation of Spatio-Temporal Mechatronics and Edge-AI Gesture Forensics.
To achieve this, we will first learn how to use a Time-of-Flight sensor, then collect data, train an AI model using NanoEdge AI Studio, and finally see how to control the keyboard to play the game.
Here is the link to the game I used: https://supermarioplay.com/fullscreen
Step 1: Setup and Strategy
A Time-of-Flight (ToF) sensor sends a matrix of distance values. You can think of it as an image, but with very low resolution (8x8 = 64 pixels).
These sensors emit short pulses of light that last only a few nanoseconds and measure the time it takes for some of the emitted light to return. Because it works with light pulses, it performs better in dark conditions than in bright ones. The maximum distance the sensor can measure in the dark is around 3 meters. In very bright light, the sensor may not function correctly or at all.
When logging data, you will clearly see if the sensor is working as expected, but remember to use it in a not-too-bright environment.
Technical Deep-Dive: VL53L5CX Photonic Forensics & Matrix Analytics
- The Time-of-Flight Logic-Hub: The sensor emits sub-nanosecond IR pulses, measuring the temporal-delay of photon reflection to calculate absolute distance. Forensics involve polling the $64$-zone matrix at $15\text{Hz}$ signal-stiffness. The diagnostics focus on "Ambient-Light Slew-Rate"; while ToF is immune to most EMI, high-ambient photonic noise can induce bit-flip forensics in the distance-mapping, requiring a stable low-light operational envelope for $\approx 3\text{m}$ ranging persistence.
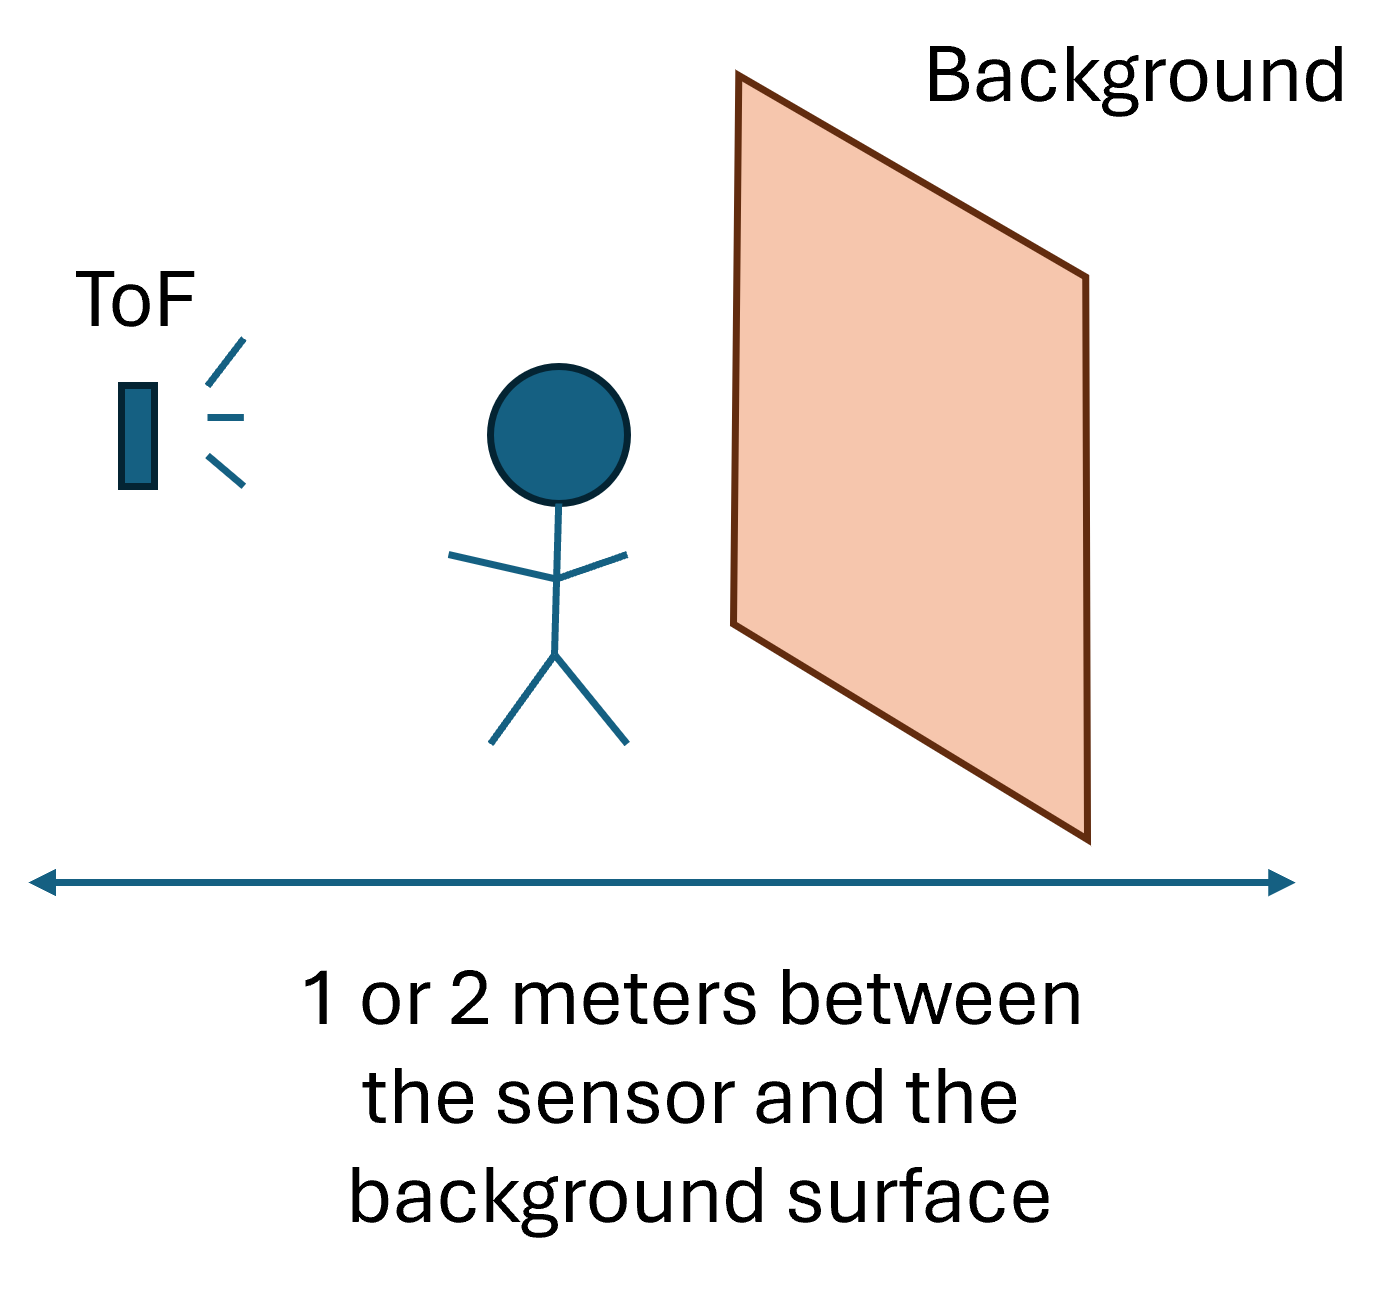
Logging good data with a ToF is difficult. To log good data you need to:
- Be in a not-too-bright environment
- Have a background (max 3 meters from the sensor)
- Make sure to be in front of the ToF
First plug the X-NUCLEO-53L5A1 into the Arduino Uno R4 WiFi, then fix the setup to a wall using Blu Tack, for example. This Structural Signal-Integrity & Mechanical Forensics ensures the "Mechanical-Zeroing" of the sensor-plane relative to the background wall, preventing parallax-error diagnostics at the edges of the sensor's 5-degree Field-of-View (FOV).
To play Mario, we need to perform 6 actions:
- Standing
- Moving right
- Moving left
- Jumping
- Jumping right
- Jumping left
Using a distance matrix collected from a ToF sensor, we can identify different signs, positions, poses, or other indicators.
In my case, I found it effective to stand in different zones in front of the ToF sensor, as shown in the attached picture:
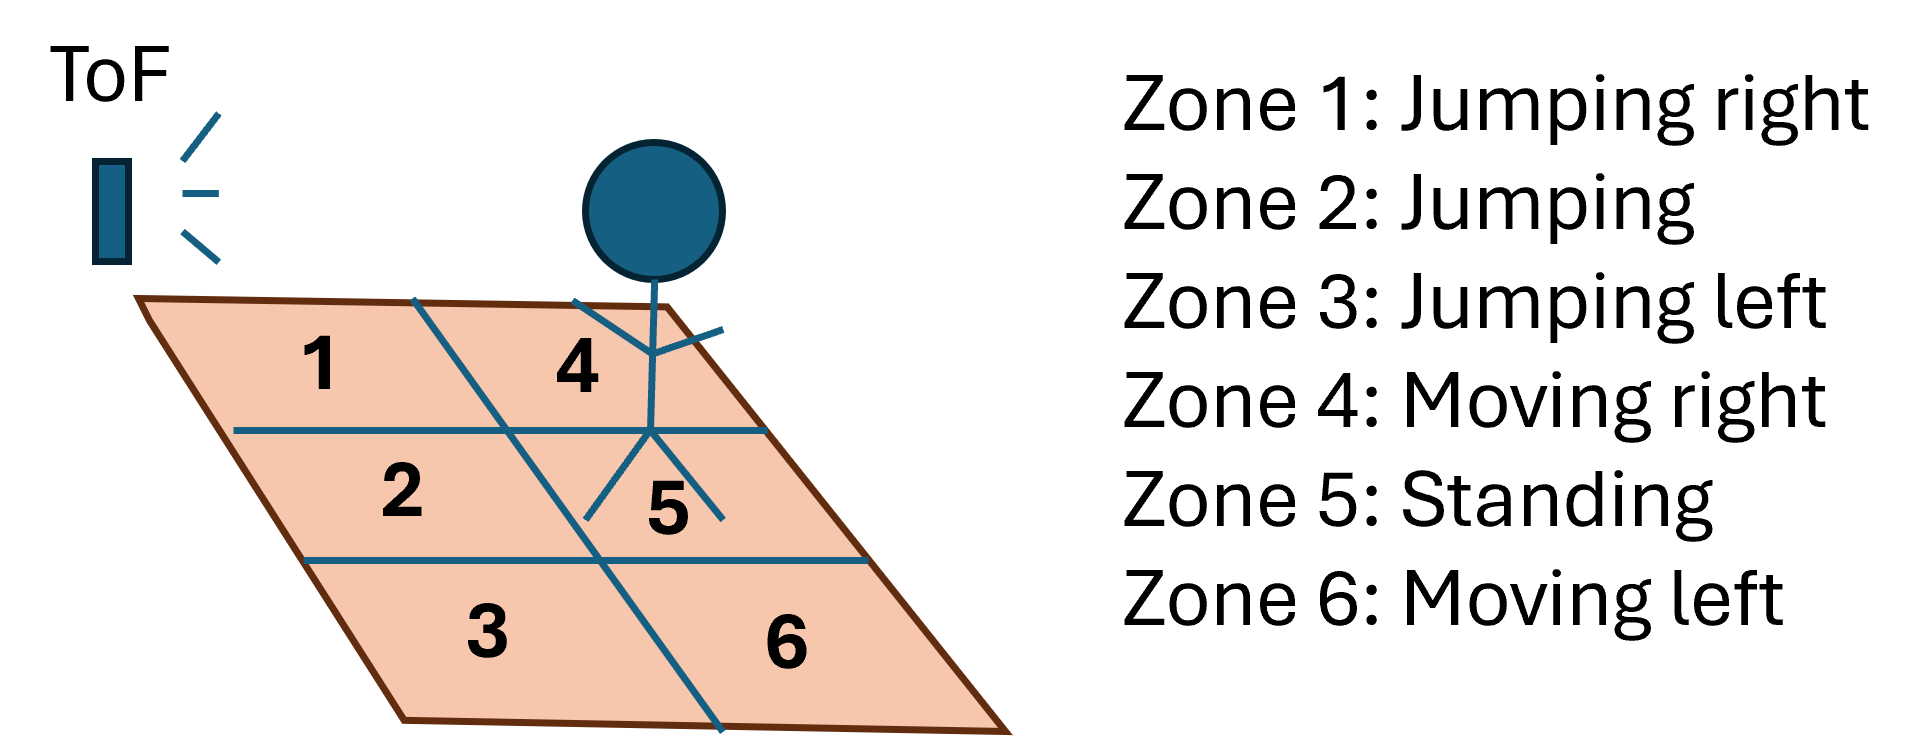
- Zone 1: Jumping right
- Zone 2: Jumping
- Zone 3: Jumping left
- Zone 4: Moving right
- Zone 5: Standing
- Zone 6: Moving left
Zones 1, 2, and 3 are close to the ToF sensor, while Zones 4, 5, and 6 are near the background.
Technical Deep-Dive: Spatio-Temporal Zone Gating The system defines these 6 physical interaction zones. Forensics involve mapping "Jumping-Left" vs. "Moving-Right" based on depth-interpolation $(1\text{m} \text{ vs. } 3\text{m})$. The diagnostics ensure that the $8\times 8$ frame-resolution provides enough spatial-entropy for the N-Class classifier to distinguish between "Standing" and "Incremental Displacement" harmonics.
Now we need to collect data.
Step 2: Collect Data
When working with a Time-of-Flight (ToF) sensor, you can choose to work with a single matrix of distances or with a sequence of matrices to capture gestures, for example.
In this case, we want to be as reactive as possible, which means being as fast as possible, so we will use only one matrix.
I used the NanoEdge AI Studio tool to create code for collecting ToF data. The code is attached below, but here is what to do if you want to generate the same code:
- Open NanoEdge
- Go the Data Logger
- Select Arduino boards
- Select the VL53L5CX
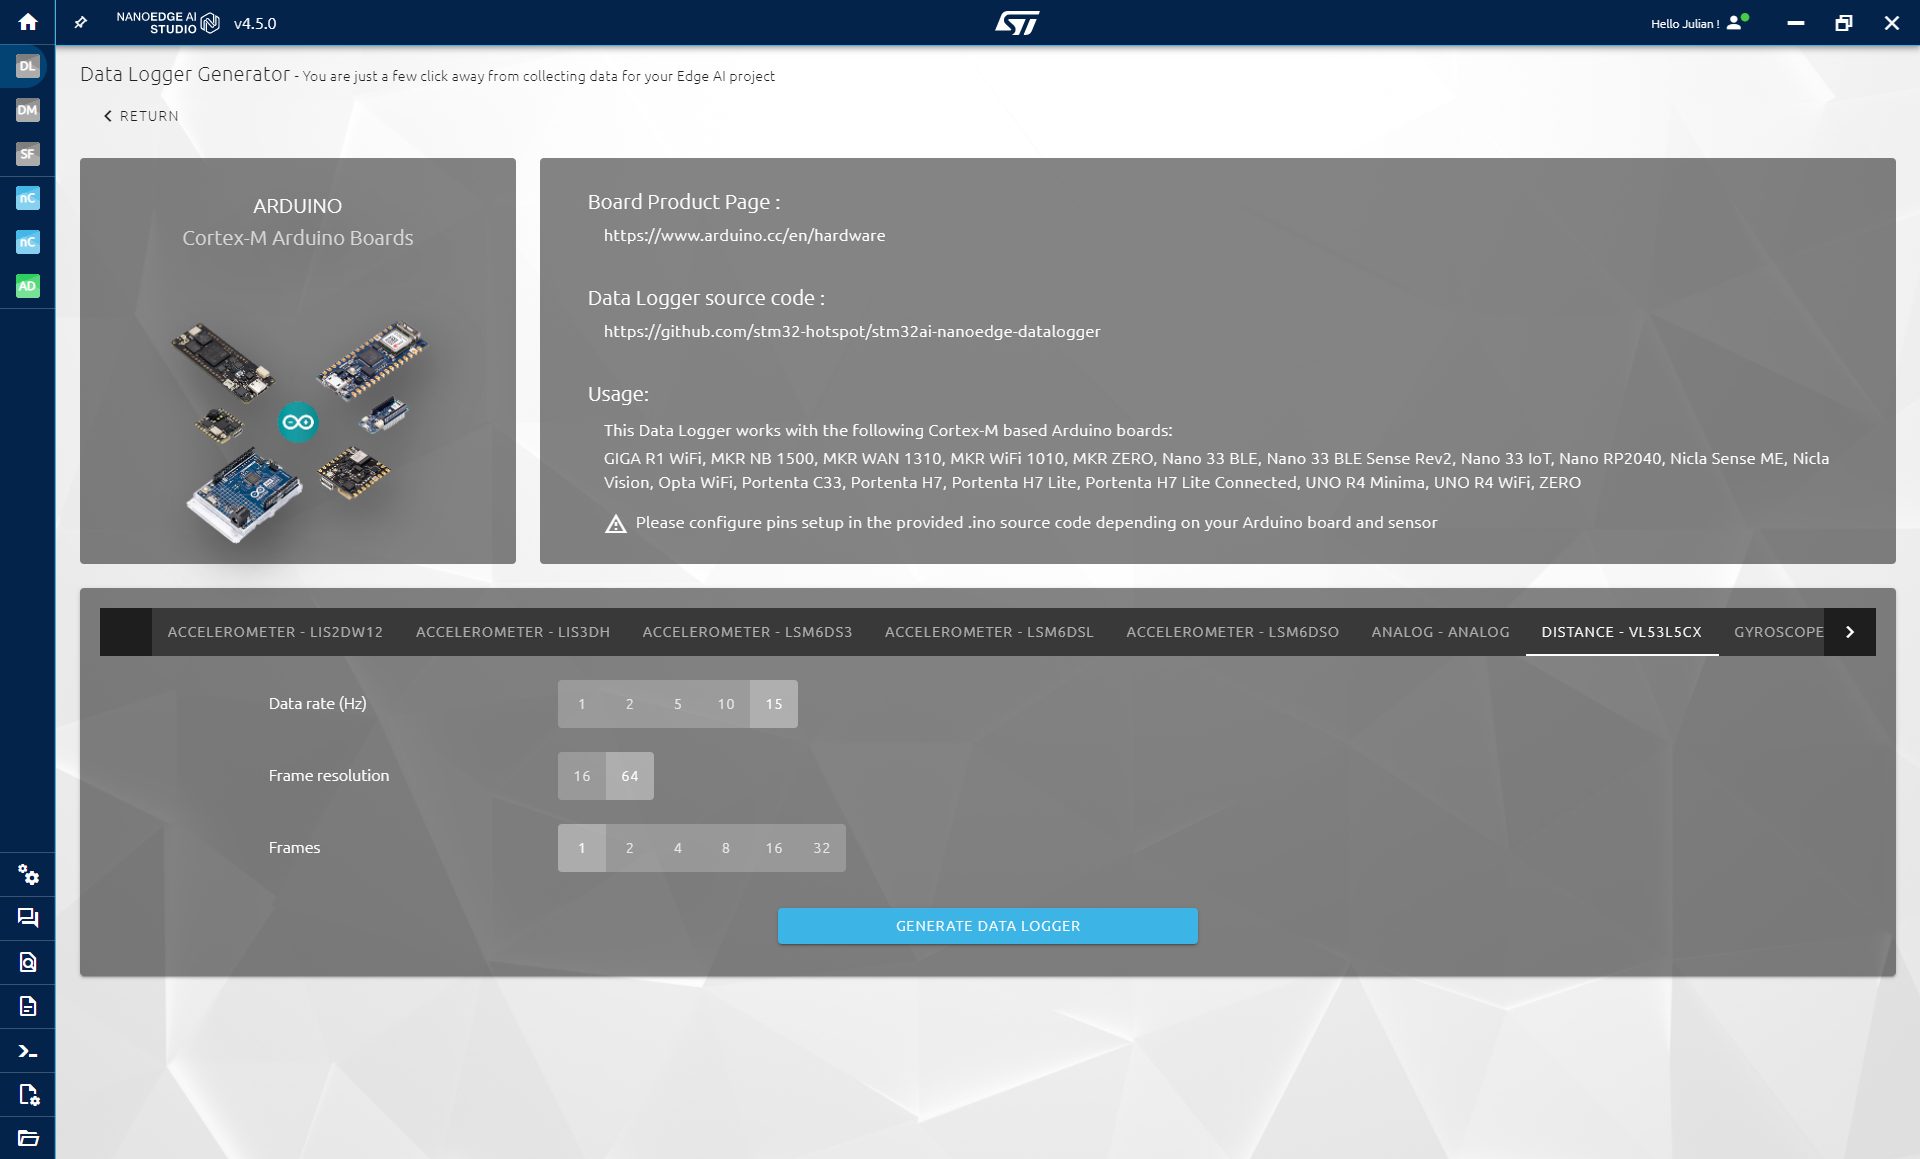
I used the following parameters:
- Data rate (Hz): 15Hz (the maximum)
- Frame resolution: 64 (8x8)
- Frames: 1
Click Generate Data Logger and you will obtain a .zip file containing a .ino file with the code ready to be flashed onto the board.
Warning:
- you need the SparkFun_VL53L5CX_Library Arduino library
- Go to sketch > Include Library > Manage libraries... >SparkFun_VL53L5CX_Library
Step 3: NanoEdge AI Studio
We will now create a project in NanoEdge AI Studio to collect data and create a model able to classify the different zone I will be standing in to then play Mario:
- Open a NanoEdge AI Studio
- Create a N-class classification project
In project settings:
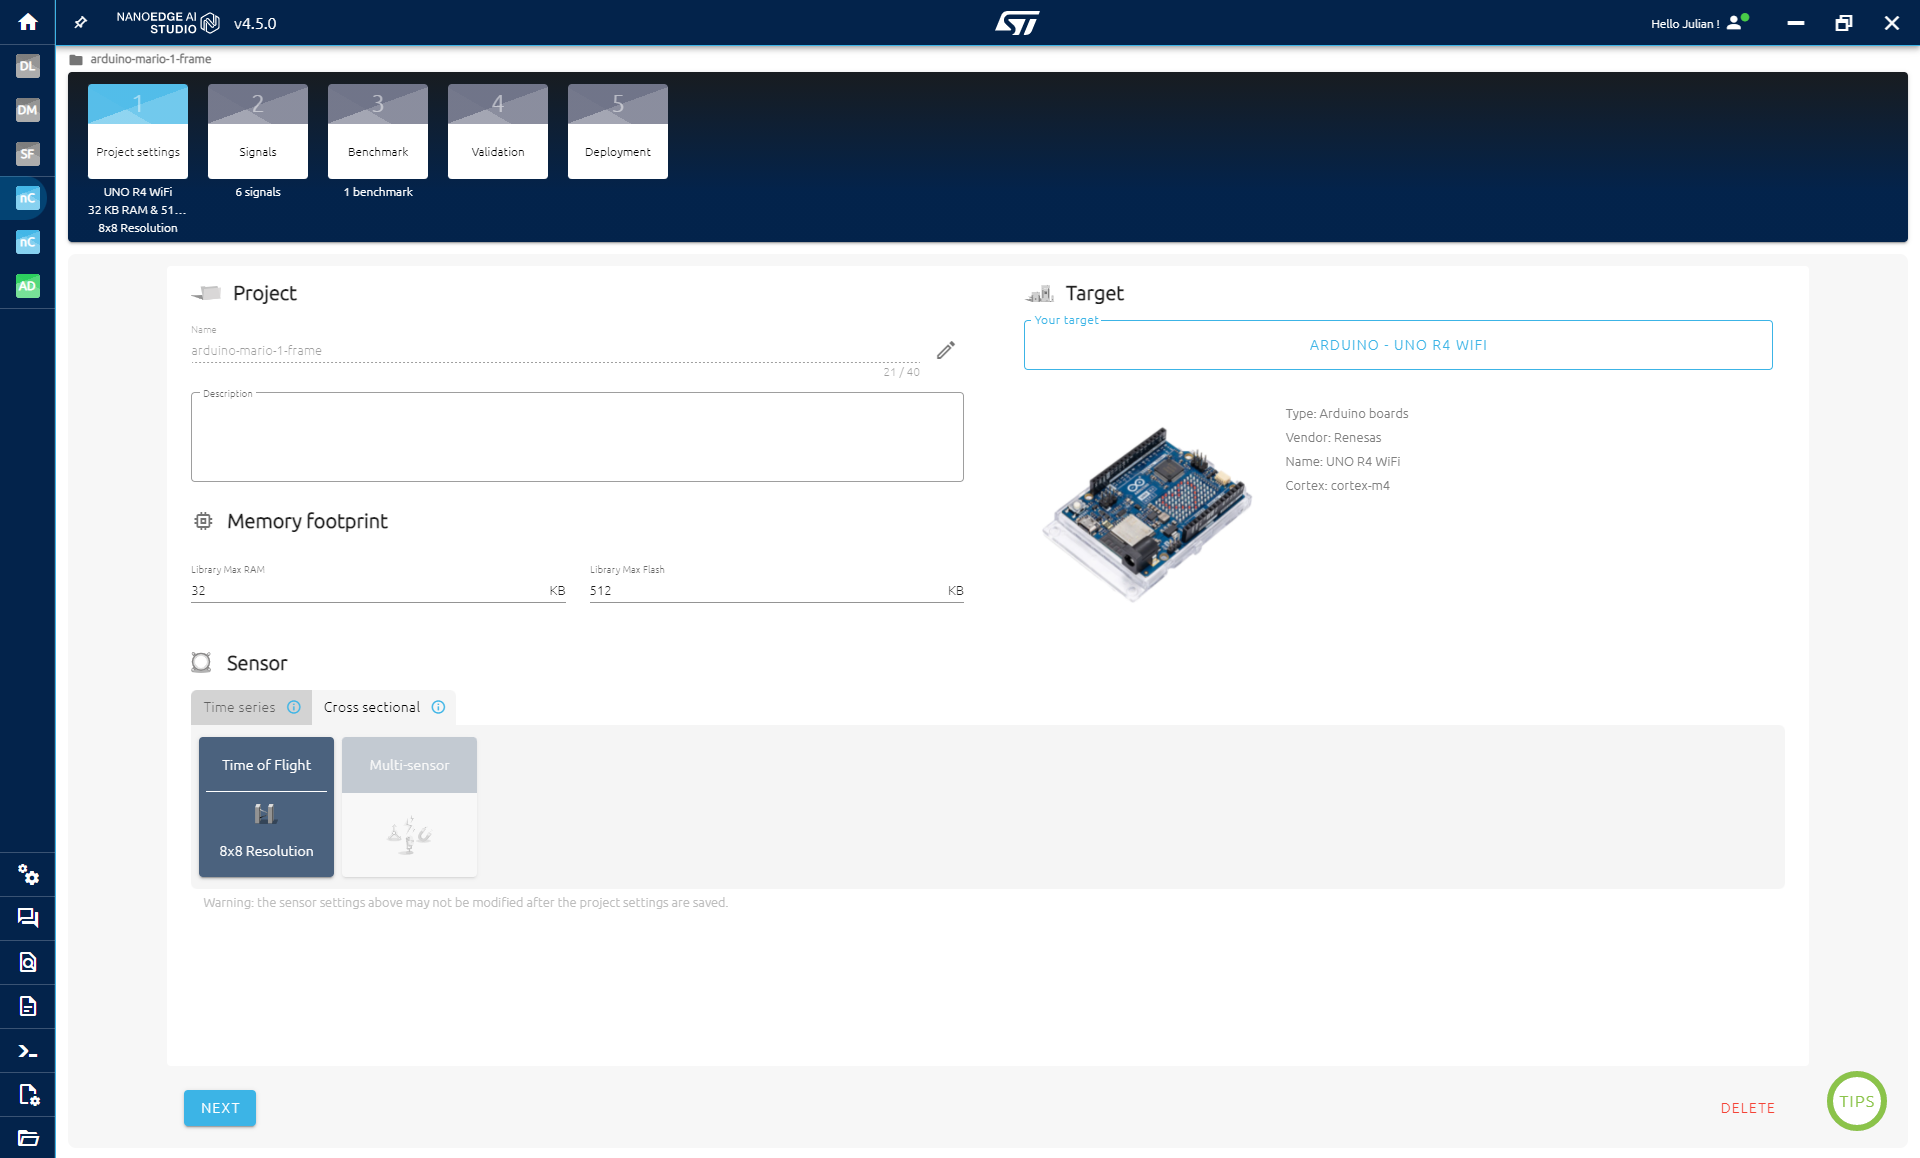
Since the version 4.5, the project settings changed a little bit, you need to select if you are working with Time series or with cross sectional data. Basically if your data contains multiple sample at different point in time or not. In our case, we use a single frame/matrix, time is not involved: we use cross sectional data.
- Select the Arduino UNO R4 WiFi as target
- Select Cross sectional
- Select Time of Flight and 8x8 resolution
- Click Next
In Signals:
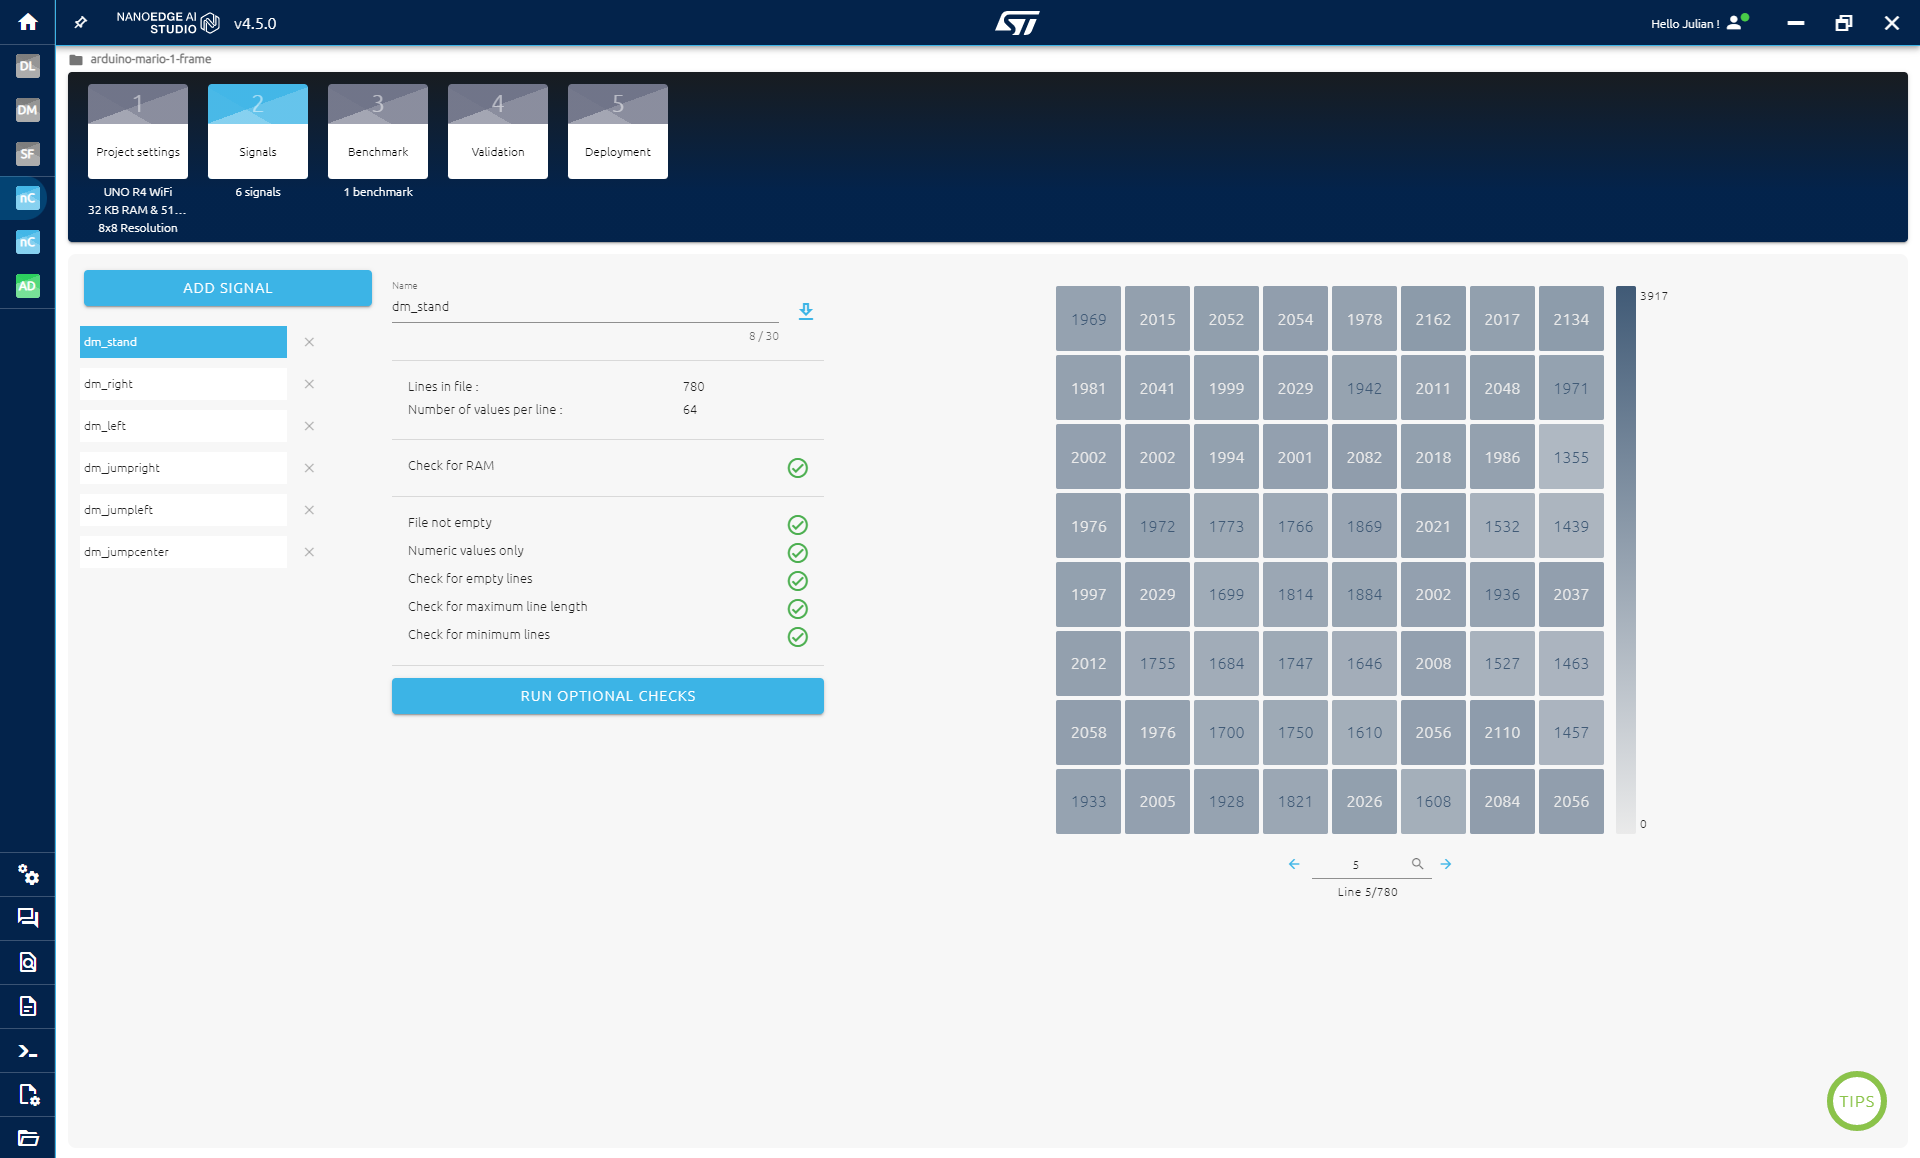
We will now collect data for each zone using serial communication.
You want to collect as varied data as possible. For example, when collecting data to move to the right (in Zone 4), you should move slightly within the zone to simulate different positions that need to be classified as Zone 4. Stand at different points in the zone: on the right, then a bit more or less to the right, a bit closer or further from the ToF sensor, etc.
When playing the game, you will alternate between zones, and you will never be in the exact same spot.
Try to avoid having overlapping data in different classes. For example, do not stand in the same spot when collecting data for both standing and moving to the left. Otherwise, it will be difficult for the model to accurately classify the data, leading to incorrect inputs when playing the game.
Now to collect data:
- Click on Add Signal
- Click on From Serial (usb)
- Select the right COM Port
- Try to be more or less in the zone before clicking start
- Log approximately 100-200 signals in each zone, following what is explained above
- Stop the logging
- Before importing the data, you can select the first few signals to delete them, if you think you weren't exactly in the zone.
Do it for the 6 zones.
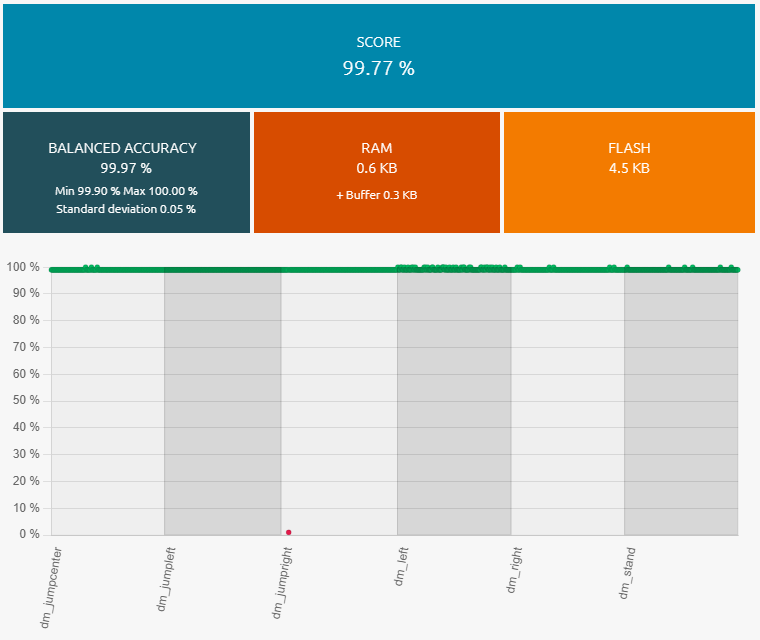
In Benchmark: The benchmark is the heart of NanoEdge AI Studio. Here we will use all the data collect to try to find the best combination of preprocessing of the data and the best model able to distinguish the data.
- Click on New Benchmark
- Select all datasets
- Click start
The benchmark will iteratively try combination of preprocessing and model on the data and evaluate the performances. It split the data into a training and testing set multiple times to have robust results.
The benchmark can take hours to finish depending on the amount of data used. If the score reach 90% or more, you can pause/stop it and continue. The benchmark will try to optimize the model as much as possible but you can stop it when satisfied.
Technical Deep-Dive: NanoEdge AI & Classification Heuristics
- The Cross-Sectional Intelligence Engine: NanoEdge AI Studio automates the selection of the optimal preprocessing and model-architecture for the ARM Cortex-M4 (Uno R4). Forensics involve the deterministic "Benchmarking" of signals, achieving $>90%$ accuracy heuristics.
In Validation: During the benchmarking process, every time a new best library is found, it will be added to the validation step.
Once you have some good libraries, you can test them in real-time, as if they were deployed on the microcontroller, to see if they work well.
To do this, click the play button in the Serial Emulator column. Select the correct COM port and click Start. You will then be able to test the model and see if it performs well.
The diagnostics utilize "Serial-Emulator Validation" before silicon-deployment, ensuring that the id_class telemetry remains stable during dynamic human motion-forensics.
If you notice that some classes are having trouble being recognized, you can go back to the logging process and perform a new benchmark. For example, I had issues with the classes "Standing" and "Moving to the Right" when I was positioned close to both zones. So, I logged new data, ensuring that I did not stand in the same place.
In Compilation: Simply click compile to get the trained model. You will obtain a .zip file containing everything needed for the next steps.
Step 4: Control the Keyboard
To play the game, we will use the NanoEdge AI Studio library to classify the required movement and the Arduino Keyboard library to send inputs to the PC and control the game.
Using the keyboard with the board can make it difficult to control your PC once the board starts sending input. To make things easier, I set a delay at the end of the setup() function. This delay gives you time to modify the code and flash it onto the board without interference from the ongoing inputs.
Engineering & Implementation: Logic-Interrupt Mitigation Analytics To prevent the Arduino from "locking-out" the PC during development, a $5\text{-second}$ setup-buffer is implemented. Forensics ensure the developer maintains a failsafe-exit from the HID-emulation loop before the AI-orchestration takes control of the OS-focus.
Keyboard Input Functions: We will use the following functions to send inputs:
- Keyboard.press()
- delay()
- Keyboard.releaseAll()
To effectively play the game, we need to avoid sending the 'a' key (move left) just once. Doing so would only move Mario slightly to the left each time a classification is made, preventing continuous movement or jumping. Instead, we will use Keyboard.press in combination with a delay, then release the key.
We will only press three keys:
- 'a' (left)
- 'd' (right)
- '0x20' (space to jump)
To jump left or right, we press two keys simultaneously. A delay of 500ms before releasing a key allows Mario to jump to maximum height.
We will use a switch() statement to press the correct combination of keys based on the predicted class.
Ensure that the classes and movements in the code match the order of your files. This order will be explained in the next step. To know what is the order of your library, it is explained in the next step.
Engineering & Implementation: HID Keyboard-Emulation & Sync Forensics
- HID-Buffer Orchestration: The Uno R4 WiFi emulates a standard USB-keyboard. Forensics involve the use of
Keyboard.press()andKeyboard.releaseAll()to simulate sustained movement harmonics $(e.g., holding 'd' for Mario's running-momentum)$. The diagnostics focus on the $500\text{ms}$ delay-window, providing a human-centric response slew-rate that prevents input-clipping diagnostics during rapid-fire jumps.
Step 5: Final Code
To add the AI to our Arduino code, here is what we need to do:
- Import the library to Arduino IDE
- Get the attached code
- replace the id2class variable
That it!
Add the library to Arduino IDE: First we need to import the library to Arduino IDE, to avoid error that may happen if you already imported a previous NanoEdge AI library, here is a safe way to do it:
- Get the .zip file you obtained after compilation in NanoEdge AI Studio
- Copy the folder nanoedge (YOUR_LIBRARY.zip\arduino\nanoedgeai_for_arduino.zip)
- Paste it in Document\Arduino\libraries
Attached code explanation: Here is what is done in the attached code:
- Include NanoEdgeAI.h and knowledge.h (the model and function)
- Add variables used by NanoEdge
- Add an initialization function
- Add the detection
- Add Keyboard.h and a switch to perform action based on the class
Here are the part added:
#include "NanoEdgeAI.h"
#include "knowledge.h"
#include <Keyboard.h>
/* Global variables definitions */
static uint8_t neai_code = 0;
static uint16_t neai_ptr = 0;
static float neai_buffer[SENSOR_FRAME_RESOLUTION * SENSOR_FRAMES] = {0.0};
/* NEAI library variables */
uint16_t id_class = 0; // Point to id class (see argument of neai_classification fct)
float input_user_buffer[DATA_INPUT_USER * AXIS_NUMBER]; // Buffer of input values
float output_class_buffer[CLASS_NUMBER]; // Buffer of class probabilities
const char *id2class[CLASS_NUMBER + 1] = { // Buffer for mapping class id to class name
	 "unknown",
	 "dm_jumpcenter",
	 "dm_jumpleft",
	 "dm_jumpright",
	 "dm_left",
	 "dm_right",
	 "dm_stand",
};
void setup() {
	 //some code
	 //initialize the keyboard usage
	 Keyboard.begin();
	 /* Initialize NanoEdgeAI AI */
	 neai_code = neai_classification_init(knowledge);
	 if (neai_code != NEAI_OK) {
	   Serial.print("Not supported board.\n");
	 }
}
/* Main function: Code run indefinitely */
void loop() {
	   //classification
	   neai_classification(neai_buffer, output_class_buffer, &id_class);
	  //actions to perform based on id_class (the detected class)
	   switch (id_class) {
	     case 6:
	       //stand
	       Keyboard.releaseAll();
	       break;
	     case 4:
	       //move left
	       Keyboard.press('q');
	       break;
	     case 5:
	       //move right
	       Keyboard.press('d');
	       break;
	     case 1:
	       //jump
	       Keyboard.press(0x20);
	       break;
	     case 2:
	       //jump left
	       Keyboard.press(0x20);
	       Keyboard.press('q');
	       break;
	     case 3:
	       //jump right
	       Keyboard.press(0x20);
	       Keyboard.press('d');
	       break;
	   }
	   delay(500);
	   Keyboard.releaseAll();
}
Replace id2class: In the code, a id2class variable contains the name of your classes and their order.
You need to replace the one in the code attached by your variable in NanoEdgeAI.h in your .zip:
- YOUR_LIBRARY.zip\arduino\nanoedgeai_for_arduino.zip\nanoedgeai\src\NanoEdgeIA.h
In this tutorial in particular, you also need to modify the switch() in the loop() part of the code to make the action. In the code above you can check that the classes correspond to their actions. For example, in the switch, the first option is case 6 because the class in id2class corresponding to stand is the last one (you count starting from 0).
Note: If you get an error because of RAM, it may be because of the library in NanoEdge. Go back to the VALIDATION STEP in NanoEdge and select a smaller library (click on the crown on the right), then compile it and replace it in Arduino IDE.
Step 6: Conclusion
With this tutorial, you learned how to use NanoEdge AI Studio with a Time of Flight to play a game using the pc keyboard. ToF-Gaming represents the pinnacle of Asynchronous Edge-AI Diagnostics. By mastering Laser-Ranging Forensics and Class-Classification Heuristics, this project delivers a robust, professional-grade gestural interface that provides absolute input clarity through sophisticated