Network Architecture: Arduino + Raspberry Pi
While an Arduino is perfect for reading a sensor, it is terrible at hosting databases or web servers. A Raspberry Pi, conversely, is a full Linux computer but lacks analog pins for sensors. The IoT Ecosystem project solves this by fusing the two platforms together using the nRF24L01 Radio Network.
Overview
I've developed a communication stack based on the OSI model for nRF24 radios over the past number of years, and it is fairly complete and fully functional. It supports quite a wide range of communication scenarios, with a mesh layer that allows wireless nodes to find communication paths through the network automatically when a given connection fails and uses other nodes to bridge the distance between points in the network.
This is one of the more advanced scenarios on how to use it.
Basically what I am doing is using the internet connected Raspberry Pi as a gateway for all of my Arduino devices, which will run their own IP stack and communicate directly with the Raspberry Pi using the MQTT protocol. This allows me to send and receive information to and from the Arduinos using any device/software that supports MQTT, including mobile devices. All of this is done wireless, using nrf24l01 radios.
These instructions assume users have working radios wired up and ready to go. There are numerous tutorials on setting up and transmitting simple messages.
The Hub and Spoke Model
- The Spoke Nodes (Arduinos): You place a
$5Arduino Nano + nRF24L01 radio + DHT22 temp sensor in every room of your house. They wake up from deep sleep, blast a data packet via radio to the Hub, and go back to sleep. - The Hub (Raspberry Pi): A Raspberry Pi sits in your living room. It has an nRF24L01 radio acting purely as a receiver.
- The
RF24NetworkLibrary: This library handles the complex packet collision physics, ensuring 5 Arduinos can talk to the single Pi without interrupting each other.
Data Visualization (Node-RED)
The true power of the Pi is its software capability.
- The Pi runs a Python script to collect the incoming radio data.
- It pushes the data into an MQTT Broker (Mosquitto) or an SQL database.
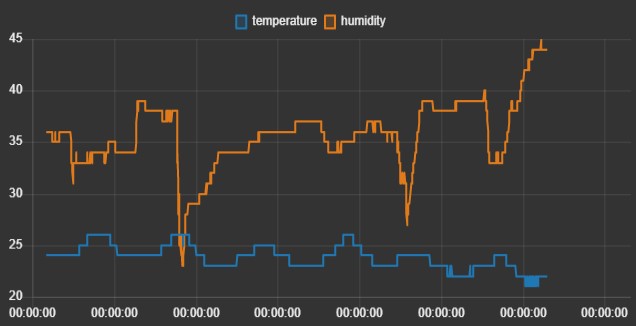
- It runs Node-RED or HomeAssistant. You can now log into your Pi's IP address from your iPhone and view a beautiful graphical dashboard showing the specific temperatures of every room in your house!
Setting it Up
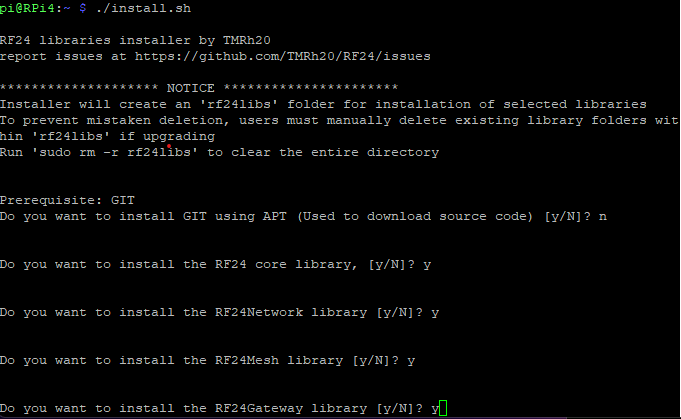
The first steps are to install the RF24 libraries. On the Arduino, the easiest way is to open the Arduino Library Manager, and select the RF24Ethernet library. It should install all the required RF24 libraries. For linux devices, an install script has been written, the instructions for which can be found here or via the main documentation page https://nrf24.github.io/RF24. In this scenario we will select to install all of the RF24 libraries including the ncurses library, and use the SPIDEV driver when prompted. Also select to build the examples when prompted.
If there are any issues with the installer or the libraries, please report them at https://github.com/nRF24
Once installed, on the Raspberry Pi, we need to navigate to the example file and build it:
cd rf24libs/RF24Gateway/examples/ncurses- If you have used the default pin connections to wire up your nrf24 module to the RPi, then from the
ncursesdirectory justcd ../buildthen runmaketo build the example file. Else edit the file per step 3. - Run
nano RF24Gateway_ncurses.cppto edit the file and change the lineRF24 radio(22, 0);to suit your chosen pin connections. Then run make per step 2.
Scroll down at https://nrf24.github.io/RF24/index.html for wiring information.
- RF24Gateway was designed to be run in
screen. This allows you to run it in the background while still being able to access the GUI as desired. Usesudo apt-get install screento install. Then just runscreen. Use key combinationctrl+A+Dto detatch from the screen and the commandscreen -rto resume the screen. - Run the following commands to configure the interface manually. (Automatic configuration requires running the gateway as root) If your username is something other than 'pi' edit the command to specify it after 'user'.
sudo ip tuntap add dev tun_nrf24 mode tun user pi multi_queue sudo ifconfig tun_nrf24 10.10.2.2/24 - If not enabled, enable the SPI interface on the RPi by running
sudo raspi-config - Once built on the Raspberry Pi, we can
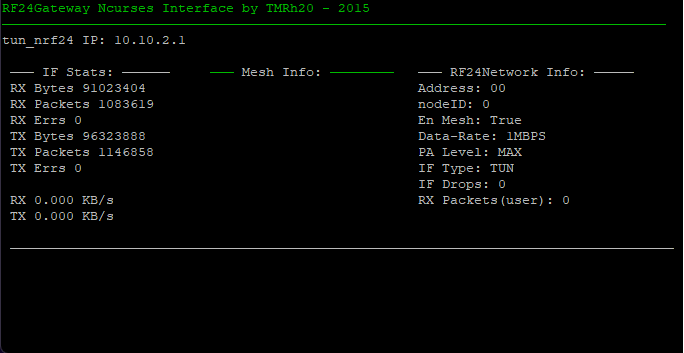
cd ncursesfrom the build directory, then run./RF24Gateway_ncursesto execute the example.
Almost ready to go! It should look something like the following:
The next step on the RPi is to install mosquitto, an MQTT broker:
- Run
sudo apt-get install mosquitto - Run
nano /etc/mosquitto/mosquitto.confand add two lines: a:allow_anonymous trueb:listener 1883 - Run
sudo service mosquitto restartto reload the configuration
All done on the Raspberry Pi!
Arduino Steps:
- Open the Arduino library manager and search for RF24Ethernet. Install the library. We also need the MQTT library just labelled "MQTT" by Joel Gaehwiler.
- Open one of the examples: File -> Examples -> RF24Ethernet -> MQTT -> mqtt_basic
- If not using pins 7 and 8 for CE and CS respectively, set up your pin connections in
RF24 radio(7, 8); - Upload to your Arduino
Mobile Device Steps:
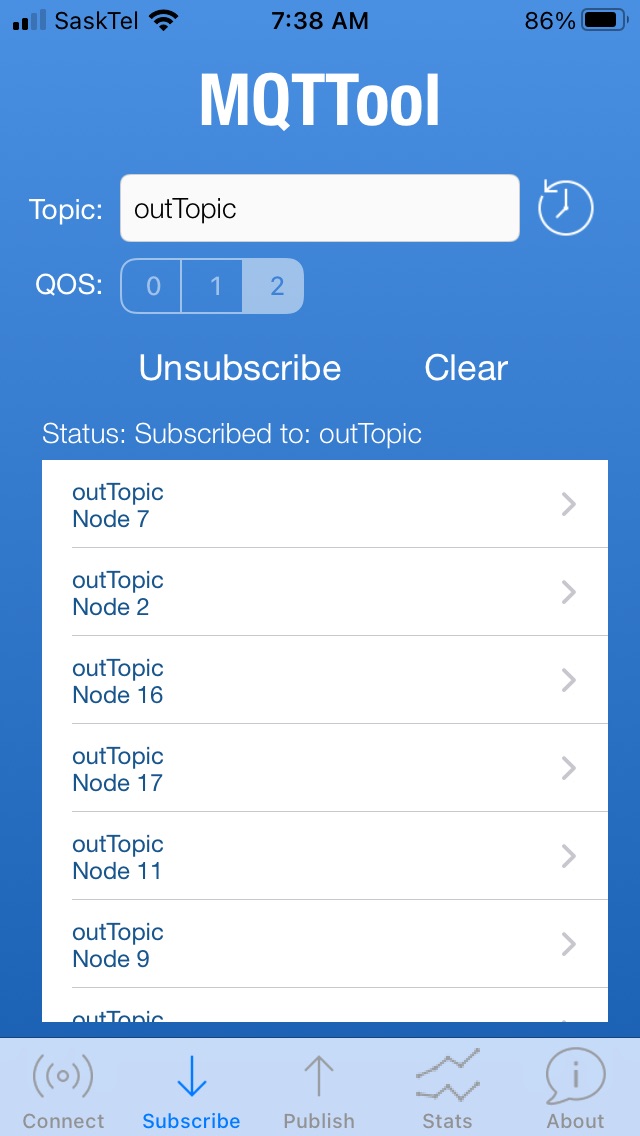
On my iOS device, I installed MQTTool and it is fairly nice to use. As long as the Raspberry Pi is connected to the same LAN as your mobile device, you should now be able to send and receive messages to and from your Arduino.
- On the Raspberry Pi, type in
ifconfigto get the IP address. Usually the eth0 or wlan0 interface depending on if you are connected via WiFi or cable. - This IP from step 1 is what you want to punch into the app on your phone, in the connection area.
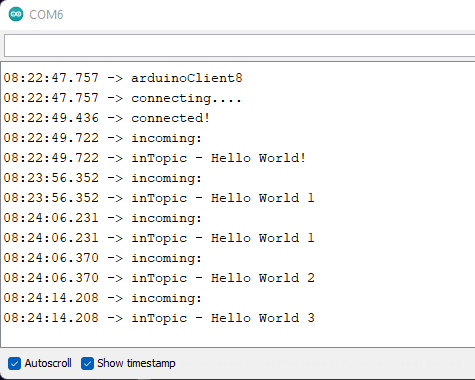
- Once connected, you can publish any message to inTopic, and the MQTT server will send it to your Arduino which will print it out over the serial port.
- You can also subscribe to 'outTopic' and your mobile device should start receiving messages from the connected node.
To add more devices, just change the IP address in the example sketch from 10.10.2.4 to use any last octet from 3-254. ie: 10.10.2.5
Expanding on these Principles:
That should get you started with RF24Gateway/RF24Ethernet and MQTT. The hard part is getting the first device working. From here it is a matter of customizing the MQTT topics and the information you send/receive.
To expand on this, users can install software such as Node Red on the Raspberry Pi, and create charts and graphs, design input/output scenarios like on/off switches for devices etc. as in a home automation system.
The RPi radio interface behaves just as it were a standard network interface, so a wide range of tools protocols and software can communicate with Arduino nodes running RF24Ethernet. This can be further extended by installing a vpn on the RPi to make the controls, charts etc accessible from anywhere.
See http://tmrh20.blogspot.com/ for further information and https://github.com/nRF24 for support.
Note:
This configuration sets up an IP enabled wireless interface on your Raspberry Pi, so suitable firewall rules and strong passwords should be used to prevent unwelcome access.
Crucial IoT Hardware
- Raspberry Pi 3 or 4: The central "Broker."
- Arduino Nano nodes (x3 to x5).
- nRF24L01 Transceiver Modules.
- RF24Network / RF24Mesh C++ Libraries.