Have you ever wondered about building an Arduino weather station on your own? Well, this might be your chance to build a basic IoT weather station. This will be an interesting project and I will be guiding you through this. In this project, you will be learning how to record measurements using the sensors and store them in Google Spreadsheets.
I got this idea after referring to Stephen Borsay's 'Transmit ESP8266 Data to Google sheets' project. Likewise, you can also upgrade this project by adding more sensors to measure weather conditions.
Hardware components used in this project
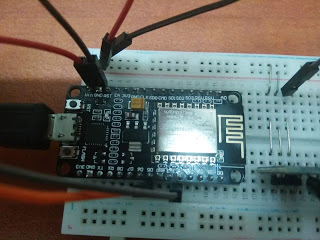
- NodeMCU devkit V1.0
- Solderless Breadboard - Half+
- DS18B20 Digital temperature sensor module
- DHT11 Humidity and Temperature sensor module
- Male-to-Male Jumper wires (x4)
- Jumpers (x4) - To reduce the usage of wires
Softwares and online services
- Arduino IDE
- PushingBox
- Google Sheets
Hardware setup
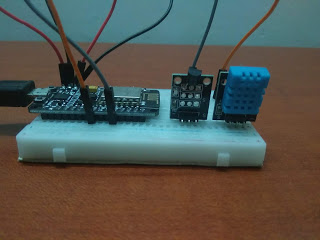
Connections
DS18B20 Temperature sensor module
- S - D4
- (+) - 5V
- (-) - Ground (GND)
DHT11 Humidity and Temperature sensor module
- S - D5
- (+) - 5V
- (-) - Ground (GND)
Coding
You can find the codes for this project by referring to the original project which is included as a hyperlink in the beginning.
You will be needing the PushingBox online service to act as a trigger to send the data from your NodeMCU microcontroller to the Google sheets.
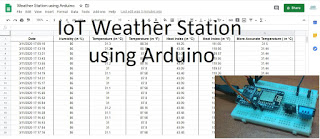
Google sheet
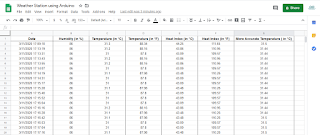
- You will be needing your gmail address to create a spreadsheet in google sheets.
- Enter your column headings which will be Date, Humidity (%), Temperature (in °C), Temperature (in °F), Heat index (in °C), Heat index (in °C) and More Accurate Temperature (in °C).
- Copy and save your spreadsheets URL key which will be found in the URL between "/d/" and "/edit".
- Go to tools and click on 'Script Editor'.
- The code which will be included in your Gscript is given in the original project. The only change in the codes will be to add another case for the more accurate temperature.
- Save the script
- Deploy as a web app. At first, Google will send you a warning saying that it is unauthorized but it's okay because you are the author.
- Save the web app URL
PushingBox
- Login with your gmail account
- Create a new service by selecting 'CustomURL'
- The root URL within the customURL configuration will be the web app URL saved in the previous step.
- Select 'GET' method
- Now, you must create a scenario using this service.
- For 'GET' method, the statement begins with '?'
Test your API by typing this statement into your browser's address bar:
http://api.pushingbox.com/pushingbox?devid="Your device ID"&humidityData=33&celData=44&fehrData=111&hicData=22&hifData=77&tempData=44You only have 100 requests per day.
Arduino
Refer to this tutorial to get familiar with the DS18B20 temperature sensor module.
https://randomnerdtutorials.com/guide-for-ds18b20-temperature-sensor-with-arduino/
If anyone has any questions about the coding, please feel free to comment below.
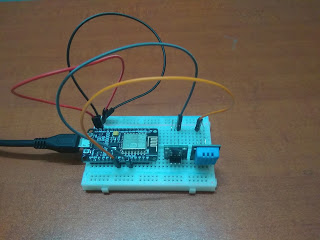
Final Look
If anyone has any questions, or suggestions, about this project, please feel free to comment below.
EXPANDED TECHNICAL DETAILS
Global Environmental Logging
This IoT station pushes local climate data to a professional-grade spreadsheet for long-term climate analysis.
- Sensory Suite: Features a DHT22 (Temp/Humidity) and a BMP180 (Atmospheric Pressure).
- API Uplink: Through the PushingBox API, the Arduino sends HTTPS requests to Google Sheets. Each request automatically appends a new row with a timestamp and the latest sensor readings.
Agricultural Utility
- Trend Visualization: By logging into a spreadsheet, users can use Google's native graphing tools to visualize weekly humidity cycles or pressure drops that indicate an incoming storm, creating a low-cost professional weather node.