Hello Friends.
I hope you are hale and healthy.
In this Project I'll show you How you can control RGB Light using Analog Joystick. You can control the colors of RGB led using Joystick.
If you take Common Cathode or Common Anode RGB led just take a look at the picture below.
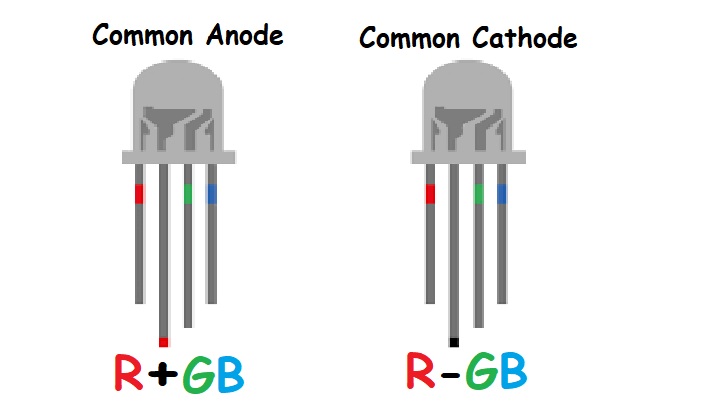
Common Anode RGB led Common pin must be connected to +5v. Common Cathode RGB led Common pin must be connected to GND.
Technical Implementation Details
This project demonstrates how to map multi-axis physical movement to visual color feedback.
Analog Input to Color Mapping
- Sensor Hookup: A 2-axis Joystick is connected to analog pins
A0andA1. The joystick's X and Y positions are represented as voltages from 0-5V. - Color Processing: The Arduino maps the 10-bit joystick values (0-1023) to 8-bit PWM values (0-255).
- The Third Axis: The joystick's integrated pushbutton can be used to cycle through different "Modes" (e.g., controlling Saturation vs. Brightness).
Visual Output
- Common Anode/Cathode Setup: Uses a standard RGB LED with current-limiting resistors, as shown in the image above.
- Smooth Fading: By using the
analogWrite()function, the Arduino creates millions of color combinations, effectively turning the joystick into a physical, real-time color mixer for mood lighting or art installations.
If you like this project do comment on YouTube video, and do not forget to subscribe my channel, link is below
link is : https://studio.youtube.com/channel/UCaXI2PcsTlH5g0et67kdD6g
If you have any doubt regarding this project, you can Telegram me at +919557024177. If you have any suggestions or project idea, kindly reach out to my channel or Telegram me at above no. You're most welcome.
Steps to make this project:
- Gather all components.
- Place Arduino Nano on Breadboard.
- Connect RGB led with 330 ohm resistor.
- Connect Jumper wires to Joystick module.
- Do connections from circuit diagram.
- Upload code and enjoy.
Your Project is ready.