The laser pointer can be operated in any given direction using a simple joystick and 2 servo motors.
This project is similar to my previous project where I made a Laser pointer operate via bluetooth using a smartphone application.
It basically contains a Servo motor mounted on a base on which we place the second servo that has a Laser pointer attached to it. The Servo on the base moves the pointer in the horizontal direction and the other servo moves it in vertical direction.
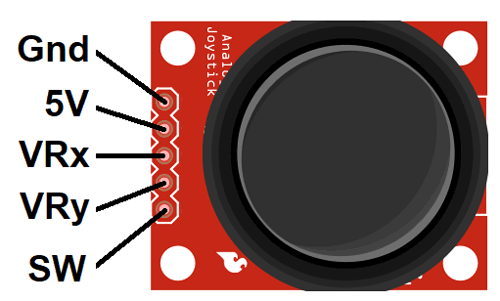
The Joystick also has an in-built pushbutton which is enabled by pressing the joystick. The SW pin provides the status of pushbutton which is used to switch on/off the Laser, VRx and VRy gives the the X and Y co-ordinates. Other 2 pins are for supply and ground.
Technical Deep-Dive
- Dual-Axis Analog Sensing (VRx/VRy):
- The joystick module contains two internal potentiometers that act as voltage dividers. As the user moves the stick, the center pin voltage varies between 0V and 5V.
- The Arduino's 10-bit ADC (Analog-to-Digital Converter) reads these values as 0-1023. A value of approx 512 represents the stick at rest in the center.
- Proportional Speed-Ramping (The "Sensitivity" Logic):
- The movement of the joystick is also programmed to be sensitive. This means more you move the joystick away from the center, the more faster the Servo will rotate. This enables fine adjustments to move the pointer to the desired target.
- Unlike basic mapping (where stick position 1:1 equals servo angle), this project uses Rate-Based Control.
- The Algorithm: The code calculates the "Error" (how far the stick is from 512). The larger the error, the faster the servo incrementing variable is increased. This allows for "Fine Adjustments" in the center (pixel-perfect targeting) and "Rapid Scanning" at the edges of the stick's travel.
- Servo Hub Architecture (2-DOF):
- The Gimbal: The "Pan" servo is mounted to the base, providing horizontal rotation. The "Tilt" servo is mounted directly to the pan horn, providing vertical movement. This creates a 2-Degree of Freedom (2-DOF) system.
- Mechanical Limits: To prevent standard SG90 servos from stalling or stripping their plastic gears, the firmware includes Software Constraints (mapping angles to 10°-170°), ensuring the laser never collides with its own chassis.
- Digital Toggle (SW) Logic:
- The joystick's internal pushbutton connects to a digital input on the Arduino. The firmware uses a "Toggle State" variable. One click of the joystick switches the laser from OFF to ON; a second click switches it back. This utilizes Digital Debouncing to prevent the laser from flickering.
Engineering & System Reliability
- External Power Mandate: It is important to use a separate supply to power the servo's instead of the arduino's 5V supply. The servos were not responding well when I tried to use the arduino's supply. I have used a separate 5V supply from an adapter to operate the Servo's.
- This project emphasizes a common "Gotcha" in Arduino robotics. Servos are high-current inductive loads; drawing power directly from the Arduino's 5V pin can cause the on-board regulator to overheat or the microcontroller to reset due to "Brownout." The author correctly identifies the need for an External 5V supply for the servos, while keeping a Common Ground (GND) with the Arduino to maintain signal integrity.
- Calibration & Dead-Zones: Analog joysticks are rarely perfect; they often "drift" or have small electrical noise at the center. The code implements a "Dead-Zone" buffer (e.g., $\pm 20$ from center), so the laser stays stationary even if the joystick is slightly imperfect.
- Laser Safety: The system uses a 655nm Class IIIa laser diode. While safe for targeting surfaces, the documentation warns against aiming at reflective glass or eyes. The hardware is designed for low power consumption, allowing the laser to be driven directly from a digital pin (with an appropriate internal or external series resistor to maintain the 20-30mA limit).
- Expandability: The modular logic allows users to swap the laser for a light-weight camera or an ultrasonic sensor, transforming a simple turret into a mobile scanning radar system.