กลับไปหน้ารวมไฟล์
loadmaster-online-dashboard-and-data-logging-on-ubidots-0a5ef1-en.md

The LoadMaster system provides a really effective and efficient way of heating water or any other resistive load using PV solar and operates with MPPT (Maximum Power Point Tracking)

A sister project displays LoadMaster data values on a remote colour Nextion display. Our experience suggests the remote display is an extremely valuable part of the project, conveniently presenting useful system performance data exactly where you wish to view it in your home (i.e in our kitchen and not the garage!).

The displayed data can drive adjustments in behaviour, thus making better 'eco' decisions to manage and understand the amount of hot water available and the solar conditions.

This project takes LoadMaster data viewing one step further. The Ubidots MQTT broker service allows you to access, record and graphically present LoadMaster data from anywhere in the world via a customisable 'dashboard' (similar services are available - Thingspeak etc).

MQTT (Message Queuing Telemetry Transport) is fundamentally a lightweight publish/subscribe messaging protocol underpinning the Internet of Things (IoT).

Ubidots kindly provide a free account for non-commercial, STEM or hobbyist users (currently 4000 data points a day, 1 months storage, 3 devices).

So How Does this Project work ?

By default, Loadmaster has a software serial port outputting a stream of data messages in Nextion display format on D17 (i.e Serial Tx). The software serial receive Rx channel exists on D15 (Rx is generally not used - 'Display traffic is currentlyone-way unless used for remote ON/OFFbuttonpress).

Transmitted Nextion variables look like this:-

Status.val=1⸮⸮⸮Watts.val=671⸮⸮⸮Whrs.val=384⸮⸮⸮BotC.val=420⸮⸮⸮MidC.val=546⸮⸮⸮TopC.val=556⸮⸮⸮Note:- AllNextion commands areterminated in 0xFF 0xFF 0xFFwhichprints as '⸮⸮⸮' also, temperaturevaluesare transmitted as Integers representing °C x 10.

This project is based around ESP8266 based WiFi devices (primarily Wemos D1 / NodeMCU etc) to serially receive the data stream, extract values and then publish data values to Ubidots.

The WiFi modules Rx input on D5 may be wired directly to Loadmaster's D17 (tx) pin on connector CN6. If you subscribe to topics (i.e wish to receive the status of say a switch control) then optionally wire the Wemos tx output on D6 to LoadMaster D15 :-

Connecting a Wemos D1 to Loadmaster

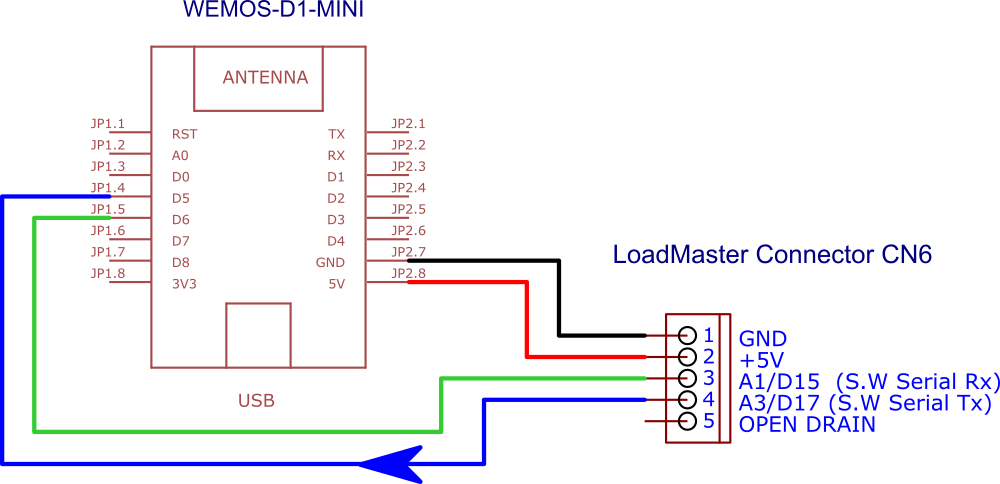
In the above arrangement, the WiFI module should be located outside of LoadMasters metal enclosure, use < 1m of screened cable.

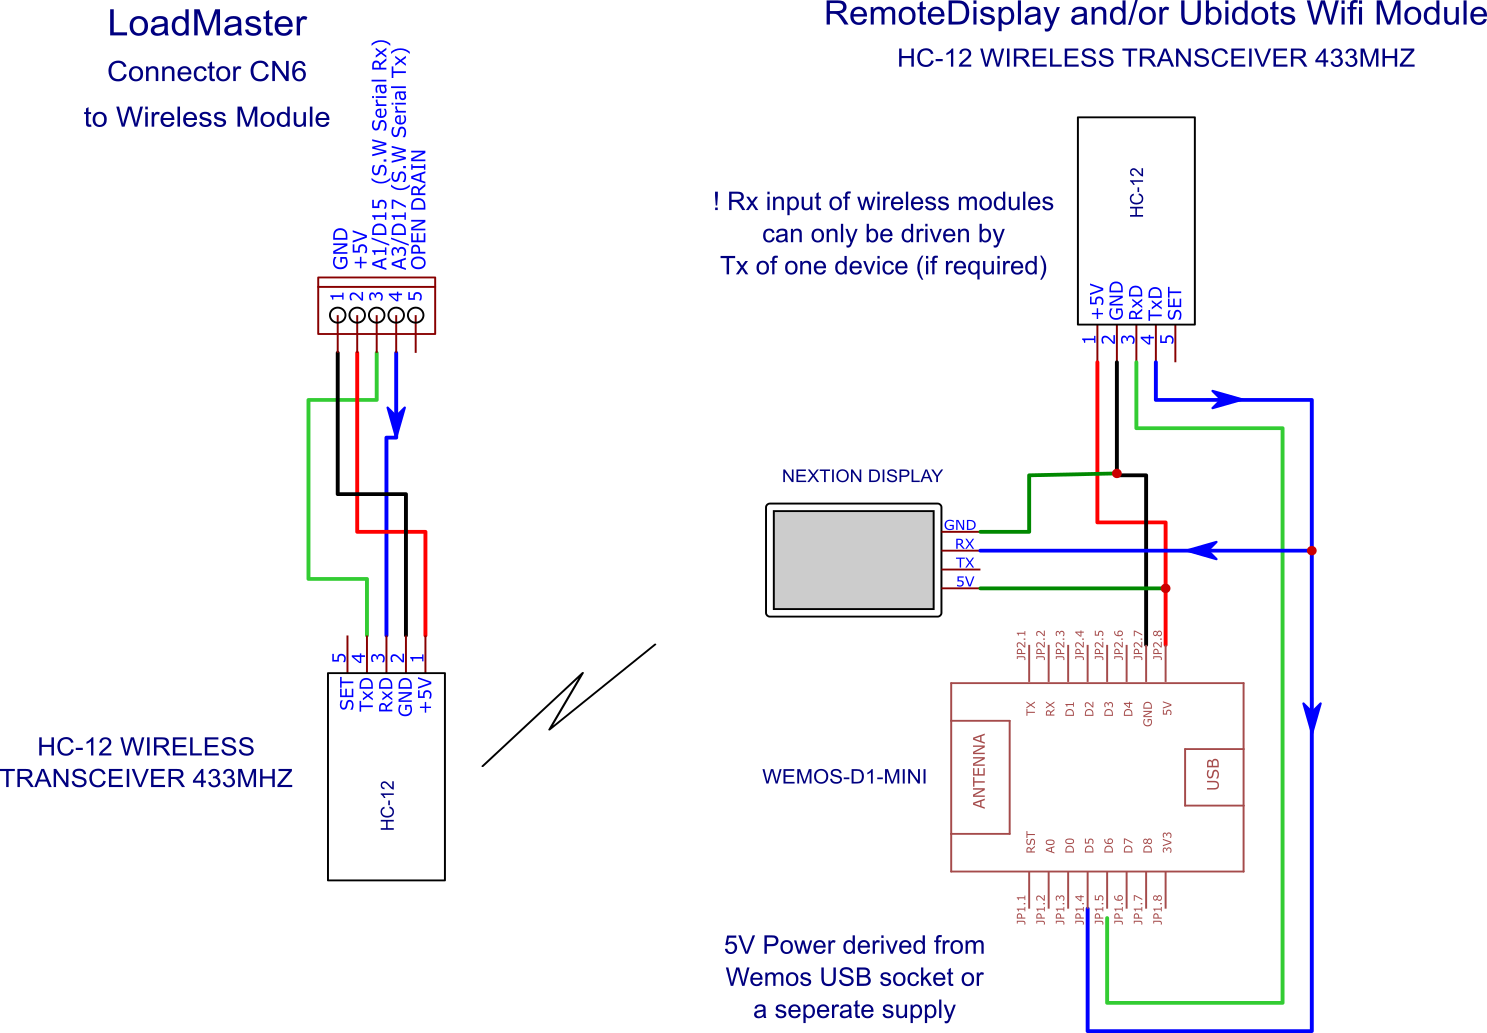
In some installations it can be desirable to add a wireless connection between the LoadMaster installation and remotely located Nextion display and/or Ubidots enabled WiFi module:-

A wirelessly connected solution - Wifi Module can be closer to WiFi Router

Installing the Libraries and Loading Firmware.

Requirements:
  • NodeMCU / Memos D1
  • Arduino IDE 1.8.2 or higher - recommend you download from Arduino - NOT Microsoft store App version.Log onto Ubidots and create yourself a free STEM account
  • Set up the Arduino IDE with appropriate libraries and hardware board managers
  • Installation of PubSubClient library by Nick Oleary 2.8.0- installed from Arduino IDE Tools | Manage libraries menu
  • Installation of UbidotsMQTTESP library
  • To use a NodeMCU, WemosESP8266 platform in the Arduino IDE, you will need to install the ESP8266 platform using the preconfigured Arduino Board Manager. If you are not familiar with adding a board with the Arduino IDE, refer to this article for additional guidance.

    When installing the ESP8266 platform in your Arduino IDE, please make sure to install version v.2.7.4.

    With the ESP8266 platform installed, select the specific ESP8266 device you are working with.

    Tools > Board NodeMCU 1.0(ESP12E module) or say LOLIN (WEMOS) D1 R2 and MiniDownload and install the UbidotsMQTTESP8266 library.For a detailed explanation of how to install libraries using the Arduino IDE, refer to this guide.

    Open the Arduino IDE and paste in the LoadMaster Ubidots Interface code below.

    Once you have pasted the code, you will need to edit and assign your unique Ubidots TOKEN, specify your WiFinetworks 'SSID'Name and it's associated Password:- /***************************************** Define Constants****************************************/#define TOKEN "BBFF-lIabcd12yourUbidotstokengoeshere" // Ubidots TOKEN#define WIFINAME "YourWifinamehere" //Your WiFi SSID#define WIFIPASS "yourWiFipasswordhere" // Your Wifi PasswordVerify your code within the Arduino IDE:- in the top left corner of our Arduino IDE press the "Check Mark" icon to verify the code and required libraries. Upload the code into your WiFi module :- choose the "right-arrow" icon beside the "check mark" icon. To verify the connectivity of the module and sent data to Ubidots, open the serial monitor by selecting the "magnifying glass" icon in the top right corner of the Arduino IDE to see the connectivity logs. If no response or problems are seen, try unplugging the WiFi module and re-connect, ensure the baud rate of the Serial monitor is set to 9600.Log into your Ubidots account. You should now see the posted data located under a new device called "loadmaster".

    Create your Own Dashboard

    Most of this should be self explanatory and Ubidots provides some excellent guidance documentation, however as some examples:-

    Temperatures 'Line Chart' - Use a Line Chart widget and add Bottom, Middle and Top temperhrs ature level variables. Watts, Watthrs and status table - this can be created using a Values Table widgetNote; - the Status variable includes secondary 'context' field. This is a text part of the variable which verbosely explains the current operating status. The DailyKWhrs variable also includes a context field for the daily maximum water temperature. Context fields were used due to the limit of 10 variables when using a free Ubidots account.

    EXPANDED TECHNICAL DETAILS

    Industrial Weight Telemetry

    Loadmaster is a professional-grade digital scale system that logs industrial weights directly to a cloud dashboard for inventory management.

    • HX711 Bridge Precision: The Arduino interfaces with a load cell via the HX711 24-bit ADC module. This module provides the extreme sensitivity needed to resolve weights down to 0.1g accuracy.
    • Ubidots Cloud Integration: Uses an ESP8266 or GSM shield to send the weight data to Ubidots via HTTPS. The Ubidots platform then provides a real-time 2D chart and a "History Log" that can be exported as a CSV for auditing.

    Efficiency

    • Power-Down Deep Sleep: To preserve battery during remote weighing, the Arduino spends 99% of its time in deep sleep, only waking up every 60 minutes or when a "Weight Change" exceeds 1kg.

    ข้อมูล Frontmatter ดั้งเดิม

    title: "Loadmaster - Online Dashboard and Data Logging on Ubidots"
    description: "LoadMaster's serial output stream (in Nextion display format) is decoded and values published to Ubidots MQTT broker. (Wemos D1 NodeMCU)"
    author: "stevetearle"
    category: ""
    tags:
      - "solar"
      - "loadmaster"
      - "hot water"
      - "mqtt"
      - "pv"
      - "dashboard"
      - "ubidots"
    views: 1270
    likes: 0
    price: 2450
    difficulty: "Intermediate"
    components:
      - "1x Arduino Nano R3"
      - "1x NodeMCU ESP8266 Breakout Board"
      - "1x Wemos D1 Mini"
    tools: []
    apps:
      - "1x Ubidots"
      - "1x Arduino IDE"
    downloadableFiles:
      - "https://projects.arduinocontent.cc/c9cb40a6-4738-442f-b3c5-973e9ddbccdc.ino"
    documentationLinks: []
    passwordHash: "171588ec078844d32400c03611f2d987c6748a860aed124e9315b5e30cab62b1"
    encryptedPayload: "U2FsdGVkX18gqlULkK9Fluf653ACd75eASe5stn0nc6FHZM58nsIk/KZcyRQZNQvzmjYU5bcA6xxtb/XXaBqoFco4A6y71JOVnUy37r8KZk="
    seoDescription: "Create an Online Dashboard and Data Logging for LoadMaster on Ubidots using Wemos D1 NodeMCU and MQTT broker."
    videoLinks: []
    heroImage: "https://cdn.jsdelivr.net/gh/bigboxthailand/arduino-assets@main/images/projects/loadmaster-online-dashboard-and-data-logging-on-ubidots-0a5ef1_cover.jpg"
    lang: "en"