Introduction
Hello everyone! Today's post is all about this vending machine prototype my Arduino club installed in our school cafeteria.
We needed a vending machine. Last year's experience on the student council taught me how funds are always short and how little opportunity there is to raise funds. So I decided to give our student council a steady supply of funds for the coming years. And give students and teachers a snack break once in a while.
You might be asking: How is this vending machine different from the others? Well, most other DIY vending machines are for personal use. When the user taps a card and presses a button, the screws turn to drop a snack. However, this one is for the entire school. This means it has additional features:
- Stores the user's name and number of future payments available in each user's card;
- Identifies the user's card using a card reader;
- Matches the user's card with the user's name;
- Waits up to 10 seconds for the user to choose a snack;
- Automatically decreases the number of available payments if a snack is chosen;
- Allows students to recharge their card by increasing the number of available payments directly from a spreadsheet.
All data, including students' names, card UIDs, available payments, are stored in the spreadsheet. This means the admin or anyone in charge can receive money from a student and increase the number of available payments. The spreadsheet is type .csv(which stores text separated by commas in the rows and columns of an Excel file). The file is stored in an SD card.
Project Overview
The "Members-Only Vending Machine" is a sophisticated IoT-adjacent project designed for institutional environments like schools or offices. Unlike simple coin-operated machines, this system handles user identification (RFID) and digital balance management (SD Card CSV). It features a multi-MCU architecture, where an Arduino Uno handles specialized sensor tasks while an Arduino Mega manages the core vending logic, including the actuation of four continuous-rotation servos. This project is a masterclass in combining various communication protocols (SPI, UART, I2C) to create a seamless, cashless payment ecosystem.
Technical Architecture & Multi-MCU Strategy
- Dual-Arduino UART Bridge: To overcome pin conflicts and timing sensitivity, the project uses an Arduino Uno exclusively as an RFID frontend. The Uno reads the MFRC522 via SPI and transmits the raw UID to the Arduino Mega via UART (Hardware Serial). This offloads the high-frequency SPI polling from the Mega, which is busy managing the 20x4 LCD and servo timing.
- Persistent Data Store (SD Card CSV): The "Economy" of the machine is built on a
.csvdatabase stored on a MicroSD card.- Atomicity & File Modification: Because the standard
SD.hlibrary doesn't support in-place editing, the project implements a "Shadow Copy" algorithm. To update a balance, the Mega reads the entire file, modifies the specific user's row in memory, and then performs aFILE_WRITE | O_TRUNCto overwrite the database. This ensures data consistency.
- Atomicity & File Modification: Because the standard
- Servo Actuation & Timing: It uses DS04-NFC continuous rotation servos. These differ from standard servos in that they spin at variable speeds based on PWM width rather than moving to a fixed angle. The "vending" action is precisely timed using
millis()—when a selection is made, the specific servo spins for a calibrated duration (e.g., 2000ms) to ensure exactly one snack rotation. - State Machine Logic: The firmware operates as a finite state machine (FSM) with states like
WAITING_FOR_CARD,VALIDATING_USER,PRODUCT_SELECTION, andVENDING. A 10-second timeout resets the state if the user fails to select a product, ensuring the machine doesn't stay locked if a card is tapped and then abandoned.
Engineering & Hardware Insights
- User Feedback (LCD 20x4): The large format I2C LCD provides detailed information, including the student's name and their remaining "Credits" retrieved from the SD file. This transparency builds trust in the digital payment system.
- Input Multiplexing: The product selection buttons are wired with pull-down resistors. The code uses an efficient
while()loop with non-blockingmillis()checks to monitor four buttons simultaneously during the selection window. - Industrial Prototyping: The prototype uses acrylic and metal components for the dispensing mechanism (screws), demonstrating a transition from "breadboard electronics" to mechanical engineering assembly.
- Scalability: While currently using a local CSV, the architecture is designed such that the SD card could be replaced with an ESP8266/ESP32 to fetch balances from a Google Sheet or central SQL database in the future.
Schematic
The circuit is set up as in the diagram:

Libraries
- <Servo.h> : For controlling the servos.
- <LiquidCrystal_I2C.h> : For the LCD interacting with the user.
- <SPI.h> : For SPI communication with the SD card module and RFID module.
- <SD.h> : For the the SD card module.
- <MFRC522.h> : For the RFID reader module.
Servo Motors
I used four DS04-NFC continuous rotation servos. I connected four pull-down resistor circuits to the MCU, each responsible for one servo motor. Using millis() , I wrote a while() loop to check constantly whether any of the buttons were pressed for the next 10 seconds. I experimented with different rates of rotation to decide on the right speed and delay to make a full 360 degree turn. After 10 seconds pass without turning a servo, the LCD shows "Paused too long. Have a nice day!", and the pay count in the Excel file remains the same.
lcd.print("Choose a snack...");
preTime = millis();
while (millis() - preTime < 10000) {
if (digitalRead(redButton)) {
myServo.attach(redServoPin);
ServoAction("Red");
servoTurned = 1;
lcd.clear();
break;
}
else if (digitalRead(yellowButton)) {
// similar code
}
else if (digitalRead(greenButton)) {
// similar code
}
else if (digitalRead(blueButton)) {
// similar code
}
else {
continue;
}
}
RFID Reader
There are great tutorials on YouTube that offer advice on how to use the MFRC522 reader module. It took much time and patience to get the module to work. What I wish I'd known from the beginning is that mine and many other modules showed Version unknown when I ran the "firmware_check" built-in example code, and they still worked well regardless of the error.
Because I was already using the SPI pins of the Arduino Mega, I had to use the SPI pins of an Arduino Uno to use the reader module, and then transmit the card UID to the Mega.
NOTE: I tried using I2C using theWirelibrary to transmit the UID from the Uno to the Mega. But for an unknown reason, communication was muddled, and the UID got lost. Using UART was the solution. Transmission, therefore, was done bySerial.print(); the Mega transmitted the same bytes to the serial monitor that it transmitted to the Uno.
Even so, it took much trial and error to pass the correct UID to the Mega:
- The Mega skipped two digits every time it received a digit. It turned out to be because the absence of a
delay(10)after the Uno's transmission of the digit. - It turned out that the Mega's adding a digit to the UID
Stringvariable had to be done inside theif Serial.available(){}statement, or else the Mega would add the previous digit to it while waiting for the next digit.
Comparing UIDs
Function: CheckUID(String UID)
Global Variables:
File myFile: For reading the contents of the Excel file in the SD card module.
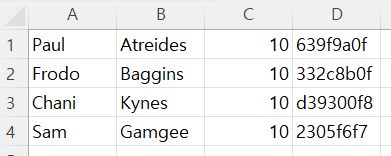
The files in the SD card are stored in the format:
Paul,Atreides,10,639f9a0f
Frodo,Baggins,10,332c8b0f
Chani,Kynes,10,d39300f8
Sam,Gamgee,10,2305f6f7
The file organizes the text into items separated by commas. Whoever opens the file will see:
Local Variables:
String contents: For reading each line in the Excel file and storing it as aStringobject.char character: For reading each character in the Excel file to be added tocontents. Whencharacterbecomes\n, the program knows it reached the end of the line in the file and pauses reading. Then, if the detected UID is the UID incontents, it shows the user's name on the LCD. The last 8 characters of each line, excluding the line breaker, should be the UID of a user's card.int startIndex: The index where the program starts reading the line.int endIndex: The index where the program ends reading the line.
Paying for the Snack
Function: DecreaseCount(String contents)
Global Variables:
File prevFile: The original file.File myFile: A file with the same title but with the contents deleted. The contents of the previous file will be added here, with the pay count decreased by 1. I wanted to differentiate the new file from the previous file, so I created a new variable.
After a bit of research, I figured that it was impossible to modify a file in an SD card using Arduino without deleting all the contents in the file. So, I had to store the original contents in a String variable, decrement the pay count of the right user, and put the contents back into the empty file.
myFile = SD.open("SA_cards.csv", FILE_WRITE | O_TRUNC);
I used the same method I used when comparing the UID to the UID of other users when the program looks for the line to modify.
Local Variables:
String prevFileContents: The original contents of the file.char data: For reading each character in the file.String piece: The line to compare withcontents, the line of the current user's name and UID.
The problem with this approach is that later, when more lines are added to the file, the large size of the String object may occupy more memory than the Arduino can handle. However, my prototype so far has not had any issues.