Preface
The Sketch/Project also includes some code to integrate an Arduino Menu and store some setup values to the SAMD21 flash. This menu can be access via the USB Port. You will find more info's about here...
Objective
I had a spare MKR WAN 1310 LoRa, a 2600mAh LiPo Battery and a MKR ENV (Environment) Shield which can measure:
- Temperature
- Humidity
- Pressure
- UV-A and UV-B
- UV-Index
So, I would like to build a IoT weather station to use it outside and get the values directly to my Smartphone. Remember this Arduino announcement. My goal is further to reduce the operating current as much as possible, measure the battery voltage and use the Arduino IoT Cloud Ecosystem.
This story is not about the general building instructions of this outside environmental sensor. Nevertheless, you will find the whole sketch some instructions and tips in this article. What I really want to share is my way to optimize the LoRa and Standby design for this project. So please read the article with this knowledge in mind.
One thing must be explained which could be easily overlooked when measuring the air pressure. You get the correct pressure value out of your sensor. But when you compare it to the pressure from the last weather forecast you see more or less a different pressure value! This is because on all weather maps, forecasts and news the pressure will always be mathematically adapted to the pressure on the mean see level (MSL). For the weather analysis it makes no sense to compare the pressure from different altitude levels. We could not see where the high- or low-pressure areas are! So, what we need to get comparable results is to do this mathematical calculation. I have enhanced the MKRENV library and you can find it in this forum entry. You can use it like so...
ENV.readPressure(MILLIBAR_MSL, 460));
460 are the altitude in meter at your location. The temperature is also important for a correct calculation, but this will automatically grabbed from the shields temperature sensor.
Installation and first tests
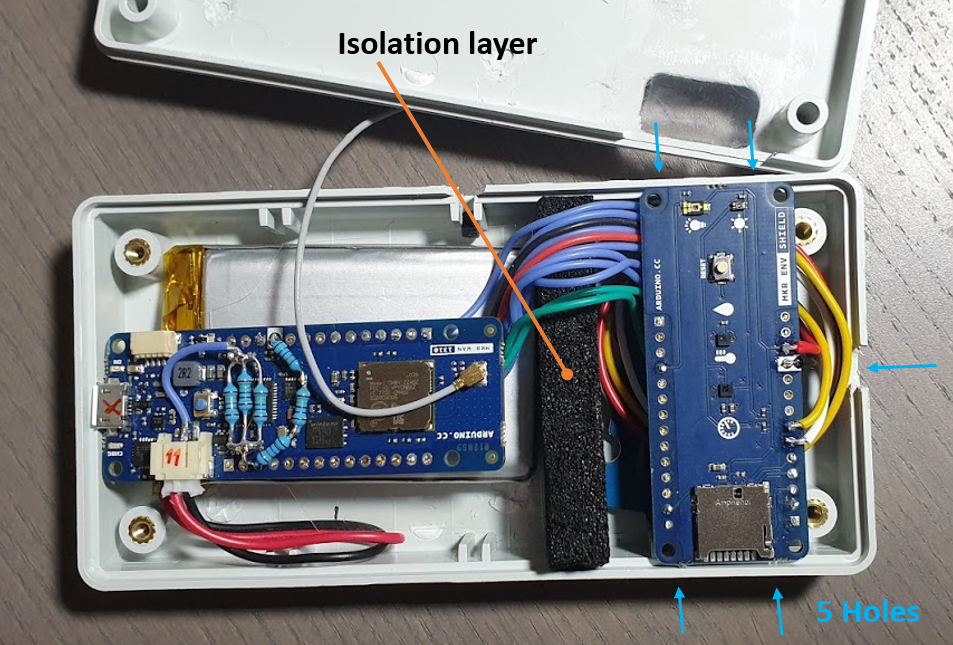
1. Connect the ENV Shield to the MKR WAN 1310 (LoRa), this is in fact super easy and great for testing. But in production the MKR below the ENV Shield is heating up the Sensors and this distort the measurement of the temperature and the humidity.

In my box I have separate the Shield from the MKR and but an isolation barrier in between. This gives you more accurate results.
2. Measure the Battery Voltage
I would like to see the actual battery voltage level in the IoT Dashboard. This gives me later also the possibility to use webhooks and generate a Alert-Email if the voltage falls below a certain level. The task is even easy on most of the MKRs. There is already an SAMD21 Pin (PB09) reserved for this and the necessary voltage divider is already in place.

But not on the LoRa MKR module. The pin PB09 is needed to control the LoRa Chip. So, an existing and free analog input port must be selected. I used: A1 in this example. The voltage divider must be built externally.

// For battery measurements
int LiPo_BATTERY = A1;
// The MKR WAN 1310 3.3V reference voltage for battery measurements
 analogReference(AR_DEFAULT);
// read the input on analog pin 0 (A1) and calculate the voltage
BatteryLevel = analogRead(LiPo_BATTERY) * 3.3f / 1023.0f / 1.2f * (1.2f+0.33f);
3. The Dashboard and the Sketch was easy to design and build. See the full code below...
4. The initial tests
After completing the code, I started with my first tests. Badly but true I got no messages to the Arduino Dashboard. I enabled maximum debugging (4) as shown in the code snippet below to get an idea what's wrong:
void setup() {
   setDebugMessageLevel(4);
Now on the seriel monitor I can see this LoRa Messages: Too much data, really?
Message length is bigger than max LoRa packet!
Message length is bigger than max LoRa packet!
Message length is bigger than max LoRa packet!
In the thingProperties.h are the variables defined which must be transmitted over LoRa so let's check them:
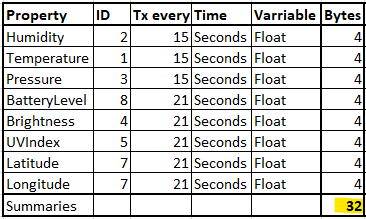
Only 32 bytes, but wait there must be some overhead to encapsulate this date in a container. Arduinos IoT Cloud Server must be able to separate the data and correctly assign the values to the corresponding dashboard widgets. Let's estimate and multiply by 2 = 64 Bytes. Even not much. But too much for LoRa, check out this table from Semtech:
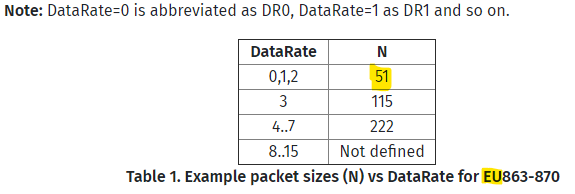
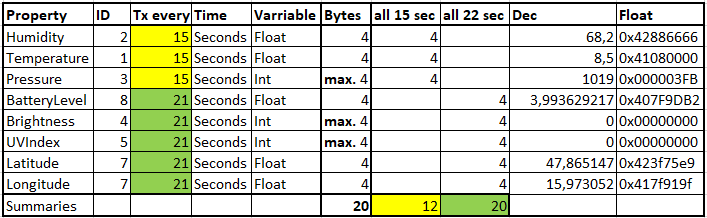
This is for the EU Region, in the US Region it is even worse. To get around this limit I reduced the data size and split it to two parts/packets. Yes, an integer on SAMD21 Cores also needs 4 Bytes as a float but the leading 0 are removed (on a byte boundary) from integers before sending it. Therefore the data size was shrinked a bit.
The serial monitor now shows what the ArduinoIoTCloud Library does on my next try:
Message length is bigger than max LoRa packet!
Message sent correctly!
Message sent correctly!
- 0 seconds - will try to send both packets and again the size is too big.
- 15 seconds - the first packet (12 Byte data) was successfully sent!
- 22 seconds - this was the second packet!
But this generates another problem. We are sending in this rhythm:
15   22
30
45   44
60
75   66
44 and 45 are only 1s apart and when 45 should be sent the packet 44 is not jet transmitted completely. This will generate another LoRa Error message:
LoRa chip is busy (LORA_ERROR_BUSY)
But this is not a problem for this project because I like to bring the LoRa MKR to sleep before the code gets so far.
Reducing current consumption
In the SAMD21 Family datasheet I found this sleep mode table:
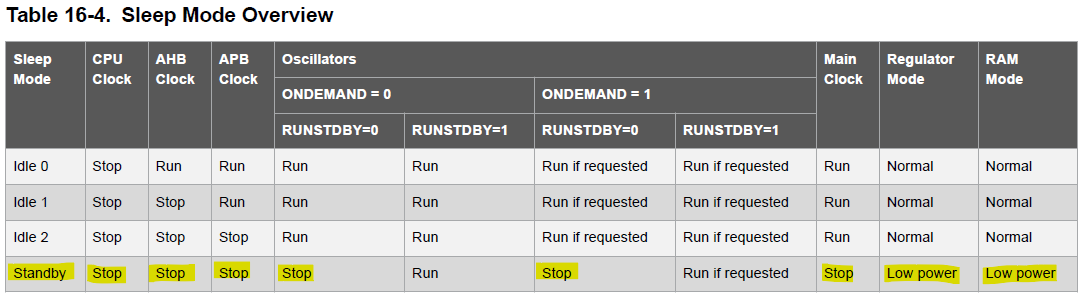
Okay, lets activate this Standby mode for 15 minutes. I checked the Adafruit_SleepyDog library and found that the command Watchdog.sleep(); uses this standby mode - great. With () you got the maximum supported sleep time of 16 seconds. So, I need 51 sequentially sleeps to reach the 15 minutes. This is the code:
// Go to STANDBY Mode for 51 times x 16,5s sleep = 841,5s + 60s
// from the start phase give us a total of ~900s = 15 minutes...
if (sleep_now == true) {
 for (int i = 0; i < sleep_cycles; i++) {
 // Enter the Standby Mode for 16 seconds (MKR WAN 1310 specific)
 Watchdog.sleep();
}
I expected that after the 15 minutes I can send the next packets. But the LoRa and/or the Arduino Cloud connection was not available anymore. I try to restart the IoT Cloud connection but was not successful.
I decided to reboot the Arduino MKR after the standby. This will fix the IoT Cloud connection issue and will reset the transmit rhythm (15, 22 as explained before).
So this is the complete code:
if (sleep_now == true) {
  for (int i = 0; i < sleep_cycles; i++) {
    Watchdog.sleep();
  }
  // Now restart the MKR
  int countdownMS = Watchdog.enable(100);   // WatchDog timeout in 100ms
  delay(countdownMS+1000);                  // Wait for 1,1 second!!!
  Watchdog.disable();                       // The WatchDog WILL time out
                                            // and restart the CPU
}
Let me explain one more thing. Initially I would like to use the cloud thing option "When the value changes" for all my properties. This is a great possibility to reduce the transmit amount and frequency. But because I need to restart the Arduino every 15 Minutes this is not an adequate mechanism for this situation. The code has only ~ 30 seconds to detect a change...
Low-Power Optimization
The Arduino MKR WAN 1310 is designed for long-range, low-power LoRa applications. Achieving a standby current of 0.92mA requires specific firmware techniques.
- Sleep Modes: The script utilizes the
ArduinoLowPowerlibrary to put the SAMD21 microcontroller into deep sleep between transmissions. - Hardware gating: It manages power-hungry components (like sensors or the LoRa radio) by turning them off or putting them in sleep mode when not in use.
Connectivity & Architecture
- LoRaWAN Protocol: The device connects to a gateway (like The Things Network) to send small packets over several kilometers.
- Telemetry: This extreme energy efficiency makes it ideal for remote monitoring where the device must run on a battery for years. The data is usually sent to the Arduino IoT Cloud for real-time visualization and alert management.
Measure current and calculate battery run time
Because I have no current probe for my oscilloscope, I can only use my multimeter to get the current level. This was easy for the long standby phase but hard for the running period. I see short times of higher current load, but it was not clear how long they are exactly. I use my scope in addition to see the voltage drop during the high current phases. This will give me a precise knowledge how long this phases are. Her my lab scenario:

With the ampere meter I can measure the following values:
Start the Arduino...
- 0 - 20 seconds continuously 15mA
- 20 - 42 seconds 2 peaks with 49mA
- 42 - 99 seconds continuously 25µA
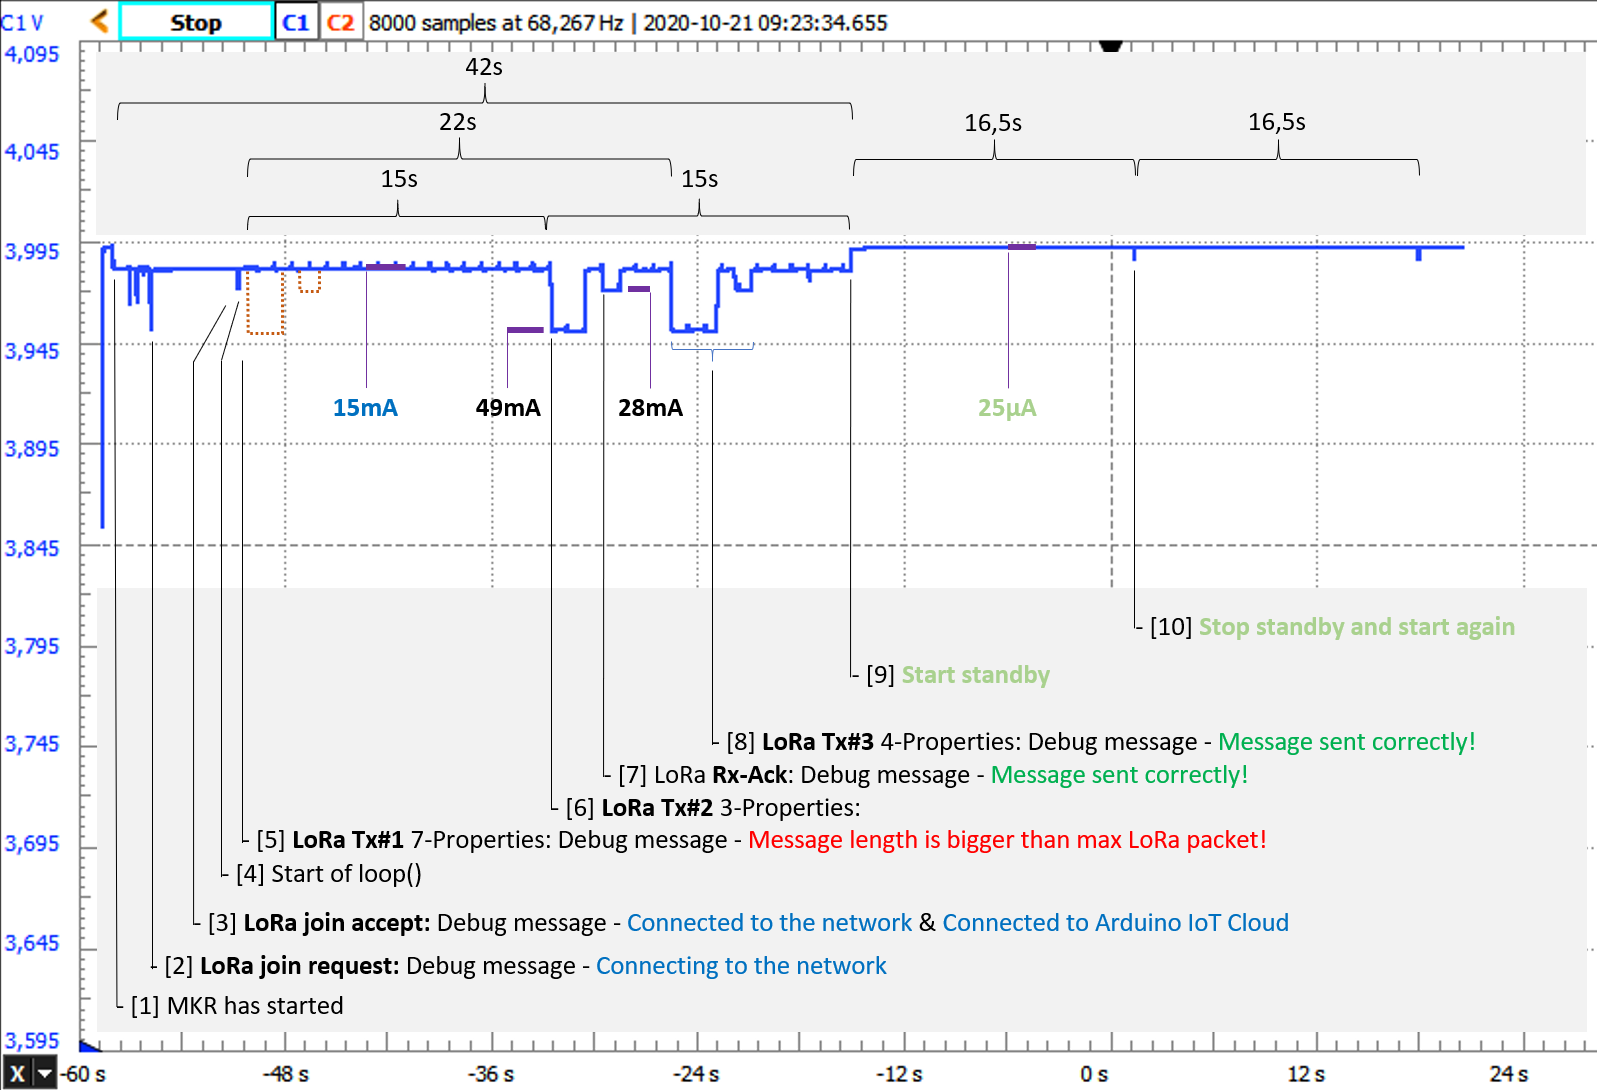
With my scope I got this measurement curve and was really surprised how much information is extractable out of this plot. In general, when the voltage is at 3, 995V (open circuit voltage) there is either no load (switched off) or only 25µA during the standby time. The voltage drops to a lower value when the Arduino or the environment shield needs more current. The more the voltage drops the more current flows. So, let's get into the details:
- [0] After the start you can see two small drops. This is maybe the readout of the system parameter from the SAMD21 flash.
- [1] Because this drop has the same level as the big ones from [6] and [8] I expect this will be the LoRa join request.
- [3] After some time you can see the LoRa join accept receive peak.
- [4] Now the setup() phase was over and the loop() starts to run. The little spikes came every second and must be the sensor and battery check. Unnecessary often something to optimize in the future :-)
- {5] Now I get the LoRa "Message length is bigger..." error and therefore there is no drop which is perfectly correct.
- [6] After precise 15 seconds you see the first LoRa transmit - the first three IoT properties (see the excel table above in yellow). It takes 1, 95s - for 12 bytes (and some overhead).
- [7] This is now the LoRa acknowledgement. The LoRa-WAN network takes care of your data which is exceptionally good because the Arduino can already forget this action even before the packet has reached the Arduino IoT Cloud Servers. On the serial monitor you got immediately the information "Message sent correctly!". DONE.
- [8] And shortly follows the next LoRa transmit. This peak takes 2, 6 seconds because now we transfer 5 properties (above in green). The ACK follows as expected.
- [9] Before this transmit cycle will start again (30s) the sketch initiates the STANDBY Mode.
- [10] After 16 seconds you can see a tiny spike which signals the wake up followed by the next 16s sleep phase. After 51 times the CPU will be restarted by the watchdog and the next cycle begins. And so forth...
Now we got everything to calculate how long a battery will run under this load. I used an 2600mAh LiPo Battery.
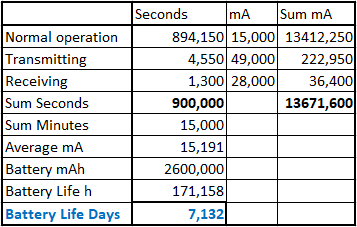
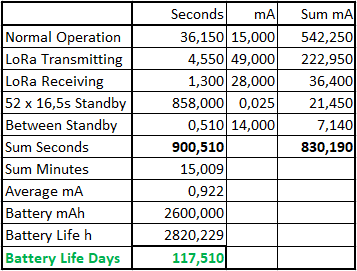
This is a huge improvement, great!
LoRa Duty Cycle
Because the LoRa frequencies are freely useable you need some kind of restriction or let's say we need a "fair access policy". This is good and important for all of us because otherwise we will end up in a totally overloaded LoRa network. This would be incredibly sad. Duty cycle is the