Summary
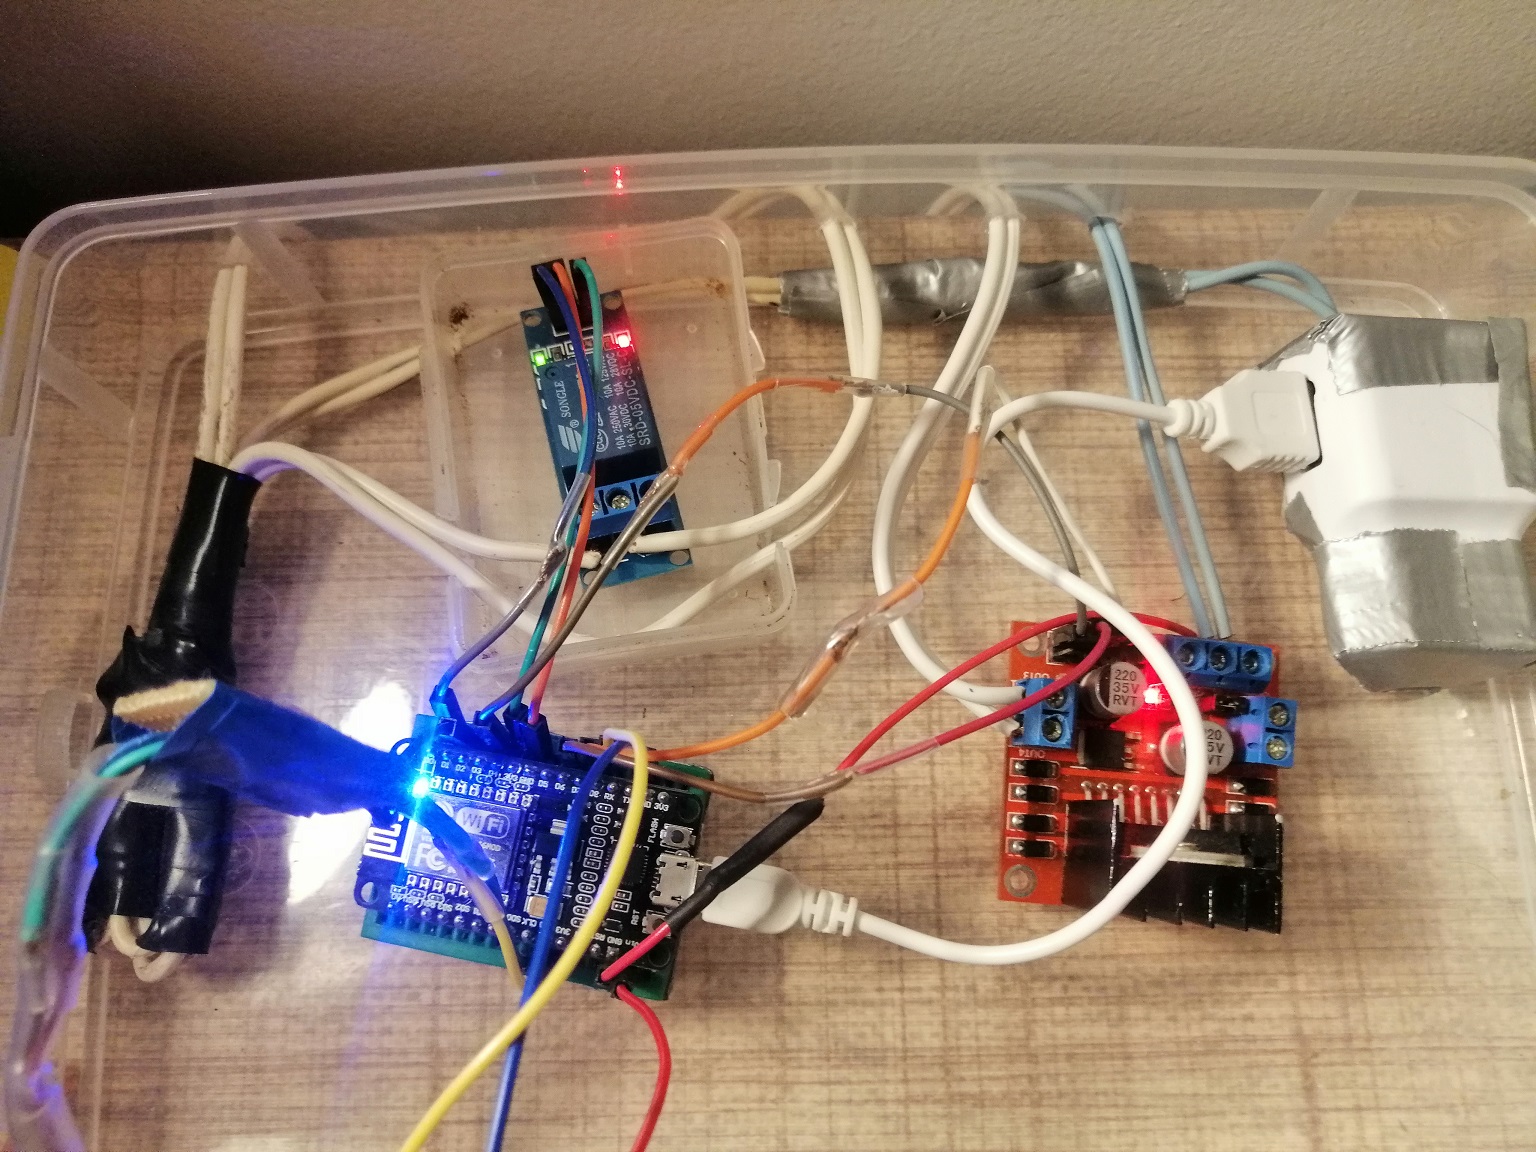
I recently bought NodeMcu Lua ESP8266 controller and decided to start some home automation (or home management) project just to make my everyday life a little bit easier. To do that, I used relay for room light, DHT11 for temperature and sensor and 2 motors - DC water pump and Servo motor for cat's feeder. Software on NodeMcu was written in Arduino Studio - sketch have one Http server which receives requests from Http client ( in my case, I wrote an android app). Sketch also contains one UDP client which is used to get time from NTP servers. I used HTTP because it's simple and my schematic is not complexed - I just needed simple request-response communication. I recently added SD card module for reading configuration for automatic feeding and watering.
Code explanation
In this part I will explain how I implement every part of my project. Full Arduino sketch and Android app code will be available later in text.
First of all, we must include libraries that will be used.
// For HTTP server
#include
#include
#include
#include
#include
Create HTTP server
Create server object.
ESP8266WebServer server(80);
Before starting the server, NodeMcu must be connected to WiFi.
// Connect to Wi-Fi network with SSID and password
 WiFi.begin(ssid, password);
 while (WiFi.status() != WL_CONNECTED) {
   delay(500);
 }
After connecting, I declared server's POST and GET method (callbacks). First argument is method Route and second is function that will be used when client call method. Inside these functions are logic for reading sensors or setting actuator state.
 // Server GET and POST methods
 server.on("/", handleRoot);
 server.on("/getTemperatureAndHumidity", handleTemperatureAndHumidity);
 server.on("/setLightState/",handleLightState);
 server.on("/startWatering",handlePump);
 server.on("/startFeeding",handleFeeder);
 server.onNotFound(handleNotFound);
Finally, to start HTTP server, use this method:
server.begin();
Water pump
For filling cat's water bowl I used 5C DC water pump, connected to L298N motor driver. I used separated 12v power supply for driver.
Driver use 3 Arduino digital pins and GND pin.
// Water pump pins
#define ENBPin 2 // D4
#define IN3Pin 4 // D2
#define IN4Pin 0 // D3
Initialize the output variables as outputs inside of setup() function.
 pinMode(IN3Pin, OUTPUT);
 pinMode(IN4Pin, OUTPUT);
 pinMode(ENBPin, OUTPUT);
Put logic for pump inside of previous declared handlePump function.
void handlePump(){
   // Run water pump
   digitalWrite(IN3Pin, LOW);
   digitalWrite(IN4Pin, HIGH);
   digitalWrite(ENBPin, HIGH);
   // Make pump run for 6 sec.
   Serial.println("Watering..");
   delay(6000);
   // Stop pump
   digitalWrite(IN3Pin, LOW);
   digitalWrite(IN4Pin, LOW);
   digitalWrite(ENBPin, LOW);
   Serial.println("Watering done.");
   server.send(200,"text/plain","Watering done");
}
Code line server.send(200,"text/plain","Watering done"); send Http response to client.
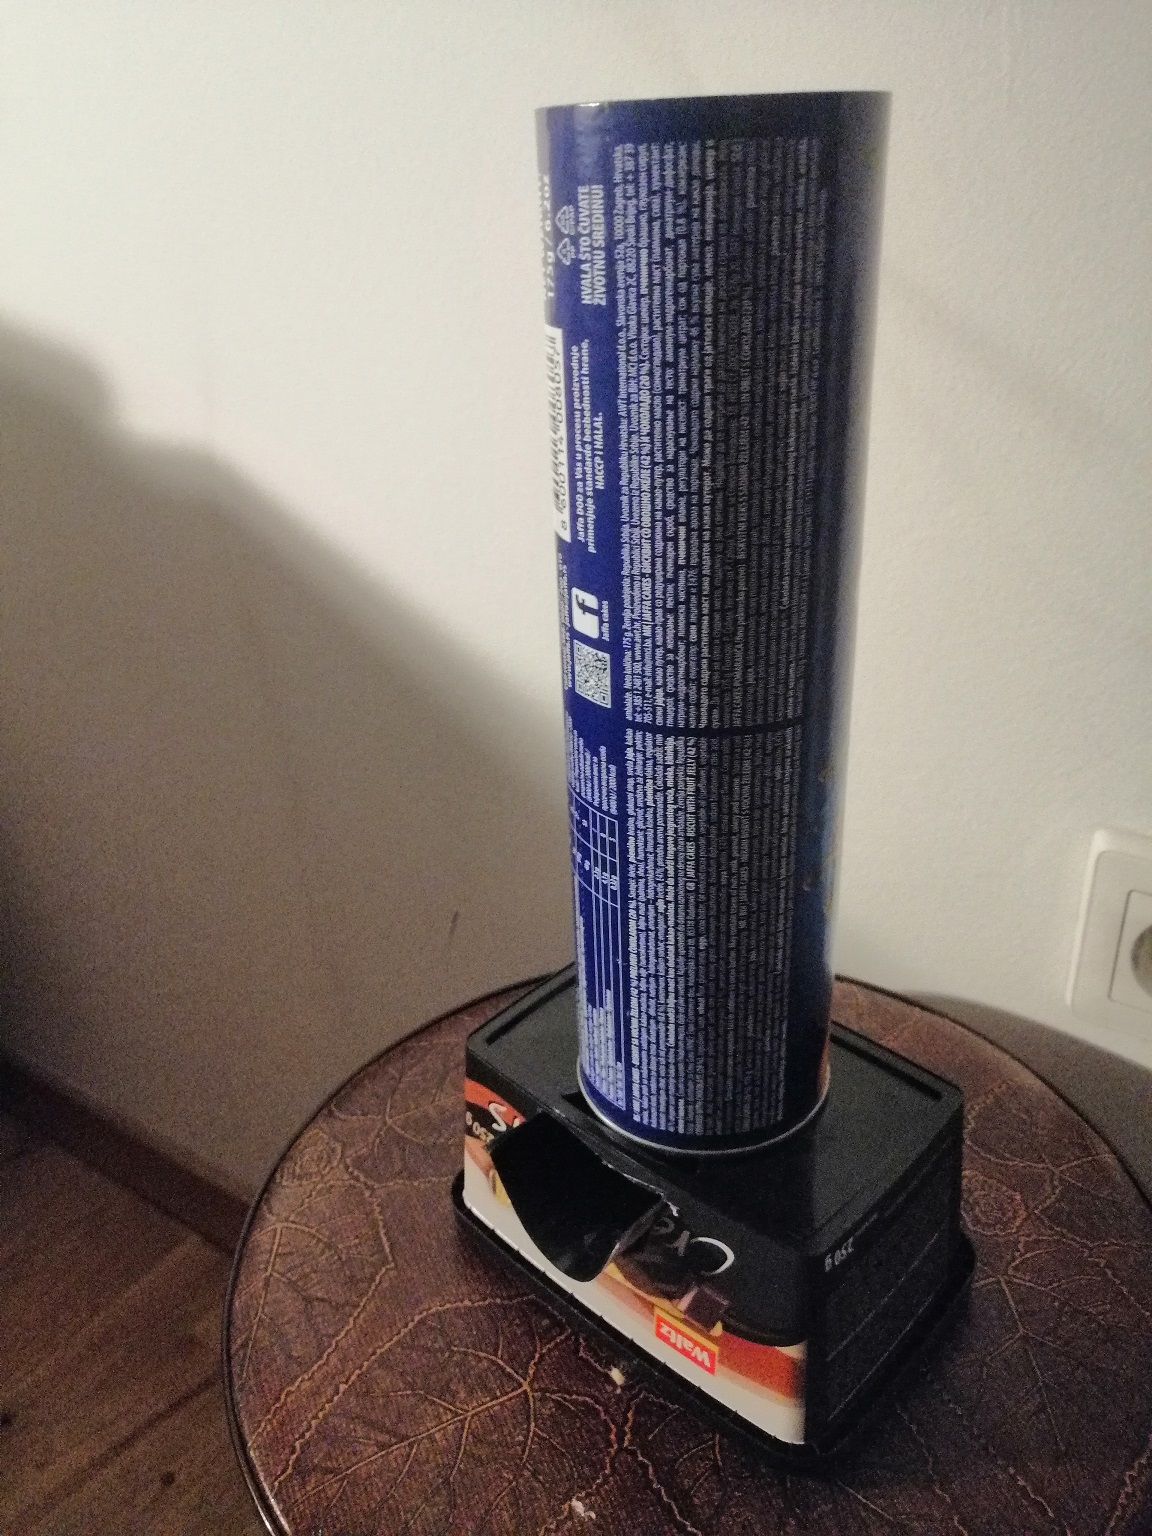
Cat feeder
I used one mini servo motor for feeder. I got idea for feeder design here.
Servo uses 3 Arduino pin:
- 5v pin
- GND
- Signal pin - in my case that's GPIO15 pin.
Declare servo:
Servo servo1;
Connect servo with pin in setup() function.
servo1.attach(SERVOPin);
Put logic for feeder inside of previous declared handleFeeder function.
void handleFeeder(){
 servo1.write(0);
 delay(500);
 servo1.write(90);
 delay(500);
 servo1.write(0);
 delay(500);\t
 server.send(200,"text/plain","Feeding done");
}
Light
For this, I just used 5V relay module.
Initialize the output variables as outputs
pinMode(LIGHTPin, OUTPUT);
Idea for this is that client sends value of light state to server, server reads it from HttpRequest and set it.
void handleLightState(){
 String message = "";
 if (server.method() != HTTP_POST) {
   Serial.println("Not allowed.");
   server.send(405, "text/plain", "Method Not Allowed");
 }
 else
 {
   String state = server.arg("plain");
   SetLight(state.toInt());
   server.send(200, "application/json", "{\\"lightState\\":" + state +"}");
 }
}
String state = server.arg("plain"); read state parameter from client request, and then passed to simple function SetLight(int state).
void SetLight(int state){
 digitalWrite(LIGHTPin, state);
 lightState = state;
}
DHT11 sensor
DHT11 sensor have 4 pins, of which 3 are used - VCC, Data and GND. VCC and GND are connected to 3V and ground from NodeMCU. Place a 10K ohm resistor between VCC and the Data pin, to act as a medium-strength pull up on the data line. I used protoboard to solder resistor and pins.
Define everything for DHT11.
#define DHTTYPE DHT11
//DHT11 sensor pin
#define DHTPin  3 //RX pin
DHT dht(DHTPin, DHTTYPE);
Initialize DHT11 sensor in setup() with dht.begin();
Read the sensor when a request from the client arrives.
void handleTemperatureAndHumidity(){
 if(ReadDHT11())
 {
     server.send(200,"application/json","{\\"temperature\\":"+ String(celsiusTemp) +",\\"humidity\\":"+ String(humidityTemp) +"}");
 }
 else
 {
   server.send(400,"text/plain","Unable to read from sensor");
 }
ReadDHT11 reads sensor.
bool ReadDHT11(){
           float h = dht.readHumidity();
           float t = dht.readTemperature();
           if (isnan(h) || isnan(t)) {
             Serial.println("Failed to read from DHT sensor!");
             celsiusTemp = 0;
             humidityTemp = 0;
             return false;
           }
           else{
             celsiusTemp = t;
             humidityTemp = h;
             return true;
           }
}
Time
Inlude libraries.
#include
Declare necessary clients.
WiFiUDP ntpUDP;
NTPClient timeClient(ntpUDP, "europe.pool.ntp.org", utcOffsetInSeconds);
My idea for using this feature is to read time from NTP server and if time is equal to predefined feeding time, start a feeder or pump.
void getTime() {
 timeClient.update();
 int hours = timeClient.getHours();
 int minutes = timeClient.getMinutes();
 int seconds = timeClient.getSeconds();
 //use
 handleTime(Time(hours,minutes,seconds);
 delay(1000);
}
Function is called inside loop().
Class Time will be in Code section of this tutorial. Function handleTime() is checking if current time is equal to scheduled feeding and watering time.
void handleTime(Time t){
  if(t.isEqual(feedingTime))
  {
     handleFeeder();
  }
  if(t.isEqual(wateringTime))
  {
     handlePump();
  }
}
SD CARD
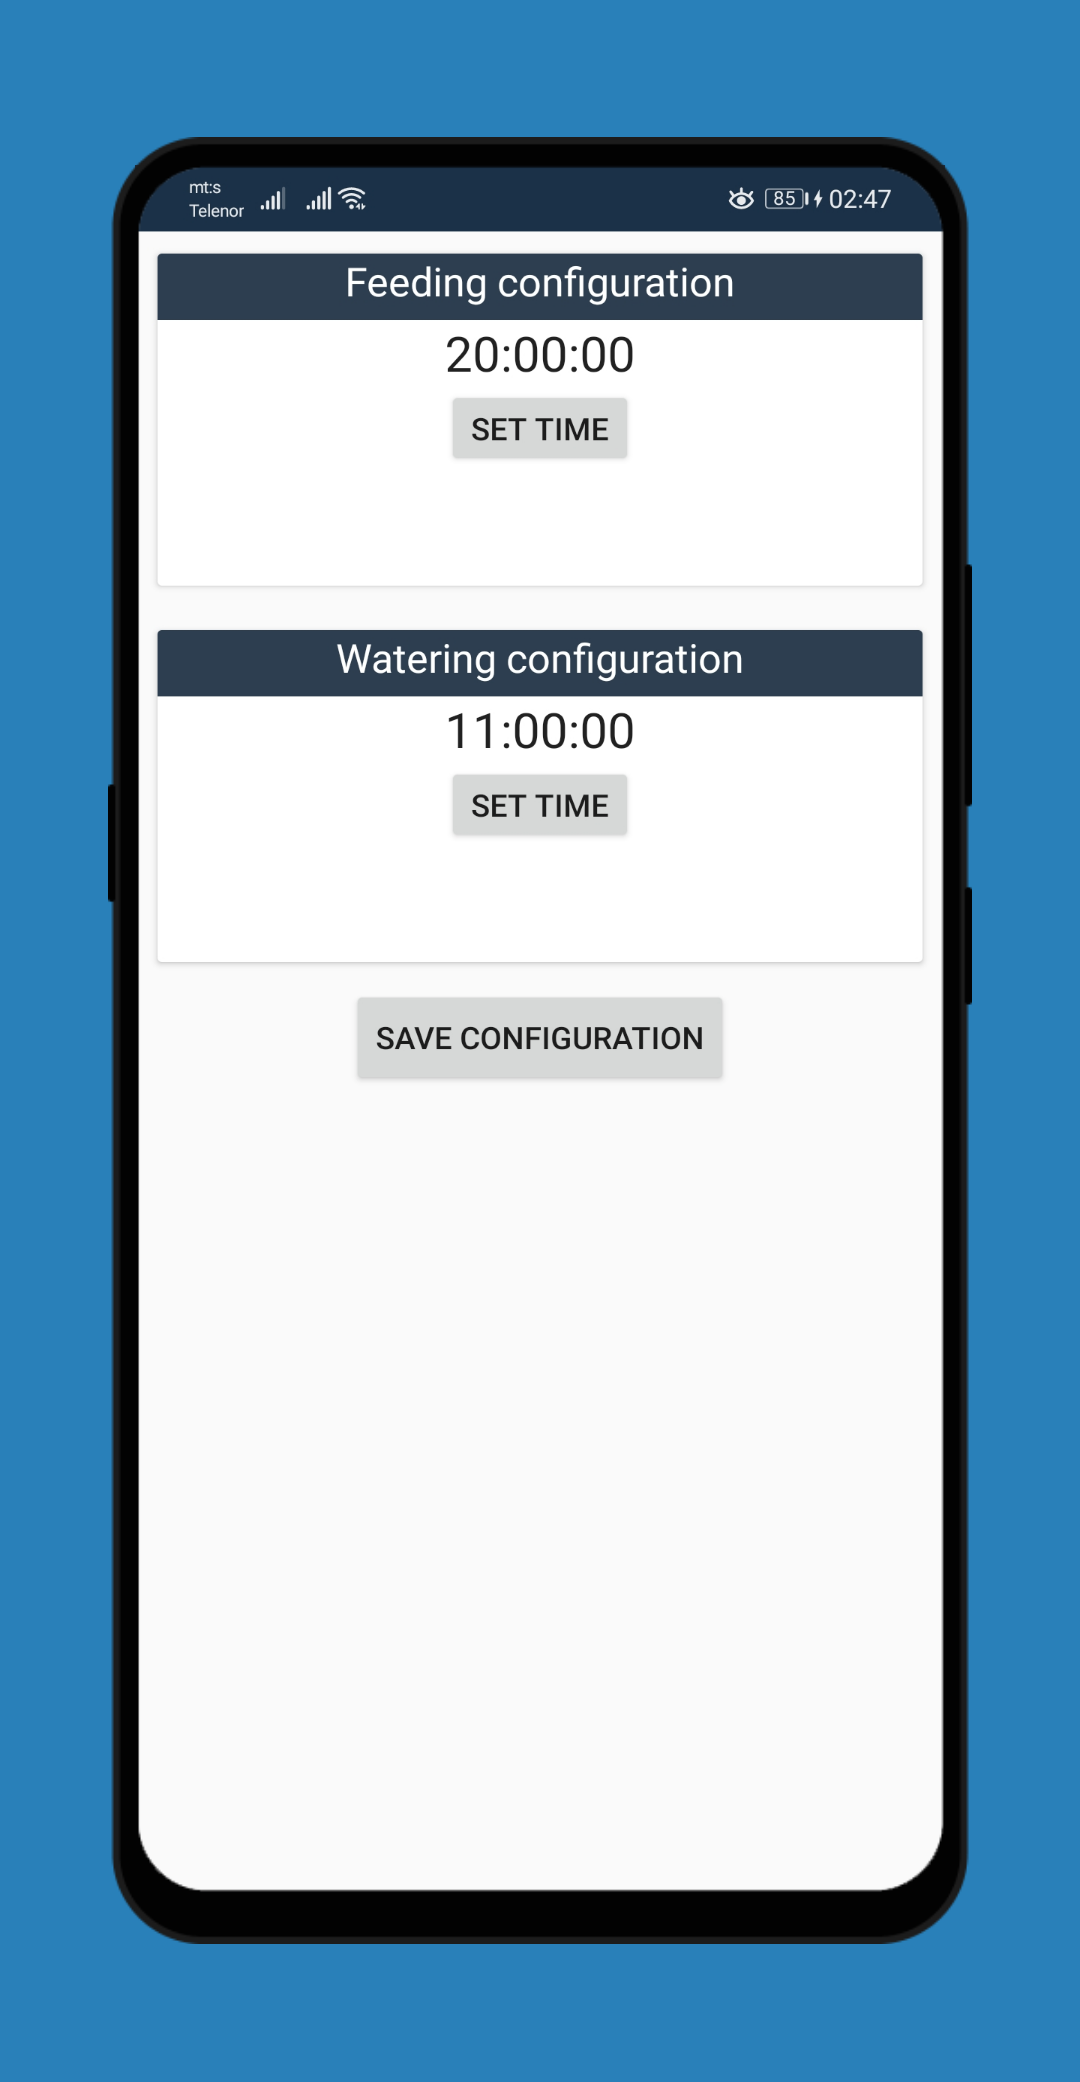
I wanted to add SD card module to this project so I can store config files for ESP8226. Config file is.json type, and it contains information about scheduled feeding and watering time, so if ESP8266 lose power, it can read config again and use those time in sketch. I can change those times with my Android app - app will send JSONobject to module, module is going to parse JSON and set all fields based on parsing result.
Wiring for SD card module and NodeMcu
CS   - D8
MISO - D7
MOSI - D6
SCK  - D5
Code for reading SD card:
void readConfig() {
 if (!SD.begin(chipSelect)) {
   Serial.println("Initialization failed!");
   while (1);
 }
 String data ="";
 File dataFile = SD.open("config.json",FILE_READ);
 if (dataFile) {
     while (dataFile.available())
     {
       data += (char)dataFile.read();
     }
     StaticJsonDocument<200> doc;
     deserializeJson(doc, data);
     //Set watering time
     wateringTime.setHours((int)doc["wateringTime"]["hours"]);
     wateringTime.setMinutes((int)doc["wateringTime"]["minnutes"]);
     wateringTime.setSeconds((int)doc["wateringTime"]["seconds"]);
     //Set feeding time
     feedingTime.setHours((int)doc["feedingTime"]["hours"]);
     feedingTime.setMinutes((int)doc["feedingTime"]["minnutes"]);
     feedingTime.setSeconds((int)doc["feedingTime"]["seconds"]);
 }
}
I used ArduinoJson library for this, because my config file is.json.
StaticJsonDocument<200> doc;
deserializeJson(doc, data);
After deserializing document, I used result to set time for feeding and watering Code for Time class will be at the end of this tutorial.
Other methods
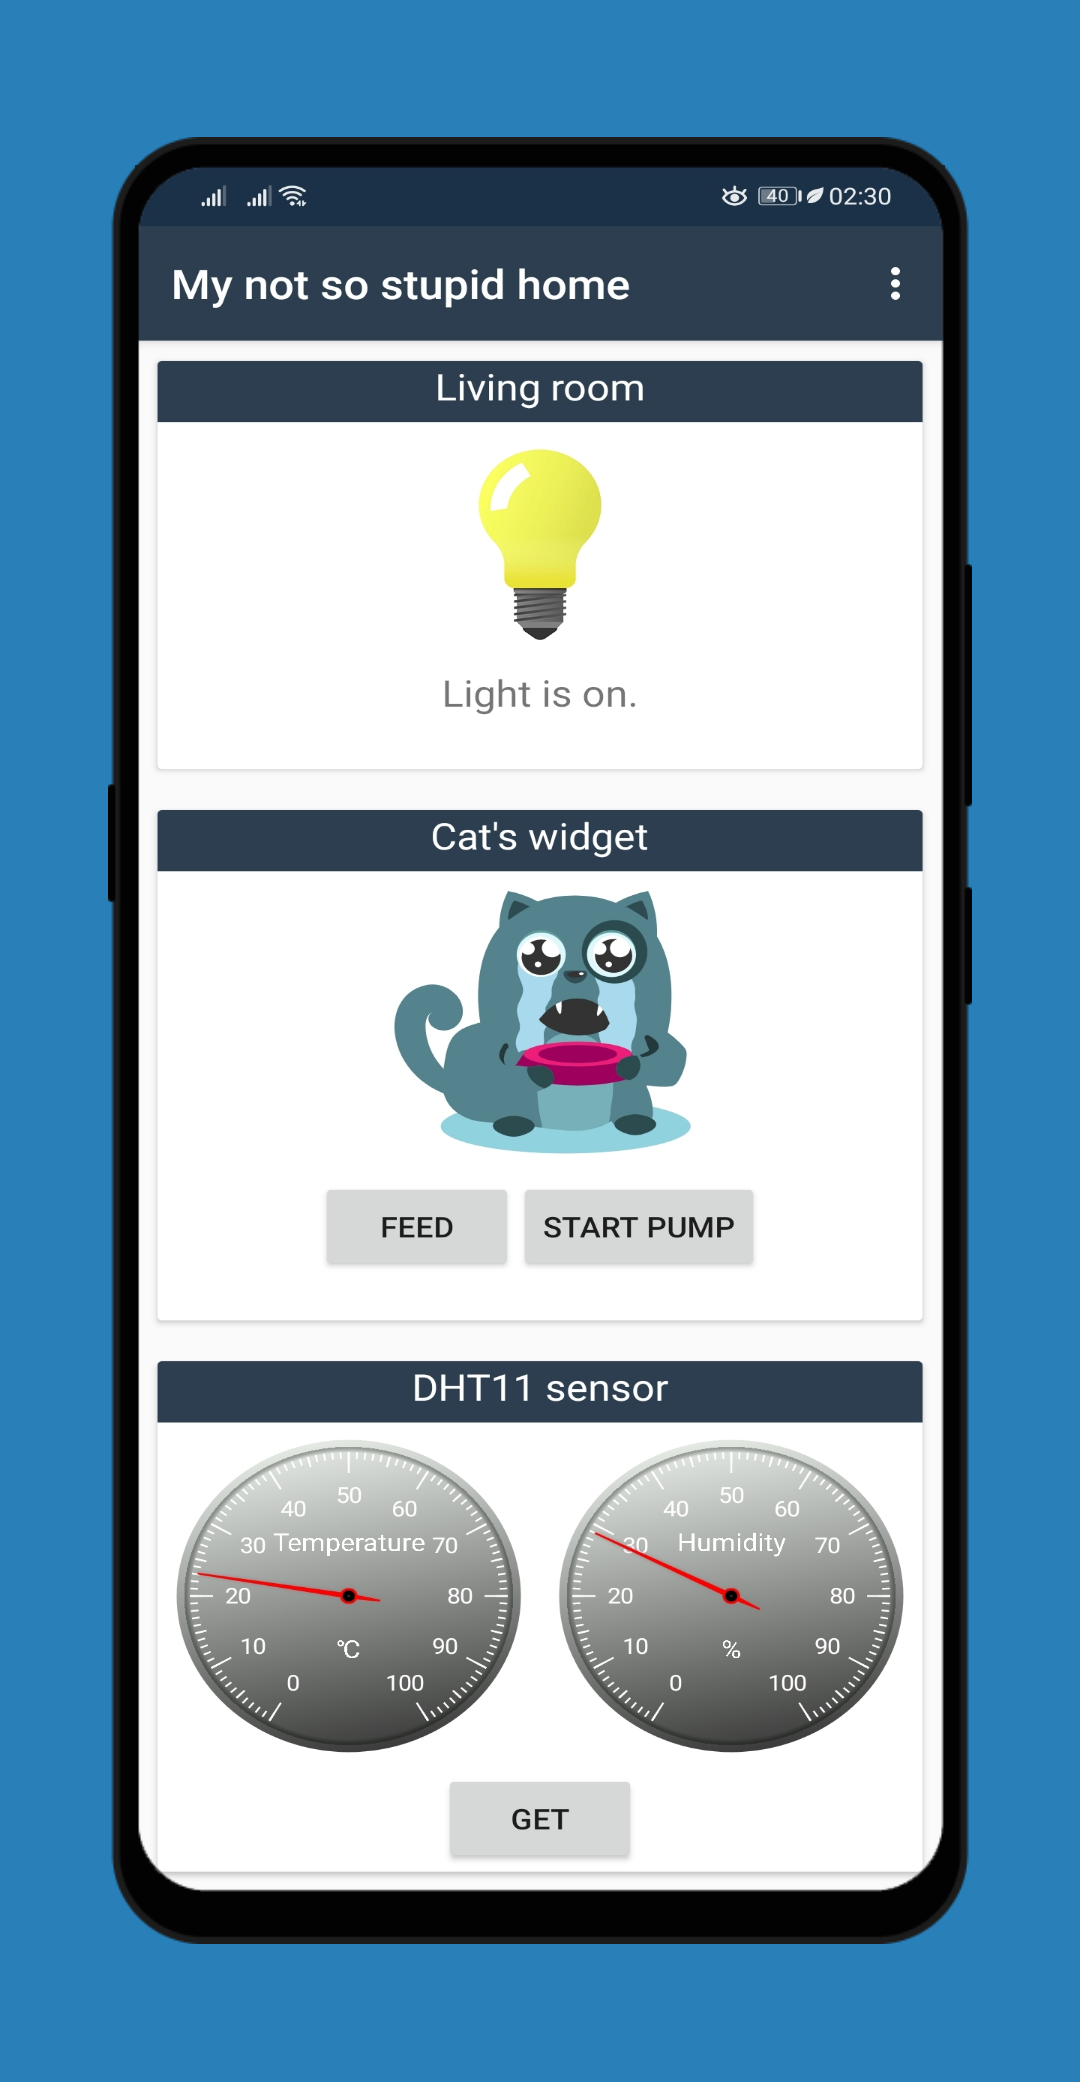
I created root method, which the client calls when it launches the android application.
void handleRoot(){
    ReadDHT11();
    server.send(200,"application/json","{\\"temperature\\":"+ String(celsiusTemp) +",\\"humidity\\":"+ String(humidityTemp) +",\\"lightState\\":"+ String(lightState) +"}");
}
It sends Http response with Json object that contain states of all sensors and actuators.
Android application
There is many client apps on Google play, or you can make Html page on server, but as a software developer, I wanted to create my own simple Android app. I used Visual Studio 2019 and C# to create a Xamarin.Android application.
I will not explain process of creating this app, but you can find the code on my GitHub page here, so you could create your own cool app.
Finished project
For now, everything is in a plastic case, but the plan is to make a wooden one with sockets that will be connected to relays and connectors for sensors and pump and feeder.
Also, I used old phone charger as 220v to 5v converter to power NodeMCU.

EXPANDED TECHNICAL DETAILS
Integrated Smart Environment Lifecycle
This project is a comprehensive home automation system that integrates environmental monitoring, security, and desktop-based command-and-control.
- Visual Studio command center: Uses a custom Windows Forms application (built in VS 2017) as the primary dashboard. The PC communicates with the "Master Arduino" over high-speed serial.
- Multi-Sensor Polling Matrix: The Arduino manages a distributed network of DHT22, LDR, and PIR sensors. The firmware aggregates this data and pushes a single "System Health" packet to the Windows dashboard every 5 seconds.
Efficiency
- Priority-Event Handling: Includes an "Interrupt" for security breaches; if a PIR sensor is triggered, the Arduino bypasses the standard polling cycle to instantly alert the PC dashboard.