I think this project will be useful for people, who uses Octoprint.
It's a screen with colorful backlight that shows you some information about printing progress. It works with Octoprint API to get all the information about current process. Python script connects to Arduino Leonardo (you can use any with usb port. I used Leo, because I had had it before) and gives it some info. Also you can control your printer through this device.
Step 1: Getting Octoprint API Key
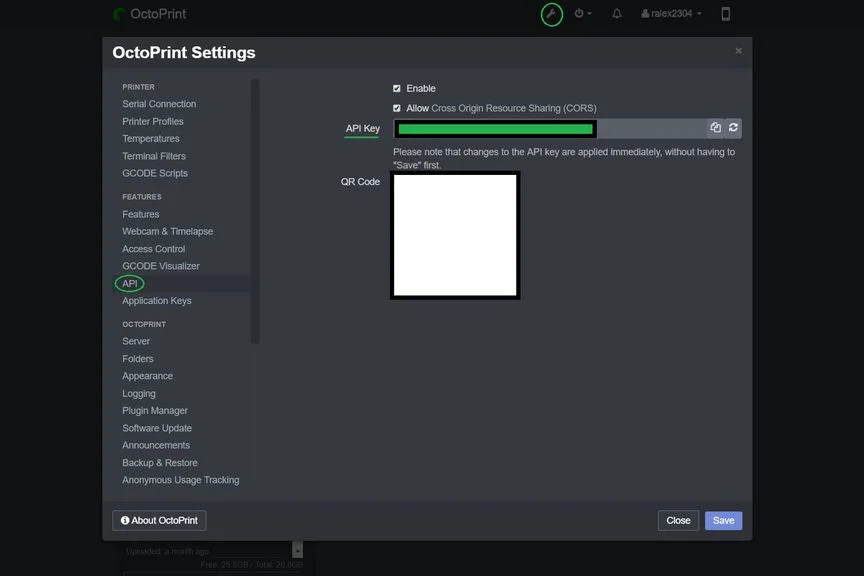
You need to have API key.
Save it.
Step 2: Setting Up Your Raspberry to Run Python Script
At first you need to connect to your raspberry through ssh.
Then login and type this command
sudo apt-get install python3-pip
Then you need to install some python packages
sudo pip3 install pyserial
After all installations download python script from Github page
Type in ssh terminal sudo nano port.py, then copy all from octoprint-monitor.py and paste in terminal. In variable API you need to paste your Octoprint API key. You can paste through clicking on the right button of your mouse. After that press Ctrl + X, type "y" and press Enter.
Then make logMaster.py file through sudo nano logMaster.py, then copy all from octoprint-monitor.py and paste in terminal. You can paste through clicking on the right button of your mouse. After that pres Ctrl + X, type "y" and press Enter.
Then make command sudo python3 port.py
If you have an error, check previous steps.
If you see "
Connecting...
Connected.
" in your terminal all is ok. Press Ctrl+C.
Step 3: Printing Case for LCD Screen
I have LCD 20x4 screen.
You need to print a file from this link
Step 4: Connect All to Arduino
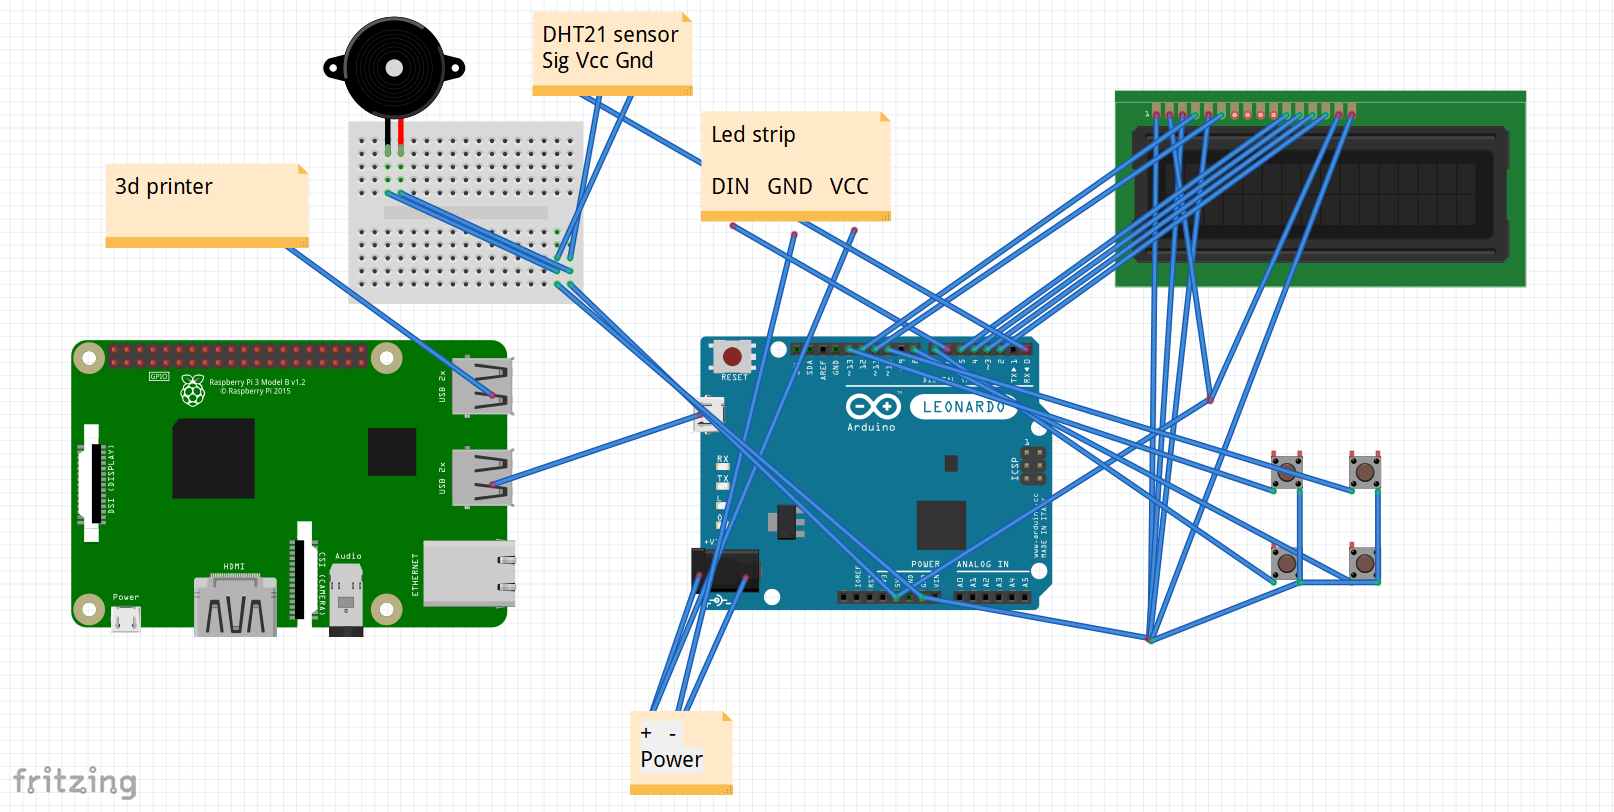
On this picture you can see wiring diagram. Connect lcd display to arduino.
- Then connect buzzer to 9th pin
- Button 1 to 7th pin
- Button 2 - 8th
- Button 3 - 10
- Button 4 - 13
- Temperature sensor - pin 0
- LED strip - pin 6
After that fix it all on printers side, glue lcd and buttons to the printed case. Fix the case with double sided tape.
Connect arduino to raspberry pi with usb cable.
Connect power supply to arduino and LED strip as on the picture.
Step 5: Uploading Sketch to Arduino
You need to download file octoprint-monitor.ino from github and upload it to arduino.
You'll need some libraries.
- Liquid Crystal (It's already installed to Arduino IDE)
Then connect arduino to raspberry pi.
Step 6: Checking That All Is Ok
UPDATE:
Auto port detection added! Now you don't need to find arduino's port.
Launch python code. If you see text "Connected serial", all is ok.
Step 7: Setting Up Script to Auto Start Up
How to add script to auto start up on raspberry pi?
It's easy. You need to type
sudo crontab -e
And add at the end of the file only one line.
@reboot /usr/bin/python3 /home/pi/port.py
That's all. Now reboot your raspberry and verify all.
Step 8: Finishing
Now the last step.
Check all and if something isn't well, write a comment with your problem.
Thank you for your attention!
EXPANDED TECHNICAL DETAILS
3D Production Telemetry
This project provides a hardware-based status dashboard for 3D printers managed by OctoPrint, allowing you to monitor long-duration prints at a glance.
- OctoPrint REST API Interface: An ESP8266/ESP32 connects to the OctoPrint server (running on a Raspberry Pi). The Arduino sends an API request to retrieve the "Job Progress (%)", "Tool Temperature," and "Time Remaining."
- JSON Payload Processing: Extracts specific numeric keys from the complex OctoPrint status response, updating a local I2C OLED or 20x4 LCD display.
Safety Cues
- Thermal Visualizer: Includes an integrated NeoPixel ring that changes color—from Blue (Idle) to Orange (Heating) to Green (Finished)—providing a long-range visual cue for professional print-farm operators.