A while ago I went to one of these shops that sells all nice and extravagant things. One of them was this wooden box emitting very relaxing bird chirping sounds if you get close enough to it. Price was 90 euro.
I thought to myself why not trying to make a clone of it? Not being any way familiar with Arduino I decided to pick up the challenge. The result is what is showed in the picture.
I started by researching online the best/easiest arduino board to use for the scope and found few tutorials on how to use Arduino MKRzero and decided to use it for my project.
I bought ultrasounds sensors on amazon together with a 5W 4 ohm speaker and an LM386 amplifier module.
Wiring
I wired arduino mkrzero board to the ultrasounds sensor:
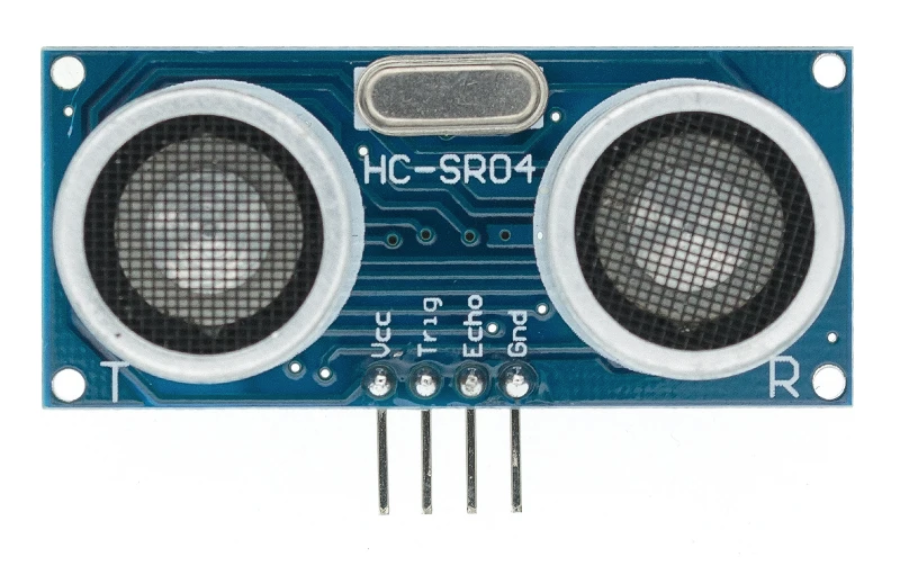
VCC supplies power to the HC-SR04 ultrasonic sensor. You can connect it to the 5V output from your Arduino.
Trig (Trigger) pin is used to trigger ultrasonic sound pulses. By setting this pin to HIGH for 10µs, the sensor initiates an ultrasonic burst.
Echo pin goes high when the ultrasonic burst is transmitted and remains high until the sensor receives an echo, after which it goes low. By measuring the time the Echo pin stays high, the distance can be calculated.
GND is the ground pin. Connect it to the ground of the Arduino.
After that I connected the LM386 amplifier module to Arduino board:
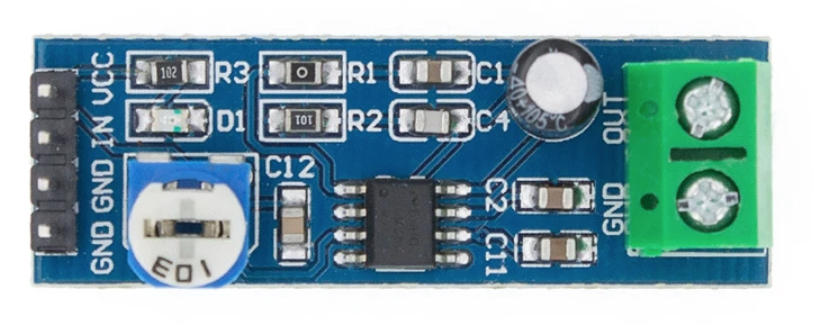
VCC supplies power to the LM386 module. You can connect it to the 5V output from your Arduino.
IN pin is connected to DAC0 on Arduino board to transmit audio signals
GND is the ground pin. Connect it to the ground of the Arduino.
As last step I connected the 5W speaker to the LM386 module.
SD card and audio files
The Audio file is stored on the SD card and must be in the .wav format with 88200 Hz, 8-bit unsigned PCM mono quality. This type of file can easily be created by software such as audacity.
I recorded a 10 minutes birds chirping in my garden and after a bit of editing in audacity I stored the file on the micro sd card.
Coding
#include <SD.h>
#include <SPI.h>
#include <AudioZero.h>
#include "NewPing.h"
This is to include all necessary libraries:
- SD to handle SD card operations
- Audio Zero to play sounds
- NewPing to handle ultrasounds sensor ( requires manual installation with Arduino IDE)
Next we define all the constants and we initialise new ping library with triggering distance (10 cm) :
// Hook up HC-SR04 with Trig to Arduino Pin 7, Echo to Arduino pin 6
#define TRIGGER_PIN 7
#define ECHO_PIN 6
// Maximum distance we want to ping for (in centimeters).
#define MAX_DISTANCE_IN_CM 100
#define TRIGGER_DISTANCE_IN_CM 10
// NewPing setup of pins and maximum distance.
NewPing sonar(TRIGGER_PIN, ECHO_PIN, MAX_DISTANCE_IN_CM);
in the setup method we open the serial port for debugging and initialise SD card:
void setup() {
// Open serial communications and wait for port to open:
Serial.begin(SERIAL_PORT);
initSDCard();
}
void initSDCard() {
Serial.println("Initializing SD card...");
// see if the card is present and can be initialized:
while (!SD.begin(SDCARD_SS_PIN)) {
Serial.println("Card failed, or not present");
delay(2000);
}
Serial.println("card initialized.");
}
Then it comes the main loop:
void loop() {
bool isTriggered = ping();
if(isTriggered){
play("1-birds.wav");
}
delay(500);
}
the ping() method is called on every iteration to check whether or not the ultrasounds sensor is triggered. If the function returns true (isTriggered = true) then we call the play function to play the .wav sound from SD card:
void play(String filename) {
// open wave file from sdcard (note: 8bit per sample, mono, 88,2 kHz)
File myFile = SD.open(filename);
if (!myFile) {
// if the file didn't open, print an error and stop
Serial.println("error opening: " + filename);
while (true);
}
AudioZero.begin(SOUND_RATE_HZ);
Serial.println("Playing");
// until the file is not finished
AudioZero.play(myFile);
Serial.println("End of file. Thank you for listening!");
AudioZero.end();
}
Conclusion and further developments
Overall I was quite satisfied with how the project turned out but of course there is space for improvements and further developments such as:
- fix popping sound before and after playing
- fix low volume noise when not playing
- add more sounds so that the play function will shuffle them
- build a nice wooden cover box
EXPANDED TECHNICAL DETAILS
High-Fidelity I2S Audio Playback
Leveraging the 32-bit ARM Cortex-M0+ power of the Arduino MKRZero, this project serves as a high-quality digital audio workstation for embedded applications.
- Native SD-to-I2S Pipeline: The MKRZero features a built-in SD card slot and an I2S (Inter-IC Sound) interface. The Arduino reads
.WAVor.MP3files directly and streams the digital data to an external I2S DAC (like the MAX98357A). - DMA-Backed Audio Buffer: Instead of manual bit-banging, it utilizes Direct Memory Access (DMA). This allows the audio to play perfectly in the background while the Arduino's main CPU handles other tasks like LED animations or button inputs.
Creative Deployment
- Portable Soundboard: Features a library of sound effects triggered by tactile buttons, making it an ideal core for custom toys, escape room props, or interactive sound-art installations.