Introduction
As online shopping has become increasingly common, it is necessary to protect delivered items from domestic animals such as dogs and monkeys. This project shows how to build an electronic device that automatically detects the presence of an animal in its vicinity and drives them away, thus safeguarding the items. It also distinguishes humans from animals and disables the alarm.
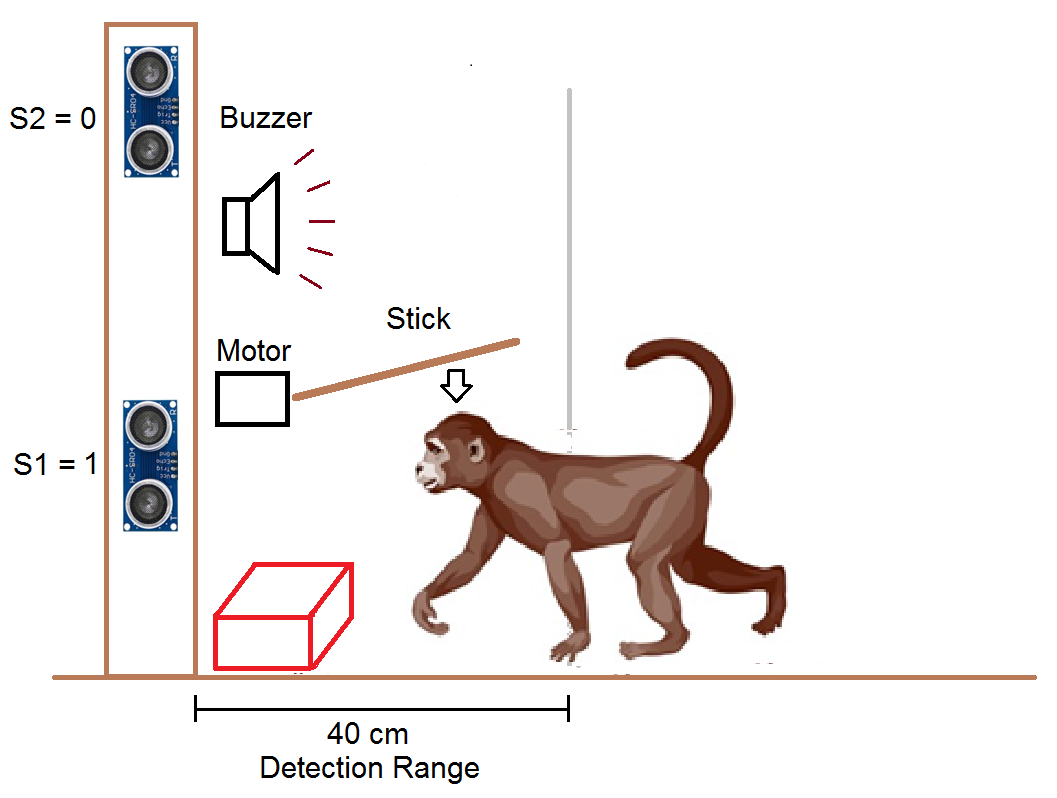
The device uses two ultrasonic sound sensors to detect the presence of a nearby object. One sensor is kept near the ground to detect the presence of an animal, and the other is kept half a meter above the first sensor to detect the presence of a human.
An audio buzzer is used to alarm the presence of a nearby animal and is disabled when a human is present. A stick attached to a motor is used to drive away the animal. If an animal comes near the parcel, the buzzer will ring and the motor will move the stick side to side to drive away the animal.
Working Description
1) Detecting the presence of an animal or human
The presence of an object (animal or human) is detected with the help of an ultrasonic distance measurement sensor. This sensor works by emitting sound waves at a frequency too high (40 kHz) for humans to hear (20Hz to 20kHz). It then waits for the sound to be reflected back, calculating distance based on the time taken to receive the sound.
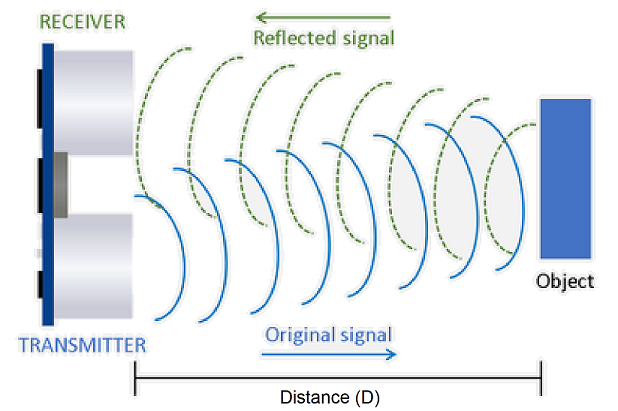
Formula: Speed (S) = Distance (D) / Time (T)
as such Distance (D) = Speed (S) x Time(T) – (1)
Speed of sound is approximately 360 meters per second.
Time (T) = time difference between sound emission and receive /2. (Dividing by 2 is required to account for the to and fro time).
From (1) Distance (D) = 360 x T
For example, if the sound is emitted at t1 = 0 sec and received at t2 = 0.01 sec (that is 10 milliseconds)
Then D =360 x (t2-t1)/2 = 360 x (0.01-0)/2 = 1.8 meter.
2) Logic to distinguish between human and animal
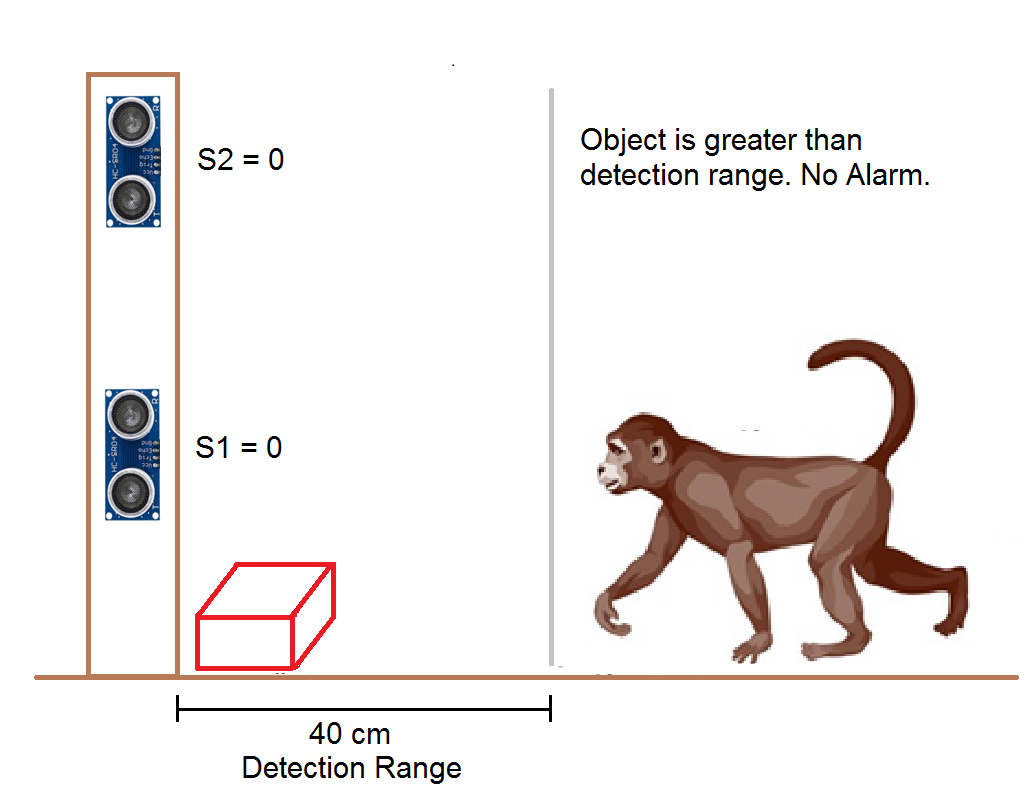
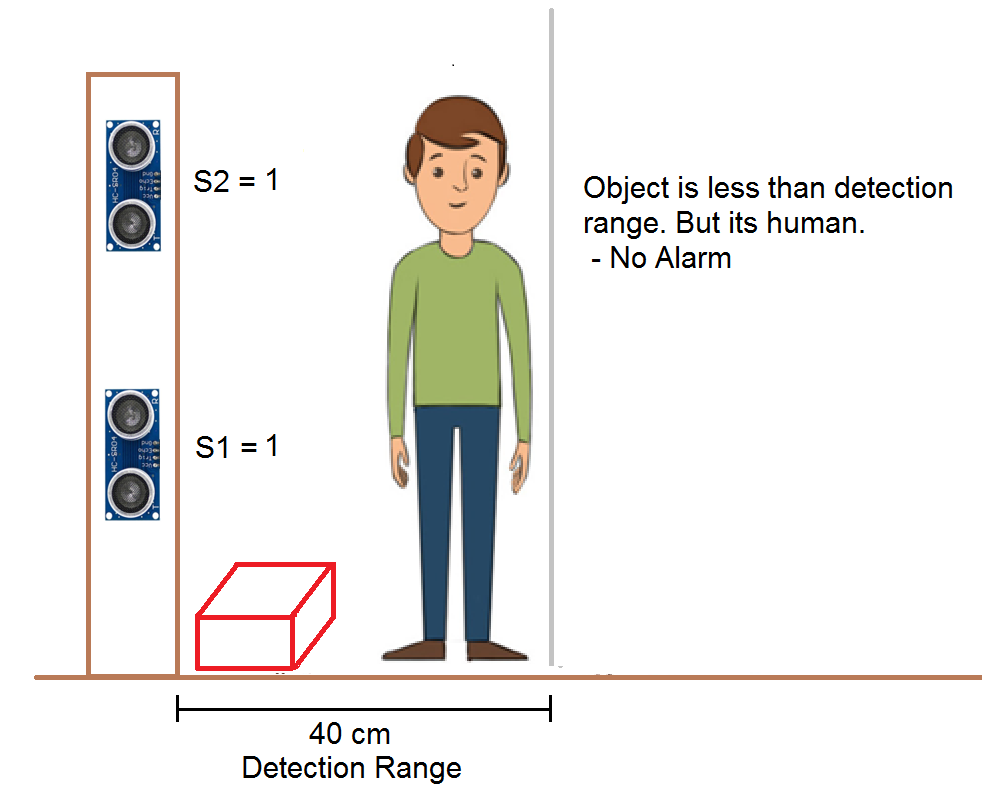
Let's say the bottom sensor is S1 and the top sensor is S2. The height of S1 should be:
- less than the height of a medium size dog and
- greater than the height of the parcel to be guarded
Height of S2 should be:
- greater than the maximum height of a dog or monkey and
- less than a 5-year-old human child
The set point for detecting the presence of an object is set at 40 cm (400 mm). When an object's distance is less than this set point, the output of the sensors is made 1, else 0. The logic used to distinguish between animal and human is described below.
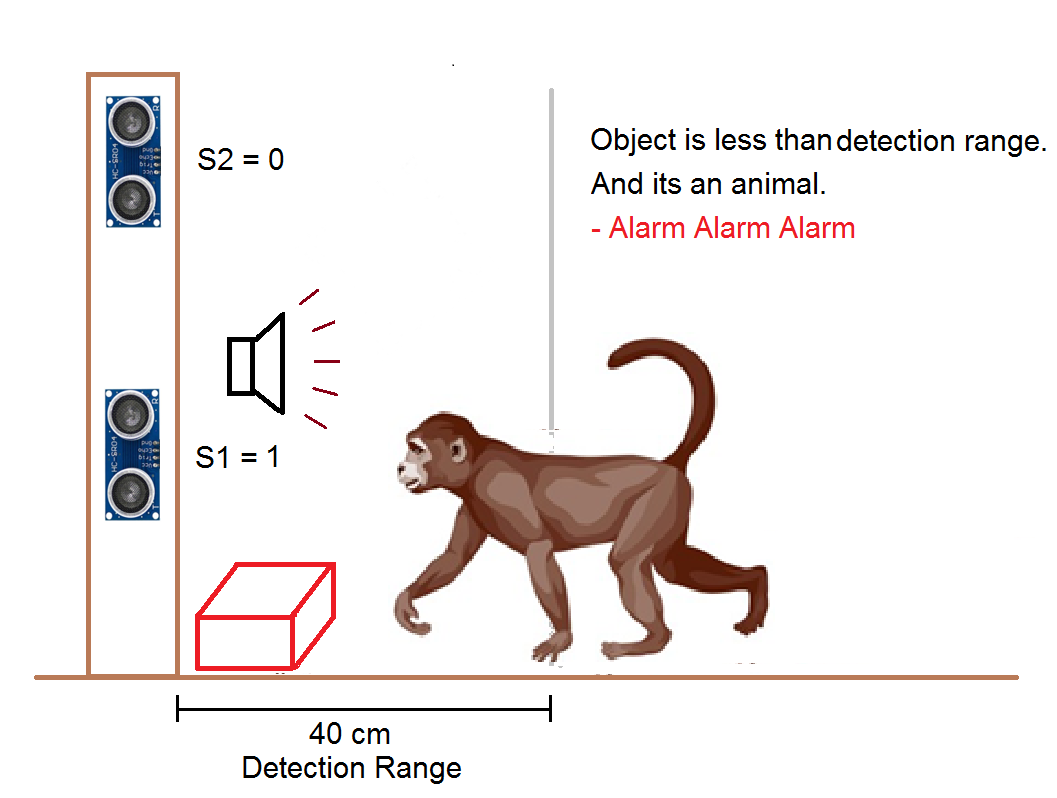
3) Buzzer and Stick
When an animal is detected, a buzzer is sounded to make an alarm. If the animal is still present, a stick is used to scare the animal automatically.
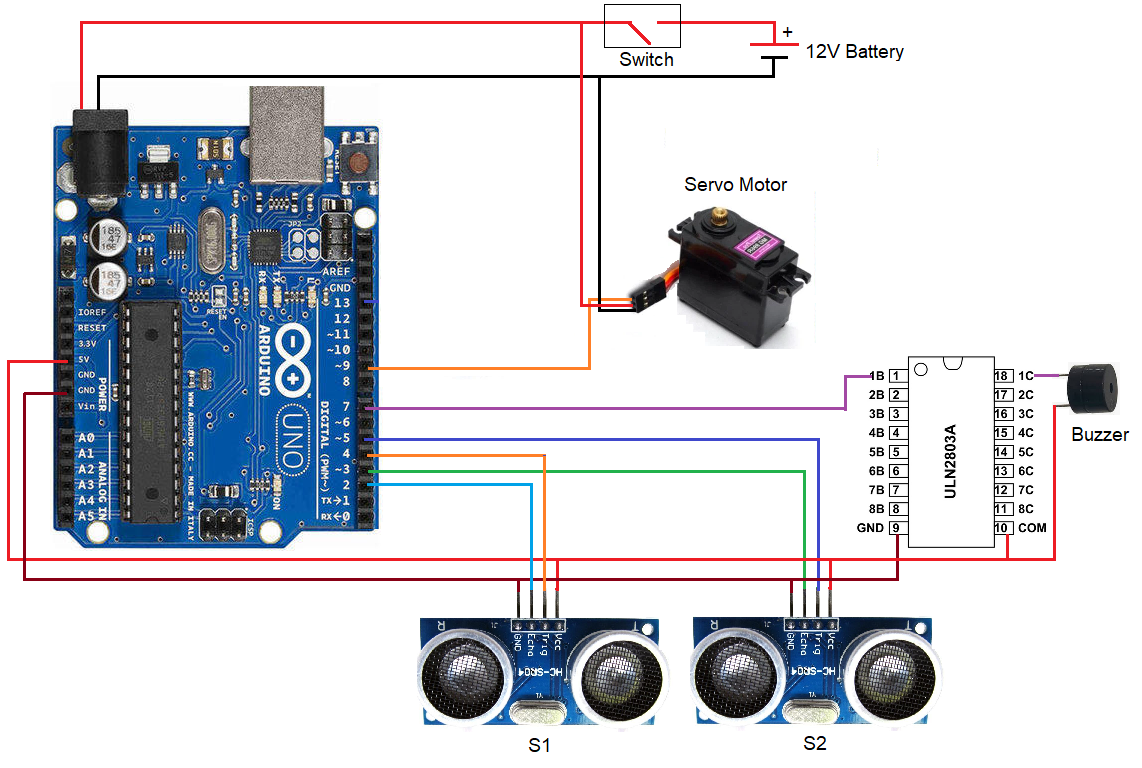
Hardware
Arduino Uno is used as the main controller in this project.
- It communicates with the ultrasonic distance sensors
- performs all the required mathematical and logical operations
- controls the buzzer to make sound
- and controls the motor to move the stick.
Ultrasonic Distance Sensors: Two ultrasonic distance sensors (S1 and S2) are used to detect nearby objects. These are connected to digital input and output pins of the Arduino Uno board.
Buzzer: A buzzer is used to make sound when an animal is detected. It is connected to digital output pin-6 of the Arduino Uno through a driver IC ULN2803.
Servo Motor with a stick: A servomotor along with a stick is used to scare the approaching animal. It is connected to PWM pin-9 of the Arduino Uno.
12V Battery: A 12V battery along with a switch is used to power the entire hardware.
The complete circuit diagram is shown below.
Place the complete hardware on a self-standing wooden plank as shown in the cover image.
Software
A block diagram-based software Computer Aided Simulation Program (CASP) is used to program the board as I'm not much conversant with C/C++ coding. The model below is created to realize the required logic.
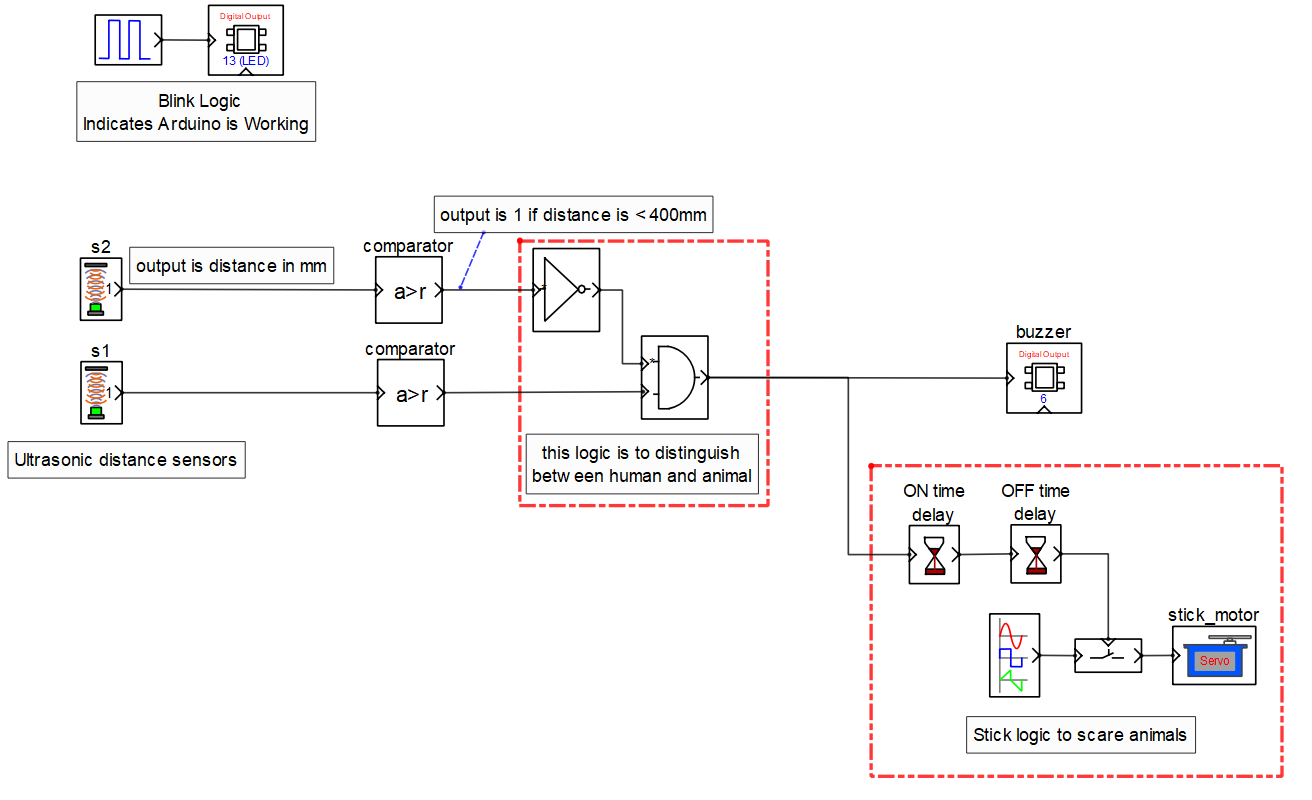
Model Description
Blocks S1, S2: are used to communicate with the ultrasonic sensors. These blocks send a pulse to the sensors and receive the reflected pulse duration. They then calculate the distance based on the formula described earlier. The output of these blocks is the distance measured in millimeters.
Two number of comparator blocks: They compare the distance from the sensor blocks with the set point (400mm). If the distance is less than the set point, the output is 1, else 0.
Logic to distinguish between human and animal
As explained earlier, the alarm should sound only when S1=1 and S2=0. So an AND and NOT logic combination is used to sound an alarm when an animal approaches and not a human.
Wiper Stick Logic
A sine wave block is used to turn the servo motor and move the stick when an animal is detected.
Time Delay Blocks
An ON time delay is used to start the motor after a short delay.
An OFF time delay is used to stop the motor some time after the alarm is OFF.
Expanded Technical Details
Automated Delivery Protection
This project uses AI-based simulation and physical hardware to protect delivered food or packages from animals.
- CASP Logic Integration: Developed using the Computer Aided Simulation Program (CASP), the system manages a specialized storage box. It uses sensor logic to verify that a delivery person is present before unlocking.
- Deterrent Output: If the sensors detect a signature matching a stray animal (e.g., movement near the box with a specific ultrasonic reflection profile), the Arduino triggers a high-frequency ultrasonic deterrent tone that is unpleasant for most animals but silent to humans.
Cloud Alerts
- Blynk Notification: The system can be extended to send an instant alert to the owner's phone when a package is delivered and when the storage box is opened.
Limitations & Future Improvements
1) As seen from the video above, the current design only works when the object is directly in front of the sensor. It cannot detect if the object is slightly to the side.
2) Sometimes, the sensors have difficulty detecting animals with fur on their bodies.
The above limitations can be addressed by using other types of sensors, such as passive infrared (PIR) sensors, or by implementing a multi-sensor array.
Procedure
1. Download and install CASP software https://aadhuniklabs.com/?page_id=550
2. Check these videos on how to install CASP https://aadhuniklabs.com/?page_id=554
3. Download project files from Gitlab repository https://gitlab.com/tul.ishwa/projects/-/tree/main/safeguard_items and extract the zip file.
4. Build the circuit as shown in the connection diagram above.
5. Run CASP. Open the project from the extracted zip file and open the workspace file ultrasonic_dist.wsp.
6. Open Setup Simulation Parameters and set the hardware programmer port to the serial port where the Arduino Uno is connected.
7. Build the model and program the board.
8. Please note that the model on the Arduino board will run only for a finite time (maybe 20 minutes or less based on the license) as we are using the free version of CASP. Just press the reset button on the Arduino board to resume.