Note: This tutorial could be outdated, please go here for a more current version.
About this project
This project will show you how to drive in a programmed way the relays on a MKR Relay Proto Shield. In particular using web server hosted on the MKR1000 you will be able to set the alarm time using your browser!
Get started
To get started you have to:
- Put your MKR1000 board in top of your MKR Relay Proto Shield;
- Upload the code on your board;
- Open the serial monitor and copy the board's IP address;
- Open your browser and paste the IP address. You should see a page similar to this:
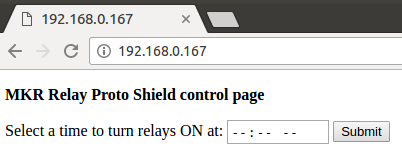
- Click on the -- and use the arrows to set the time:
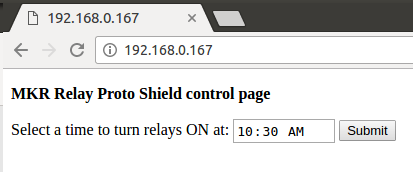
- Click on submit!
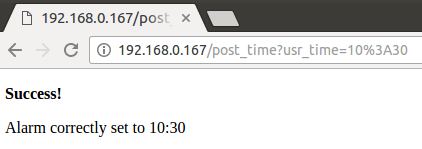
So when your time will be matched (in this example at 10:30 AM) the two outputs on your MKR Relay Protoshield will be driven HIGH for five minutes!
How to use and improve this example
You can use this example to make your own gardening system and small automation in general! Use the MKR1000 IoT capabilities to ask for weather forecast and use them to have a smarter ON/OFF policy.
EXPANDED TECHNICAL DETAILS
High-Power Chronometric Load Management
This project provides a professional-grade solution for scheduling high-power electrical loads (like grow lights or pool pumps) using a precise time-of-day clock.
- DS3231 RTC Temporal Synchronization: The Arduino monitors a high-accuracy Real-Time Clock module over I2C. This ensures the schedule remains accurate to within 1 minute per year, even without an internet connection.
- Relay-Cycle Duty Mapping: Users can set "ON" and "OFF" times via a serial menu or physical buttons. The Arduino manages a 4-channel relay module, ensuring that high-voltage loads are switched safely at exactly the right second.
Reliability
- Power-Loss State memory: The Arduino saves the current relay states and schedule to its internal EEPROM. When power is restored after an outage, the Arduino instantly resumes the correct schedule.