In this project we use data from the motion sensor on the Arduino Nano 33 BLE Sense which is mounted on a bike’s suspension and used under different road conditions. The data was cut into 5 seconds and labeled according to the surface variation and activities. Then processed in Edge Impulse Studio through Neural Network blocks: Spectral Analysis (x, y, z acc) and Classification (Keras) which will produce an ML model that can detect 5 road surface characters and rider activity output (idle, medium, rough, smooth, sprint). The model is deployed into the program on the Nano 33 BLE Sense which has an angle servo motor installed that can adjust the bike’s suspension knob. In the end, this project succeeded in implementing a "smart" system on the bike's suspension which can automatically adjust the level of travel on the suspension (lock, medium, open) according to the character of the road and the activities. Comfort, efficient use of energy have been achieved, and the effect of excessive bobbing can be eliminated with the help of embedded ML from Edge Impulse. This project also has the potential to maximize its use in sport cycling activities such as MTB (cross country, trail, downhill) so the riders focus more on handling and pedalling.
Project Overview
"AI-Ride" marks a paradigm shift in mountain bike (MTB) technology: Predictive Damping. While traditional high-end suspensions use simple valves, AI-Ride utilizes an Arduino Nano 33 BLE Sense running an embedded Neural Network. By analyzing high-frequency accelerometer data from the bike's fork, the system identifies terrain types (Gravel, Asphalt, Roots) and rider activities (Sprinting, Coasting) in real-time, instantly adjusting the mechanical damping knob via a precision servo to optimize traction and energy efficiency.
This project consists of 5 steps:
- Collect data
- Data acquisition and labelling
- Train and build model
- Deploy model and test
- Modify code, attach, and test
Step 1: Collect Data
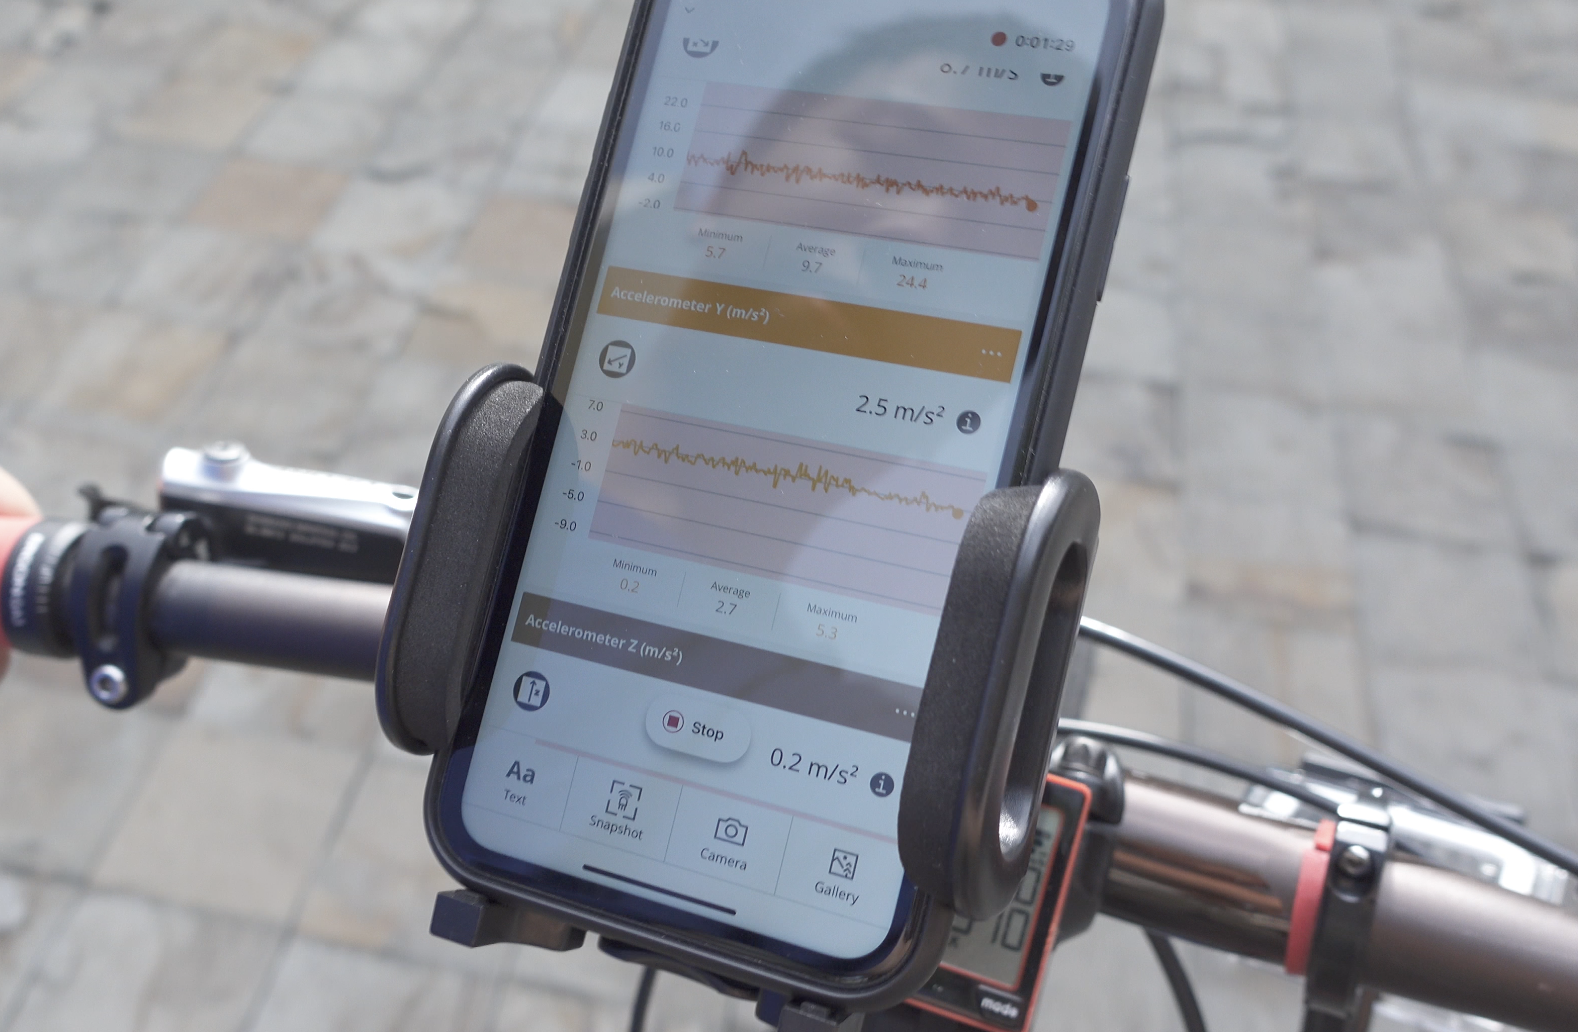
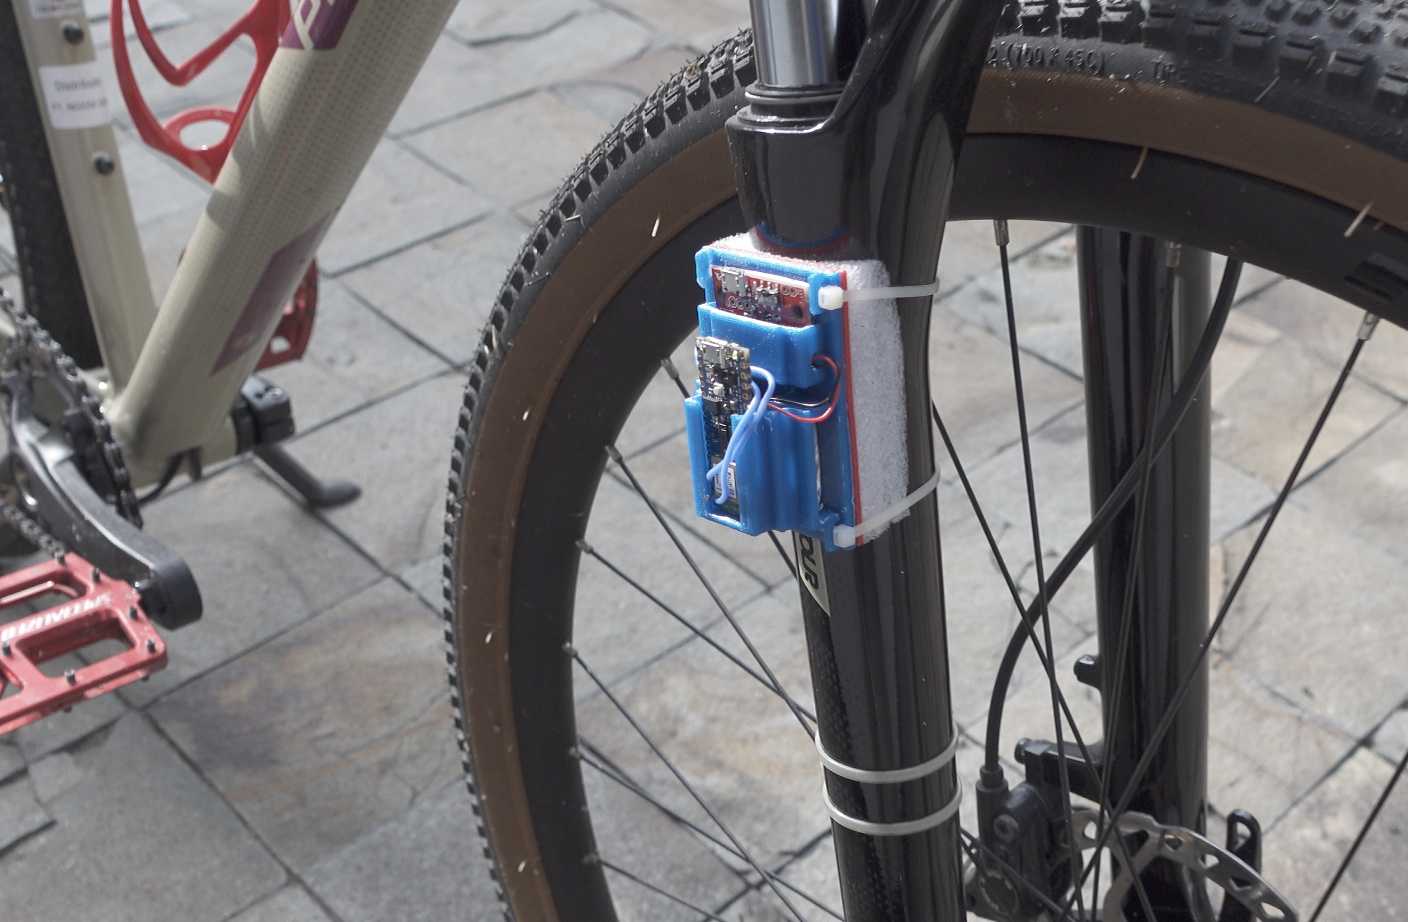
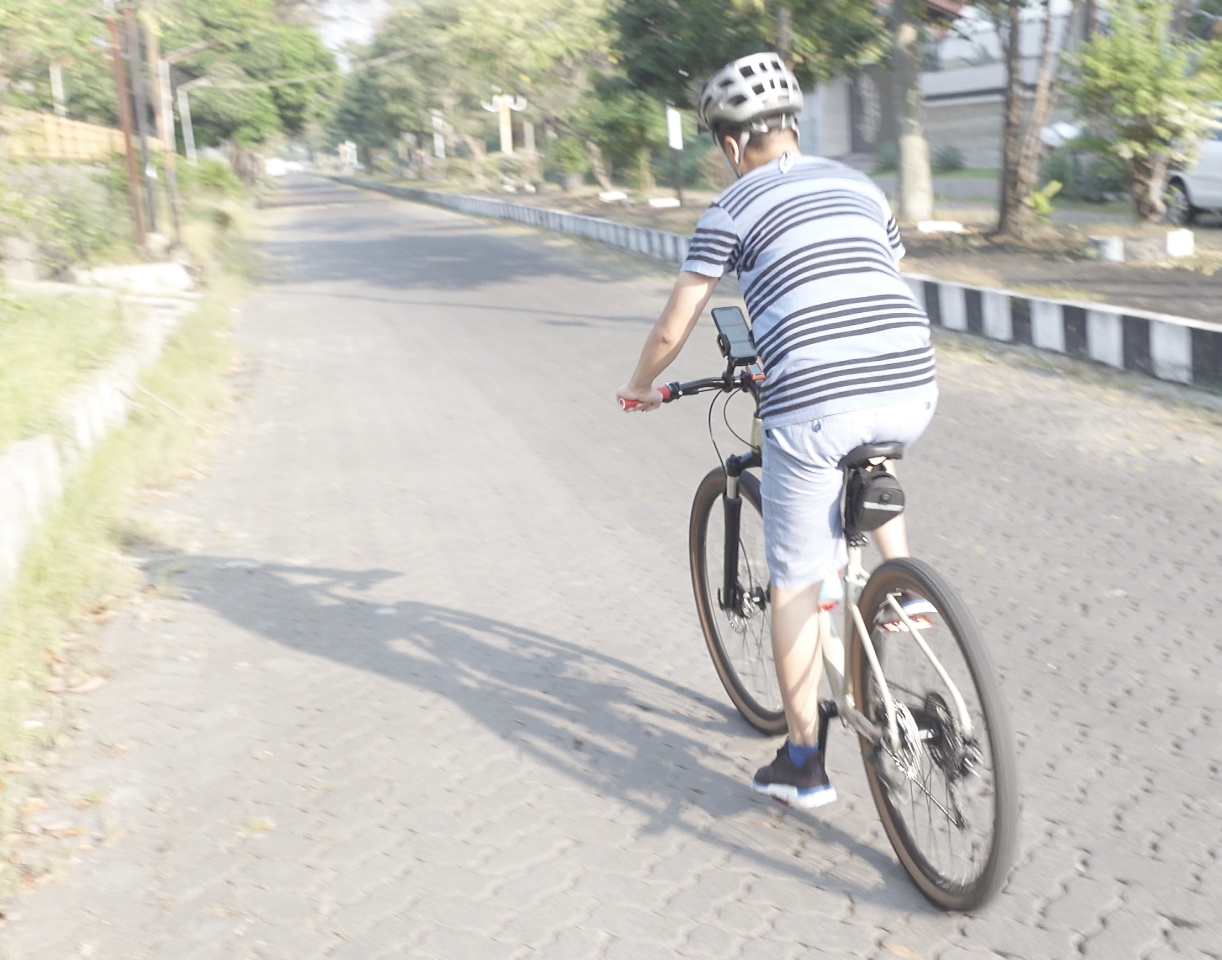
This data collecting is a very important stage and requires preparation, we have to make a mounting case for the Nano 33 BLE Sense and the battery on the bike suspension tube. For easy data recording, we use a smartphone with the Arduino Science Journal (Arduino SJ) app. We also use a smartphone bike mounting so the graphs result can be seen immediately when data recording occurs.
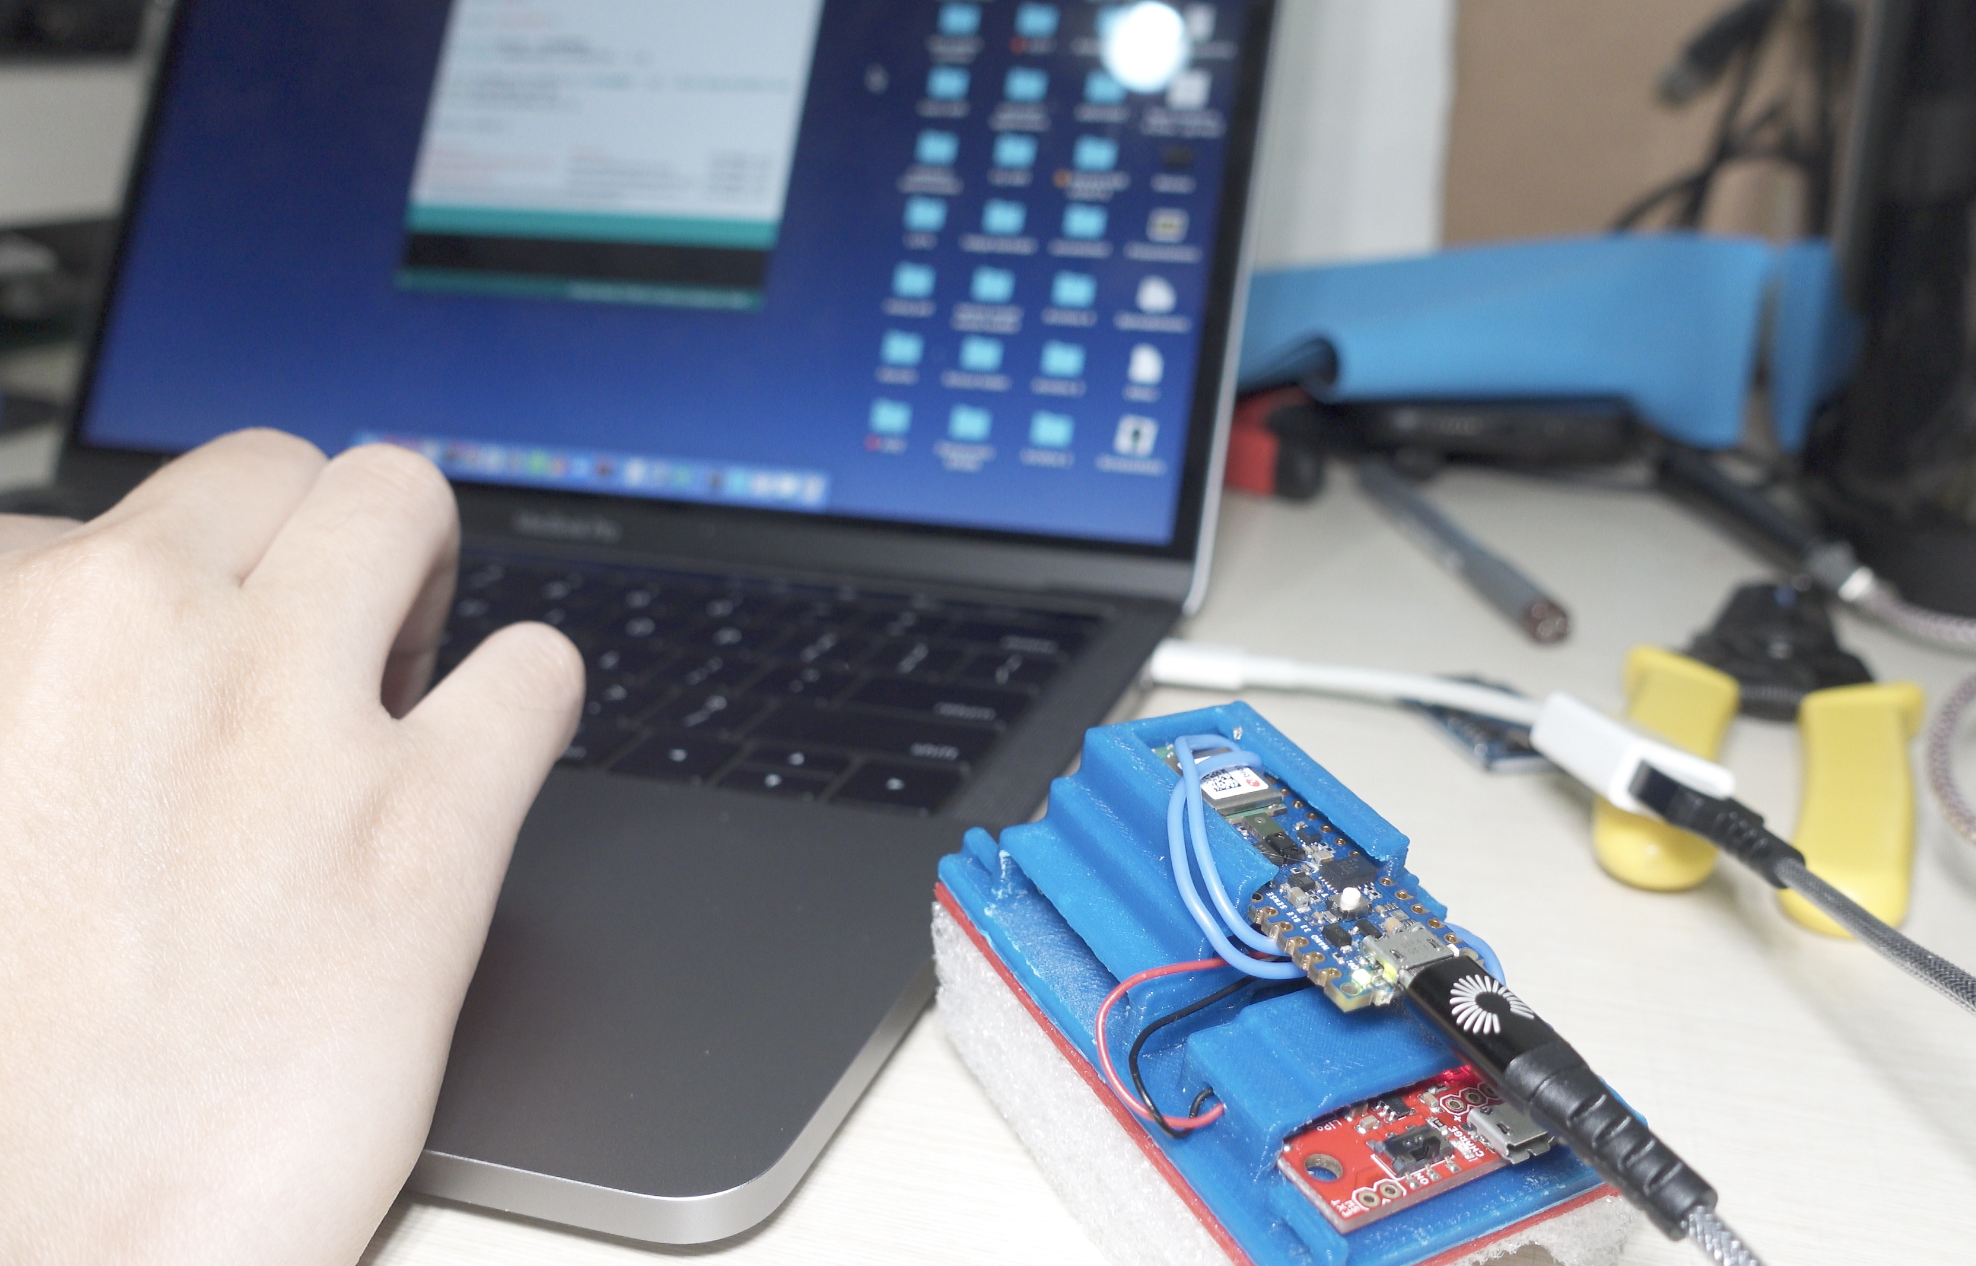
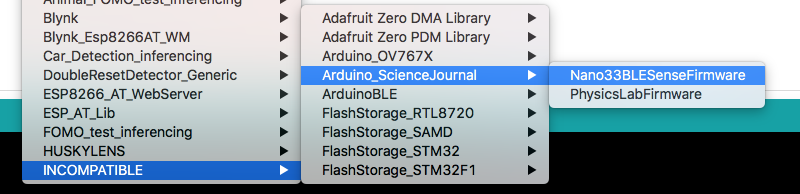
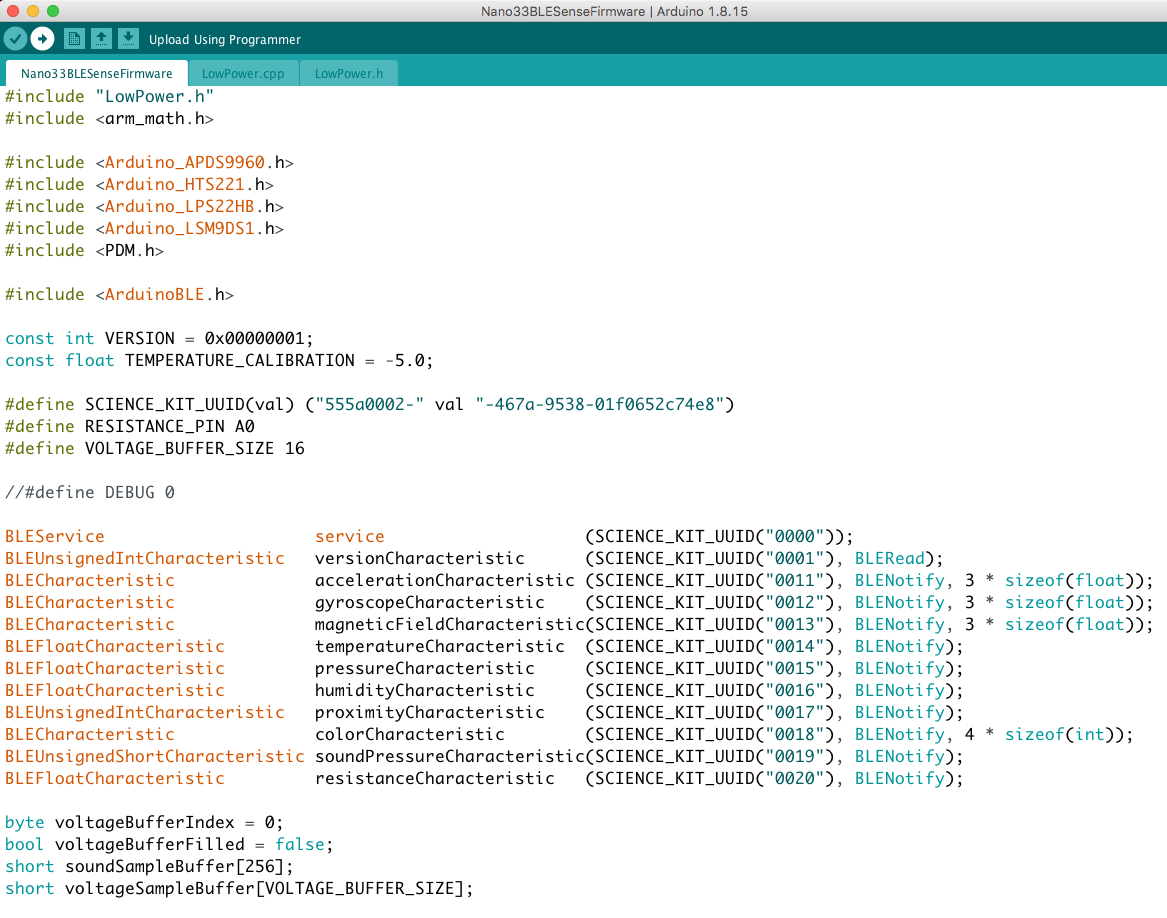
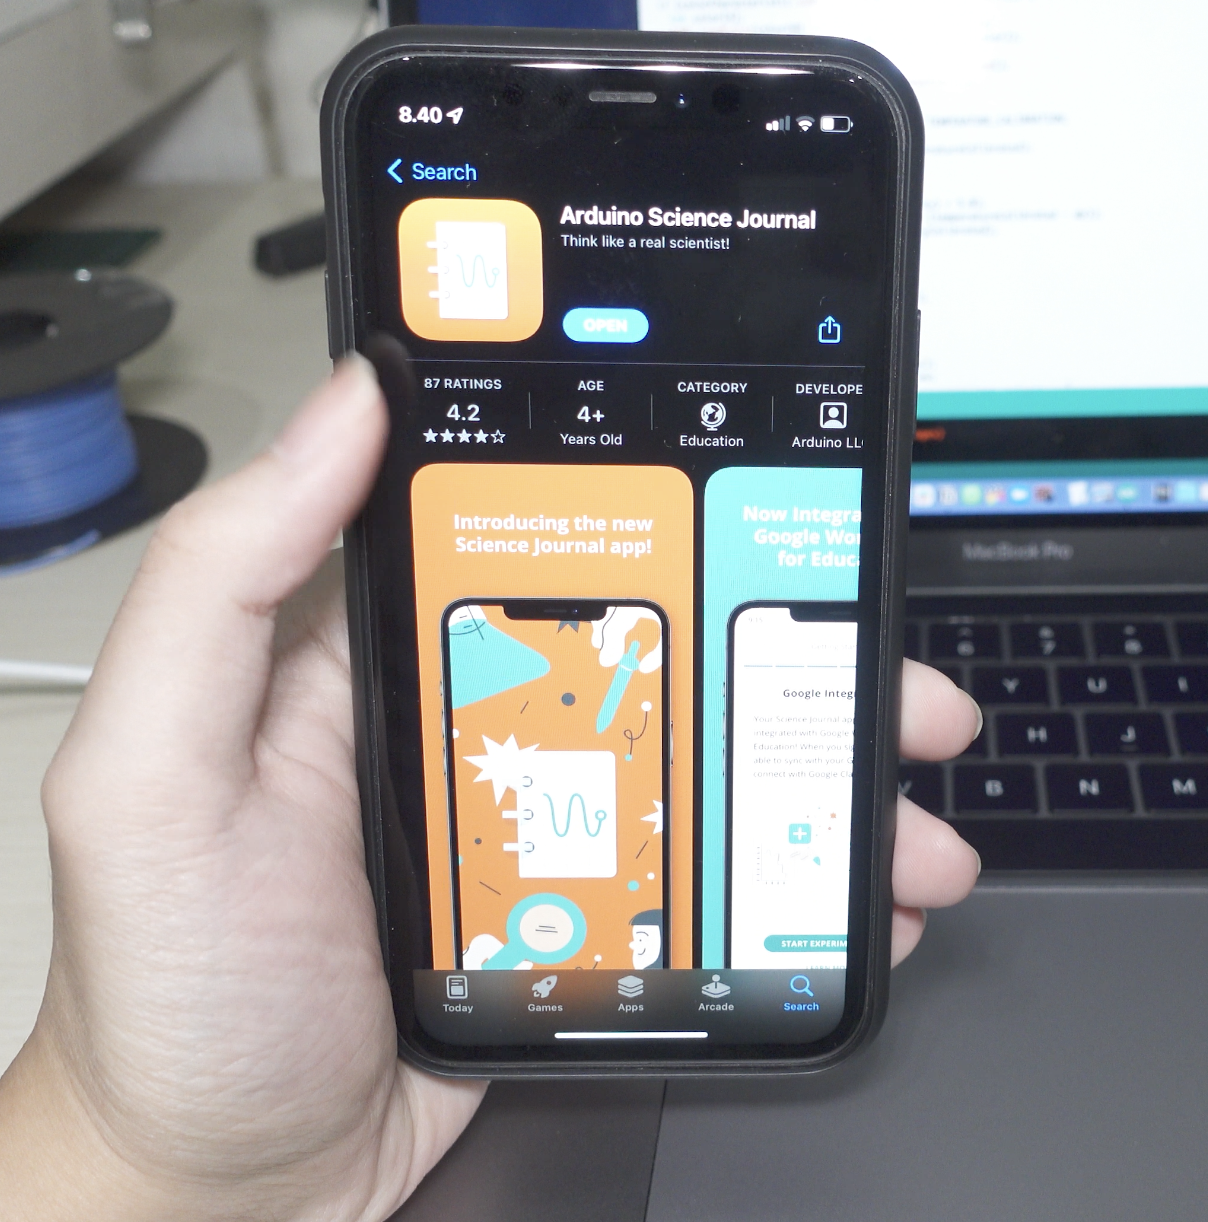
The first thing to do on Nano BLE Sense is to upload Arduino Science Journal firmware via Arduino IDE. Find and install the libraries by using the Library Manager (Tools > Manage Libraries…) the type arduino science journal, select latest version and download. After that, go to File > Examples > INCOMPATIBLE > Arduino_ScienceJournal > Nano33BLESenseFirmware. Then click the Upload button. Now Nano BLE sense is ready to be attached on bike suspension.
After everything is installed in place, power on and connect the Nano BLE Sense to the Science Journal app via bluetooth. Click on Add button then choose sensor input, add accelerometer X, Y, and Z. So now it is ready to take data samples, start ride, then start record - stop, and name each recorded condition (rough/gravel, medium/pavement, smooth/asphalt). In addition, I added an idle state, and also a sprint (power pedal and lean bike to left and right).
After getting data from the app, you can download the csv file. Then we can proceed to step 2 in Edge Impulse Studio side.
Step 2: Data acquisition and labelling
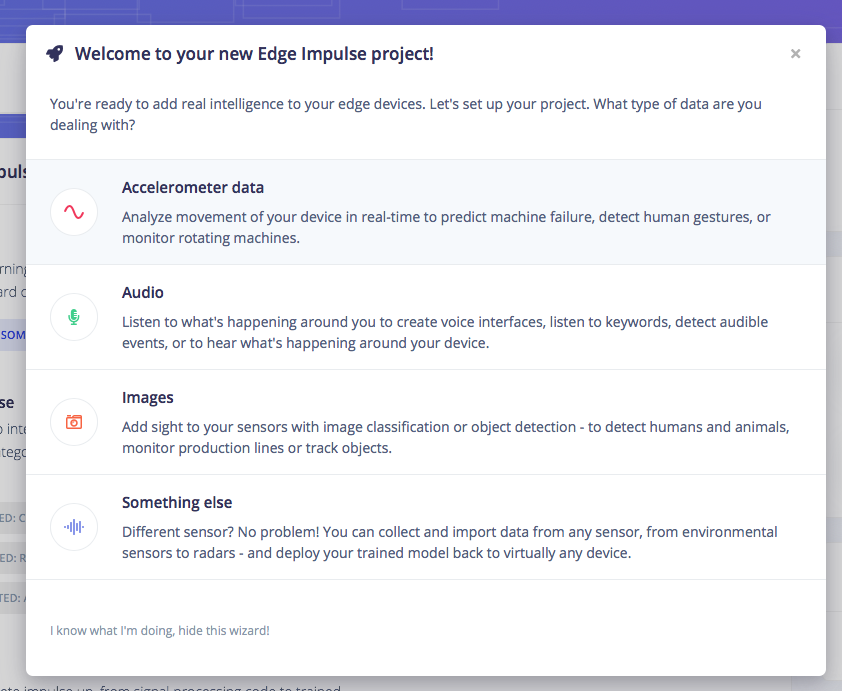
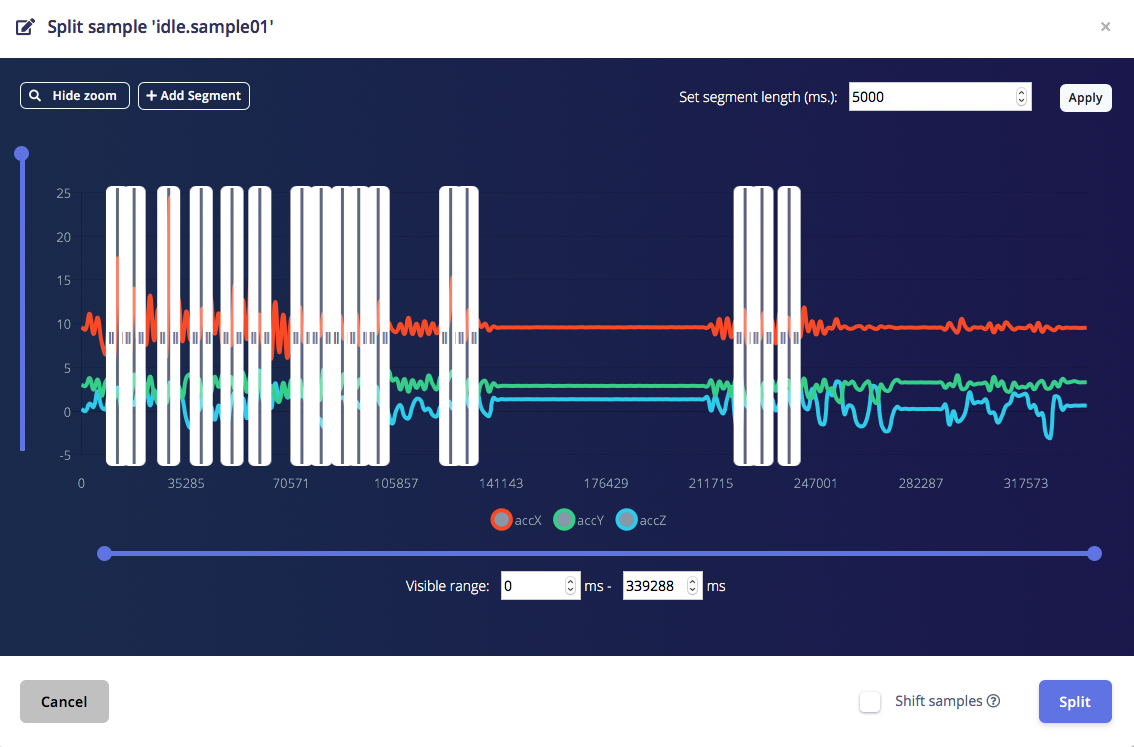
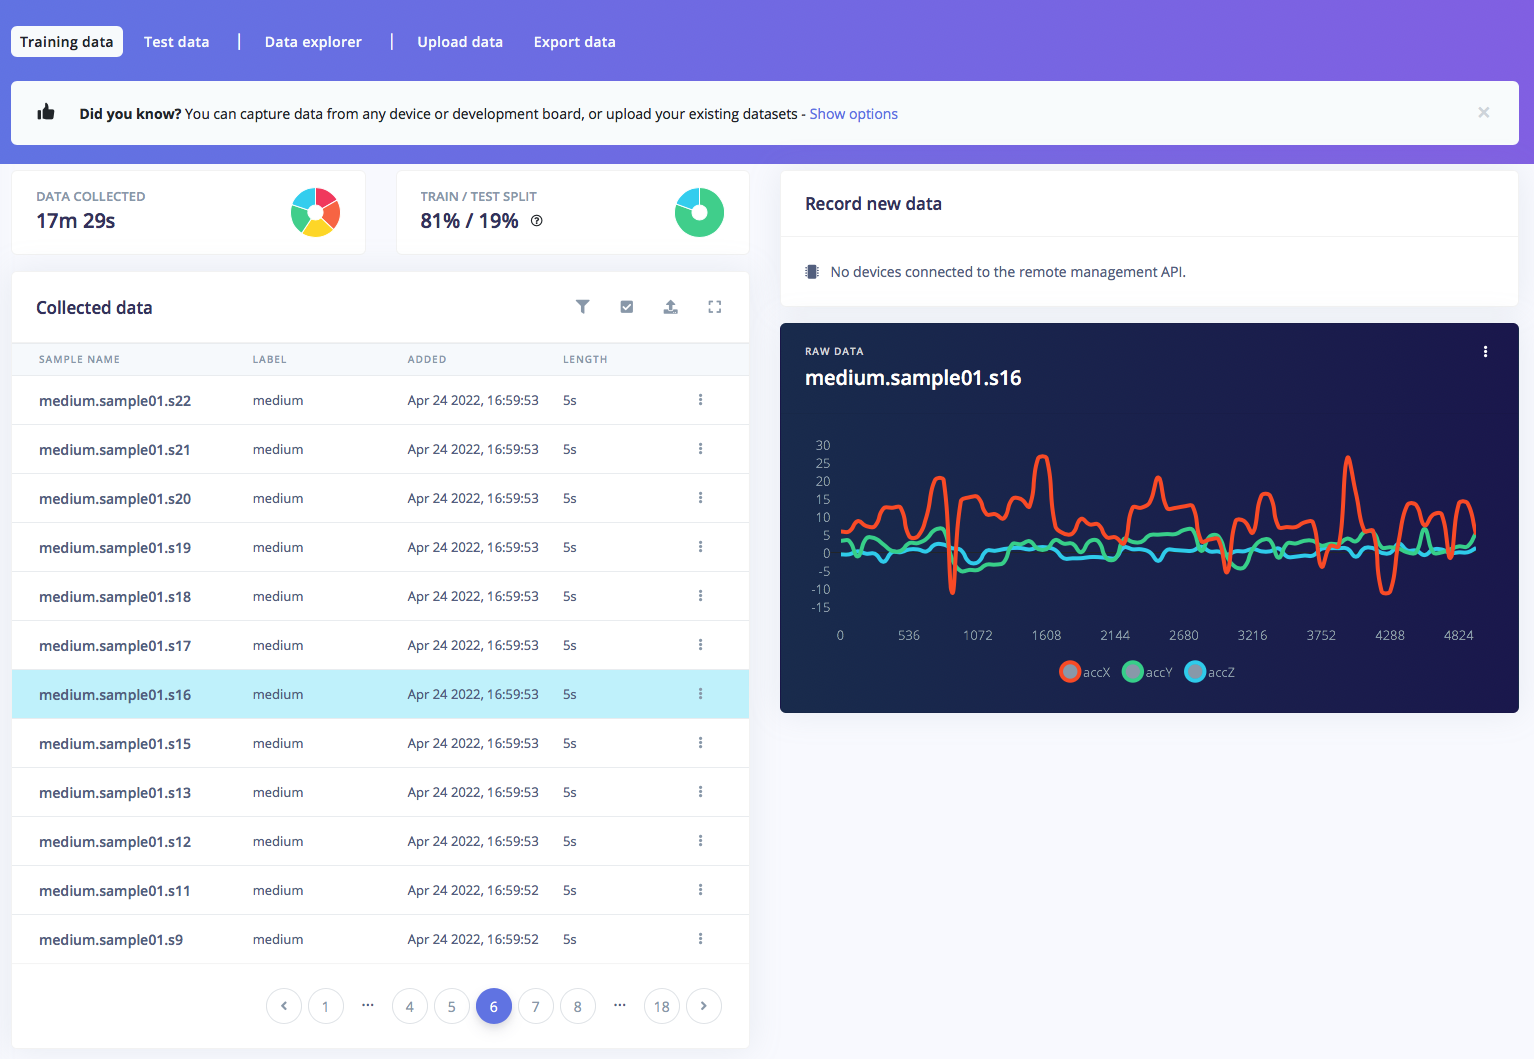
Open studio.edgeimpulse.com (sign-in/up). Create new project, then choose accelerometer data. In dashboard > Project Info, choose one label per data and Arduino Nano 33 BLE Sense for latency. Then in Data acquisition, click on Upload Data tab, choose your CSV files, auto split, then click Begin upload. Now, it’s time for labelling. Click on data sample collected, click on … (three dots) then choose split sample. Set segment length 5000 ms (5 sec), or add segment manually then click Split. Repeat.. until all samples labelled in 5 sec interval. Make sure that the ratio between Training and Test data is ideal, around 80/20.


Step 3: Train and build model
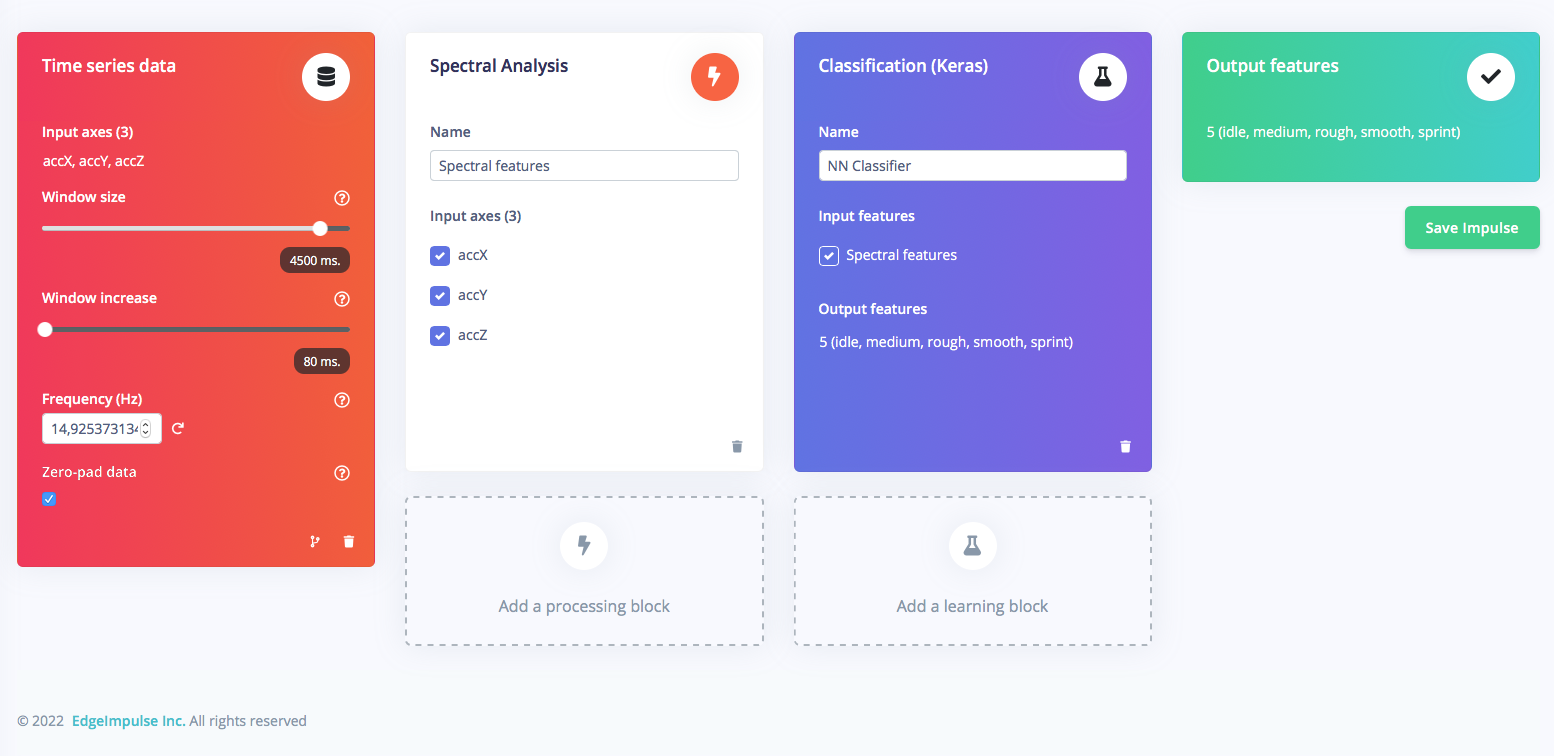
Once you have dataset ready, go to Create Impulse and set around 4500ms in Window size (for 5 sec data sample), and 80ms on Window increase. Then add Spectral Analysis processing block, and Classification (Keras) as learning block, then Save Impulse.
EXPANDED TECHNICAL DETAILS
- TinyML & Spectral Analysis (Edge Impulse):
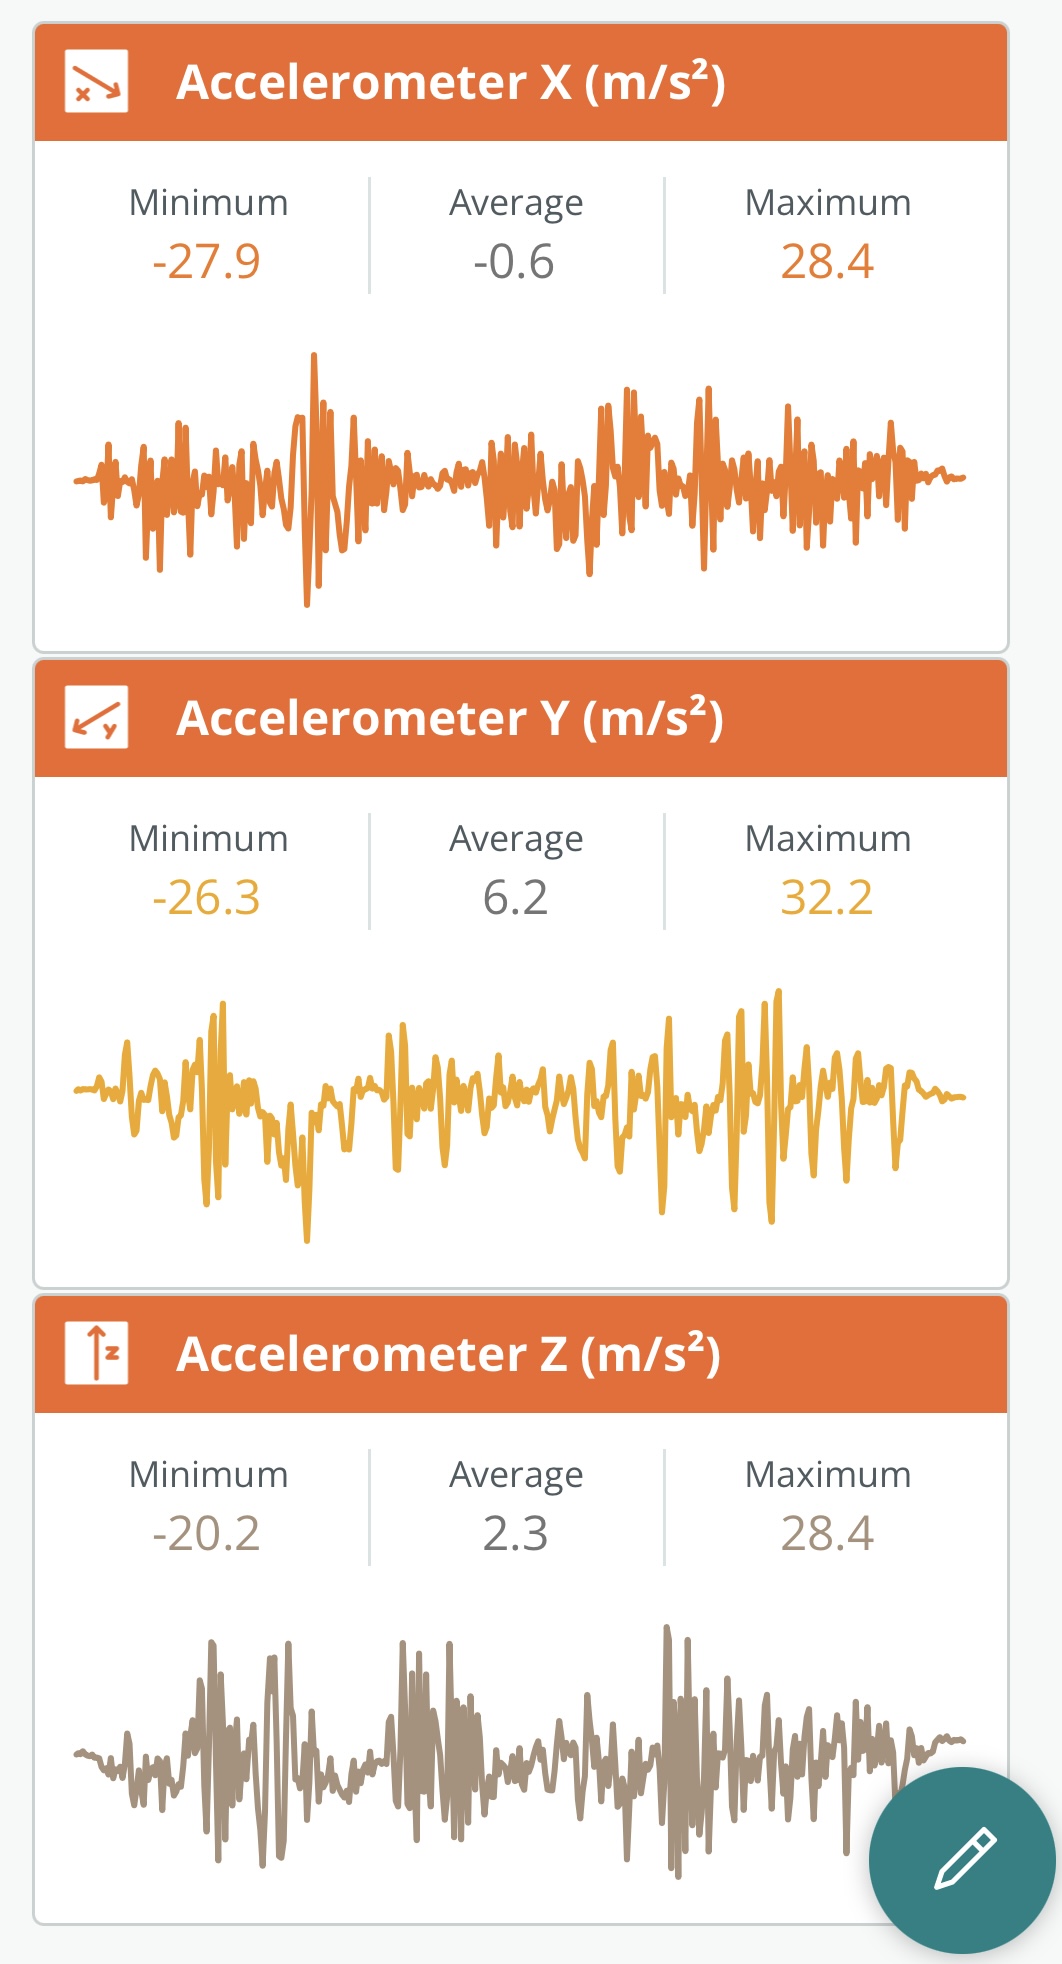
- Motion Forensics: The system captures 50Hz time-series data from the onboard LSM9DS1 IMU.
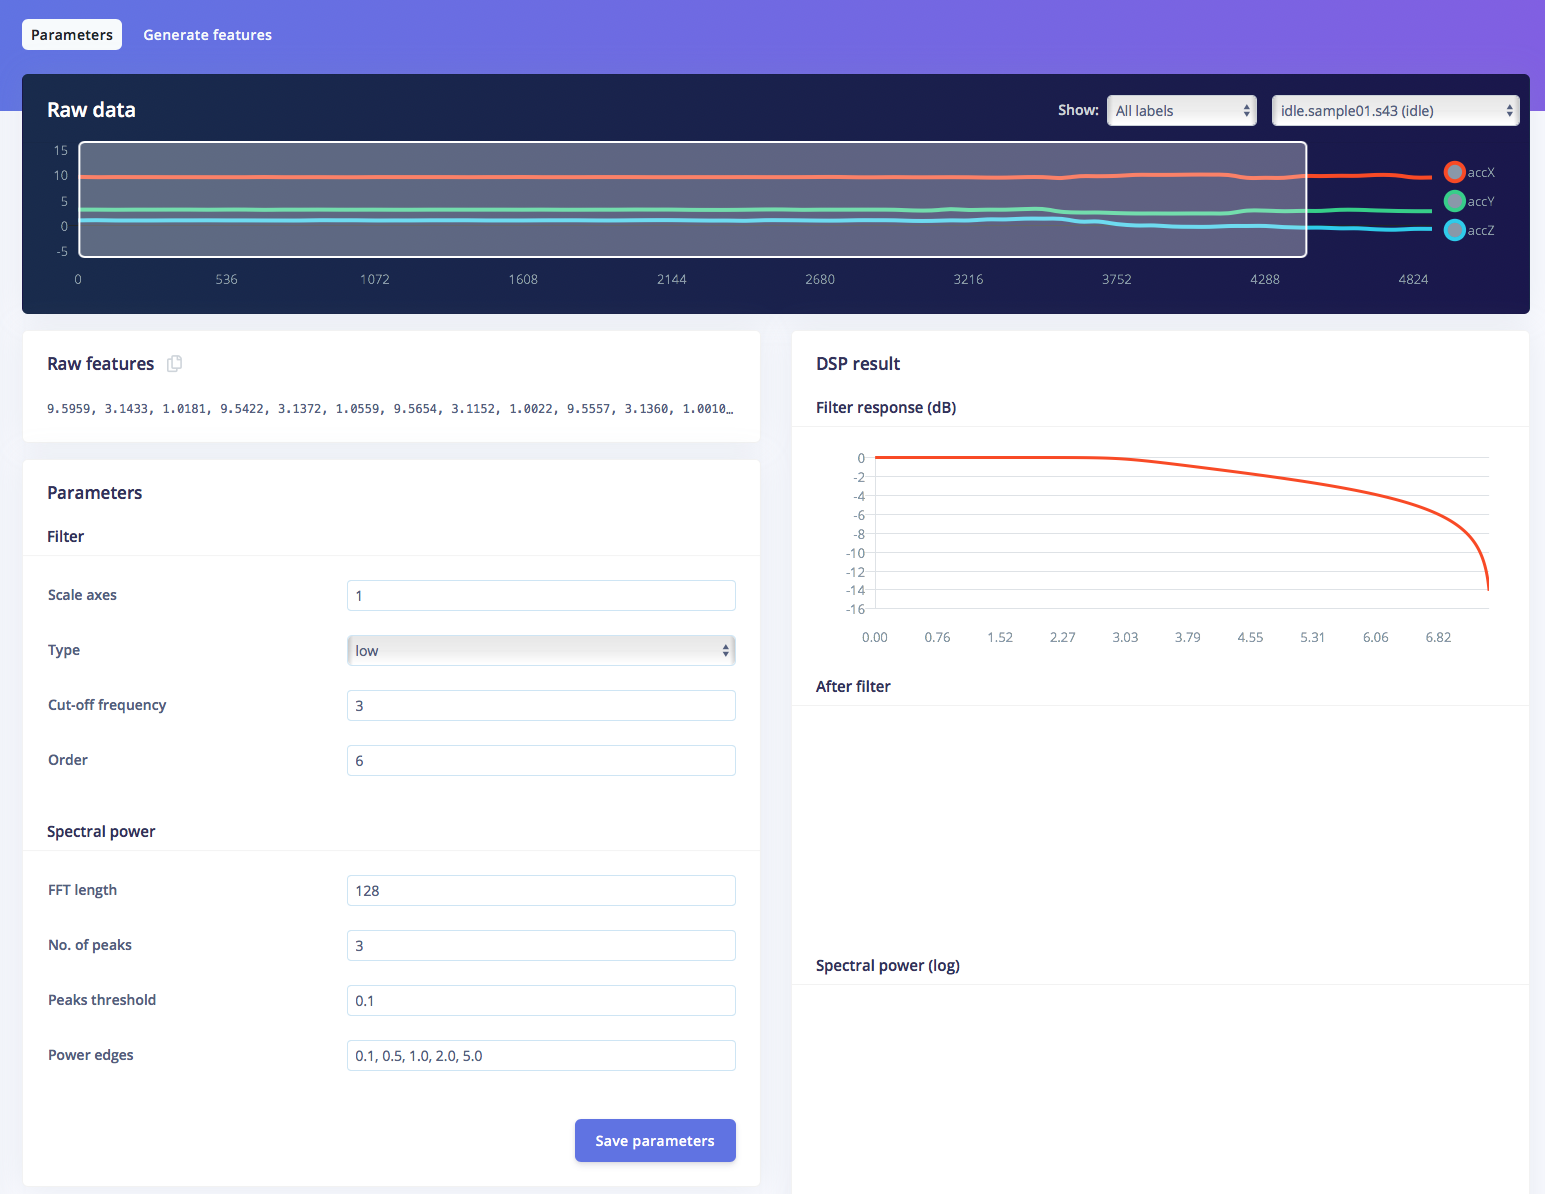
- Feature Extraction: Instead of raw data, the model uses Spectral Analysis. By applying a Fast Fourier Transform (FFT), the software identifies "Energy Peaks" in specific frequency bands—for example, high-frequency "jitter" indicates a gravel surface, while low-frequency "bobbing" suggests a heavy sprint.
- Neural Network Inference:
- Keras Classification: The trained model is a Classification Neural Network deployed directly to the Cortex-M4F processor. It outputs a probability score for five distinct classes: Idle, Smooth, Medium, Rough, and Sprint.
- Edge Deployment: The inference engine runs locally on the bike, ensuring zero latency and zero reliance on cloud connectivity, which is critical for reactive suspension adjustments on technical downhill trails.
Go to Parameter section, and press Save parameters.
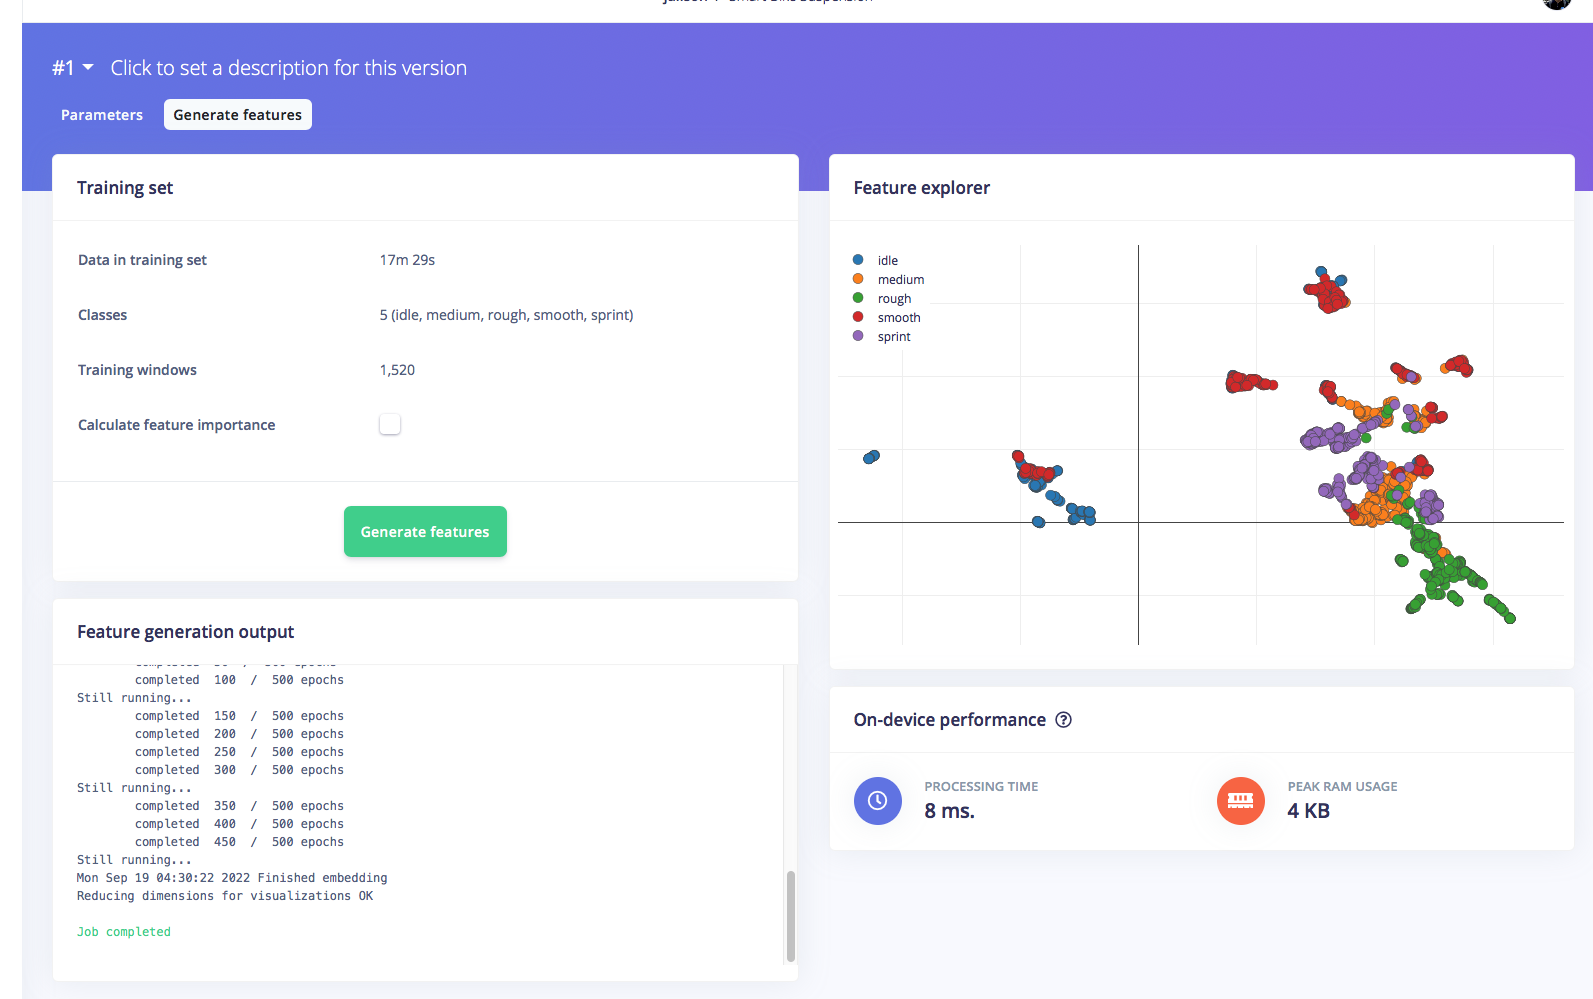
Click on Generate features button, you should get a result just like the one below.
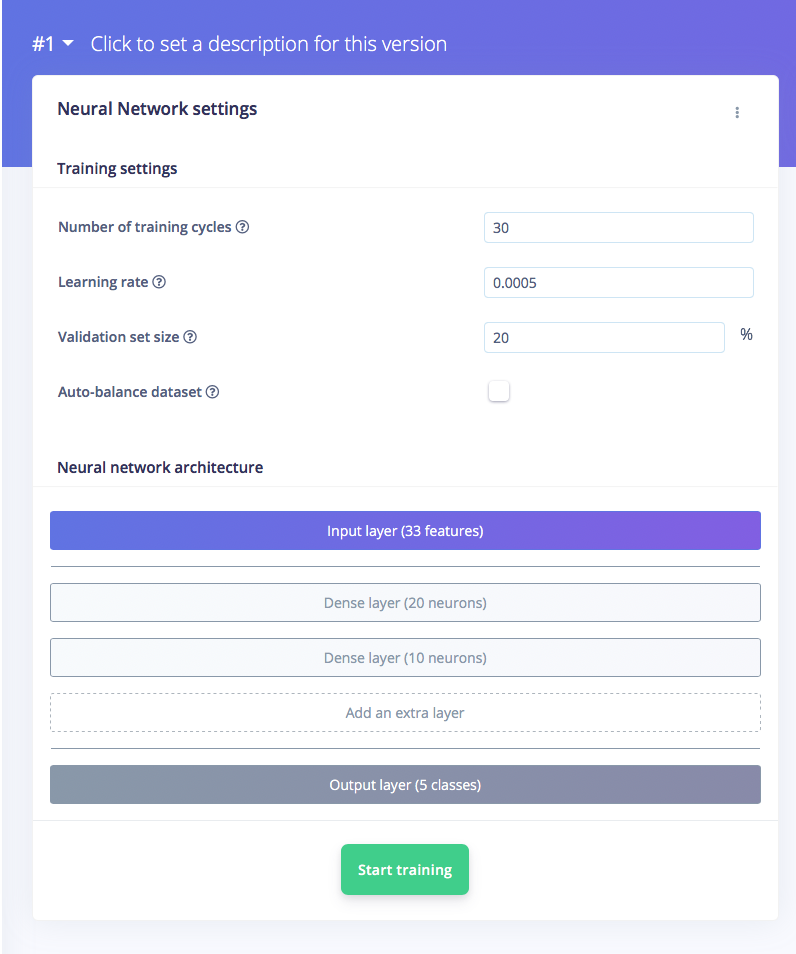
Then, navigate to NN Classifier section, and leave training setting for Neural Network as it is. Train the model by press the Start training.. and you can see the progress. If everything is OK, you should see something like this (91% accuracy is quite good).
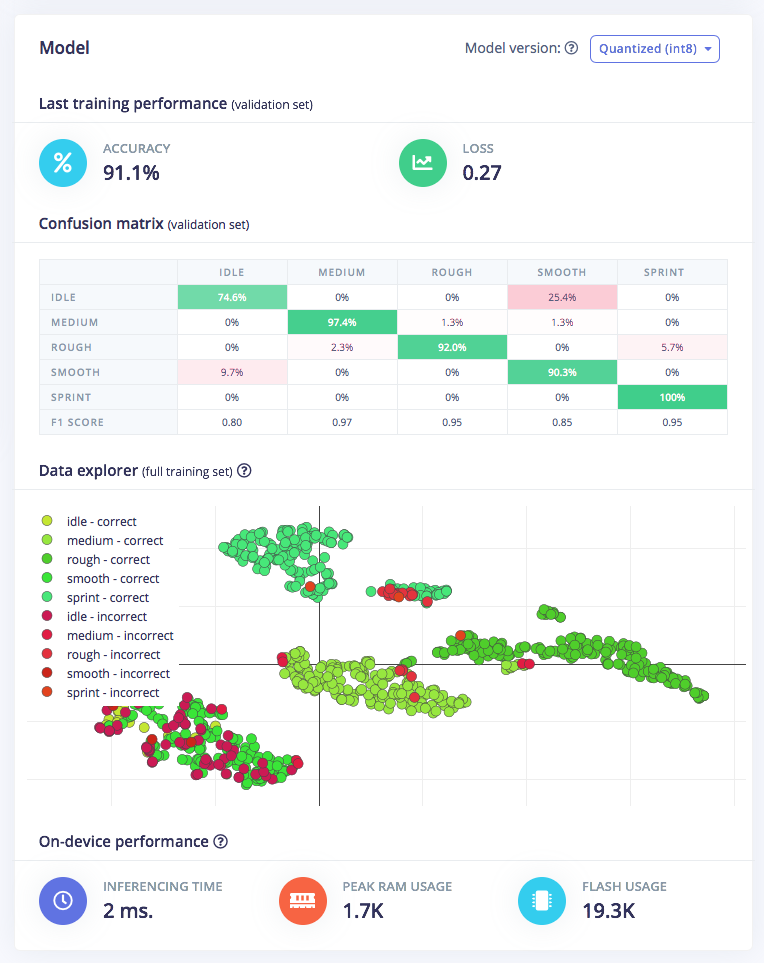
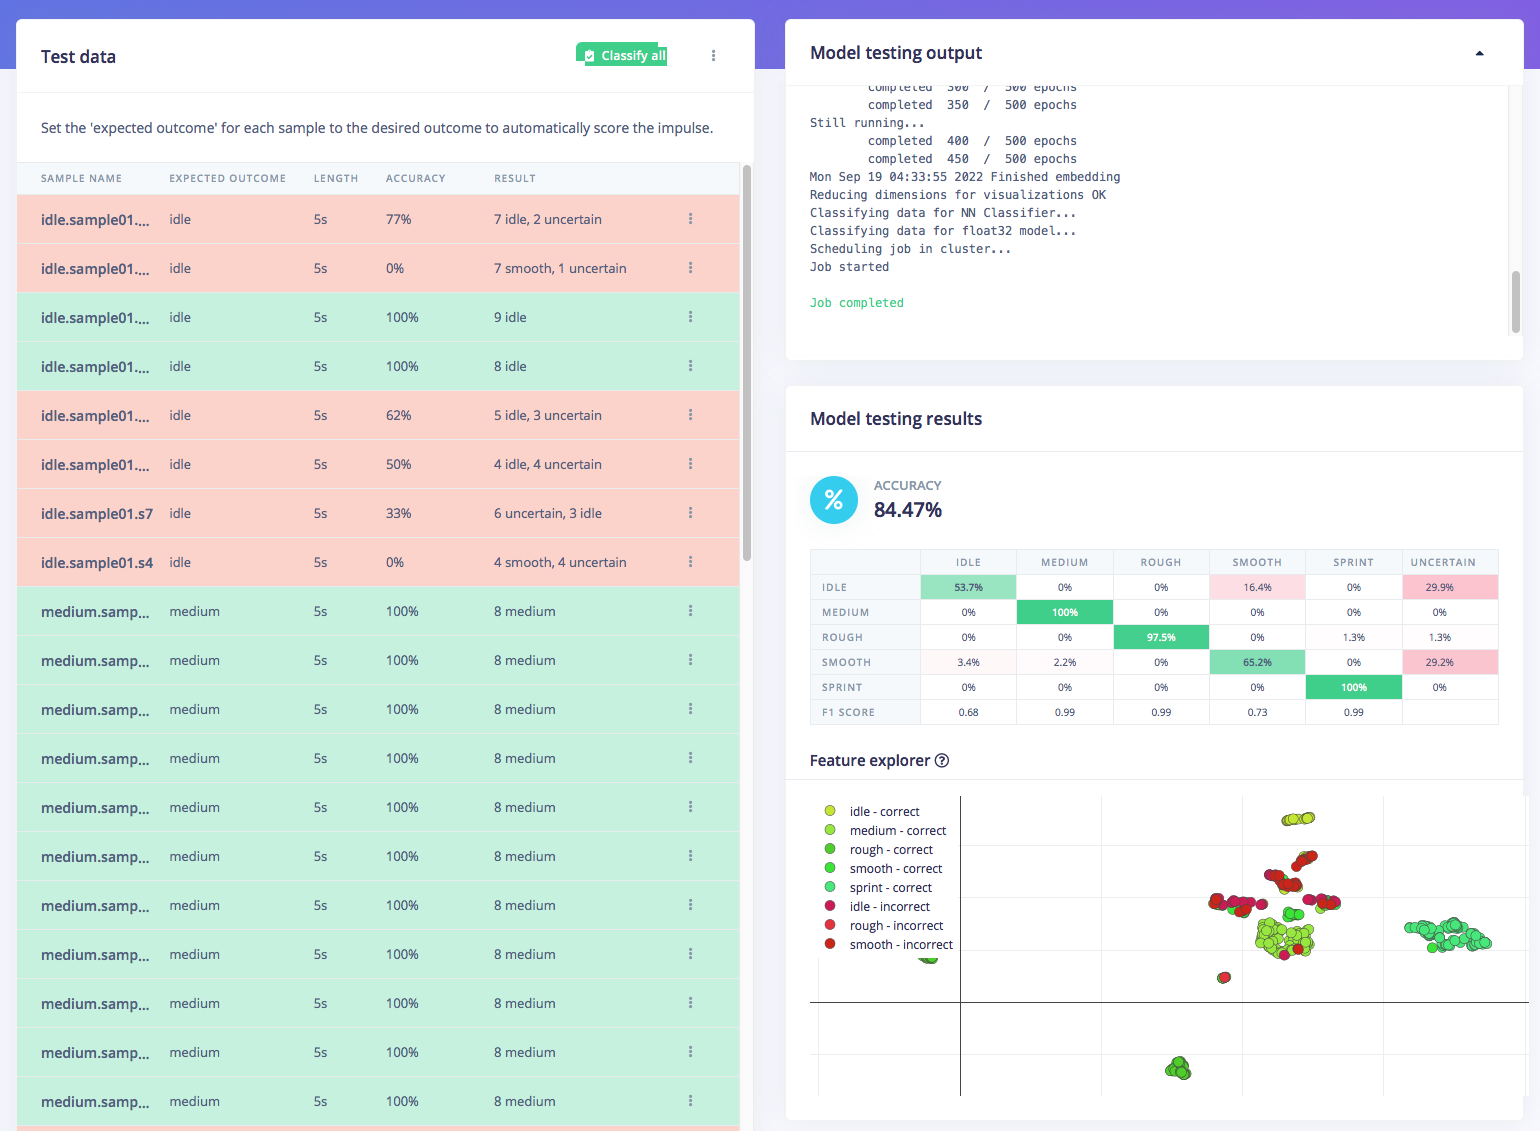
After that we can test the model, go to Model testing section and click classify all. If the accuracy result is more than 80%, then we can move on to the next step — deployment. (If accuracy result is not as good as expected, re-start with quality datas, label, or just retrain the model with Training cycle and Learning rate setting changes)
Step 4: Deploy model and test
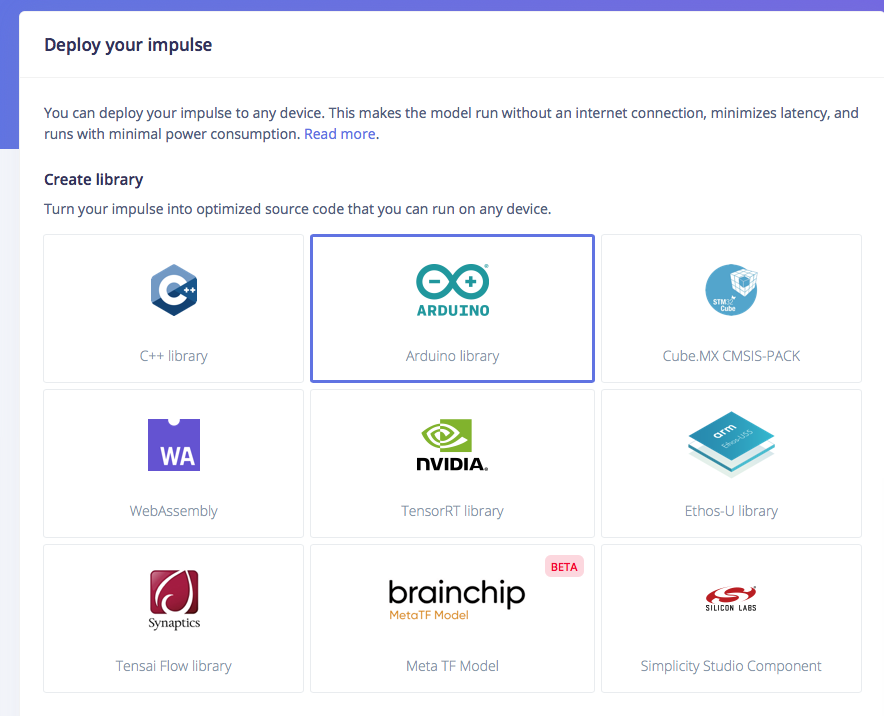
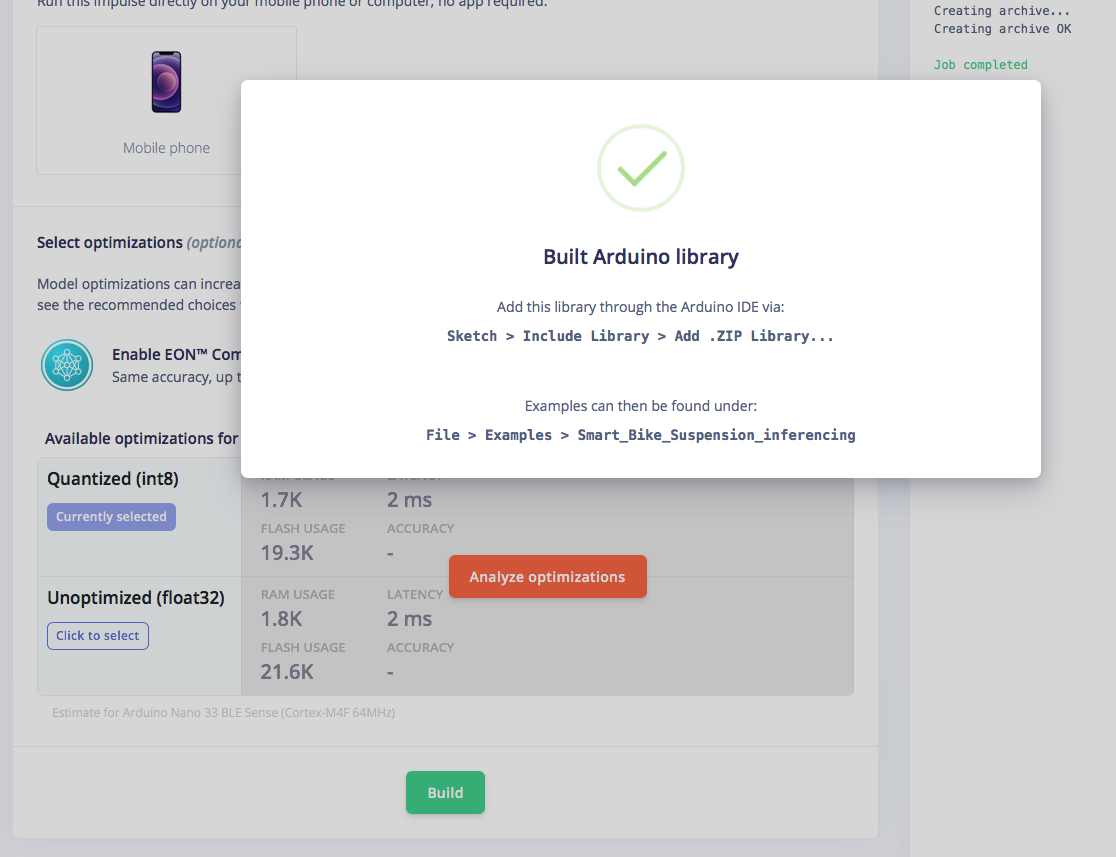
Now, we can start to deploy the model to Arduino Nano 33 BLE Sense. Click on deploy your impulse, choose Arduino Library, then click Build. The .ZIP library will be downloaded then open your Arduino IDE to add this library. After that you can find examples in menu File > Examples > Smart_Bike_Suspension_inferencing Upload it to your Nano 33 BLE Sense, open Serial monitor then try to simulate motion on your Nano 33 BLE Sense.
If your motion simulation detected by BLE Sense correctly, the we can move on final step, attach to servo and apply it on the bike suspension to test it on the real conditions.
Step 5: Modify code, attach and test
We need to modify the example file above which is embedded with the trained model in order to convert the output to the desired servo rotation. So if the detected condition is idle or smooth, the servo will turn the suspension knob to lock position. If the road conditions are pavement or when sprinting, the servo turns the knob to half open (medium). And if a very rough condition is detected, the servo will fully open the knob in order to maximize the suspension travel. The following is a modified arduino code that can be uploaded to the Nano 33 BLE Sense. (Arduino code attached in Code section)
Engineering & Implementation
- Data Acquisition via BLE:
- The project utilizes the Arduino Science Journal over Bluetooth Low Energy (BLE). This allows the rider to visually monitor the accelerometer's "Ground Truth" during training sessions, ensuring that the labeled data precisely matches the physical terrain sensations.
- Power Rail Stabilization:
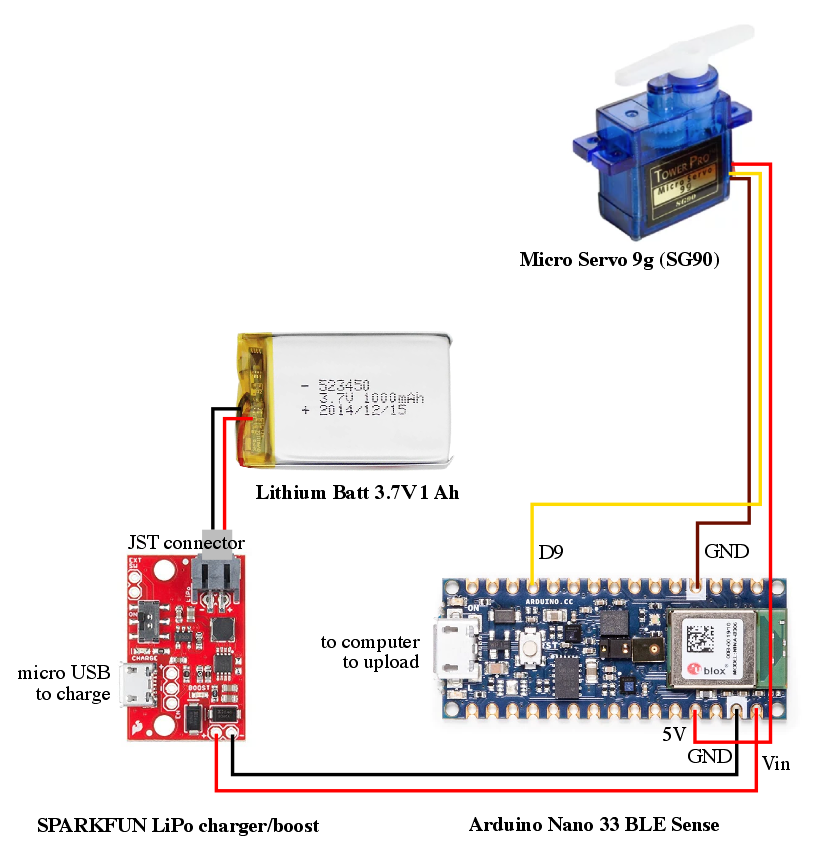
- To prevent NNR (Neural Network Reset) caused by motor noise, the 1AH Li-Ion battery is regulated through a 5V Booster. This provides a steady logic voltage for the Nano 33 BLE Sense while delivering the peak current required by the servo motor during high-speed valving changes.
- Active Damping Mechatronics:
- Servo-to-Valving Actuation: The output of the TinyML model is mapped to a micro-servo. The servo is coupled to the suspension fork’s compression valve via custom 3D-printed gears.
- High Probability Rough: Full Open (Maximum travel).
- High Probability Sprint/Smooth: Locked (Maximum pedaling efficiency).
- Mixed Terrain: Medium damping.
- Servo-to-Valving Actuation: The output of the TinyML model is mapped to a micro-servo. The servo is coupled to the suspension fork’s compression valve via custom 3D-printed gears.
- Mechanical Integrity:
- The 3D-printed mounting bracket and gears are engineered to withstand the extreme vibrations of off-road cycling. The design accounts for the "Hard-Stop" limits of the suspension fork, preventing the servo from stripping gears during a lockout command.
For installing servo components on bike suspension, we need to design servo mounting brackets with gears which are connected to the upper suspension knob (needs to mod the design for different suspension types and brands). <3D design file attached in other section>
We have tested it in the real conditions and make it happen the idea of “smart” bike suspension. This project also has the potential to maximize its use in sport cycling activities such as MTB (cross country, trail, downhill) with complex conditions such as climbing, jumping, dropping, cornering, and data can be retrieved by involving professional athletes so the output setting of the suspension is better. scalable, and more “smart”.
You can check this real world test video:
Conclusion
AI-Ride demonstrates that AI isn't just for data centers; it belongs on the trail. By mastering the intersection of Inertial Forensics and Robotic Actuation, this project provides a professional-grade framework for the next generation of "Thinking Machines" in the sports and mobility sectors.