As a Halloween fanatic, I needed a way to sync up the Costco Skeleton punk rocker animatronic with the Lowe's Bluetooth Reaper Band animatronics. Once I figured out what I needed to do it was surprisingly easy. This little project will keep the punk rocker animation going for as long as the music is playing, just like the Lowe's Reaper Band animatronics do.
I wanted a good way to sync them up, and do it nondestructively so I wouldn't have to cut or splice any wires and the whole thing could be undone if necessary.
The Reaper Band and Punk Rocker look great together, but they are entirely different products and concepts from different manufacturers and retailers. The way they work is completely different - the Reaper Band acts as a Bluetooth speaker and can synchronize animation between the two different props, and the Punk Rocker will only play from his own prerecorded 30-second bits, triggered by either a timer, a continuous mode, or a motion sensor.
Using Arduino, we can override that motion sensor and continuously trigger it as long as the Reaper Band is playing music, instead of waiting for motion to trigger it.
Project Overview
"Rocker-Sync" is a high-level masterclass in Animatronic Interoperability. Typically, holiday props from different retailers (Costco vs. Lowe's) operate on closed, proprietary ecosystems. This project utilizes an Arduino Uno to perform real-time signal translation, intercepting the analog "Sync" pulses from a Lowe's Reaper Band Leader and converting them into digital trigger commands for a Costco Skeleton Punk Rocker. The result is a seamless, multi-prop performance where the entire band activates in perfect union with the music.
Disclaimer
The usual stuff applies. I am not a professional and I am not responsible if you hurt yourself or damage your expensive props trying this out.
How It Works
The Reaper Band syncs up to each other by using a small cable to plug one into the other. When music is playing, the Reaper Band prop set to "Leader" sends an analog signal to the Reaper Band prop set to "Follower".
As long as it's getting a signal, the "Follower" prop animation keeps playing. We need the Costco Punk Rocker to do the same thing.
The Arduino will listen to the analog signal coming the Reaper Leader and if it detects sound, it will send a pin up/pin down signal to the Punk Rocker, just like its motion sensor would, triggering an animation sequence while the music is playing.
Technical Deep-Dive
- Protocol Translation Forensics:
- The Reaper Band Sync Logic: The "Leader" Reaper Band prop emits an analog signal (quantized between 1 and 1024) that corresponds to audio peaks. In its native state, this signal only talks to other "Follower" Reaper Band units.
- Arduino Proxy Mode: The Arduino polls pin A5 to monitor this analog stream. By analyzing the voltage level, the system identifies the "Active Playback" state. If the signal is greater than zero, the Arduino assumes the "Leader" is performing and dispatches a trigger.
- PIR Motion Sensor Overriding:
- Bypassing the Passive Infrared (PIR) Trigger: The Punk Rocker is normally triggered by a low-fidelity motion sensor. The Arduino hijacks the "Green" signal wire of this sensor's ribbon cable. By pulsing Digital Pin 2 (PIN HIGH/LOW), the Arduino emulates a motion detection event, forcing the Punk Rocker into its performance cycle continuously as long as music is detected.
- Non-Destructive Tapping: The hardware forensics focus on "back-probing" the existing connectors with jumper wires and securing them with shrink tubing. This preserves the original warranty and allows the system to be reverted to its factory state.
- Signal Repeating & Daisy-Chaining:
- GND-Referenced Synchrony: To maintain the original "Reaper Follower" chain, the Arduino must act as a signal repeater. By outputting a PWM signal on Pin 3 (referenced to a common GND), the Arduino re-broadcasts the "Sync" signal to subsequent props, preventing the chain from breaking at the hub.
Basic Workflow
1.) The Reaper Band Leader sends an analog signal its Follower, with a value of 1-1024 for the audio signal, or 0 for paused/no audio
2.) Arduino is connected to output cable from the Leader, and if it detects the signal (1-1024) then it will do what the motion sensor normally does and send PIN HIGH/PIN LOW digital command to the Punk Rocker's electronics
3.) OPTIONAL - if you have a "Follower" Reaper Brand Prop, use Arduino to send the analog signal back out to him to run the animation.
Engineering & Implementation
- Voltage Mapping & Safety:
- The sync signals between these props often operate at standard 5V logic. However, the project emphasizes the use of Common Ground (GND) between the Arduino and both props to ensure signal integrity and prevent floating-pin errors which could cause erratic animations.
- Pulse Dynamics:
- The Punk Rocker plays in 30-second bits. The Arduino logic is tuned to maintain the "High" state on the trigger wire, effectively "Stacking" the animation sequences so the drummer never stops while the Reaper Leader is active.
- Hacking Proprietary Connectors:
- The project identifies the 3-pin DuPont connector architecture inside the Lowe's props, detailing which pins are data-active (Gray/Green) and which are ground (Black), providing a blueprint for the "Silent" pins that must be bypassed.
Wiring
From the Leader Reaper Band prop, use the Output/Input wire that was included with him. (if you're good with making wires, crimping, etc you could create a DuPont connector to this, but I just plugged in a couple of male/male jumper wires and secured them with shrink tubing.
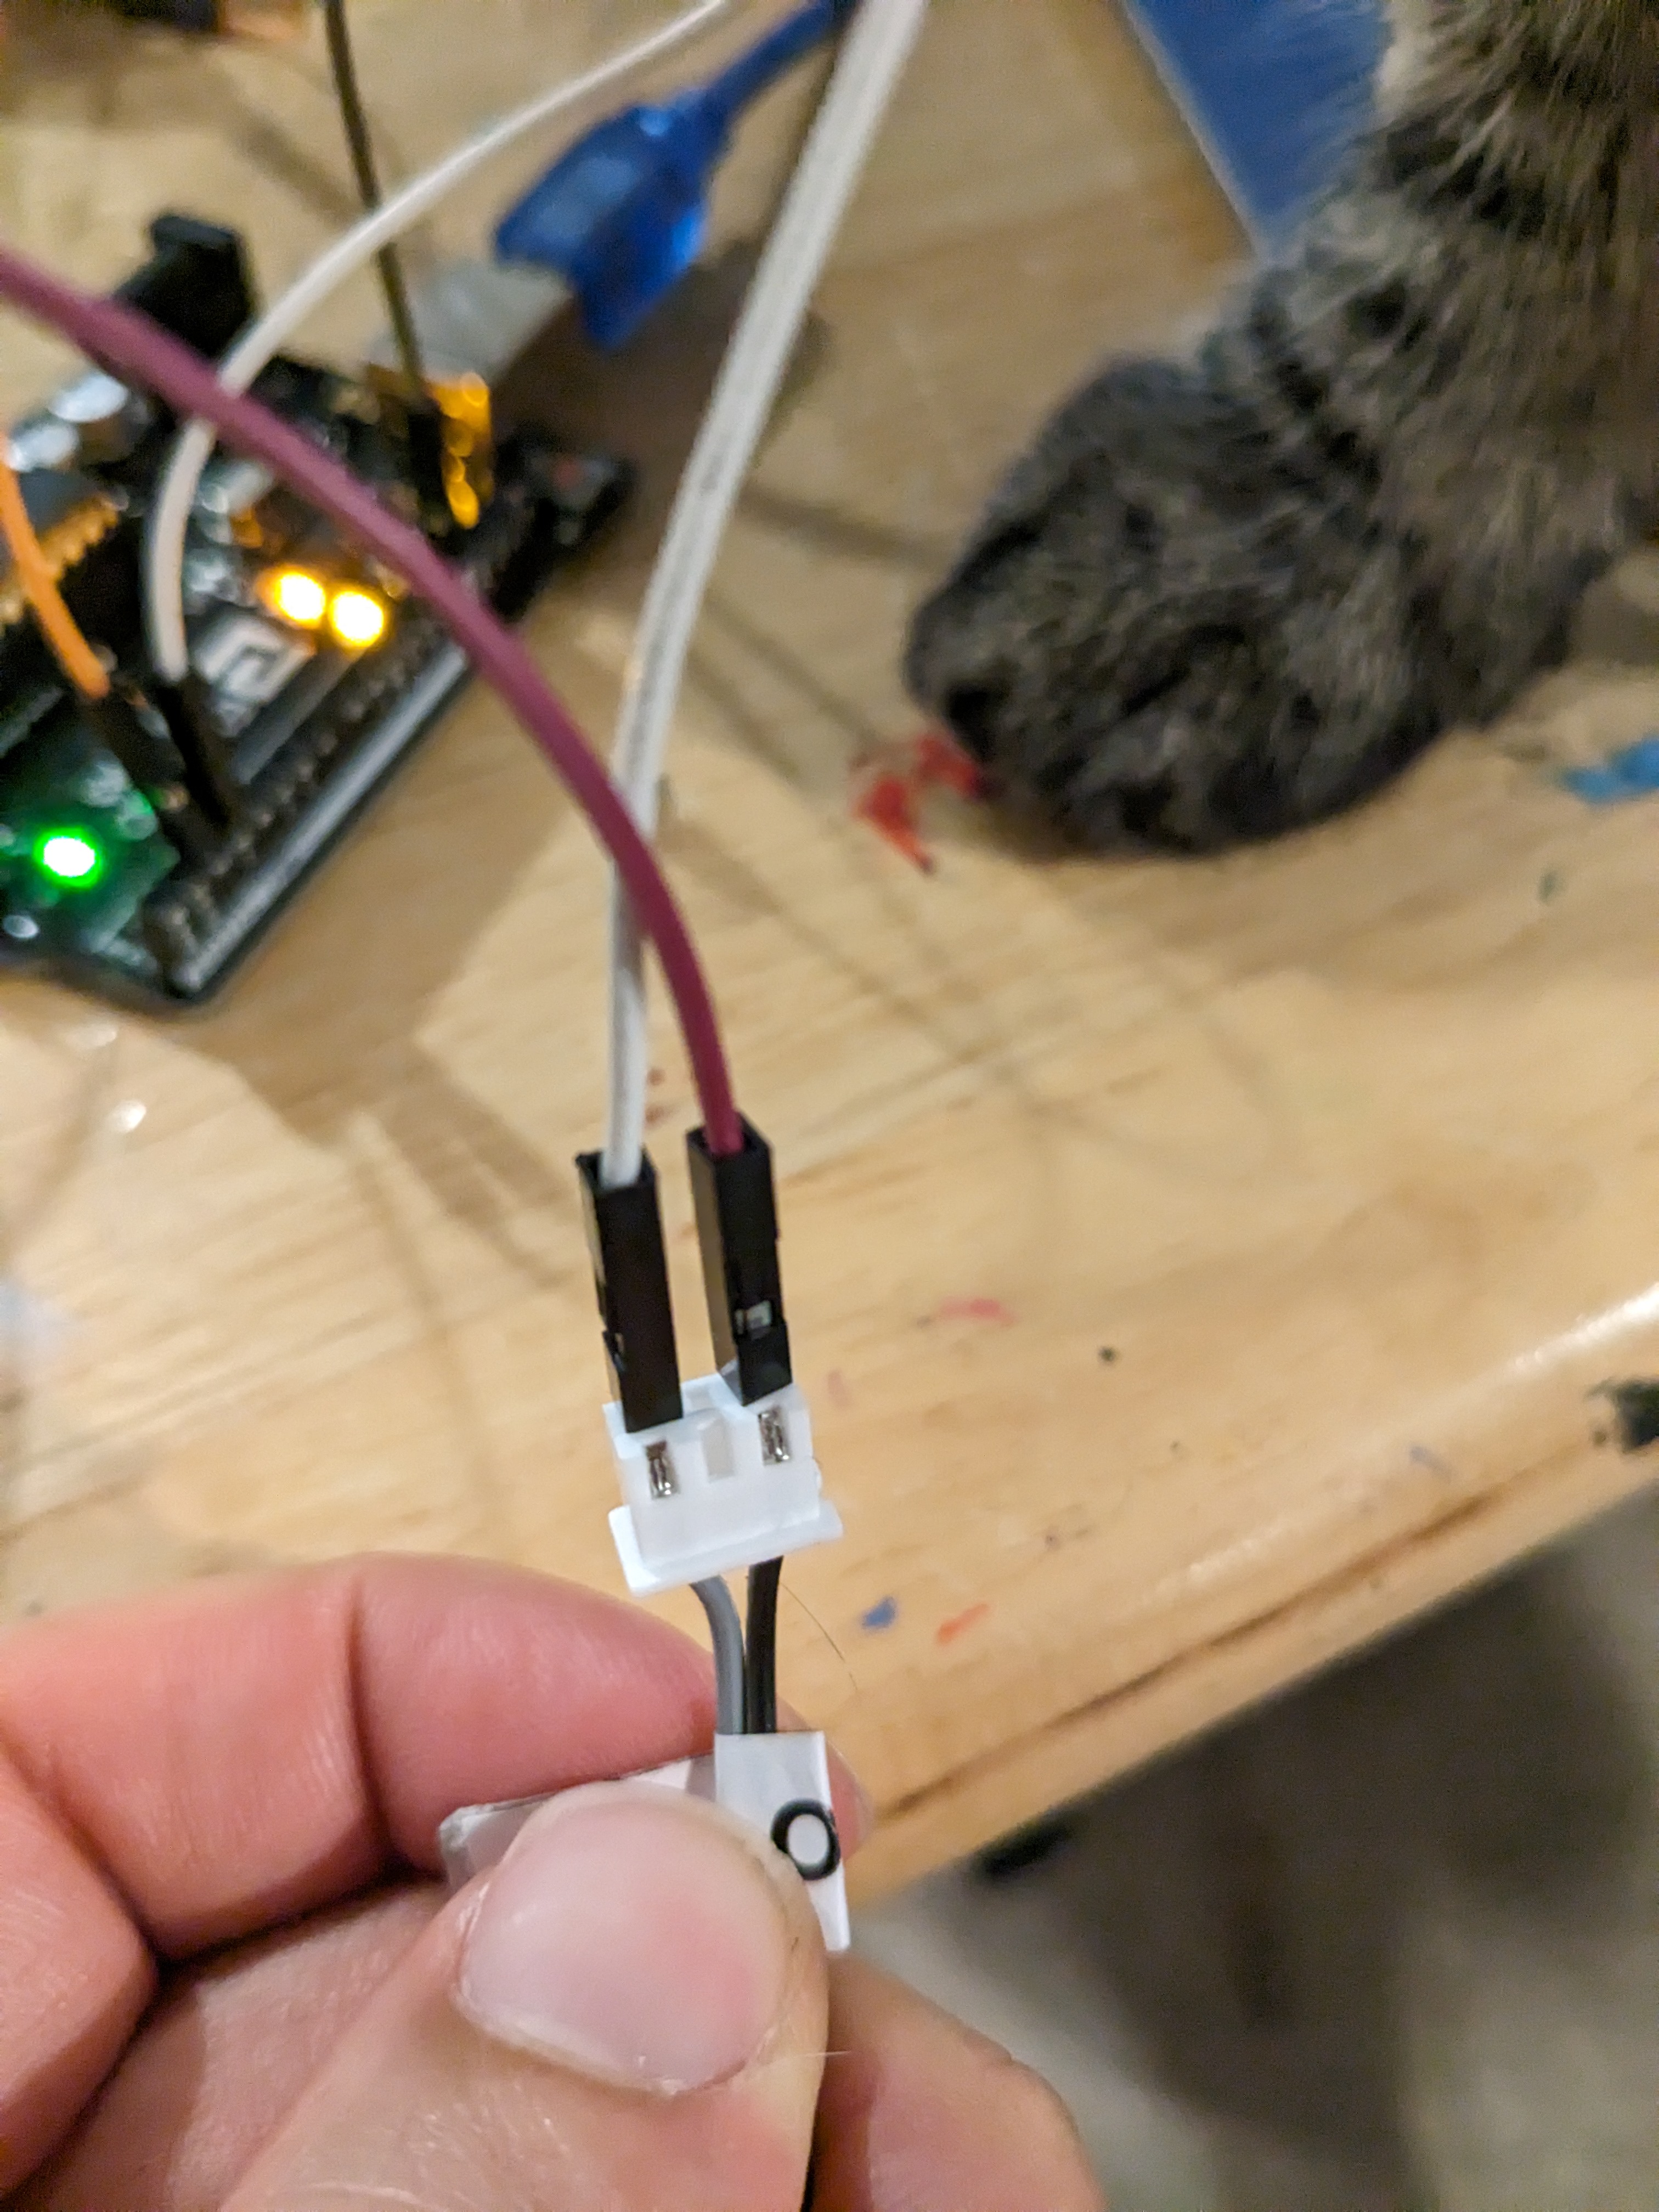
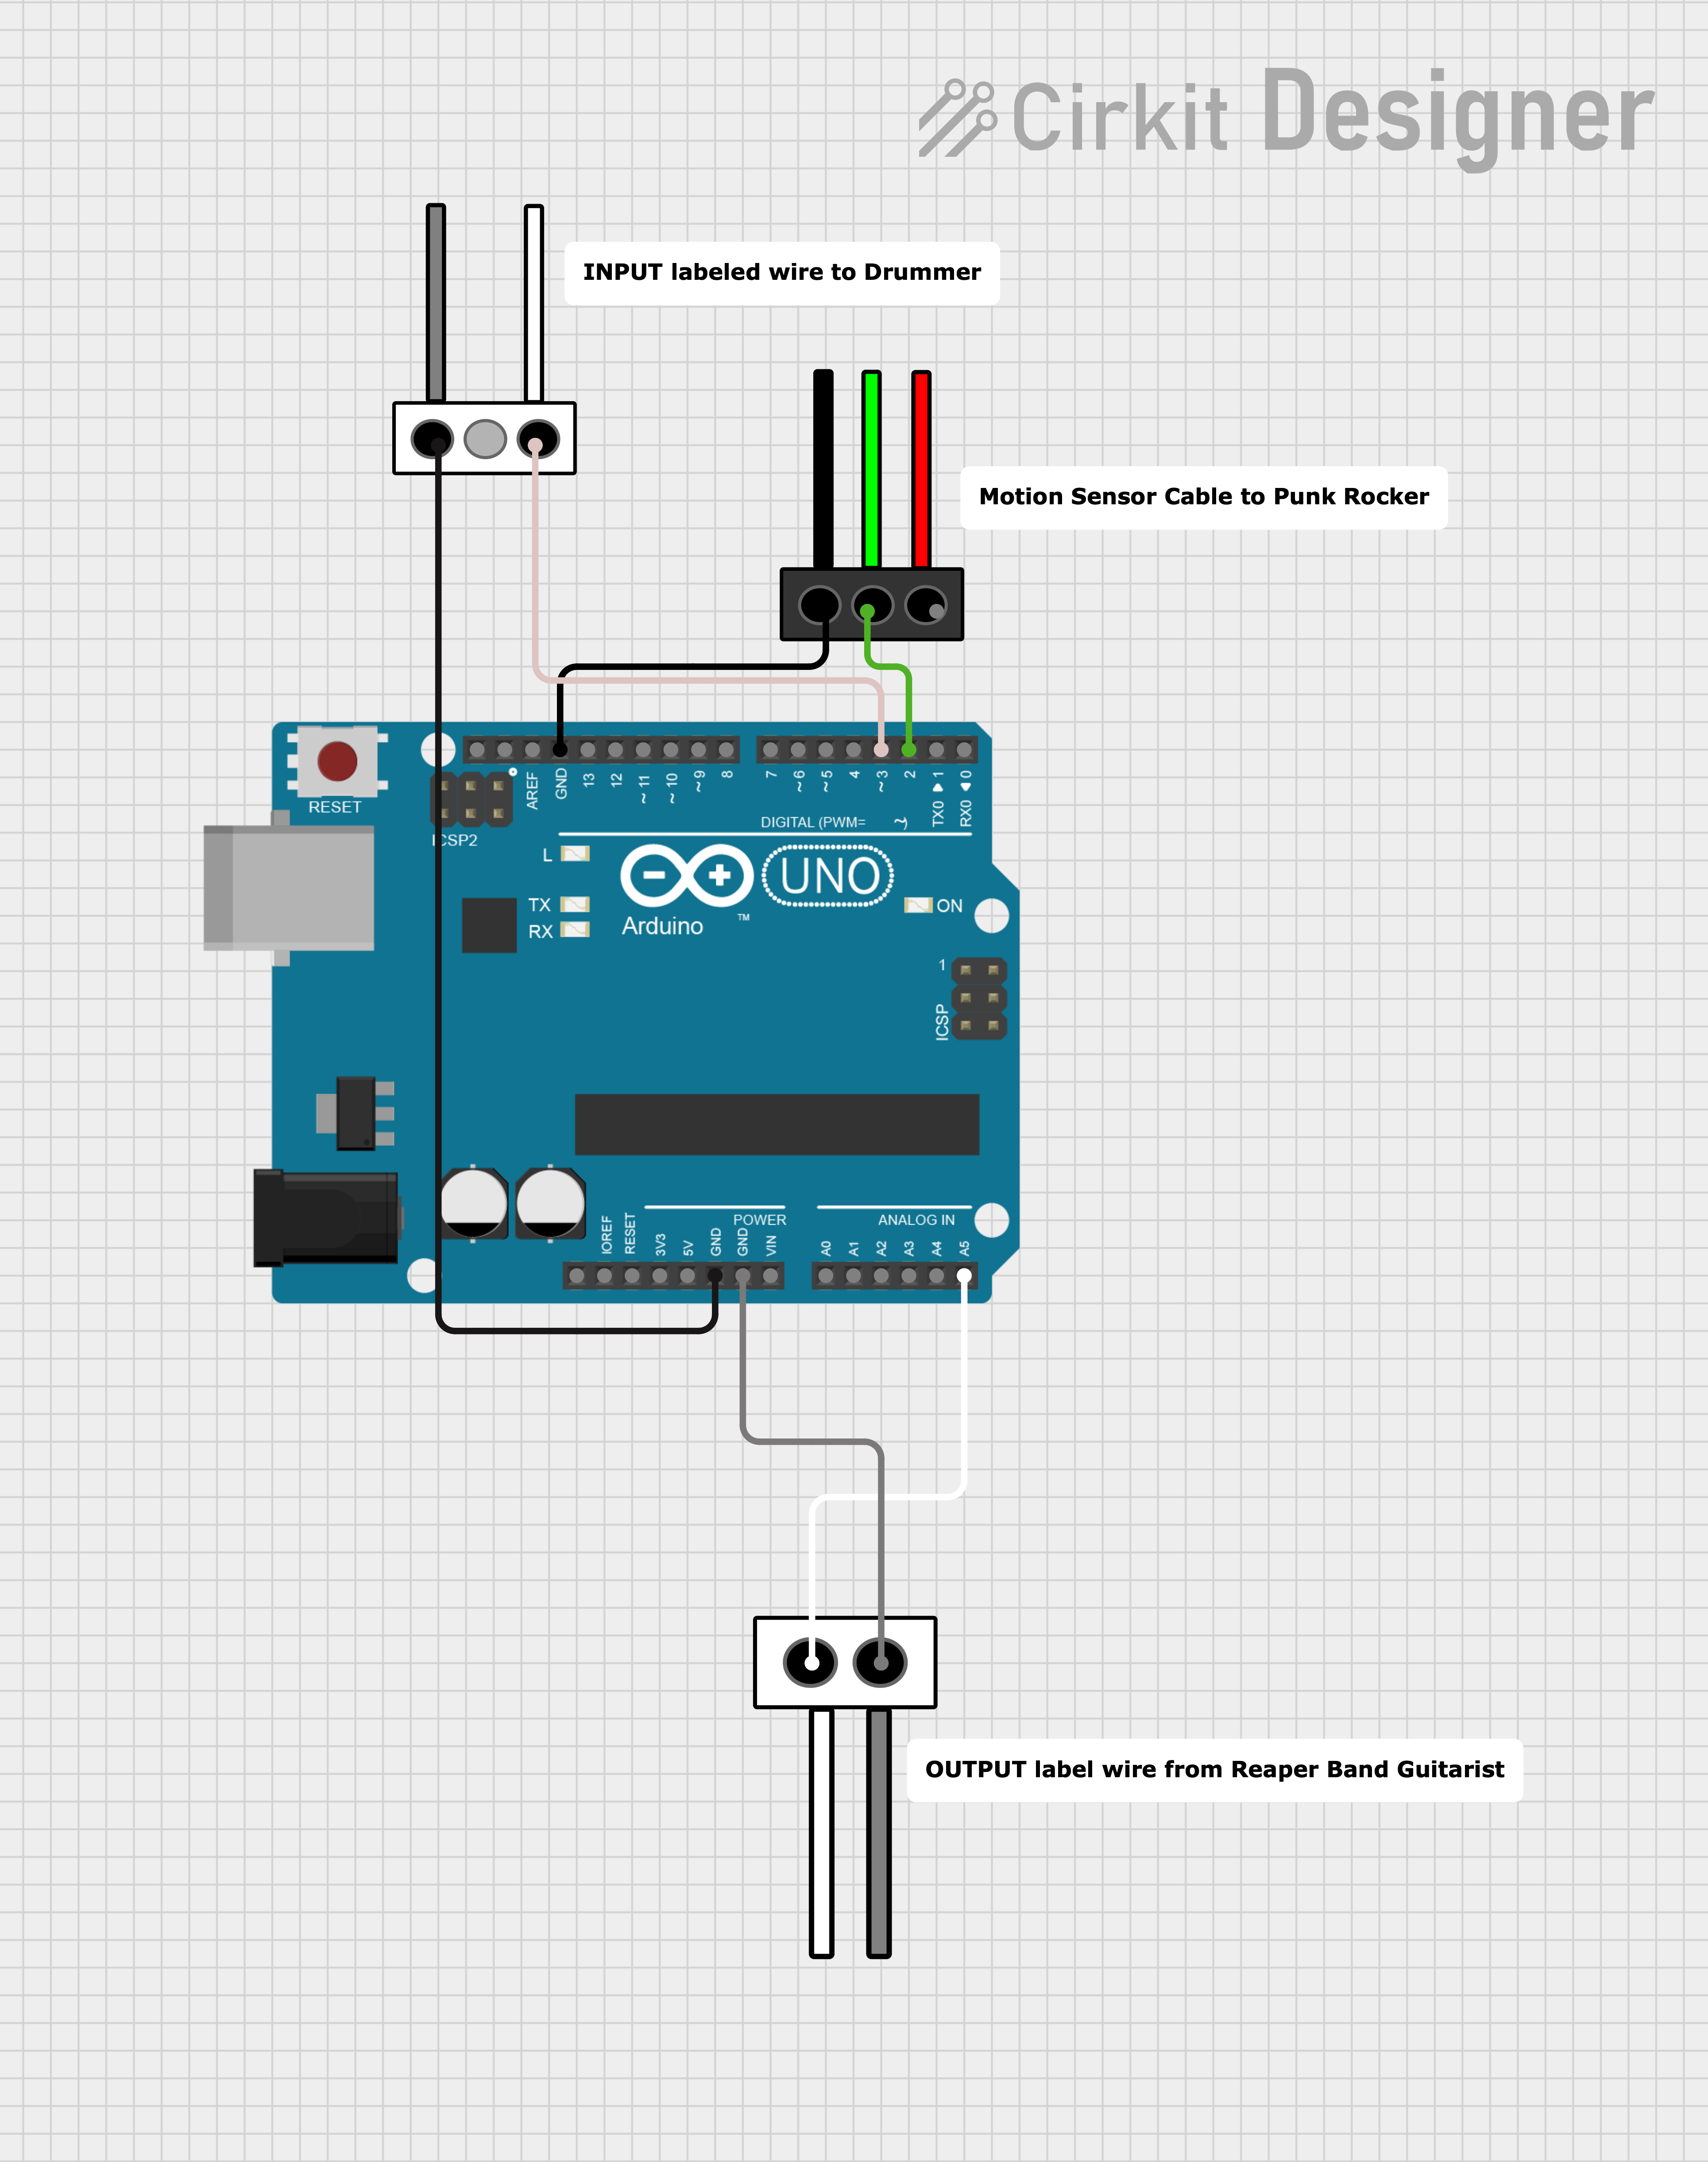
You can then easily connect the output wire to the Arduino. From the Reaper Leader, connect the output wire to pins A5 (gray wire) and GND.
Next, connect the Arduino output to the Punk Rocker. Using digital pin 2 in the Arduino to the green wire inside the Punk Rocker's motion sensor, and the black wire to GND. We no longer need the red wire on this particular ribbon. Again, I just used jumper wires but if you want to make your own connections that works too.
Optional - Connecting a Follower Reaper Band prop
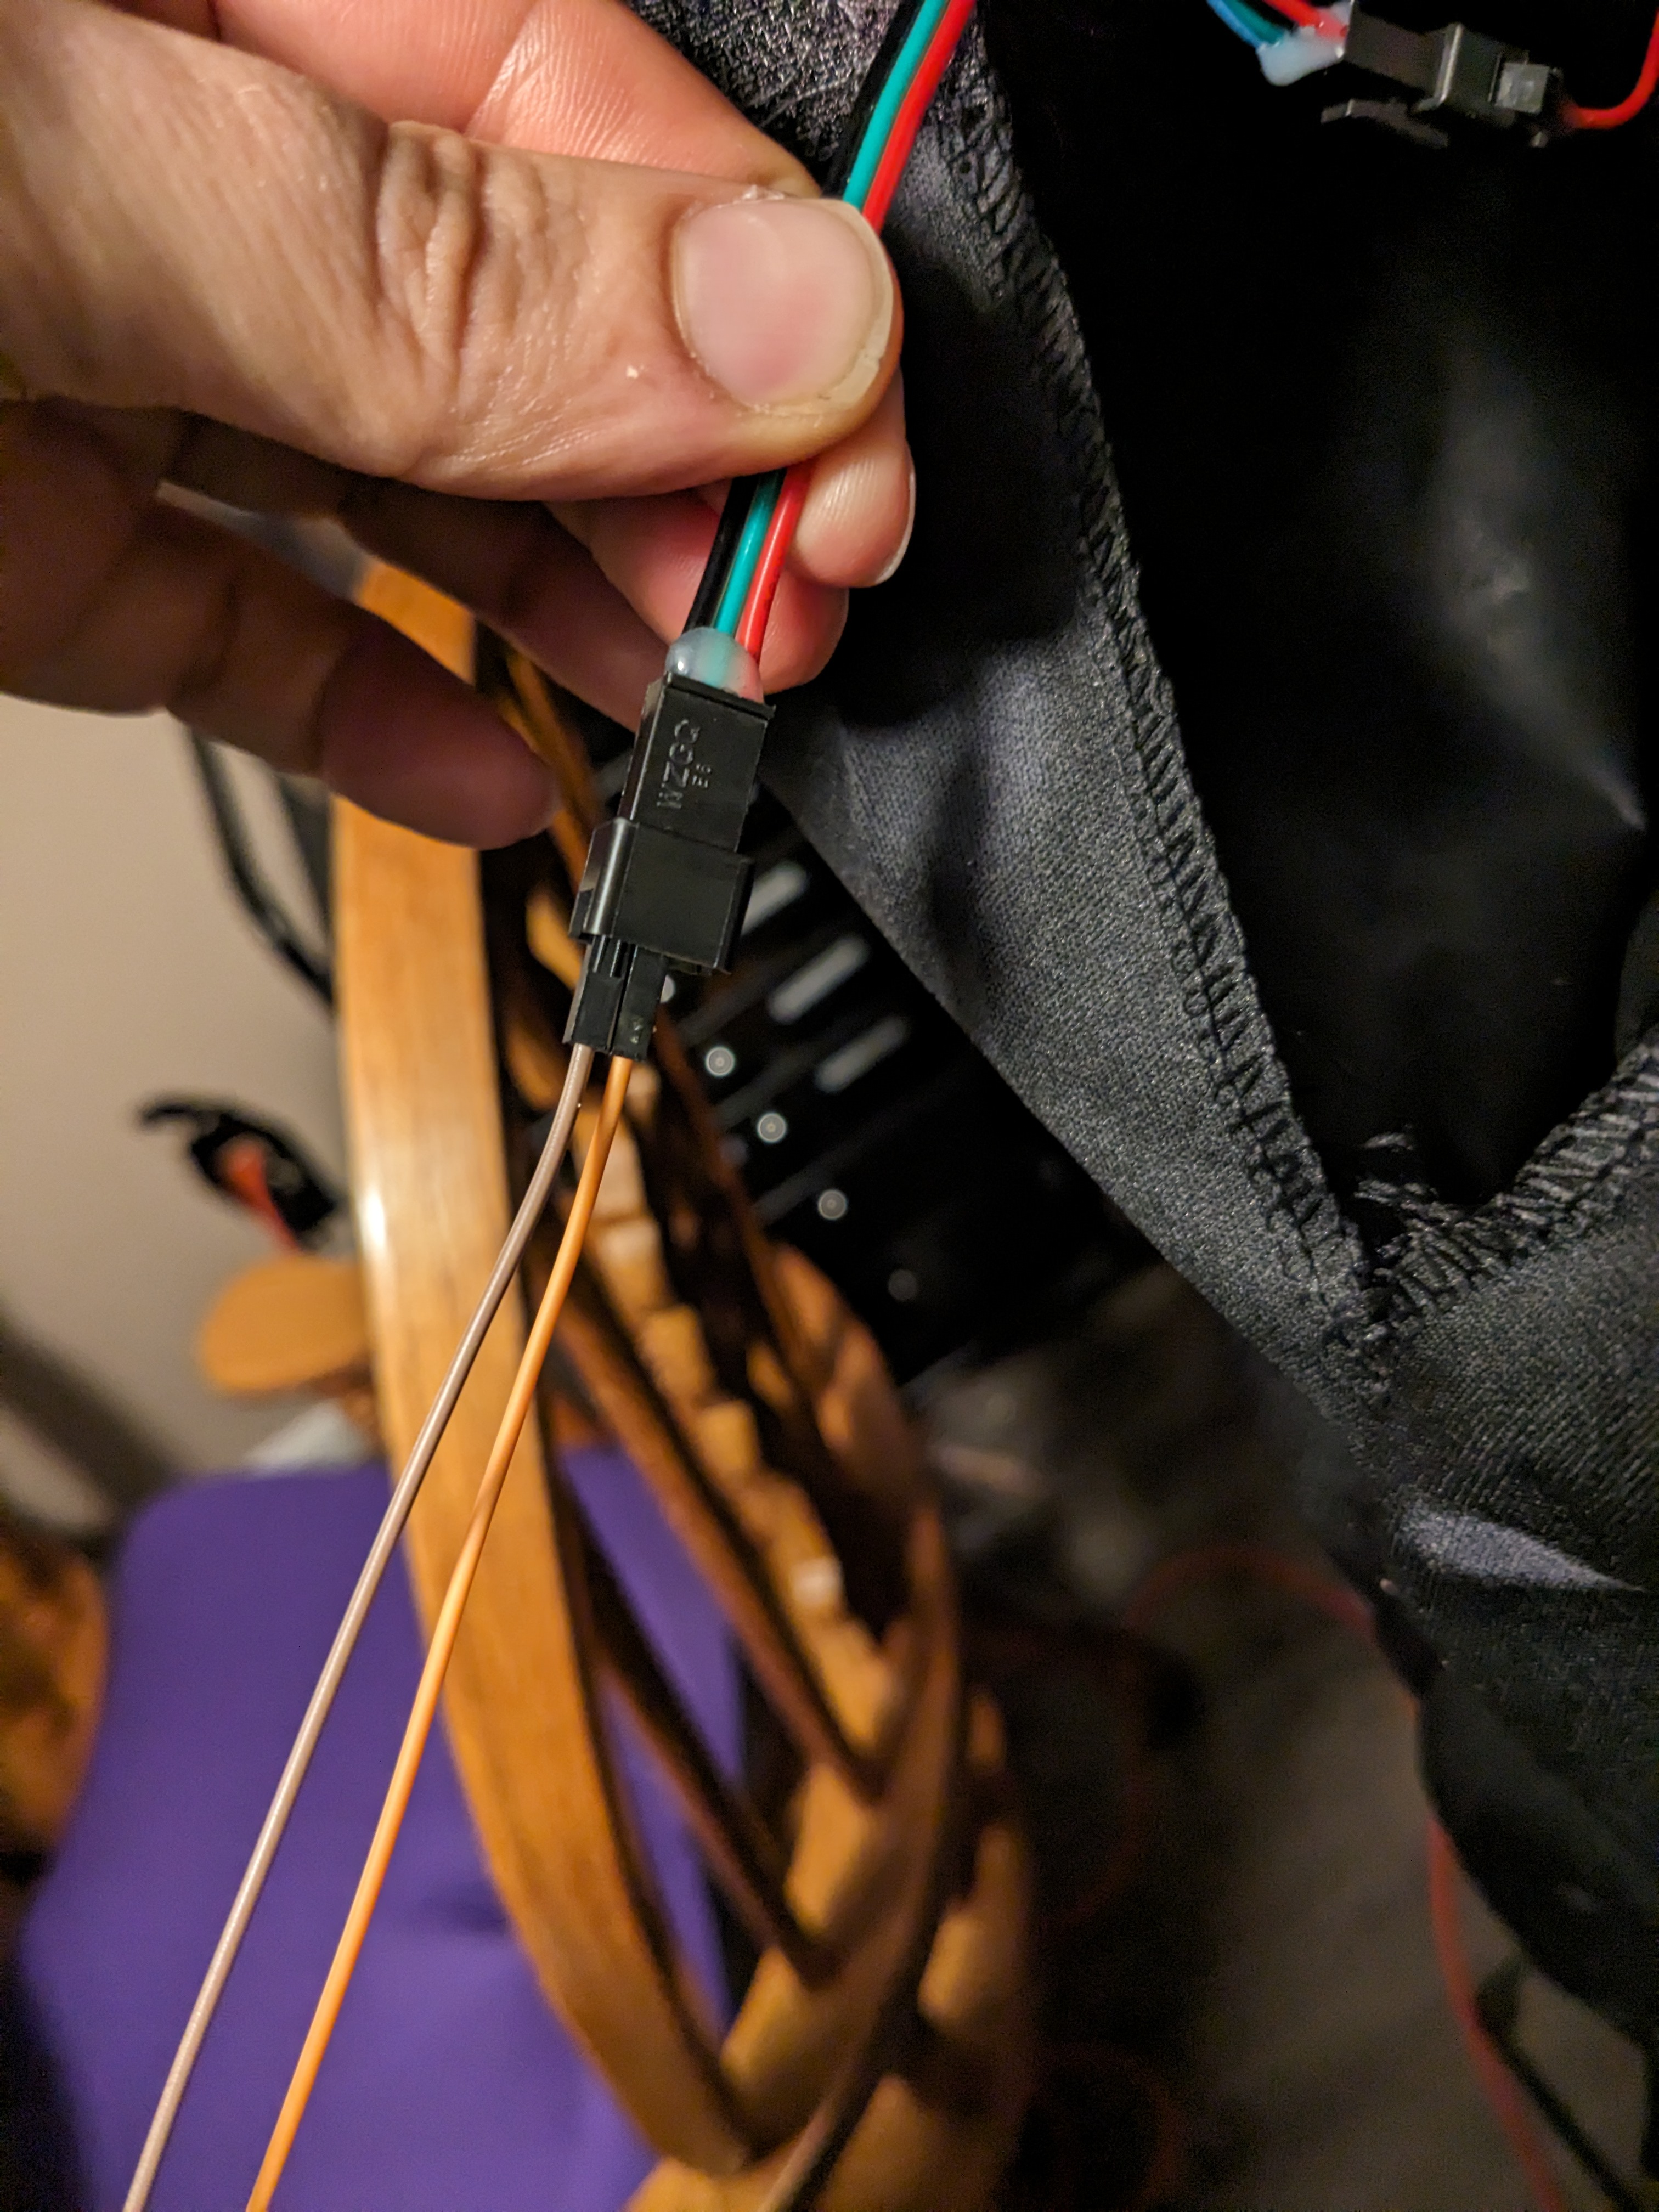
If you have a second Reaper Band prop you want to make into a follower, there's now a problem - we've already used the included Input/Output wire to connect to the Arduino. Luckily, both Reaper Band props include their own Input/Output wires, so we can use the second one to take the signal back out of the Arduino and into the second prop. Connect this one to GND and Pin 3. (do not use 5 or 6 for analog output here, it sends too high of a signal and the animation will never stop.)
Wiring Diagram
I labeled this according to how I set mine up, but you don't necessarily need to have Guitarist as leader and Drummer as follower. Also worth noting - the input/output cable included with the drummer has a 3-pin Dupont connector on one end with only two wires, the middle pin is not used.
Conclusion
Rocker-Sync proves that different manufacturers' "closed" systems can be unified through creative Signal Forensics. By mastering the art of Analog-to-Digital Trigger Conversion, animatronics enthusiasts can create complex, stadium-style light and motion shows using standard retail hardware.
Unified Performance: Mastering the prop-net through signal forensics.
Code is included in the normal code section. Happy Haunting!