The system of several Arduino interconnected by an I2C bus is not new. But many people are not aware of this possibility and the advantages of such a joint connections between several Arduino. There are also difficulties in understanding the interaction of sketches on multiple devices.
My version of such connections – the project of the URB (Universal Railway Bus) was designed for railway modellers. But its capabilities can be applied anywhere. First of all, I will give a simple example that will show you the main advantage of such a system.
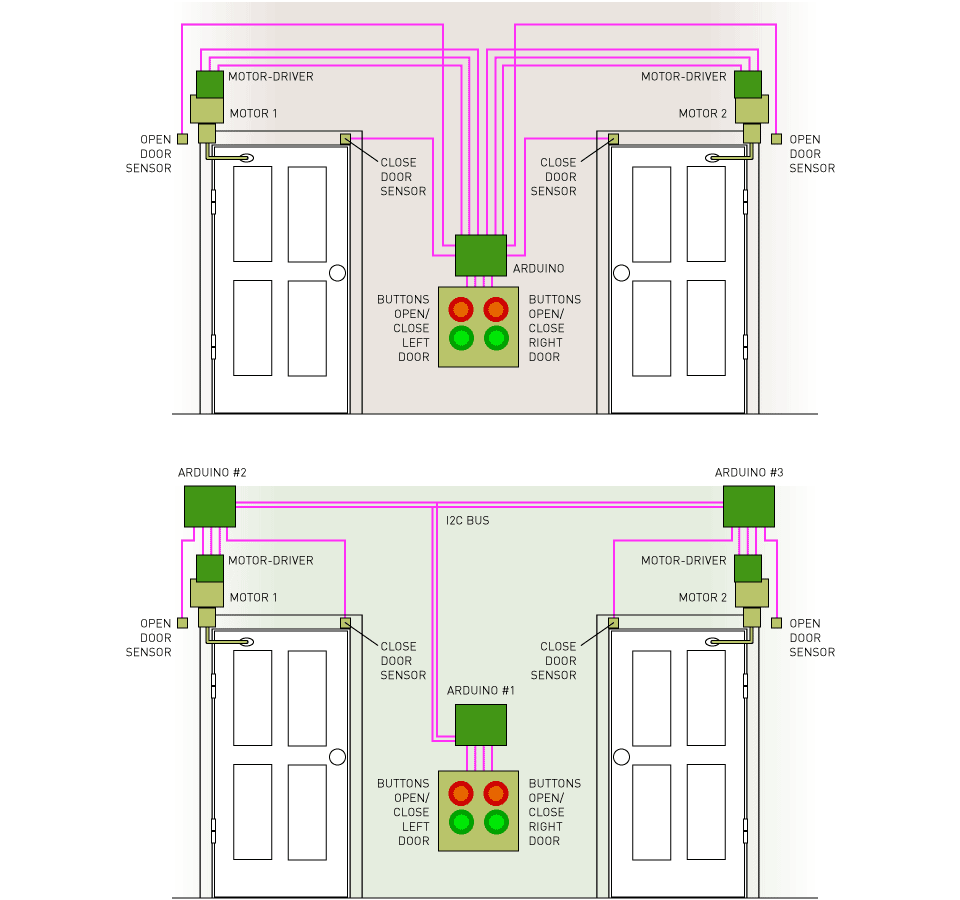
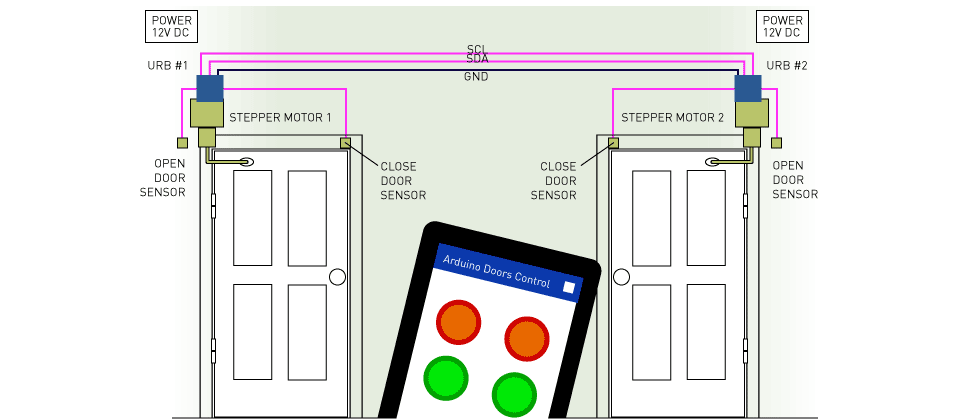
This two pictures with doors only shows the concept. When you press corresponding buttons, the DC motor rotate in different directions and, according to commands from the sensors, reduce the speed, and then stop.
In the upper picture, the sketch must process the commands of the buttons and send control signals to the motor driver. When signals are received from the sensors, the sketch should change the rotational speed from maximum to zero over a certain time interval in order to ensure a smooth closing of the door. Also, the sketch must lock the rotation of the motor in the wrong direction, for example, if you press the button to close the door when it is in the closed position. After that, you also need to add a similar algorithm for the second door. Obviously, the code of this sketch will be large.
If you use local Arduino (#2 and #3) controlling each of its motor and receiving commands from its sensors, then the Arduino #1 sketch is reduced to a few lines. Just Now you need three sketches. The sketches of Arduino #2 and #3 are the same, and also simpler than the sketch on first picture. In addition, the number of wires is significantly go down.
Again, this is a fictional example. It will work in reality, but at large distances you need to use another version of the I2C bus - RS485. Nevertheless, you can see on the video how I2C bus works with railway barriers.
Conclusion: Combining multiple Arduino simplifies programming and reduces the number of wires, it also allows you to locally configure your devices and quickly find faults. By dividing the system into functional blocks and checking them separately. Also, the problem of insufficient number of I/O pins is solved – just add one more Arduino! Arduino NANO is very cheap a board!
For railway modellers
Any modeller encountereddifficulties in creating electronics for a railway layout. This is a lot of wires, thecomplexity of connecting devices and their compatibility among themselves, andmost importantly the inability to add or change something in the finishedlayout without dramatic changes in the wiring. These shortcomings are absent in the URB concept. All wiring between the blocks is made up of four wires. For example, if you need to put a few new turnouts, or signals, or sensors, or streetlights on the layout, you just cut the four-wire bus in the nearest place and insert another a URB unit. It remains only to upload the sketch, and your newly installed pieces are immediately integrated into the layout. At any time you can reprogram already installed URBs directly at your's layout, you just need to leave the opportunity to reach it with a mini-USB cable. This way you can change the control or setting of any layout's devices, and replace it if necessary. Another plus is theability to experiment with each URB independently of others, and solve problem to look for possible malfunctions in electrical parts on layout. It isalso possible to assemble URBs with peripheral modules separately on the table.You'll tune the prototype and then will transfer it to the layout. This allows you to realize your ideas much faster.
URB system consists of software and hardware. The software is described in detail on my website and is called Protocol 2. The hardware is a universal connectors board and named URB unit. You can program sketches yourself or use examples from my site. In any case, thanks to the standardization of the code under Protocol 2, it will be more convenient for you to use a system of several Arduino. And I do not use complex code in my examples. All Protocol 2 is based on the classical sketches from Arduino IDE.
URB unit
Not necessary to use specialized hardware in the URB project. You can use a breadboard with wires or any shields. But it is very uncomfortable! And to avoid this, I came up with a URB (Universal Railway controller Block) unit.
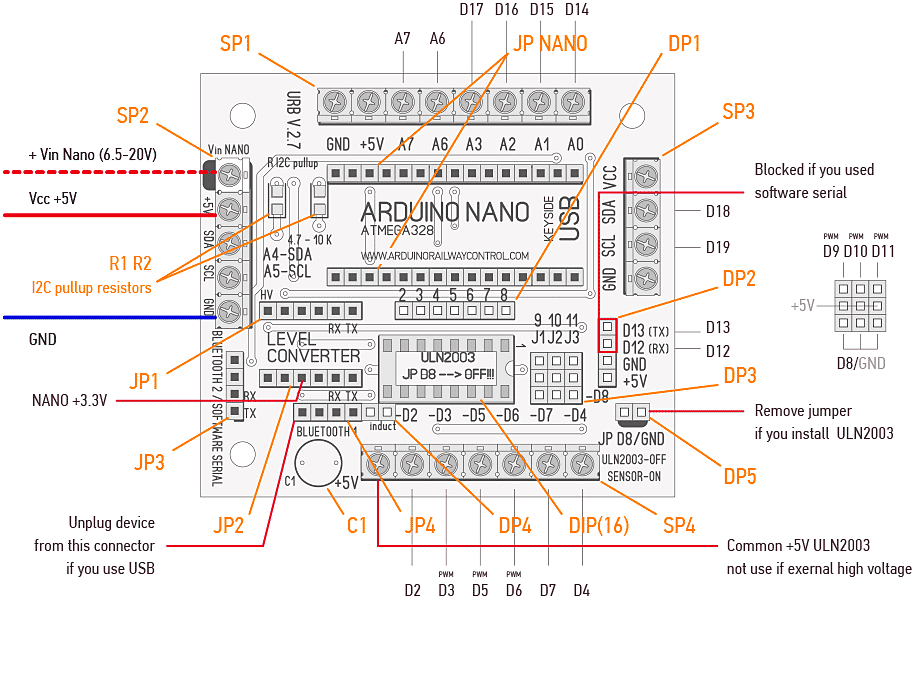 URB 2.7
This board uses Arduino NANO. Therefore, the dimensions of URB's are only 65x75 mm. The board is designed to avoid incorrect connection of Bluetooth modules and Arduino NANO. To the functions of Arduino, the board (URB unit) adds the following capability:
- Connectors for two Bluetooth HC-05 (HC-06) modules
- Direct plug 3 servos or direct plug 3 any Arduino sensors
- Direct plug relay block
- Direct plug motor-driver aka L298 or similar
- Convenient screw connections
- 6 (7) High-Current outputs (Up to 0.5A per channel)
- High-Voltage Outputs up to 50 V
- Reliable data exchange between the MCU (like Raspberry Pi) using 3.3 volt logic and Arduino
- Built-in I2C bus
- Optional: install I2C pull-up resistors and smoothing capacitor for power supply
Also, this board can not be broken, it only connectors. That is, if you accidentally burned the chips - just replace them on the board :)
Unfortunately, you have to independently solder connectors to this PCB.
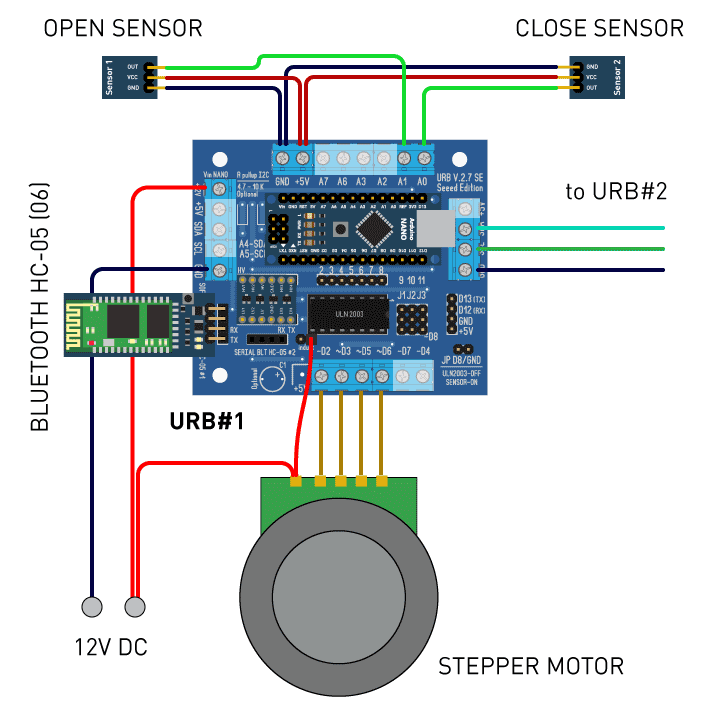
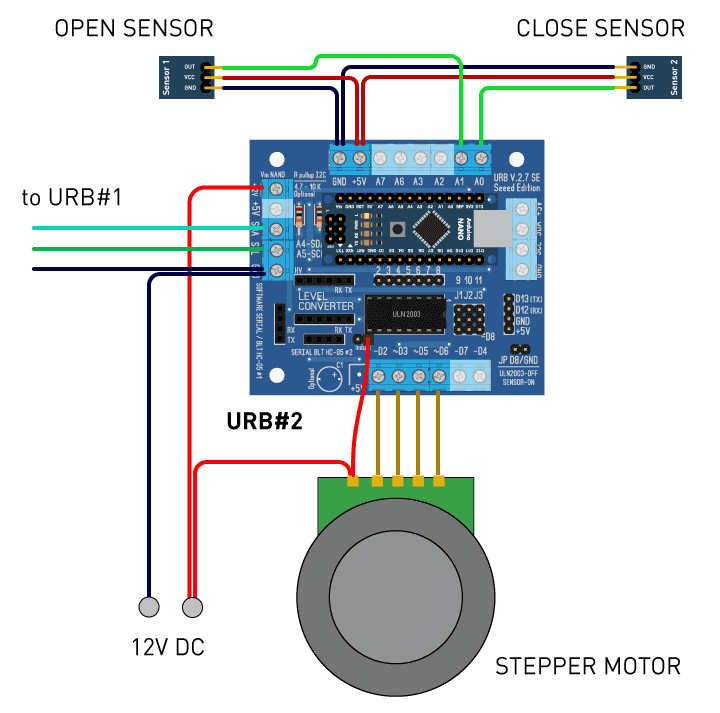
Simple network (working example)
Here I will give the simplest interaction of two URB units. The code of these two sketches is very simple. In addition, this example demonstrates the different combinations of same I/O pins on the URB unit. Also in this example, you can simultaneously test two serial ports with a connection without routing (point-to-point) and a I2C bus with routing, and the most interesting is their combinations. So yes, it is this scheme that allows you to simultaneously manage from two independent consoles above hundreds of devices on a railway layout or something else.
The system works as follows: after connecting the application to the URB #1 board via Bluetooth, when you press arrow-buttons, the servo will change its position. The same will happen when the infrared sensors triggering.
You can infinitely supplement this system with new devices and change the code, only you will need to use more powerful supply.
Your personal universal kit
Let's go back to the example of doors. If you use two URB units and powerful stepper motors at 12 volts, you will get such a design. As a control, you can use the Android application. If you are interested, I will write such an free application for doors control. And of course, instead of doors, you can use anything :)
Like from Lego cubes! From several URB units you can invent any systems with a minimum of wires and very simple programming and connecting.
I use these units in each of my projects or examples, and above all in the my home layout.
If you have a big robot
One more example. If your robot is very long, for example a crane, then it is easier to install several URB units and connect them with your crane control system than using a lot of wires and programming codes for platform drives, winches and cables.
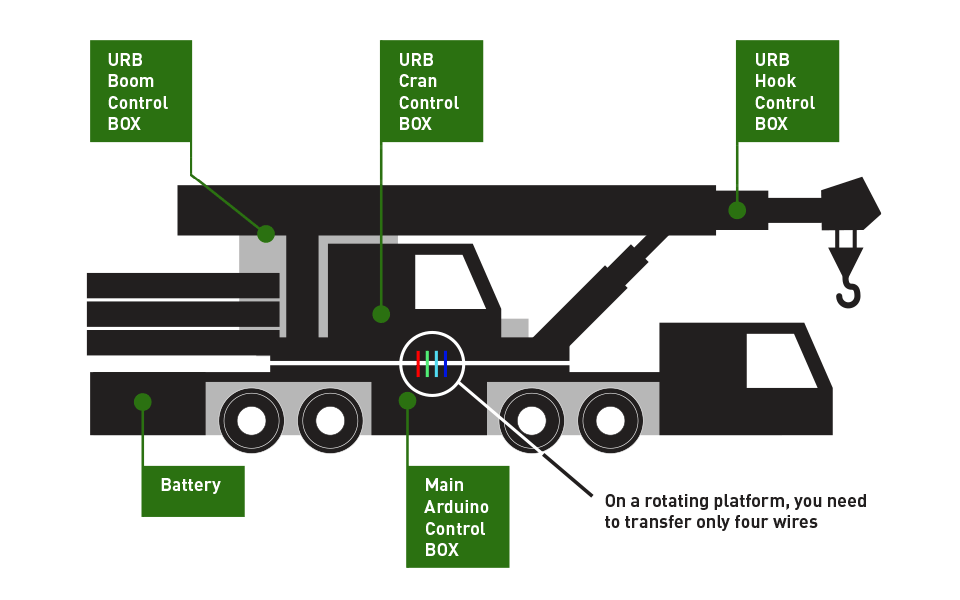 URB units for crane control
EXPANDED TECHNICAL DETAILS
Local Area Networking (LAN)
The URB (Universal Routing Bus) Unit is designed to simplify the networking of multiple Arduino boards.
- Bus Topology: Uses a shared physical communication link (often RS-485 or I2C) to allow dozens of Arduinos to talk to a central master unit.
- Addressing Logic: Each "Node" has a unique ID. The master unit handles the routing and collision detection, ensuring that data from one sensor-filled Arduino reaches the central database or actuator node reliably.
Demonstration Setup
In the "Arduino Train DEMO," the URB units manage the complex state of a model railroad:
- Sensors: Detecting train positions.
- Actuators: Controlling switches and signal lights.
- Synchronization: Ensuring that the entire multi-node system acts as a single, cohesive network, demonstrating the power of modular embedded networking.
Sorry for my bad English. You can correct this post.