About The Project
Arduino with Tiny ML opens up endless possibilities for creative projects in the field of arts. With this combination, you can create spaces to play music, light shows, and even smart sculptures that respond to moves in defined spaces.
Smart sculptures are art pieces that incorporate technology to create movement and interactivity. They use motors, sensors, and other electronic components to bring life to otherwise static objects.
For example, if you attach a board with a ML model to your jacket, you can move and it will detect for a light show a movement that responds with music, changing colors and Smart sculptures in sync with the movements.
Built With
With a lot of love, motivation to help others Arduino, Edge impulse studio and Python, using:
- Arduino Nicla Sense ME
- Edge Impulse Studio
- The iconic K-way rain jacket
- Edge Impulse CLI
- Arduino IDE
- Arduino Nano RP2040
- Arduino Opla IoT Kit
- Raspberry Pi 4 (just to install the broker)
- Robot (I used one build with Lego’s)
- Spotify Account
- Any projector or display with HDMI connection
Setup
To setup the Linux Machine (Debian) you need to install the following libraries. Before installing the libraries in Linux run the following code lines in the debian terminal:
sudo apt update
sudo apt upgrade
After updating and upgrading we will write the following command, to install the Mosquitto Broker enter these next commands:
sudo apt install -y mosquitto mosquitto-clients
You’ll have to type Y and press Enter to confirm the installation. After the installation you need to write the following command to modify a file and this step will allow us to put as a public the mosquitto broker:
sudo nano /etc/mosquitto/mosquitto.conf
Once that you have open the file go to the end of the file without modifying the rest of the file and add this lines:
listener 1883
allow_anonymous true
press CTRL-X to exit and save the file. Press Y and Enter. Restart Mosquitto for the changes to take effect.
sudo systemctl restart mosquitto
To make Mosquitto auto start on boot up enter:
sudo systemctl enable mosquitto.service
Then to check the status of the mosquitto broker enter:
mosquitto -v
To use Mosquitto broker later on your projects, you’ll need your Linux IP address. To retrieve your IP address, type the next command in your Terminal window:
hostname -I
Also we need to install the libraries for Python to use in Thonny one of them is the Paho package and it provides a client class which enables applications to connect to an MQTT broker to publish messages, and to subscribe to topics and receive published messages. In this project, the Python script is going to publish messages to the Arduino Nano and Arduino WiFi MKR to turn the GPIOs on and off to control the lights and the buzzer.
To install paho-mqtt run the following command:
sudo pip install paho-mqtt
Also install the following libraries:
sudo pip3 install python-vlc
sudo pip3 install bluepy
sudo pip3 install buildhat
sudo pip3 install spotipy --upgrade
Arduino Setup in windows
I used the arduino IDE 1.8 and I install this libraries:
- PubSubClient library
- BHY2
- WiFi NiNa
- MKRIoTCarrier
- ArduinoBLE
Spotify setup
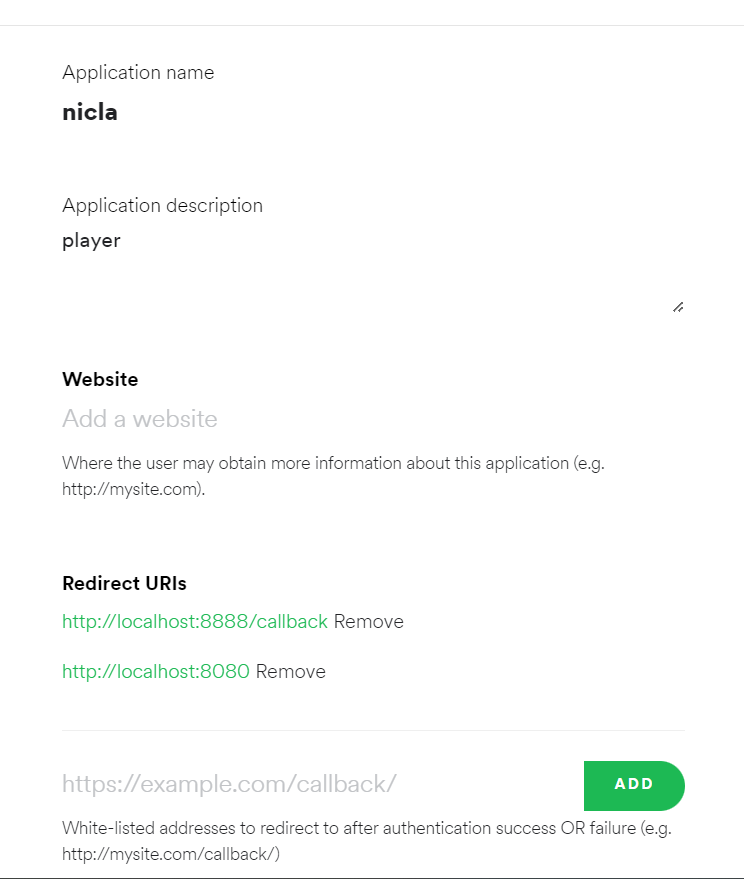
To setup the Spotify control in Linux we need to follow this steps, create an account in the spotify developers site, create a new project, then click in EDIT SETTINGS to do some changes, in the redirect URIs we need to add this lines that will be used in the Linux Machine:
http://localhost:8888/callback
http://localhost:8080
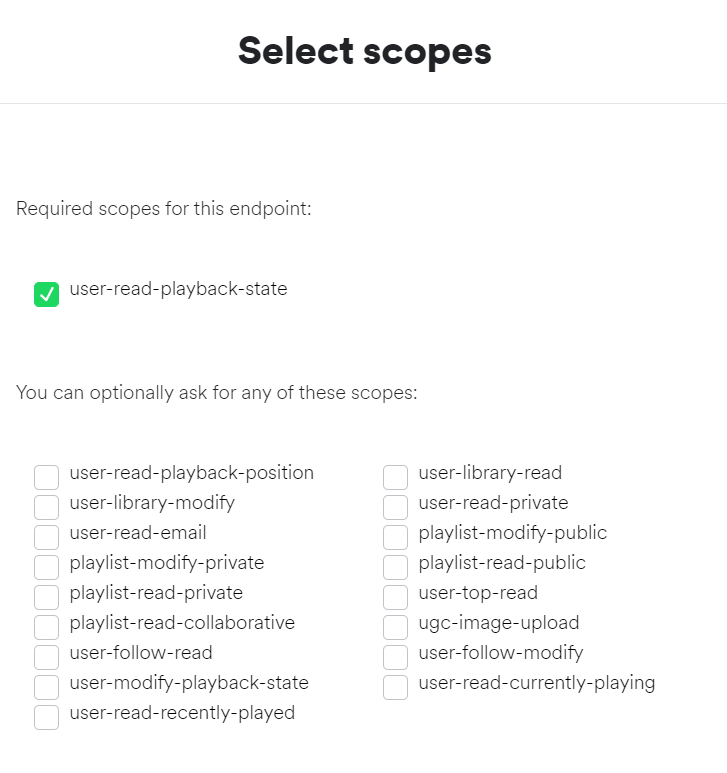
Then go to the next link: https://developer.spotify.com/console/get-users-available-devices/
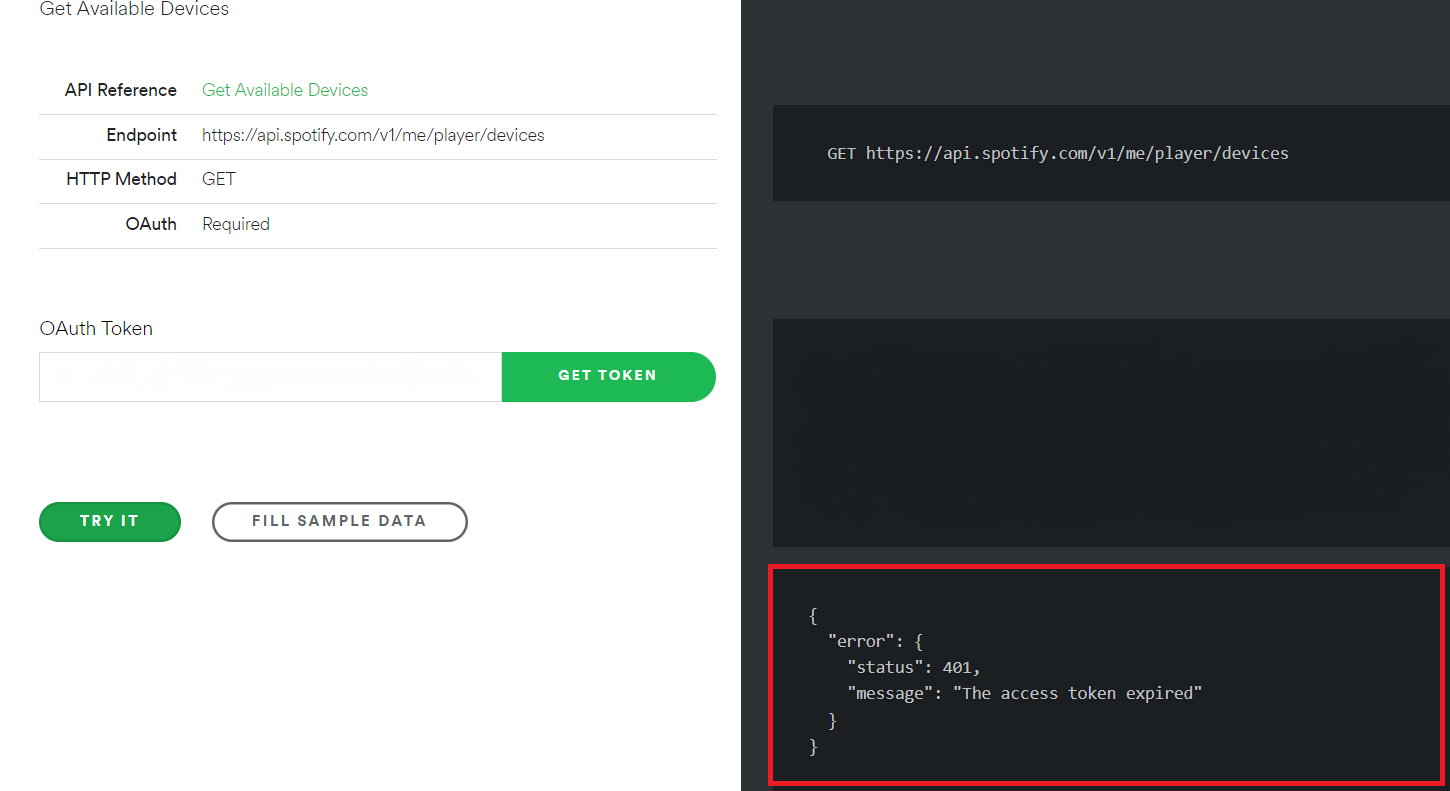
This page will allow you to obtain the Device ID that we need in the code to play the music in the device that we are going to dedicate with speakers, not necessarily the Linux machine could be a speaker with a spotify connection. Click GET TOKEN to see the next menu options and select the same option then click REQUEST TOKEN.
After this we will click in TRY IT and this will give us in the red square marked in the image below the Device ID and the name of the device to double check that we are selecting the right one, when you are doing this you need to play music in that device to not have errors, spotify needs to locate the devices that are playing or using spotify (I don’t show in the image below my data because is sensitive).
Also after this we have to run this Python script to log in with our credentials in the Linux machine to control remotely the device used (in my case my phone) to play music. When you run the output from the code is a link that allows you log in in Spotify and then you have to copy and paste that URL in the white space after the URL in the terminal used to run the code.
Edge Impulse setup and Model Training
To create the model I used the Arduino x K-Way - Outdoor Activity Tracker project in theEdge Impulse documentation site. I follow all the steps I just need to include that to record data using the command edge-impulse-data-forwarder after the installation of the Edge Impulse CLI it ask about the variables name and this need to match with the Arduino code that is used in the documentation so the variables will be:
accX, accY, accZ, gyrX, gyrY, gyrZ, heading, pitch, roll, rotX, rotY, rotZ, rotW
This image shows the accuracy from the Edge Impulse platform in my model.
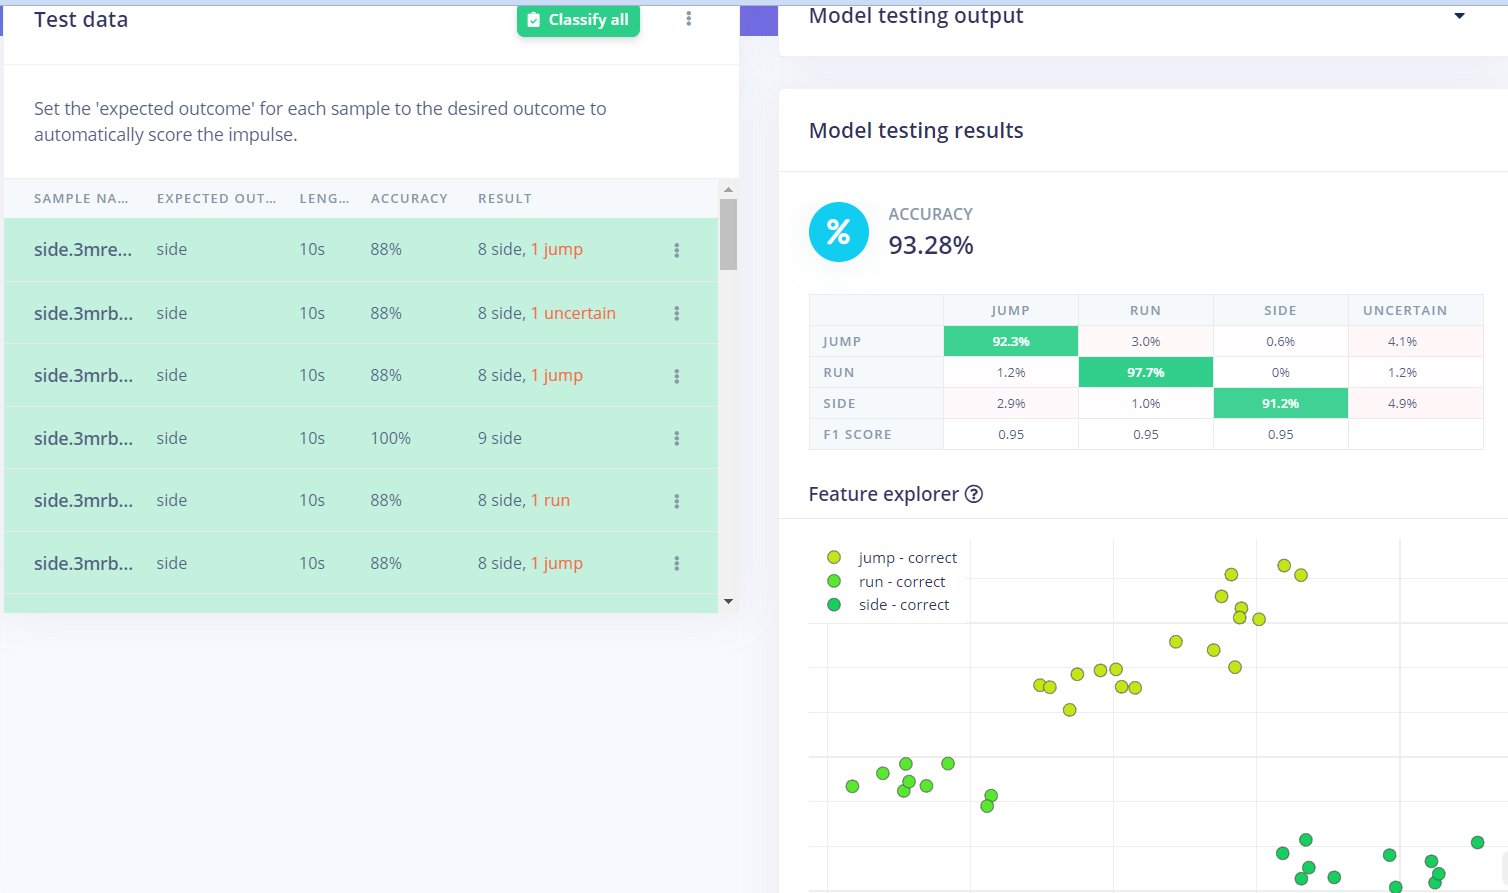
And this is my model in the Edge Impulse Studio platform that you need to include in the Arduino IDE as a library. Also you can download it as a ZIP file from this link .
Don't forget that you need the media for the projector used in this project go to this link to download it and use it.
Interactive spaces Script Running
Code preparation
Before running it, we need to change few code lines in the interactivespaces.py file, first we need to add the IP from our Linux machine were we set up the mosquitto broker:
broker_address="192.168.0.0" #put the ip from Raspberry as broker_address
Also we need to change in case is necessary the directory so make sure all the player lines have the right directory in your Linux Machine:
player= vlc.MediaPlayer('/home/pi/Desktop/model4/ink1.mp4')#change the directory
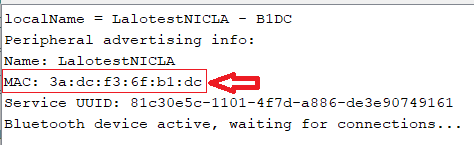
And change the MAC address from the Arduino board that you are using in this line:
p = btle.Peripheral("1a:b4:c0:25:3a:aa")#use the scanner.py file to obtain this BLE address for the NICLA
And one last thing that I need to mention is that to upload the code you have to install and set up PlatformIO with Visual Studio code, once you have done that upload the Arduino file BLE_model to the Nicla Sense ME.
Also to upload the code you have to install the library BHY2 1.0.4 which is the version that I used that runs correctly then you have to go to \libraries\Arduino_BHY2\src and look for this file BoschSensortec.h open it and change this value:
#define WORK_BUFFER_SIZE 2048
change it for:
#define WORK_BUFFER_SIZE 64
This will allows us to upload properly our model with the library BLE in the PlatformIO.
Workflow
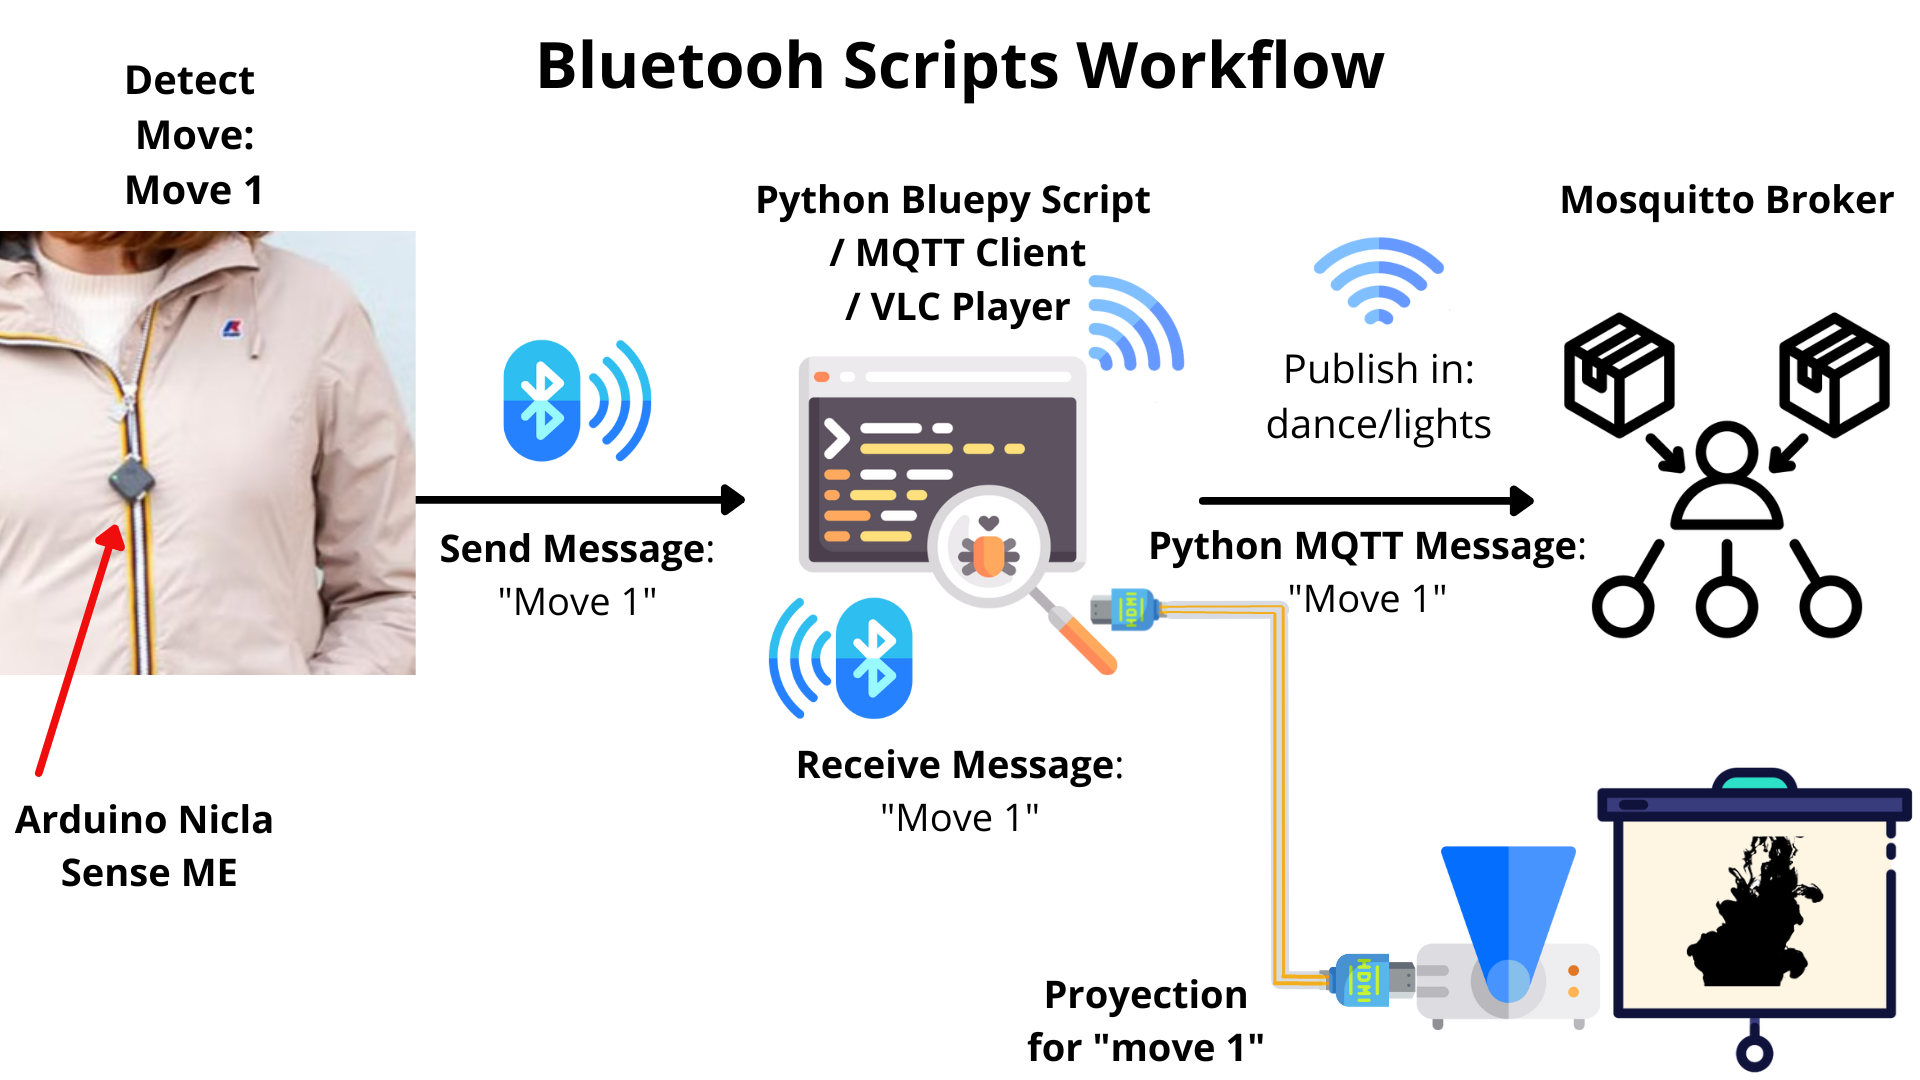
Now I would like to explain how it works this project let’s start with the Bluetooth workflow, first we have the Nicla board with the model so this board is connected to the Linux machine using a Python code to receive data from Arduino continuously every 2 seconds the Arduino is running the classifier to detect the movement and after this the movement is updated, for this project I have trained the movements: Jump, Run and Side (it refers to dance), depending on which was detected it will send a message.
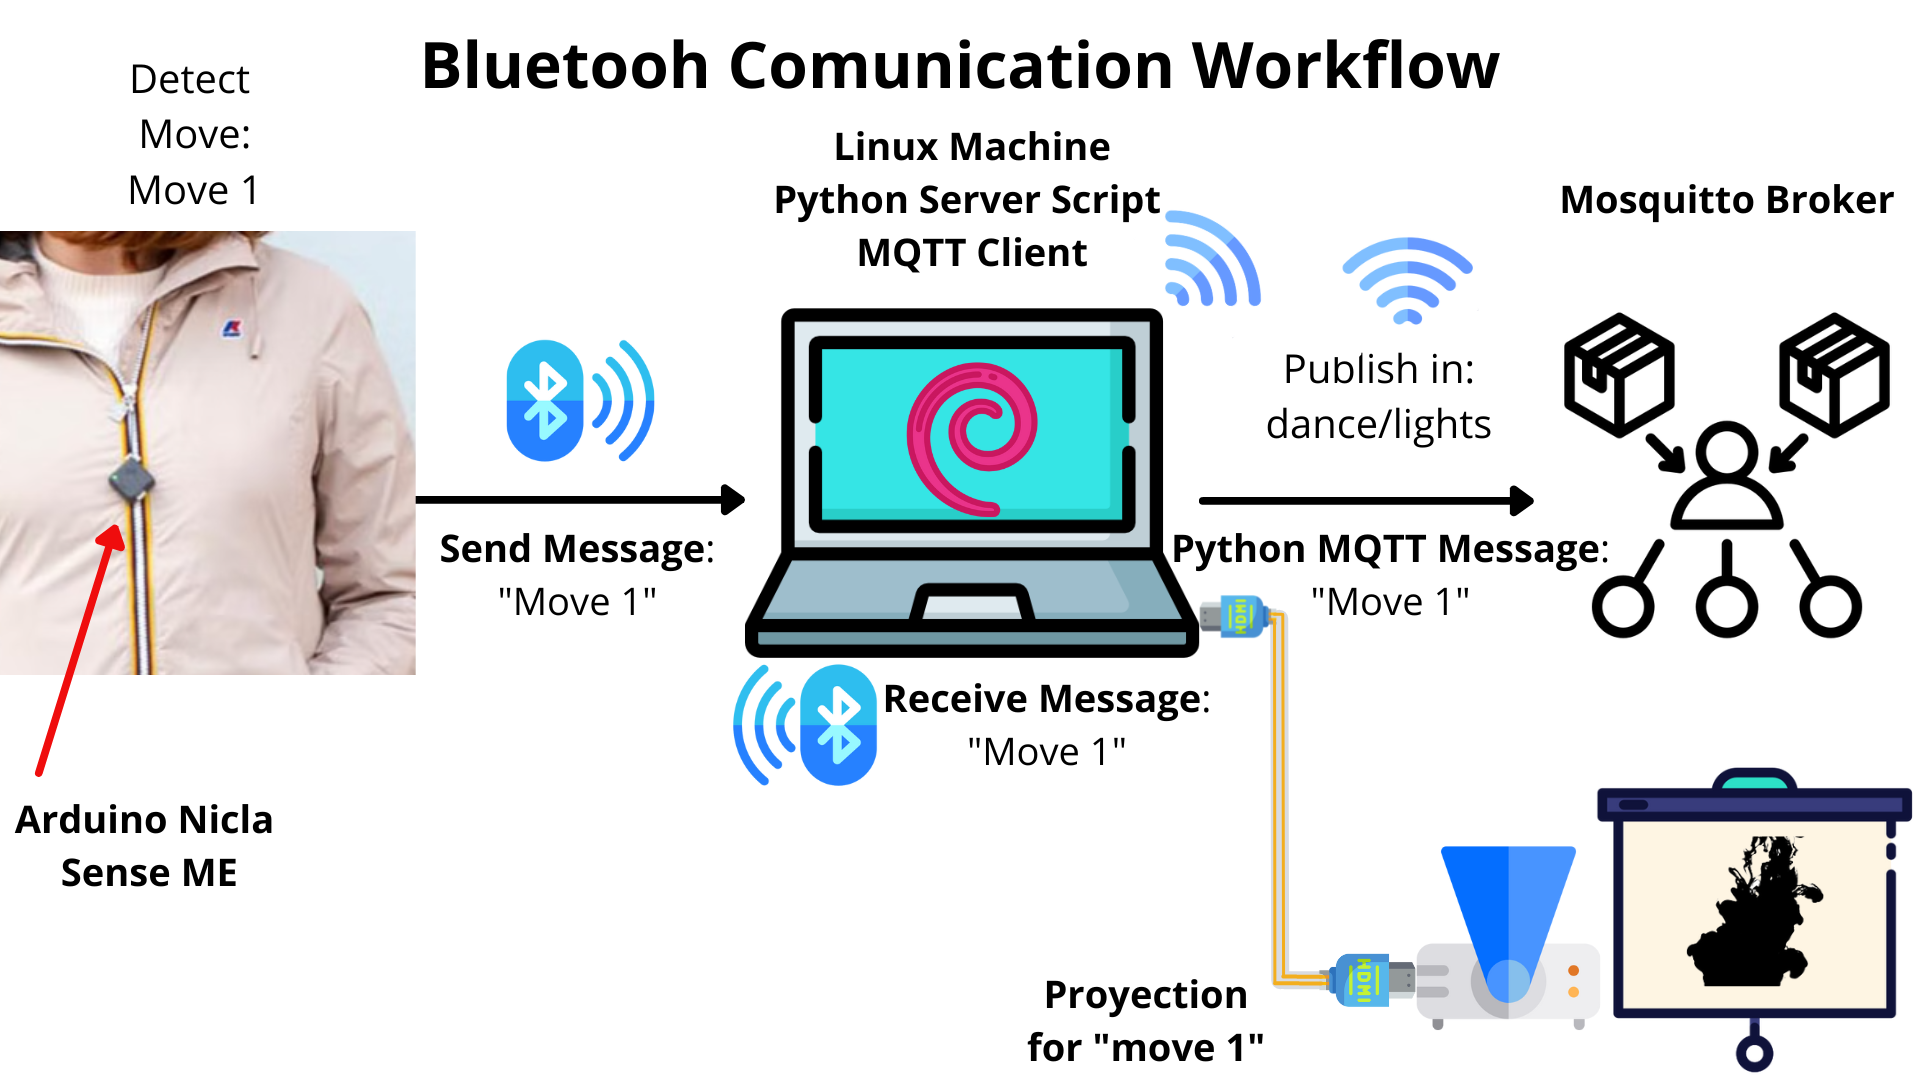
And this message is received as an input and the same Python script has conditionals to send different messages depending on the move using MQTT broker from Linux machine to the network. But also at the same time in the script run a video player in the device, the machine is connected to a projector to run the animation corresponding to that movement.
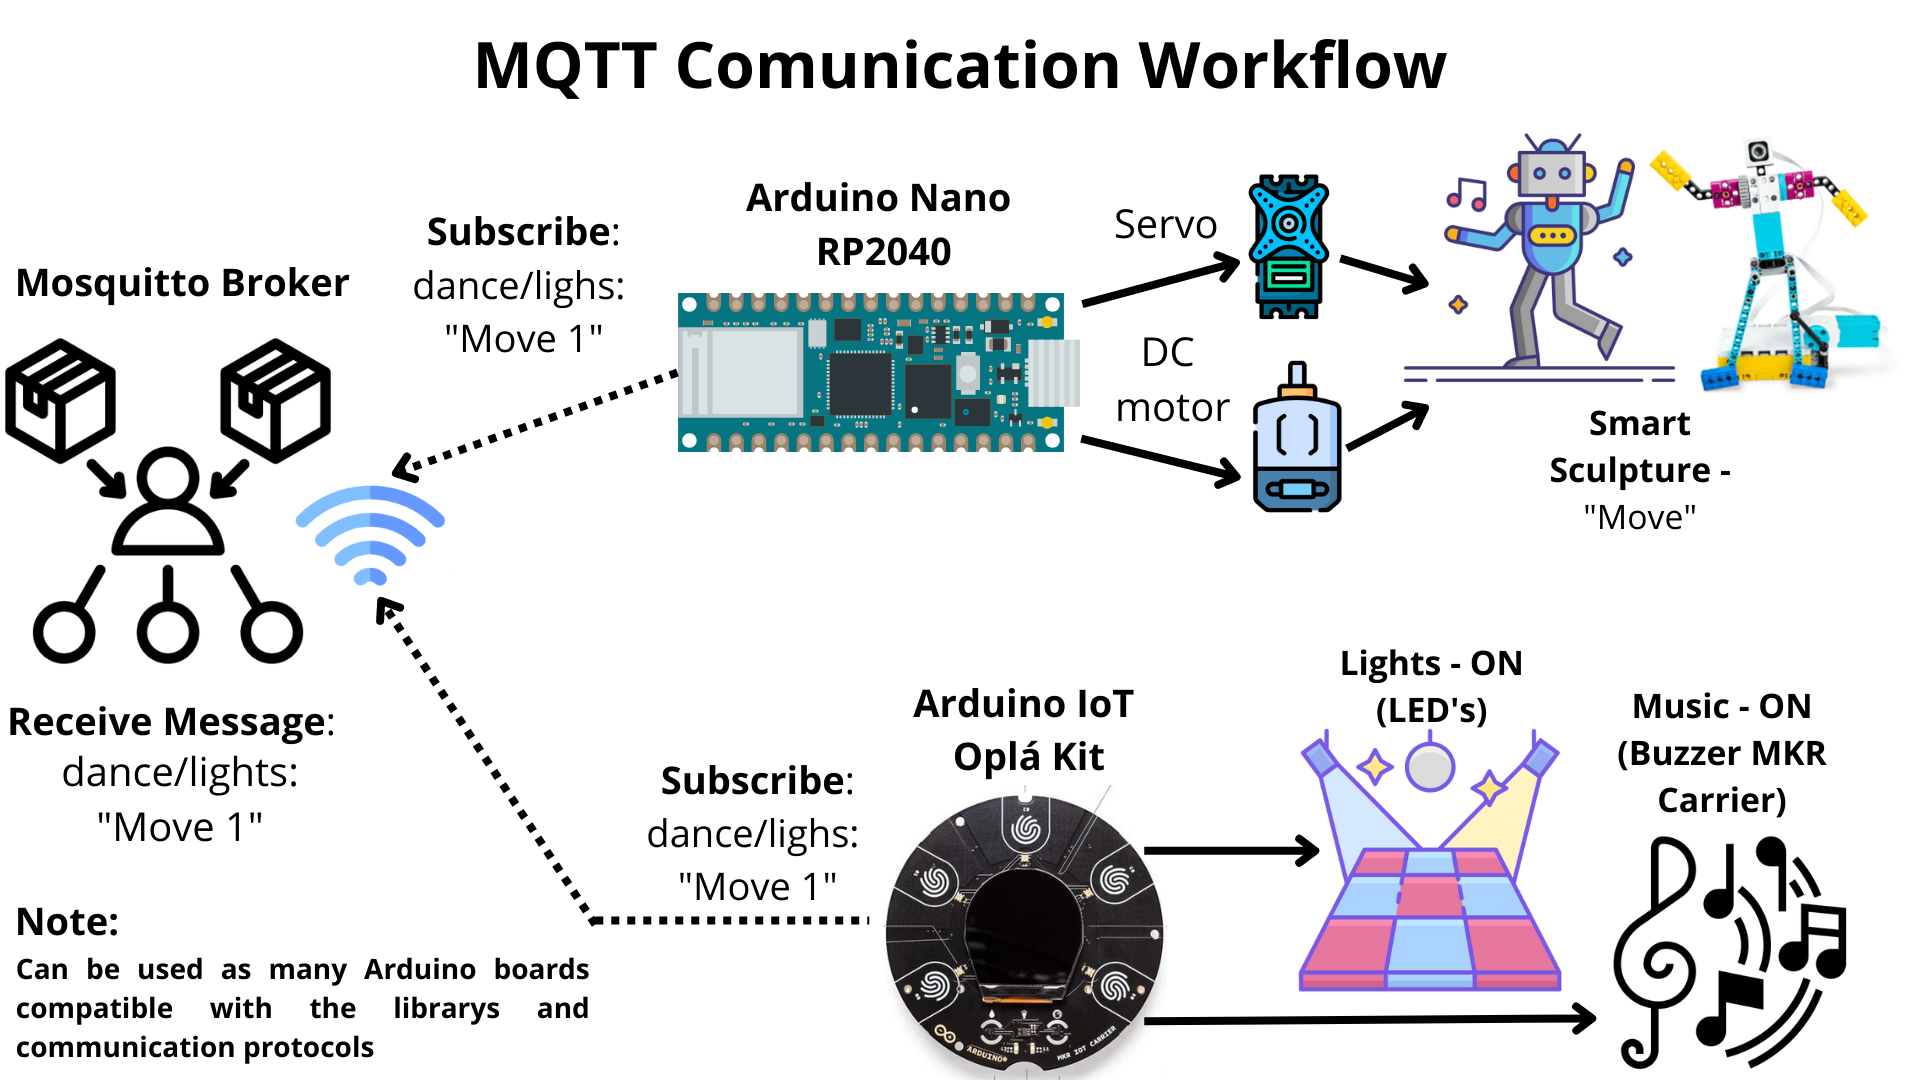
Before talking about the MQTT I need to say that the Arduino boards once they have the code uploaded and they are connected to a power source they connect directly to the broker and they subscribe to the channel to receive the messages wirelessly. Now let’s talk about the MQTT workflow that continues the process, once the python sends the message to the broker in the “chanel: dance/lights”, they will receive the message “on” and they will start doing the things programmed, run sound with the buzzer or blinking the leds in different colors.
One thing that I would like to highlight is that this project was made with the resources that I have at the moment but this doesn’t mean that that’s the limit. Thanks to the MQTT protocol this can be escalated to have as many devices as can support the broker or service used. Also recently Arduino have a lot of products that can be included and are compatible with this project one recent release was the plant-watering-kit . This can used to simulate effects like the Bellagio fountain water show in Las Vegas to add an extra element. Unfortunately I didn’t have enough time to include it but in the future I will do it. Also I need to mention that I used for this project the Lego robot, but can be used the Engineering Kit Motors Backup from Arduino to mix it with 3D printing to create different elements that can move. And thanks to the Nano Screw Terminal Adapter the Arduino can control a lot of motors or elements.
Now an extra thing is that all of this workflow can be replaced with the Arduino Cloud platform, and connect everything using the documentations provided to use the cloud, the only problem that I have trying this, was connecting the Nicla to the cloud because the board only have Bluetooth connectivity but it’s not impossible Arduino provided two ways to connect the board to the cloud, one of this options is use the Portenta H7 to interface with the Nicla Sense ME using the ESLOV connector . And the second one that I tried was use Arduino Nicla Sense ME as a MKR Shield in the same documentation of using the Nicla as a shield said it’s possible using ESLOV with a few changes and then It’s possible to connect it to the cloud. Which opens up a whole new world of possibilities. With cloud integration, you control them remotely.

Now let’s talk about the script. The script is the base of interaction for the player of mapping, lightning, music and smarts sculptures during the movements made. The script has been entirely developed with Python on top of a VLC, MQTT and Spotify integration, for a more intuitive and synchronous interaction. The script serves a real-time player, lightning, sculptures movement and music activation is served through the trained model that is deployed on the Arduino Nicla Sense ME, which sends the data by Bluetooth connection to a Opla kit and a Nano RP2040 board wireless using the MQTT broker.
EXPANDED TECHNICAL DETAILS
This project, developed for the K-WAY interactive challenge, proves that microcontrollers no longer just turn on motors. They can use onboard Neural Networks to see, hear, and understand human motion without sending a single byte of data to a cloud server.
The core of the system is the