When preparing the lunch, everyone has probably encountered the moment when you let the pan on the fire and the water or milk start boiling and coming out of the pan.
To prevent it you could set the fire lower but that is no fun, let me introduce you the overengineered way:
- Take an Arduino board and an accelerometer
- Use Embedded AI to detect when the water is boiling thanks to the vibration
- Start a fan to blow on the pan to prevent the water from coming out of the pan
Pretty simple right :)
Project Overview
"Boil-Guard" is a rigorous implementation of Thermal-Anomaly Forensics and Asynchronous Edge-AI Vibration Orchestration. Utilizing the enhanced computational-profile of the Arduino Uno R4 WiFi, the system executes real-time classification of fluid-dynamics by monitoring the micro-vibrations induced by nucleate boiling. The project explores the sophisticated deployment of a Pre-Trained N-Class Classifier, implemented via NanoEdge AI Studio to identify the specific frequency-harmonics of boiling water without direct thermal-contact. The build emphasizes accelerometric high-speed sampling-forensics, TIP120-driven actuation diagnostics, and industrial-grade kitchen-safety heuristics.
Step 1: Setup
You need a USB-A pan, a fan and electric hob or induction hob.
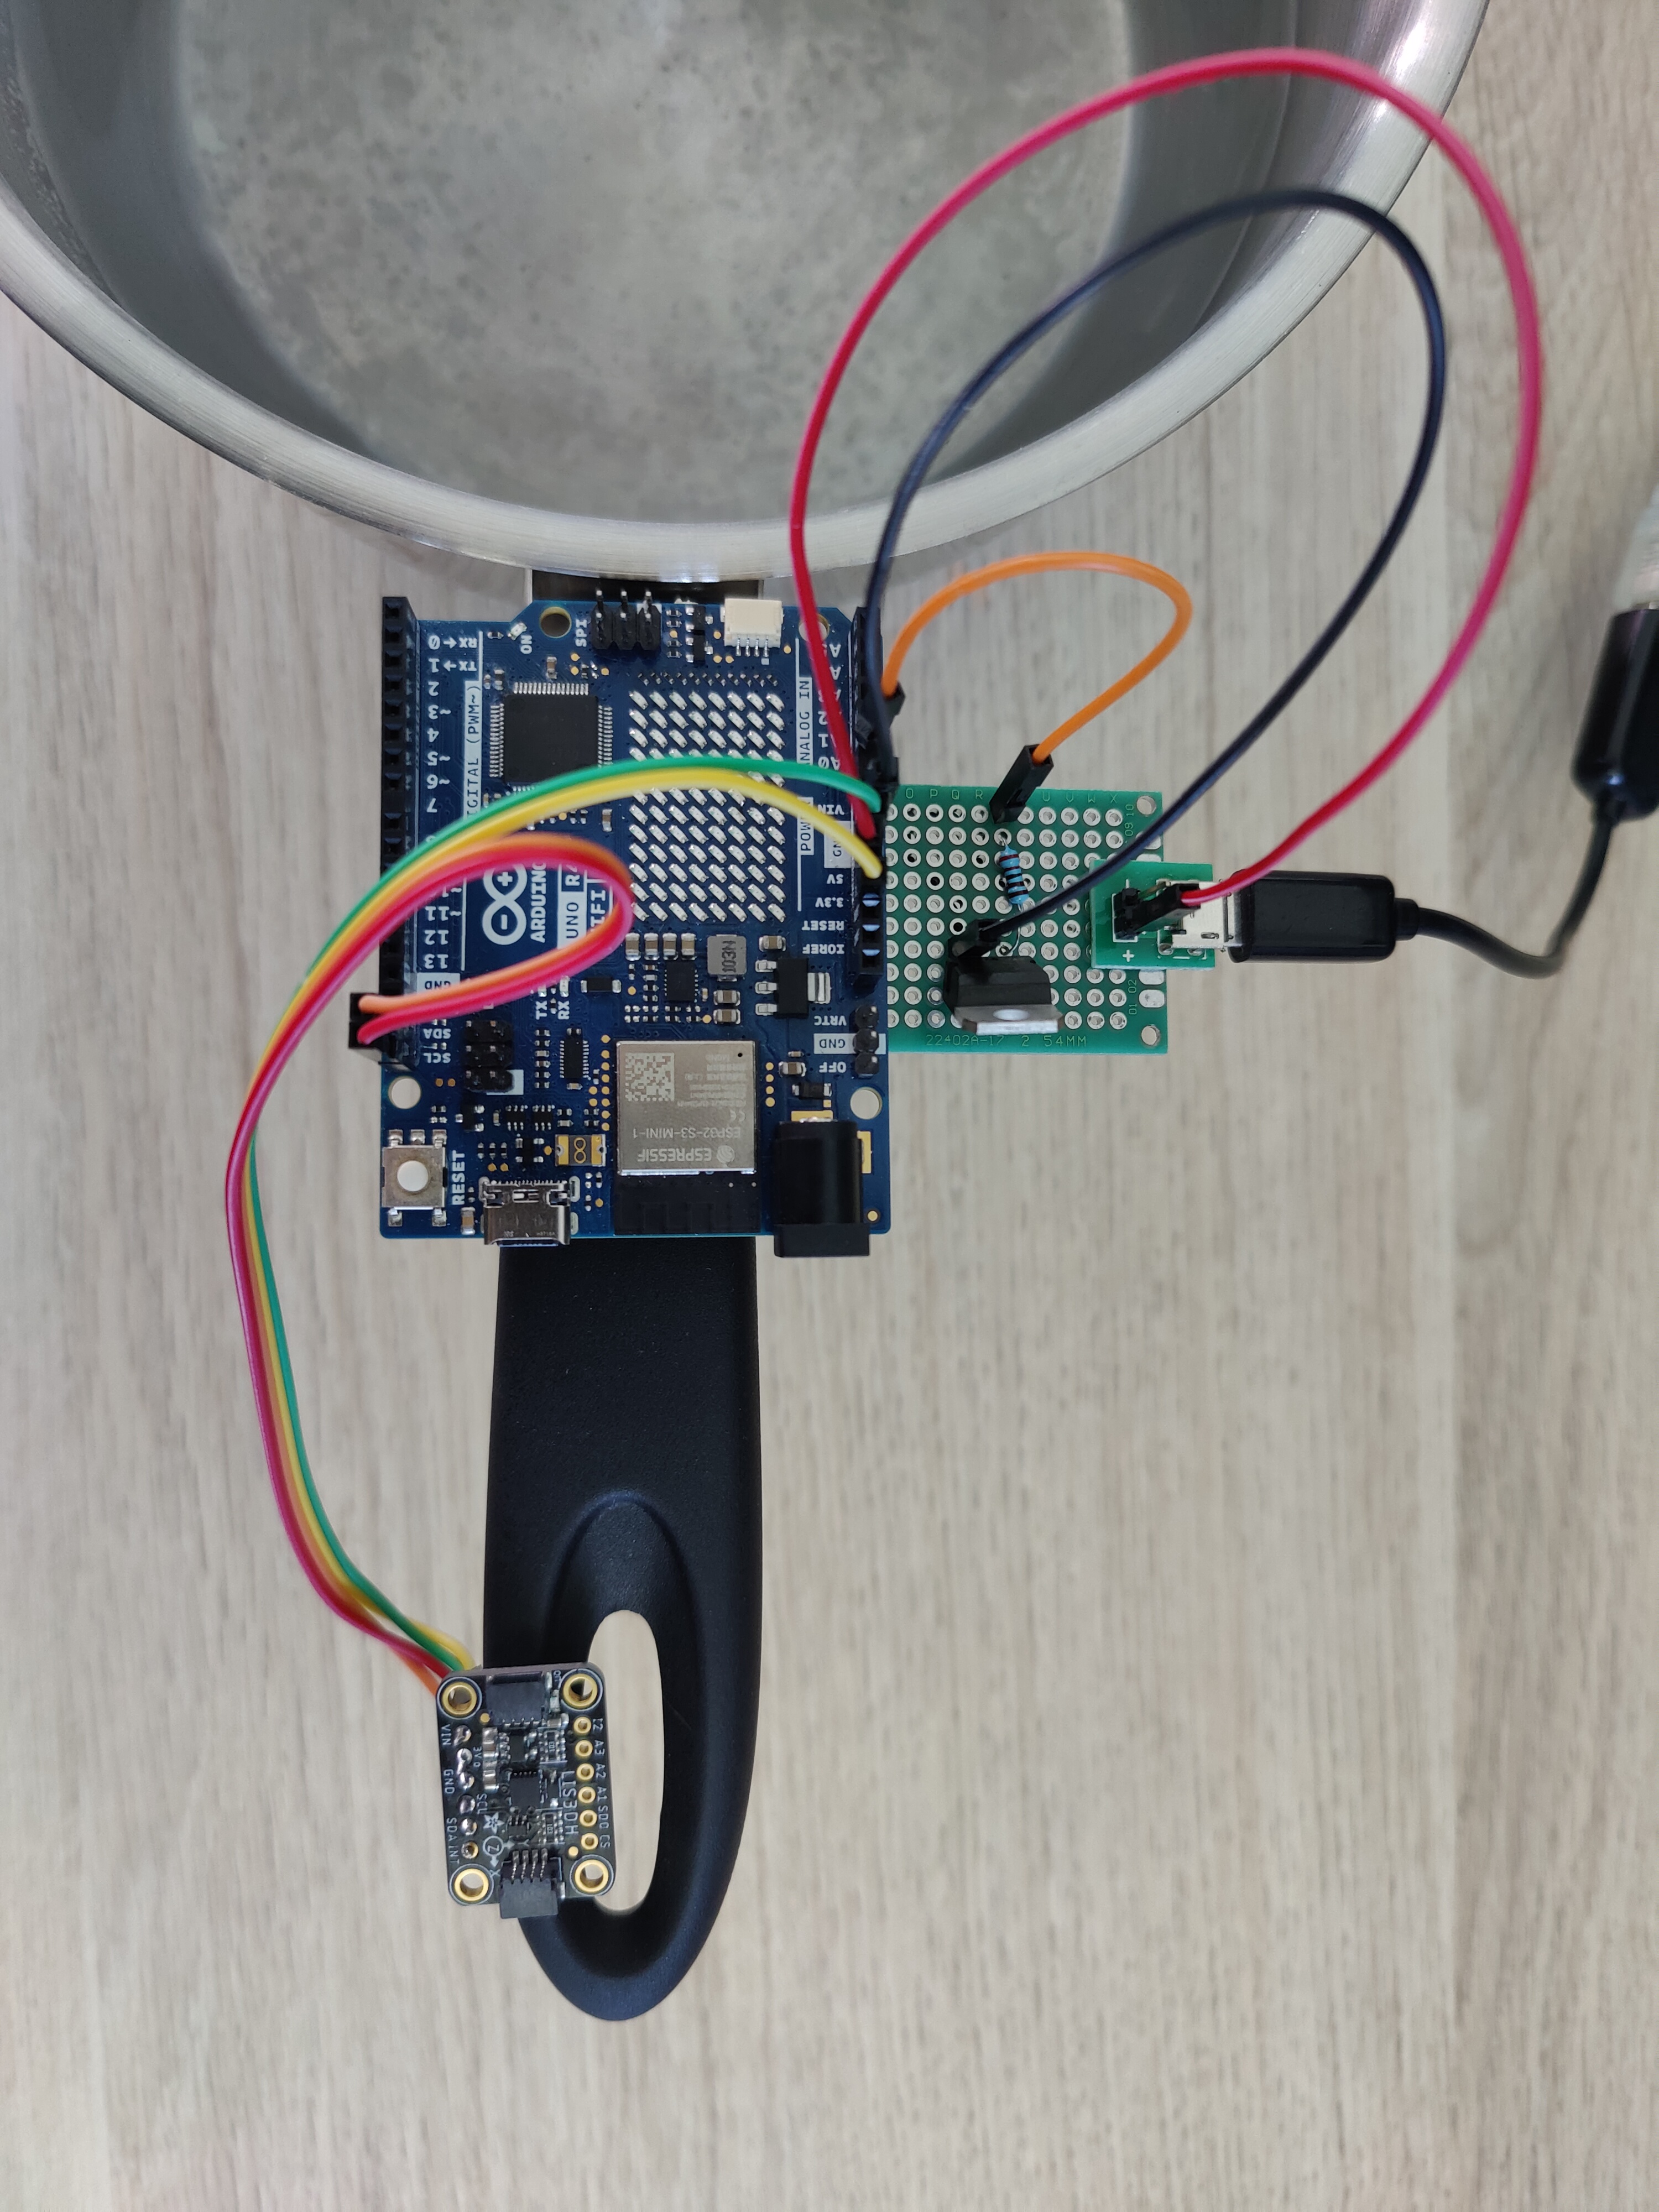
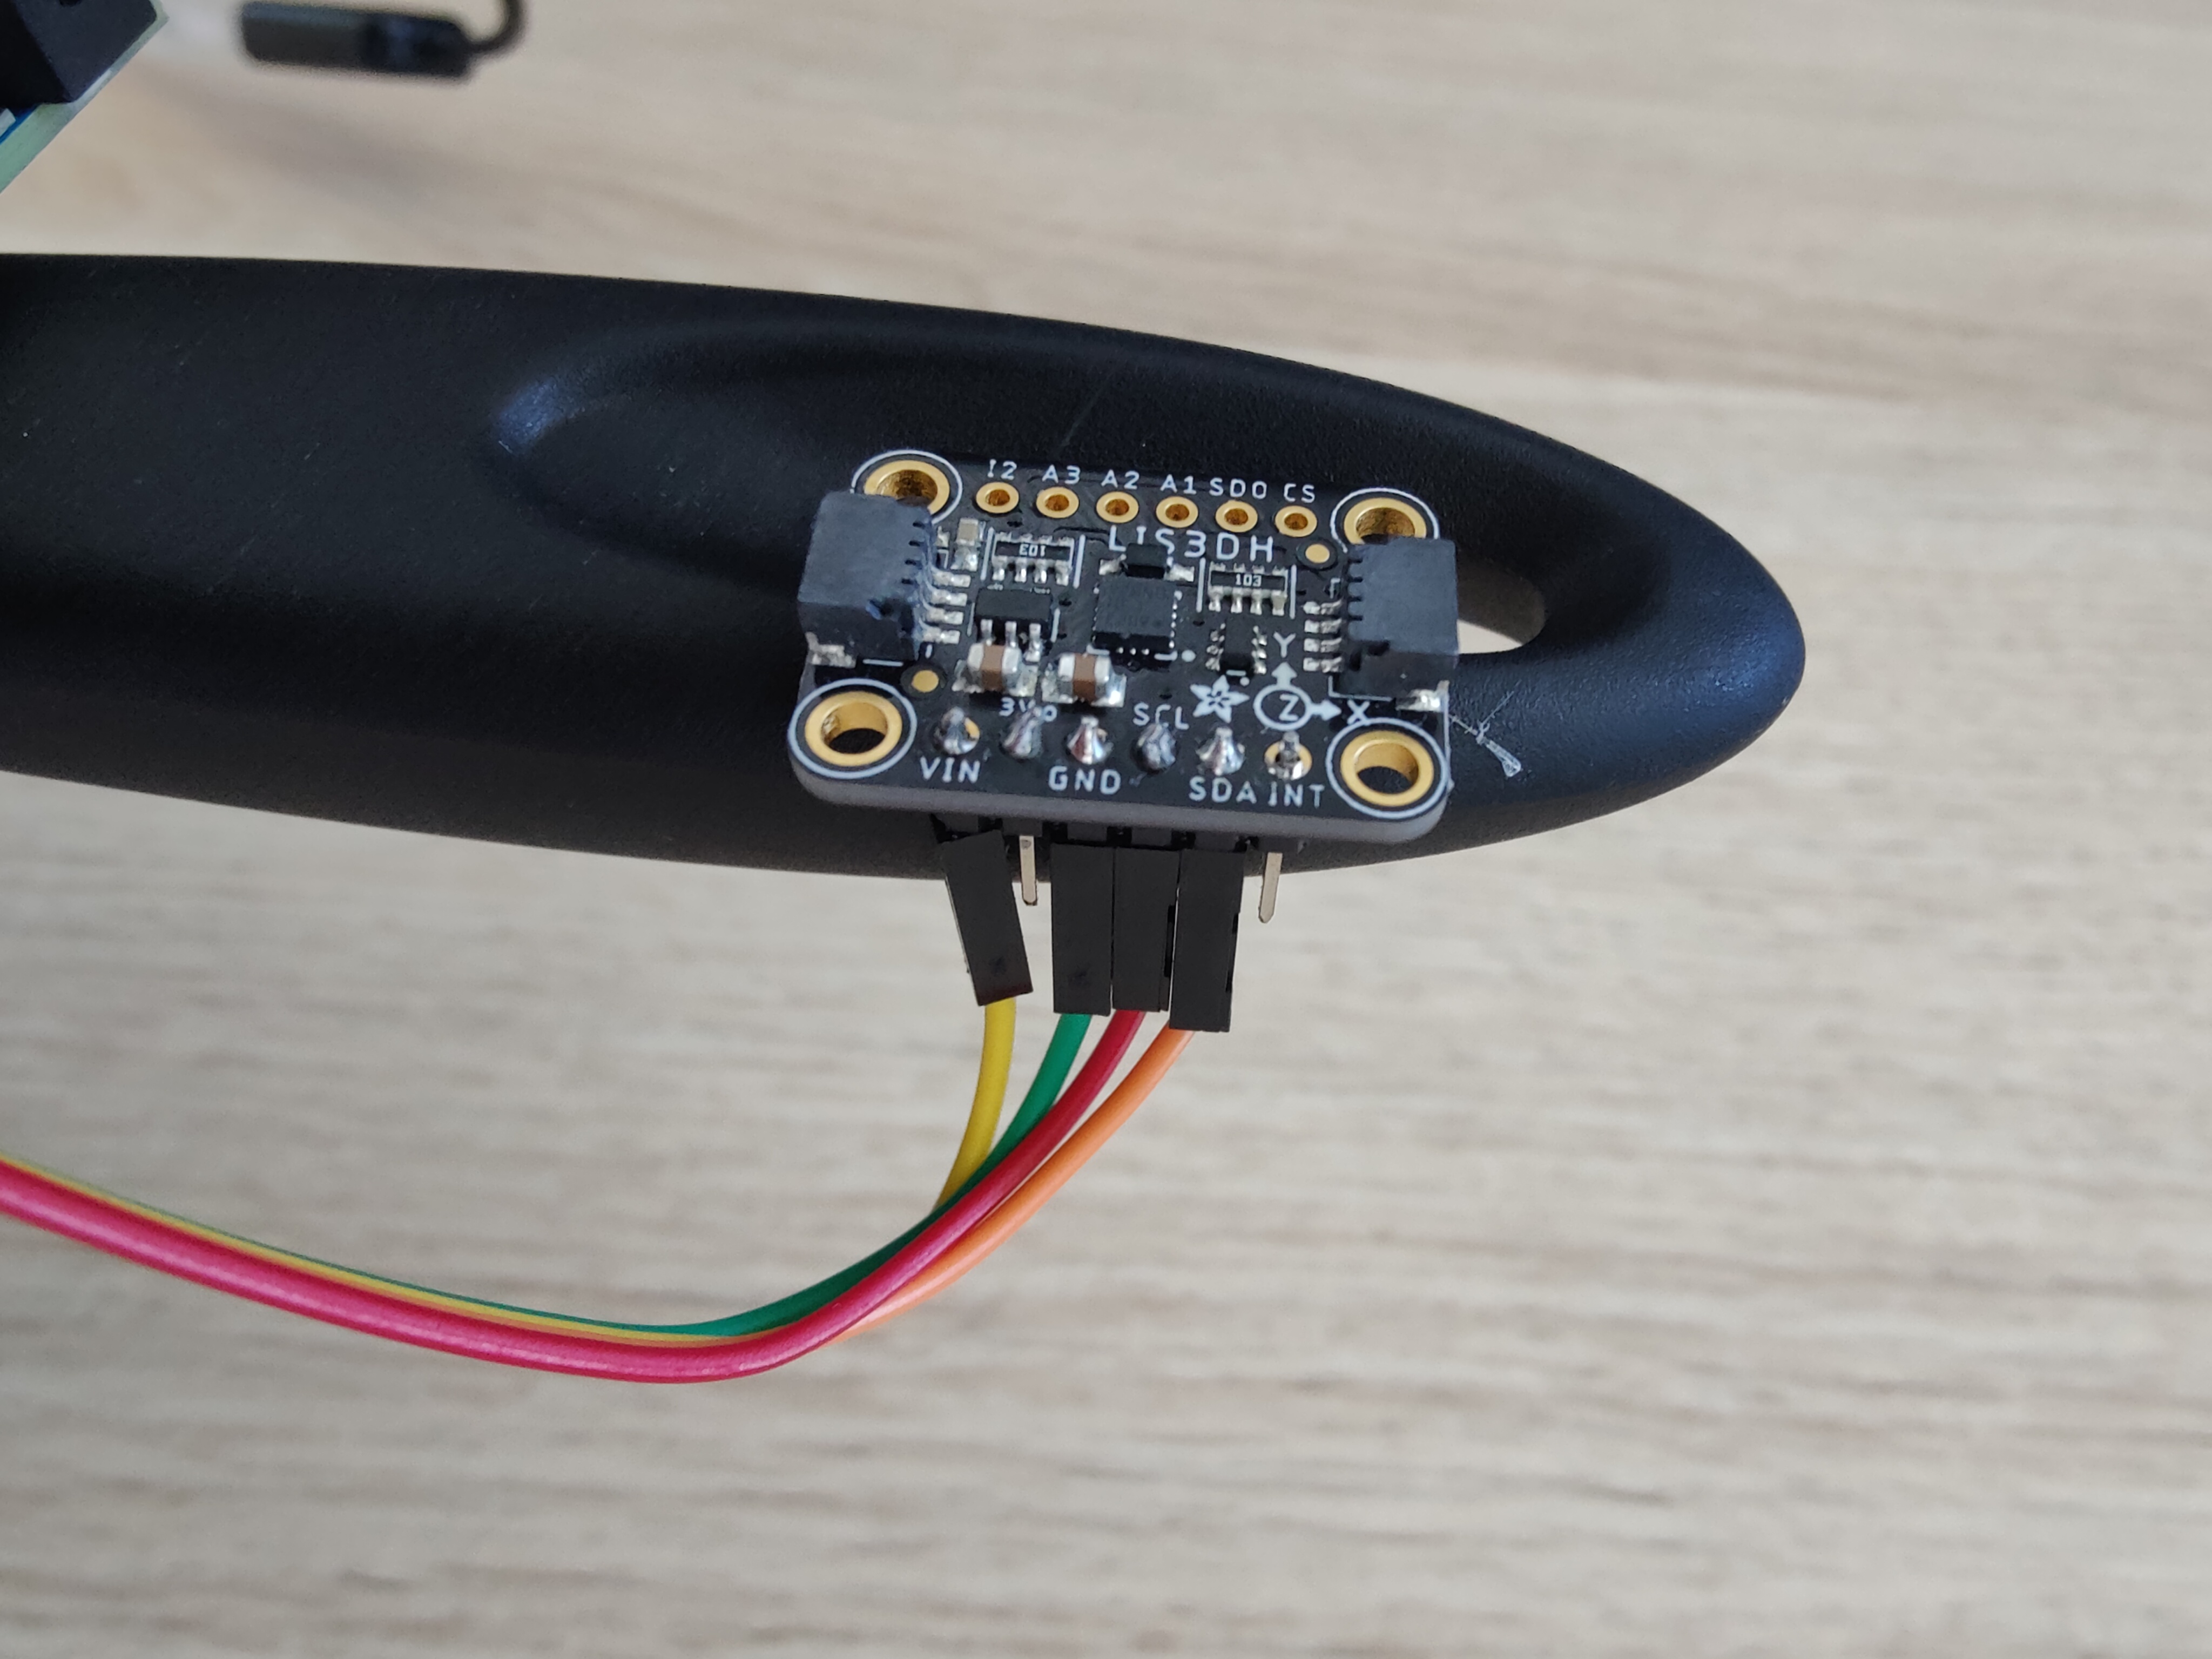
Then, we need to connect the accelerometer to the Arduino board. Use jumper wires to connect:
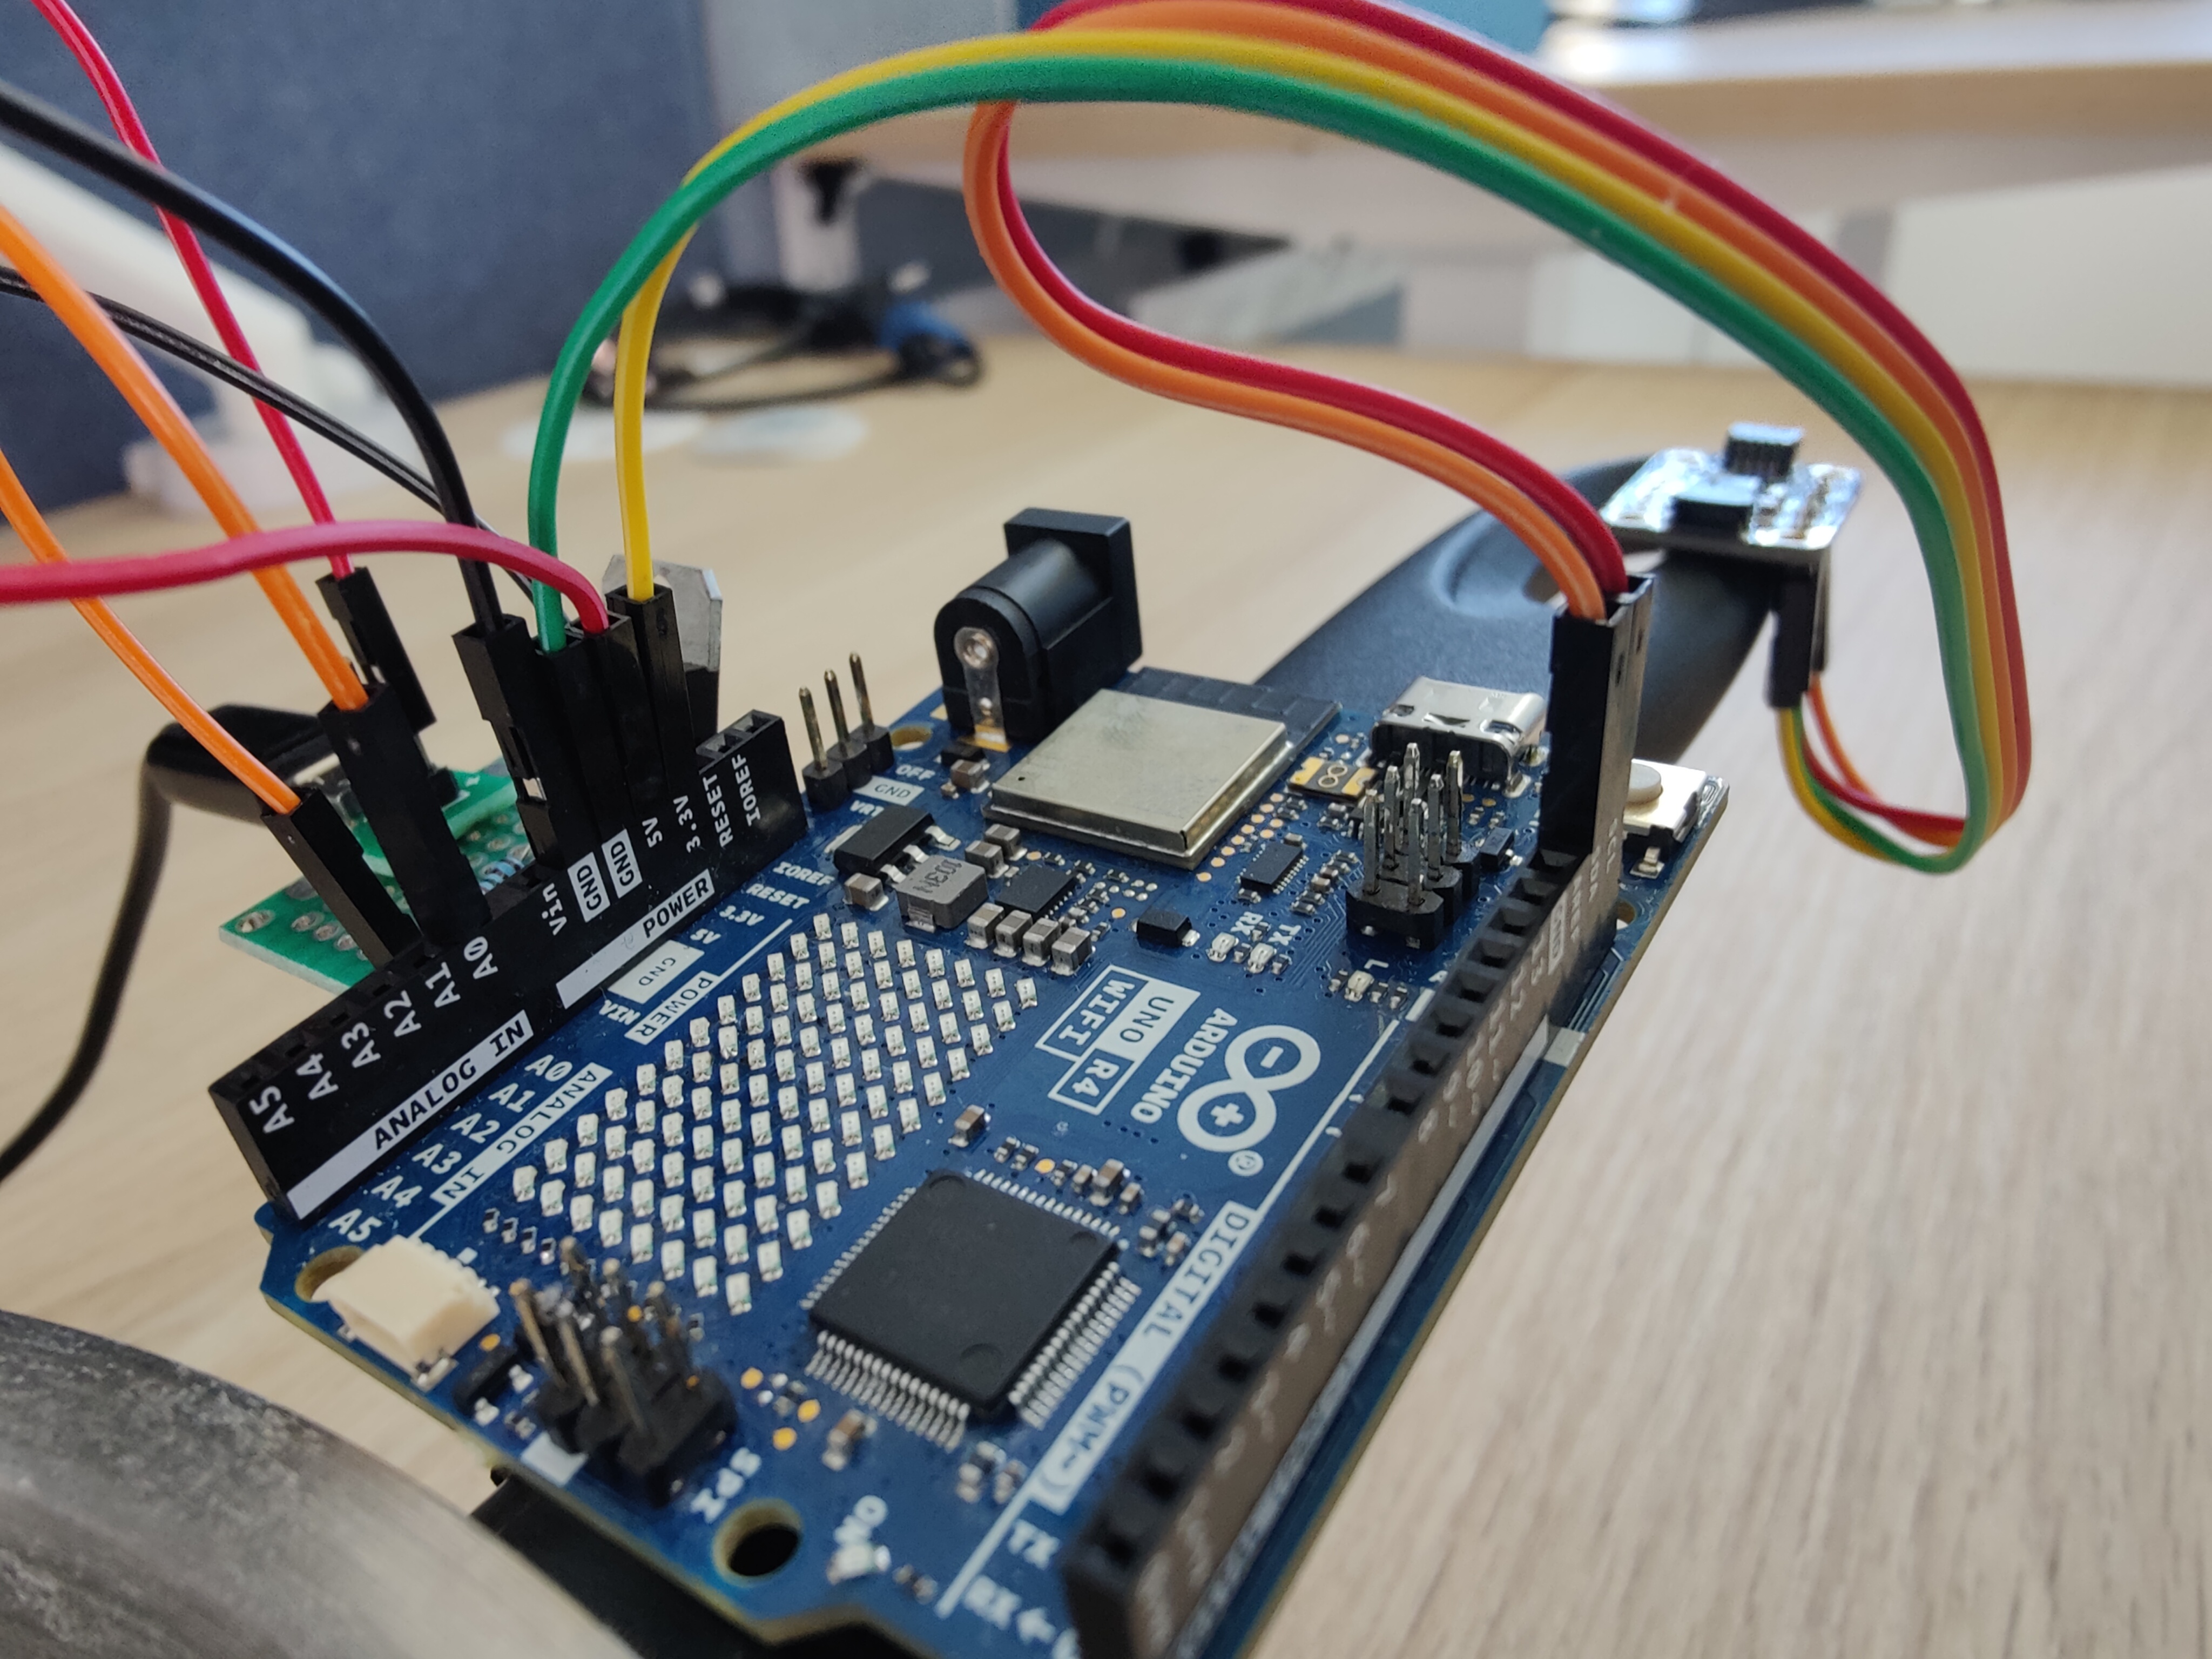
- VIN (mic) to 3.3V (board)
- GND to one of the GND on the board
- SDA to SDA
- SCL to SCL
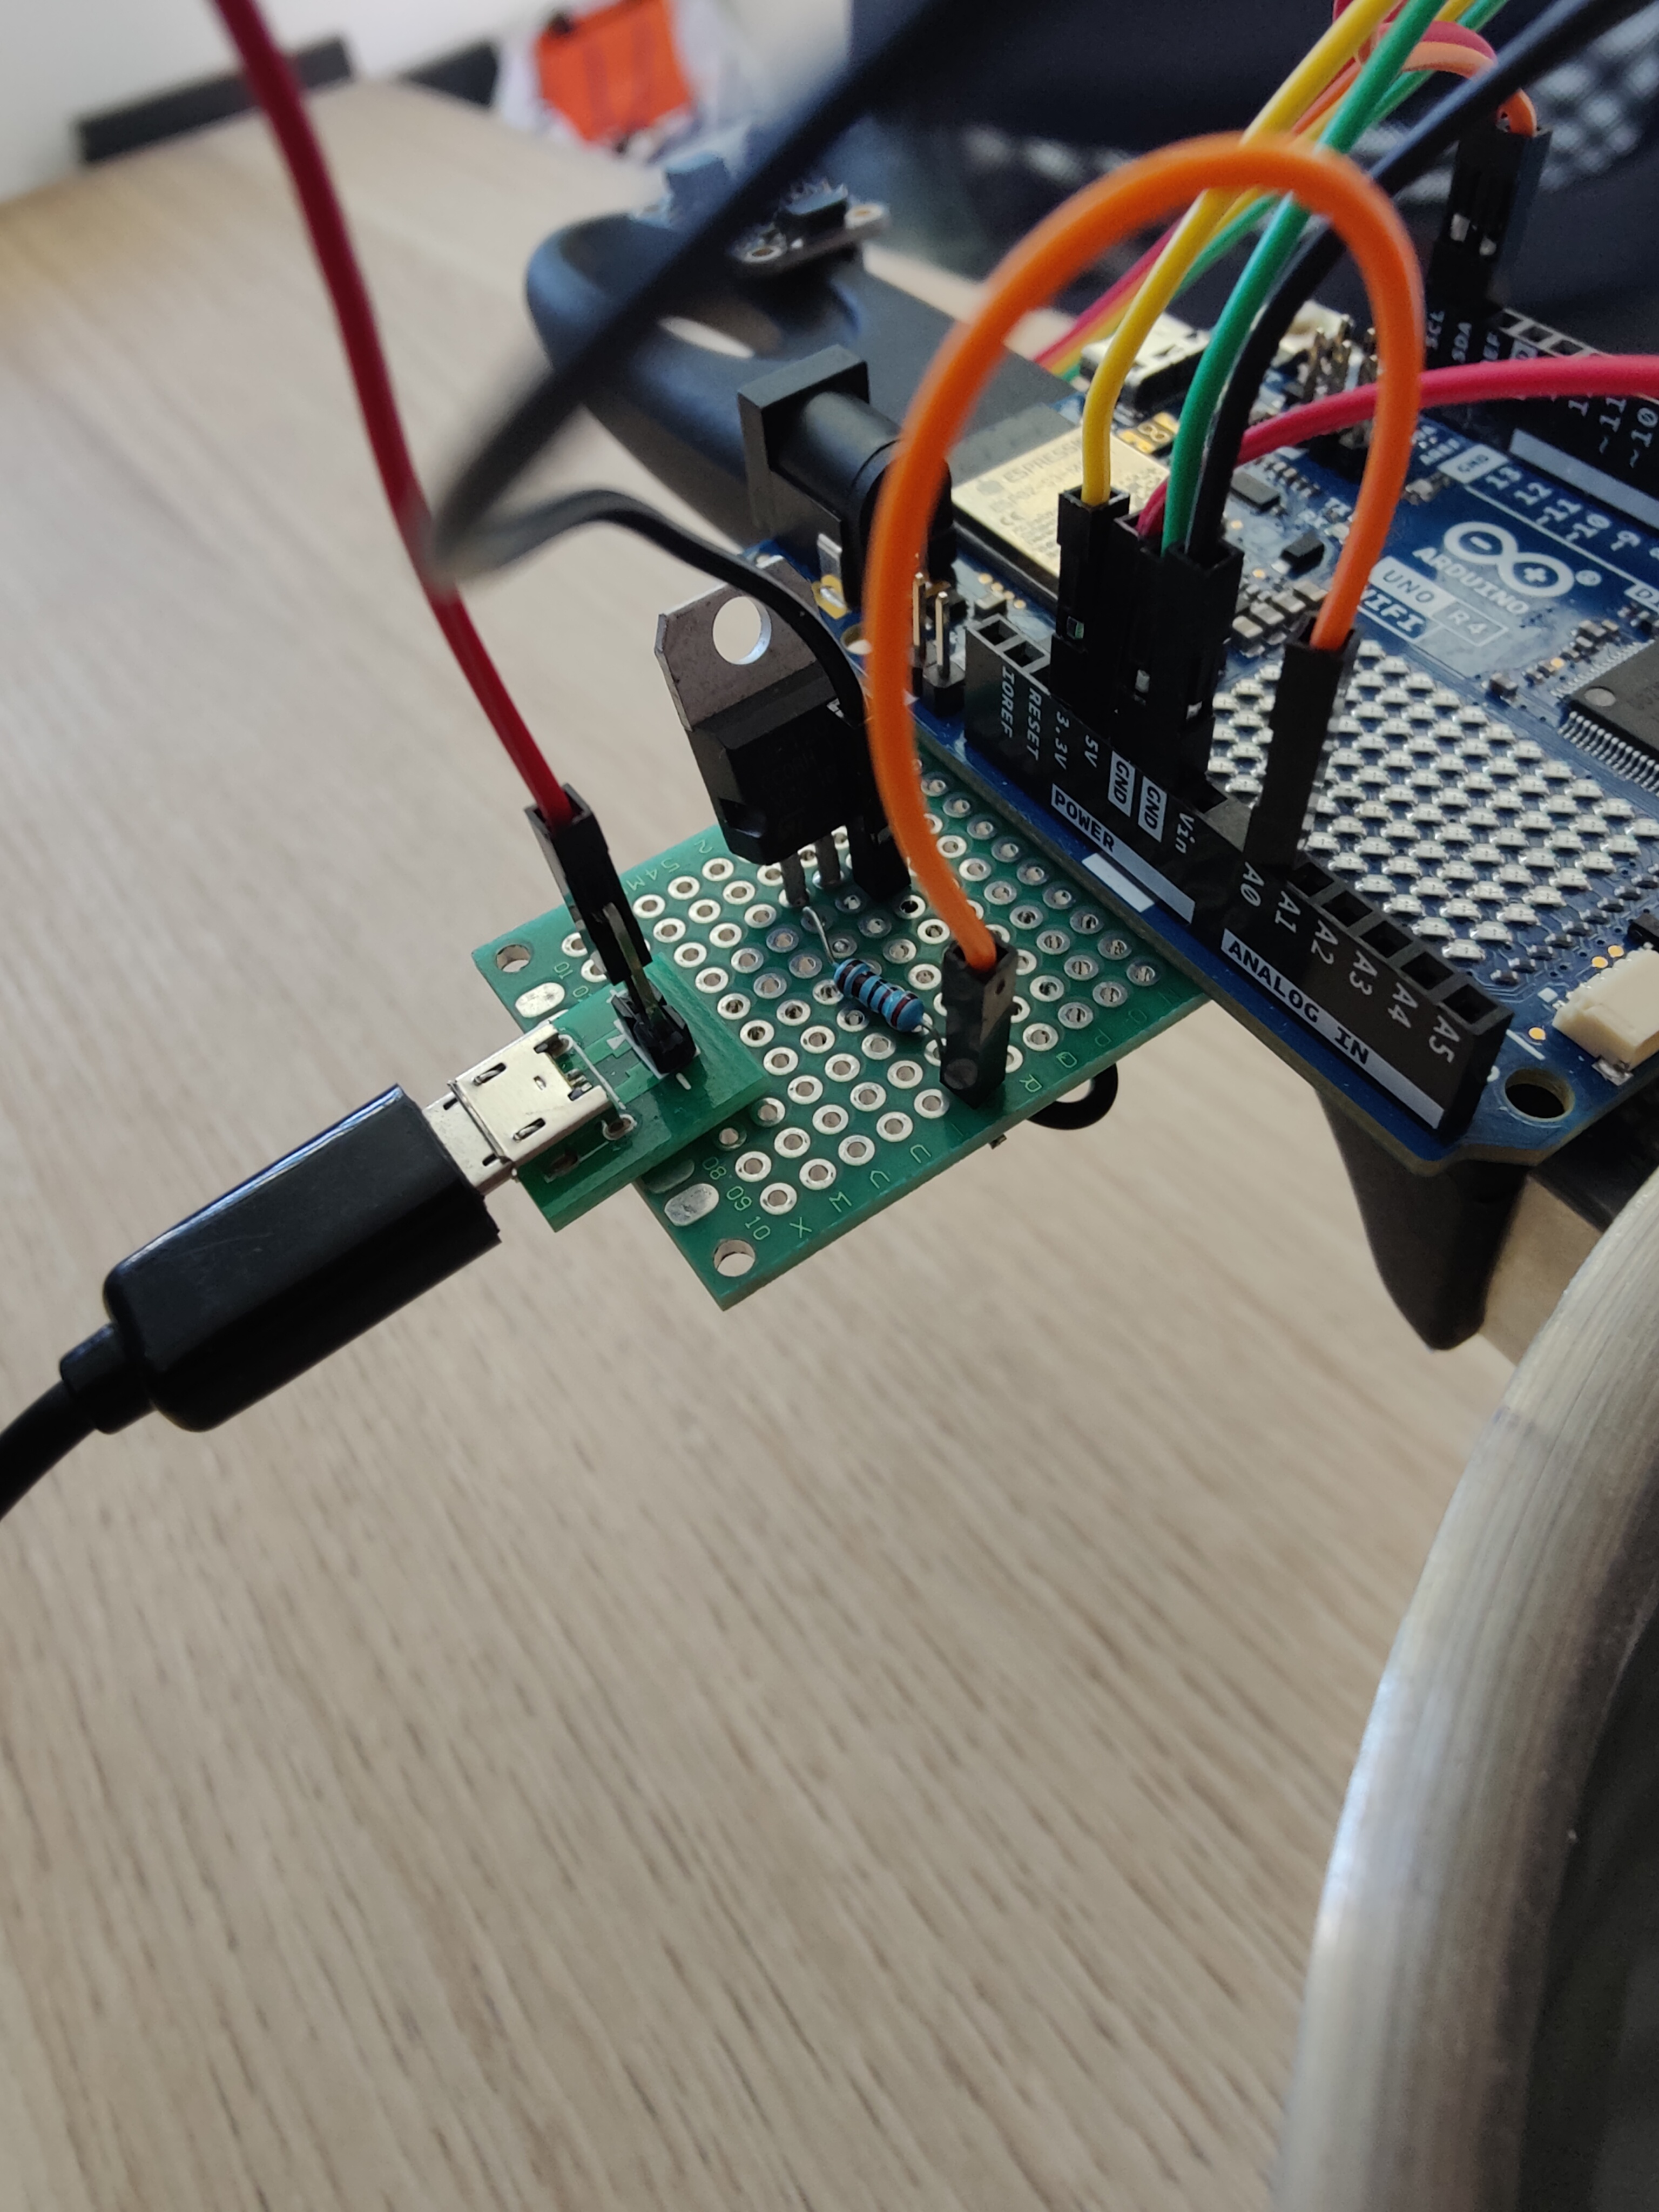
Then we replicate this mintage: https://adam-meyer.com/arduino/images/2011/03/tip120-lightbulb1.png (link to the tutorial: https://adam-meyer.com/arduino/TIP120) The goal of the TIP120 transistor is to be controlled as a switch. Logical 1 outputted by Arduino pin should power on the Fan and logical 0 should stop it. Here we use the A0 pin with the resistor (look at the orange wire in the pictures).
Then you can fix the setup on the pan with hot glue and you need to find a way to fix the fan. I used plastic clamps (serflex).
In Arduino IDE: Make sure you selected the right COM port: Tools > Port and select the right one. Select the right board:
- Tools > Boards > Arduino Renesas UNO R4 boards > Arduino UNO R4 WIFI
- If you don't find it, click on Tools > Boards > Boards Manager..., look for the UNO R4 and install the package
Technical Deep-Dive
- Vibration-Classification & Inference Forensics:
- The LIS3DH Acquisition-Hub: Operating at a $1.6\text{kHz}$ sampling-rate to capture the high-frequency harmonics of surface-tension rupture. Forensics involve the measurement of the "Spectral-Power Density"; 512 samples per axis are processed to create high-fidelity vibration-signatures. The diagnostics focus on "Signal-Noise Separation," ensuring the AI-engine ignores ambient compressor-vibrations and culinary-activity diagnostics.
- NanoEdge AI Inference Engine: The system utilizes a compiled C-library optimized for the Renesas RA4M1 core. Forensics include the deterministic calculation of "Classification-Probability Buffers," evaluating whether the current state matches the "Boiling" or "Nominal" knowledge-matrix. The diagnostics ensure that inference occurs in sub-10ms windows to prevent thermal-overflow harmonics.
- Mitigation-Orchestration & HMI-Matrix Diagnostics:
- The TIP120 Switch-Probe: Utilizing a Darlington pair to bridge the logic-output $(A0)$ to the high-current fan load. Forensics include the measurement of the "Thermal-Response Latency"; once the AI detects a boiling-event, the fan initiates forced-convection to prevent spill-over forensics.
- LED-Matrix Feedback Harmonics: Utilizing the Uno R4's 12x8 matrix to provide real-time visual-telemetry of the AI state $(e.g., Scrolling "Boiling" alerts.)$
Step 2: Collect Accelerometer data
To train an AI to be able to detect when water is boiling, we need first to collect data of both situation: boiling and not boiling. We can create some code to collect data from the accelerometer, but NanoEdge give access a tool to generate it automatically so we can use it to gain some time:
- Open NanoEdge
- Go the Data Logger
- Select Arduino boards
- Select the LIS3DH
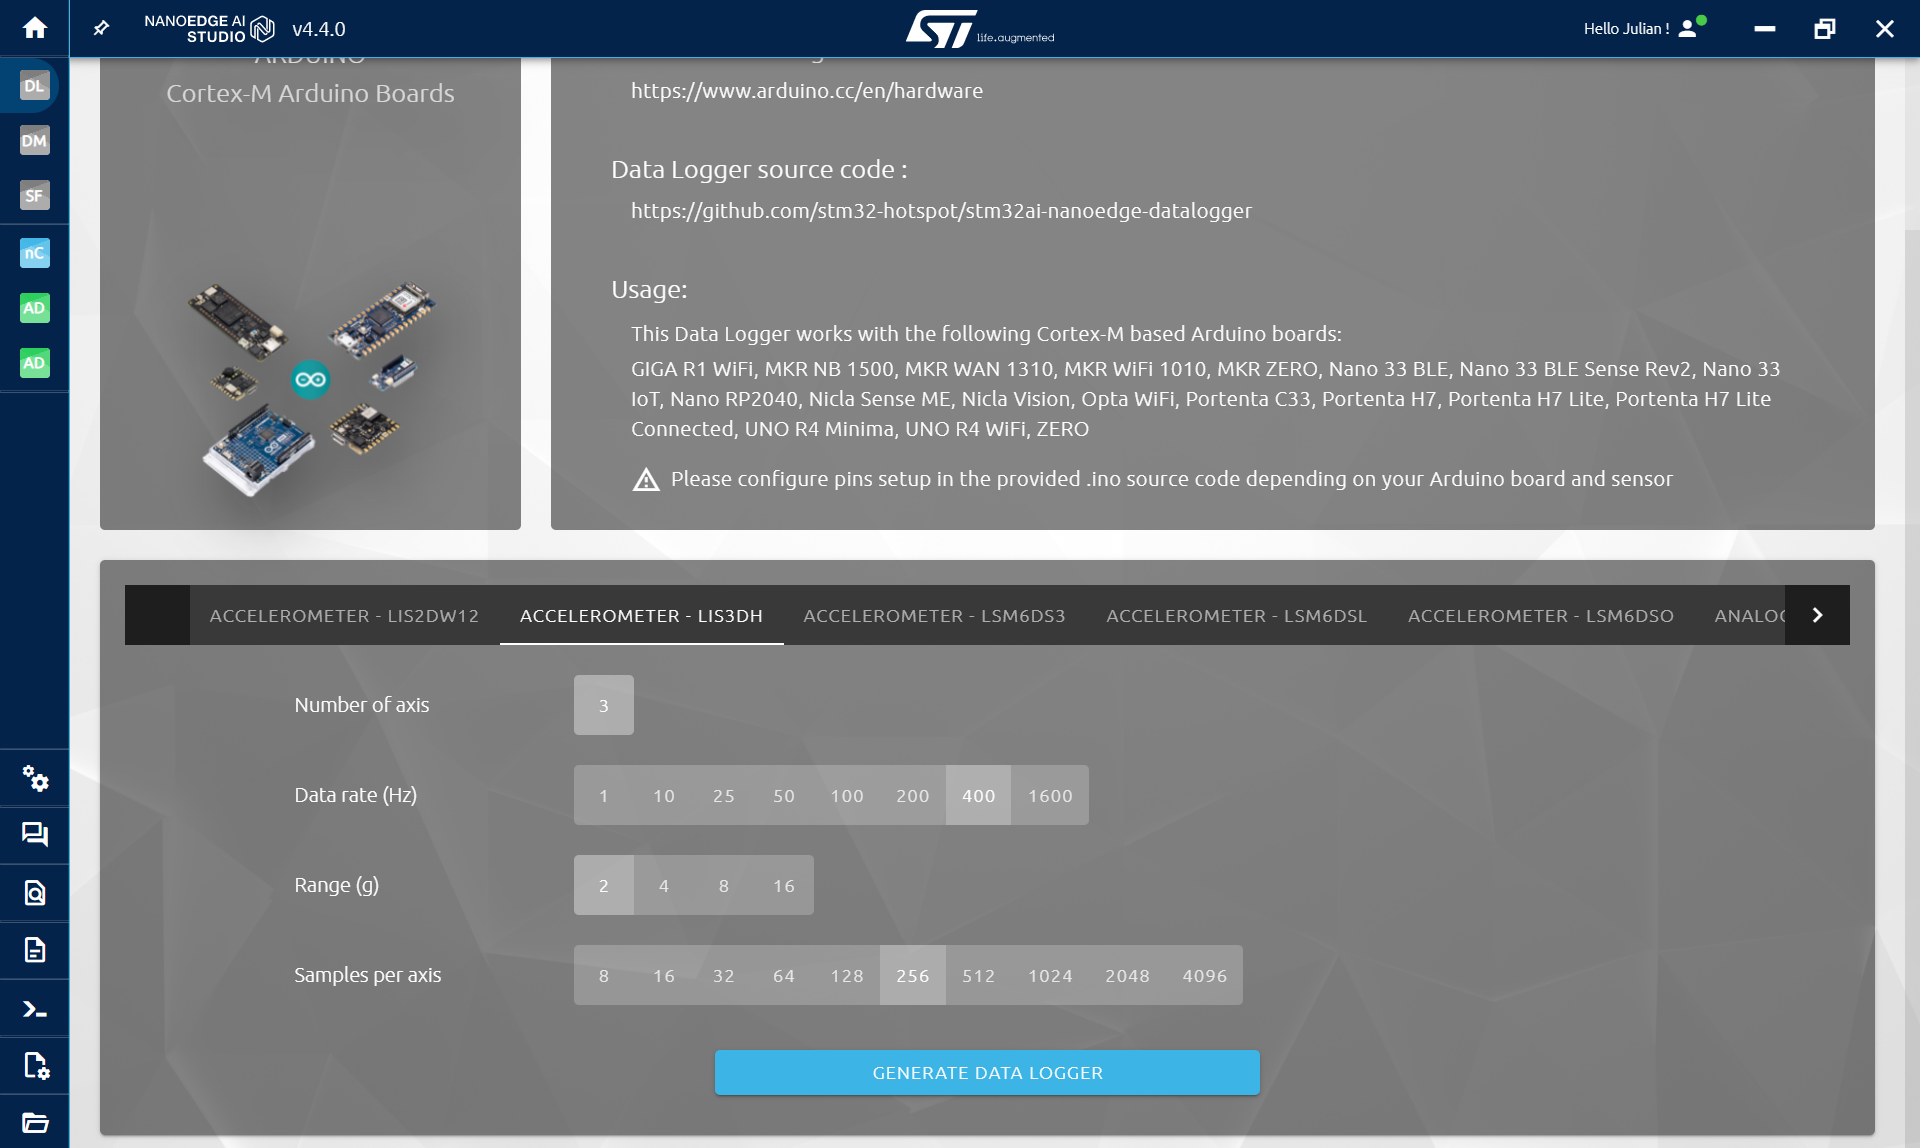
Because the vibration made by the boiling water are pretty small and that we don't need a lot of data, here is the parameter to select:
- Data rate (Hz): 1600Hz
- Range: 2g
- Sample per axis: 512
(You can test other parameters but be careful with the sample per axis as it will require more and more RAM for the buffers.)
Click Generate Data Logger and you will obtain a .zip containing a .ino file with the code ready to be flashed on the board. The code will print buffer via serial. In our case it will send buffer of size 3*512 at a frequency of 1.6kHz. In the next step, we will read these printed buffer and log datasets to then train the model.
Warning: You may need to install the library for the accelerometer if you have never used if before:
- In Arduino IDE, go to sketch > Include Library > Manage libraries... > adafruit LIS3DH
In the data logging code, some part related to NanoEdge are commented. We will use later, after using NanoEdge AI Studio to get an AI library.
The data logging code from NanoEdge is attached at the end.
Engineering & Implementation
- Vibration-Coupling & Structural Forensics:
- Adhesive-Bonding Analytics: Mounting the LIS3DH via high-temp resistant interface. Forensics ensure that the "Mechanical-Transfer Function" between the vessel and sensor remains linear across a range of $25^\circ\text{C}$ to $100^\circ\text{C}$.
- PCB-Bus Integrity Diagnostics: Utilizing aviation-grade wiring-aesthetics to connect the IMU to the I2C bus. Forensics focus on "EMI-Suppression Analytics" to prevent induction-hob harmonics from inducing logic-flicker diagnostics on the SDA/SCL lines.
- Dataset-Curation & Benchmark Heuristics:
- The implementation involved recording 200+ signals of varying boiling-intensities. Forensics include the "Validation-Set Cross-Entropy Analytics," verifying that the model maintains 90% accuracy across different water-volumes and vessel-geometries.
Step 3: NanoEdge AI Studio
Now that we are able to collect data using the accelerometer, the next step is to use NanoEdge AI Studio to log signals and use these signals to create an AI able to recognize boiling water signals from other ones.
- Open NanoEdge AI Studio
- Create a N class classification project
In project settings:
- Select the Arduino R4 WiFi as target
- Select Accelerometer 3 axes as sensor
- Everything else is optional
- Click Next
In Signals: Here we will add data of both not boiling water and boiling water and do it multiple times with different water levels. We first start simple, I choose to stick with a half full pan and do the following:
- Put the pan on the electric hob or induction hob (at maximum power)
- log non boiling data while it is heating up
- Stop logging non boiling when you think it is close/starting to boil
- Wait a little to make sure it is really boiling
- Start logging boiling water
Every 10 signals logged, I was pausing the log and moving a little bit the pan on the fire to add some variety to the data. I logged around 150 signals of non boiling water (the time it took to start boiling) and around 50 to 100 boiling water.
I then changed the water level and repeated the process multiple time.
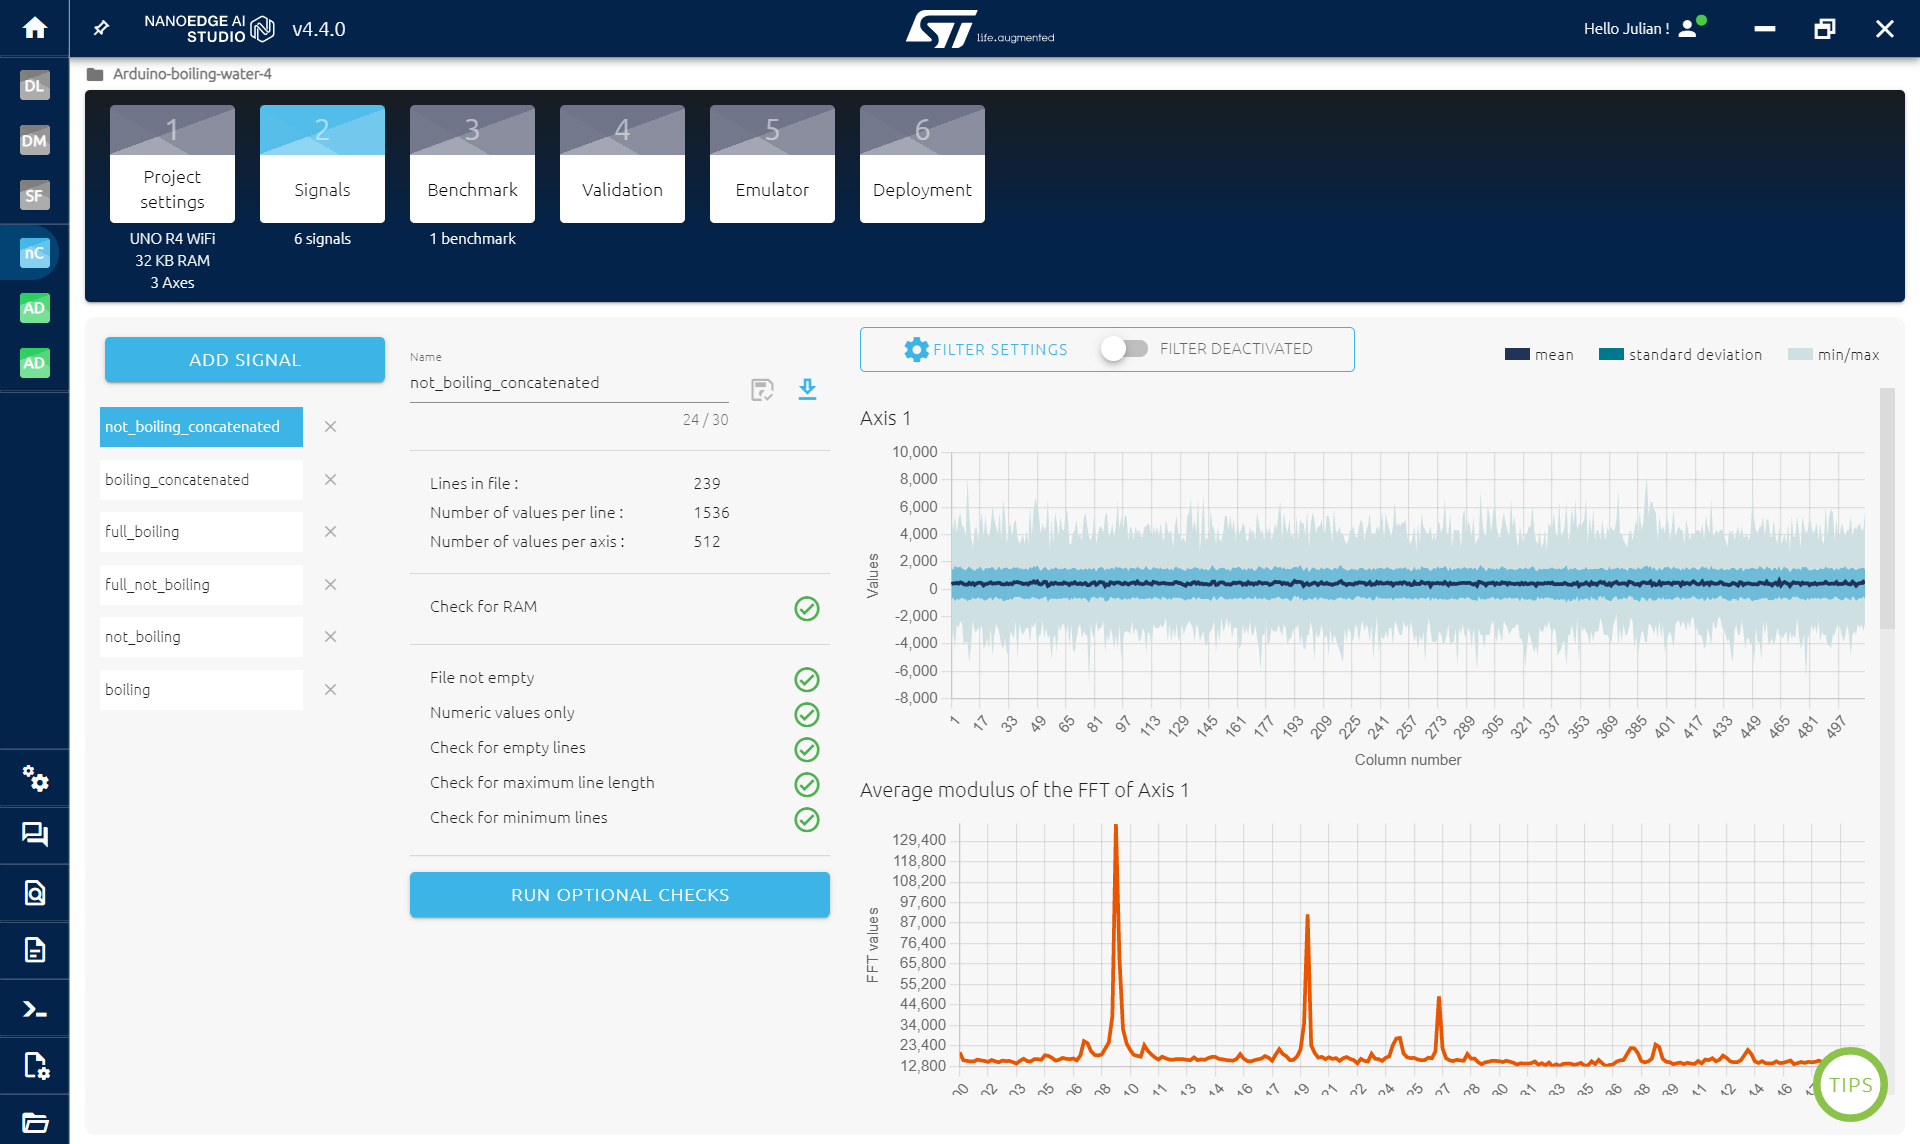
To log data in NanoEdge, here how to proceed:
- Click on Add Signal
- From Serial (USB)
- Select the right COM port
- Click Start/Stop in NanoEdge to collect signals
- Stop when satisfied
I collected multiple boiling classes and multiple not boiling classes. But to launch a benchmark, you need to concatenate all files to ends up with only 2: boiling and not boiling.
To do so, you can:
- Download all files that you logged
- Go back to the NanoEdge AI Studio home page
- Go to Data Manipulation
- Import all the not boiling files
- Click concatenate above
- Click extract line and click run
- Then save the file containing all the signals
- Do the same for the boiling
- Go back to the project and import our 2 datasets containing everything
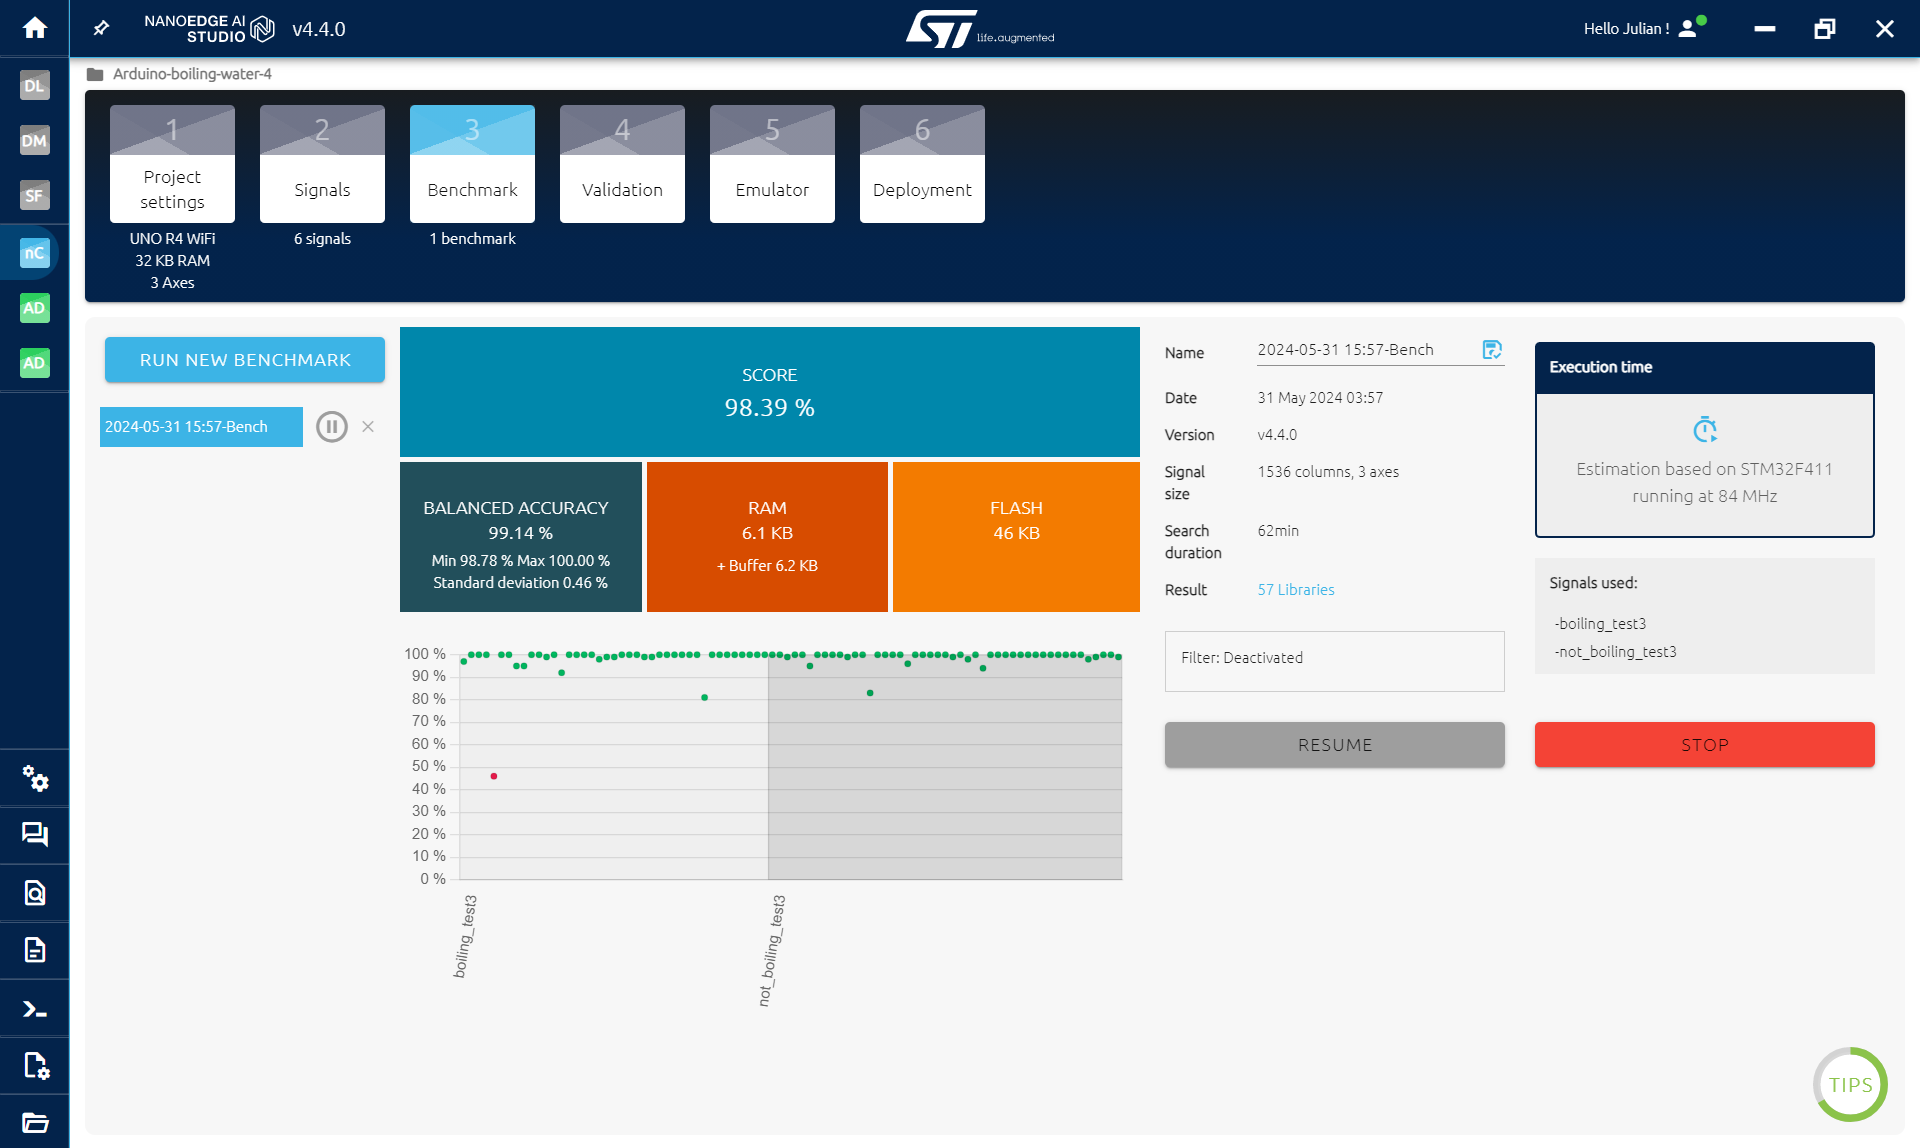
In Benchmark: The benchmark is the heart of NanoEdge AI Studio. Here we will use both kinds of signals to try to find the best combination of preprocessing of the data and the best model able to distinguish the data.
- Click on New Benchmark
- Select all datasets
- Click start
The benchmark will iteratively try combination of preprocessing and model on the data and evaluate the performances. It split the data into a training and testing set multiple times to have robust results. The benchmark can take hours to finish depending on the amount of data used. If the score reach 90% or more, you can pause/stop it and continue. The benchmark will try to optimize the model as much as possible but you can stop it when satisfied.
In Validation: Validation is made to test models on new data. What can happen when training machine learning or AI model is that the models overfit. It means that a model will have good results during the training but will not be able to work well on new data because it learned the training dataset by heart instead of learning how to classify the data... To use validation, you need new datasets of both boiling and not boiling signals. You can go back to the previous step to collect more data and download the csv to use them in validation.
To use validation:
- Select up to 10 models that you want to test (the first ones are the best ones)
- Click New Experiment
- Select a new dataset of not boiling water and boiling water
- Click start
You will get the performance of all the selected model on your new data.
I passed quite some time in this part to train a model that works well. Meaning that I deleted some data and logged new ones, did other benchmark and validation until I found a model that seemed to work as expected. Start simple, and add more and more variety while checking that the model works.
In Compilation: Simply click compile to get the trained model.
Step 4: Add NanoEdge AI Library to Arduino
To add the AI to our Arduino code, it is pretty easy, here is what we need to do:
- Include the model and the knowledge
- initialize the model
- Do detections
That it, and everything is done using functions! Additionally I added some printing on the Led matrix and started a fan when the boiling class is detected to prevent the water from leaking out of the pan.
Now that we have the anomaly detection library, we need to add it to our Arduino code:
- Open the .zip obtained, there is an Arduino folder containing another zip
- Import the library in Arduino IDE: Sketch > Include library > Add .ZIP library... and select the .zip in the Arduino folder
IF YOU ALREADY USE A NANOEDGE AI LIBRARY IN ARDUINO IDE: go to document/arduino/library and delete the nanoedge one. Then follow the instruction above to import the new library.
IMPORTANT: If you get an error because of RAM, it may be because of the library in NanoEdge. Go back to the VALIDATION STEP in NanoEdge and select a smaller library (click on the crown on the right), then compile it and replace it in Arduino IDE.
The main code is attached at the end, find below explanation of each import part:
NanoEdge:
#include <NanoEdgeAI.h>
#include "knowledge.h"
//DON T FORGET TO CHANGE NEAI_MODE TO 1 to do detections
#define NEAI_MODE 1
/* Global variables definitions */
static uint16_t neai_ptr = 0; //pointers to fill for sound buffer
static float neai_buffer[SENSOR_SAMPLES * AXIS] = {0.0}; //souhnd buffer
uint8_t neai_code = 0; //initialization code
uint16_t id_class = 0; // Point to id class (see argument of neai_classification fct)
float output_class_buffer[CLASS_NUMBER]; // Buffer of class probabilities
const char *id2class[CLASS_NUMBER + 1] = { // Buffer for mapping class id to class name
	 "unknown",
	 "boiling_test3",
	 "not_boiling_test3",
};
void setup(){
	 //some code
	 /* Initialize NanoEdgeAI AI */
	 neai_code = neai_classification_init(knowledge);
	 if (neai_code != NEAI_OK) {
	   Serial.print("Not supported board.\n");
	 }
}
void loop(){
	//some code
	if (NEAI_MODE) {
	   neai_classification(neai_buffer, output_class_buffer, &id_class);
	   switch (id_class) {
	     case 1:
	       Serial.println("!!! Boiling !!!");
	       break;
	     case 2:
	       Serial.println(" Not Boiling ");
	     default:
	       Serial.println(" Error ");
	       break;
	   }
}
The id2class variable depends on the name of the classes that you used in NanoEdge. The order of boiling or not boiling classes can change, you need to copy the one in NanoEdgeAI.h for the compilation .zip:
- YOUR_LIBRARY.zip\arduino\nanoedgeai_for_arduino.zip\nanoedgeai\src\NanoEdgeIA.h
Ue the matrix to display messages:
#include "ArduinoGraphics.h"
#include "Arduino_LED_Matrix.h"
/* Declare matrix to display */
byte frame[8][12] = {
	 { 0, 0, 0, 0, 0, 0, 0, 0, 0, 0, 0, 0 },
	 { 0, 0, 0, 0, 0, 0, 0, 0, 0, 0, 0, 0 },
	 { 0, 0, 0, 0, 0, 0, 0, 0, 0, 0, 0, 0 },
	 { 0, 0, 0, 0, 0, 0, 0, 0, 0, 0, 0, 0 },
	 { 0, 0, 0, 0, 0, 0, 0, 0, 0, 0, 0, 0 },
	 { 0, 0, 0, 0, 0, 0, 0, 0, 0, 0, 0, 0 },
	 { 0, 0, 0, 0, 0, 0, 0, 0, 0, 0, 0, 0 },
	 { 0, 0, 0, 0, 0, 0, 0, 0, 0, 0, 0, 0 }
};
//text to display
char text[30];
ArduinoLEDMatrix matrix;
void setup(){
	//some code
	matrix.begin();
}
void loop(){
	//some code
	// if we want to write something we set our text