The Robotic Transition: From Logic to Locomotion
Welcome to Part V of the Arduino Beginners series. In the previous modules, we focused on the "Brain" of the project—learning how to blink LEDs, read sensors, and write logic. However, an LED "Hello World" doesn't do much in the physical world. This lesson marks a significant milestone: we are moving from "Logic" to "Locomotion" as we begin the construction of your very first Custom Autonomous Robot.
The Skeleton of a Machine: Understanding the Chassis
The Chassis (pronounced "Kah-See") is the functional skeleton of your robot. It provides the mounting points for the motors, battery packs, and the Arduino itself.
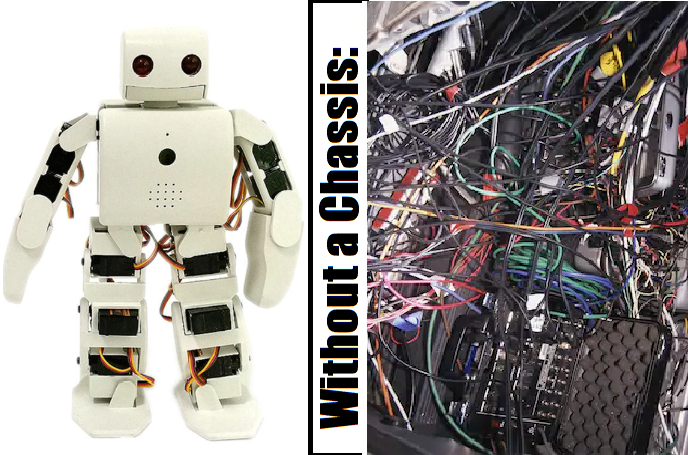
- Why We Use a Chassis: Without a rigid frame, the forces generated by the motors would pull the components apart. A well-designed chassis ensures that the wheels remain parallel and that the center of gravity is low enough to prevent tipping.
- Materials Matter: For beginners, a laser-cut acrylic or 3D-printed chassis is ideal because it is lightweight and features pre-drilled holes for standard Arduino components. If you're feeling adventurous, you can even fabricate one out of wood or aluminum.
- Differential Steering: Most beginner chassis use a "Two-Wheel Drive (2WD)" system with a trailing caster wheel. This allows the robot to turn in place by spinning the motors in opposite directions—the simplest form of robotic navigation.
The Component Ecosystem
Starting from this tutorial, we will begin integrating the parts you've learned about into a unified mechanical system:
- The Prime Movers: We will mount two DC Geared Motors. These are different from LEDs because they require high current, leading us to our next critical component.
- The Command Center: The Arduino Uno will sit at the center of the chassis, acting as the navigator.
- The Power Bridge: Because the Arduino cannot provide enough current to move a motor, we will eventually introduce the L298N Motor Driver, which acts as a "High-Current Switch" controlled by the Arduino's low-power logic.
Building Your Own Path
The beauty of this custom robot project is modularity. While I recommend a standard 2WD kit (like the one from Banggood), the code we will write throughout this series is universal. Whether your chassis is round, square, or three-legged, the principles of PWM speed control and Ultrasonic obstacle avoidance remain the same. Today, your task is to choose your frame and mount your motors. The "Spark" of life comes in the next part!
Introduction
Hi, it's me again, Will_the_Star. Starting this lesson, something special is happening. You might have noticed something different about this tutorial already. If you scroll up, you can see that I have changed the difficult setting from 'Easy' to 'Intermediate'. This is because, in this tutorial, the work requires me to pump up the hardness. Let me rewind.
This Project and the Next Few
If you're wondering what all this is about, let me tell you. Maybe, you were thinking after all the other projects
'This is all very good, but it's not useful. All these LEDs don't actually accomplish anything, so what's the point in doing it?'
This question has a surprisingly simple answer. The only reason that I did those project, was for you to learn. If you hadn't learned all those skills and knowledge, you would never be able to do these. So now, again I encourage you, unless you either have read and done them already, or already know everything I covered from somewhere else, I STRONGLYADVISEYOUTOGOBACKTOTHESTART. Great. Now, let me explain. After you complete this course, you will walk away with a fully built, custom made ROBOT! The assembly of your robot will start today, here in this tutorial! It will be a project that stretches across a number of tutorials. Now, here's the great thing about the robot you're about to make. You will be able to basically make it your own way. You can choose most things. I will help you for the tricky bits, but most is actually very easy. So then, let's go!
Starting the Chassis
Chassis is a strange word. It has three different origins.
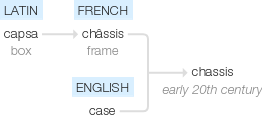
It's pronounced 'Kah-See'. It means the framework of something, the skeleton almost. The reason we need one is pretty clear, I think.
Right, let's start.
Choosing your Chassis
To start with, let's choose the chassis for your robot.
You can buy plenty online, or if you know what you want, make it yourself. If you do it yourself, 3D Printing or Laser Cutting is a good idea. Have a look at mine.
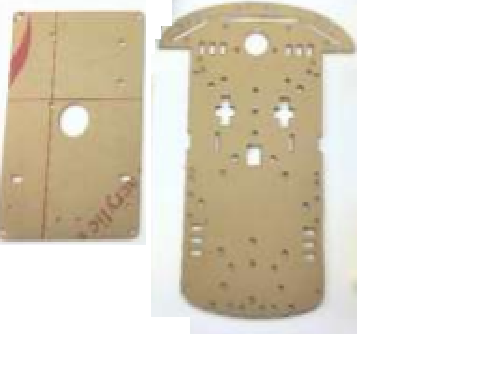
Pretty straightforward, two parts to it, and loads of good places to attach stuff. If you want the same one, you can get it here, with the rest of the stuff I'll be using in this tutorial myself.
Endtro
I know this project has been short. The next part to it will come out soon, and I hope to see you guys there too. Goodbye!