🏆 TensorFlow Lite for Microcontrollers Challenge 🏆

The winners of the TensorFlow Lite for Microcontrollers Challenge were announced on Octuber 18, 2021. This project was among the five worldwide winners and was featured in the Experiments with Google website.
The Concept
A good practice to consider while being into traffic is to warn other users on the road of the direction you are going to take, before turning or changing lanes. This habit contributes to a smoother traffic flow and reduces sudden moves from unaware drivers. In fact, cars, motorbikes, trucks, buses and most of the vehicles you can think of, incorporate some kind of turn signalling devices.
Although being among the most vulnerable vehicles on the road, bicycles do not usually have such built-in signalling devices. In fact, bicycle riders either do not warn of a turn or if they do, they need to release a hand from the handlebar in order to make a sign to other drivers. This move reduces the rider stability and it might not be properly understood by everyone.
It is possible to find some add-on turn signal lights for bicycles in the market, but they usually require the rider to push a button to activate them and to push again to switch them off, in a similar way to motorbikes. And it is really easy to forget to switch them off. If you think twice about it, this is something worth to be improved.
From here is born VoiceTurn, a voice-controlled turn signal lighting concept initially thought for bicycles, which could be extended to other vehicles as well. The aim of this project is to use a Machine Learning algorithm to teach a tiny microcontroller to understand the words left! and right! and act accordingly by switching the corresponding turn signal light on.
The Board
The microcontroller board to be used is an Arduino Nano 33 BLE Sense: an affordable board featuring a 32-bit ARM® Cortex™-M4 CPU running at 64 MHz, a bunch of built-in sensors, including a digital microphone, and Bluetooth Low Energy (BLE) connectivity.
However, what makes this board an excellent candidate for this project is its possibility of running Edge Computing applications on it using Tiny Machine Learning (TinyML). In short, after creating Machine Learning models with TensorFlow Lite, you can easily upload them to the board using the Arduino Integrated Development Environment (IDE).
Speech recognition at the Edge does not require to send the voice streaming to a Cloud server for processing, thus suppressing network latency. Additionally, it runs offline, so you can be certain that your turn signal lights won't stop working when passing through a tunnel. Last but not least, it preserves user privacy since your voice is not stored or sent anywhere.
Train the Machine Learning Model
The word recognition model has been created using Edge Impulse, a development platform for embedded Machine Learning focused on providing an amazing User Experience (UX), awesome documentation and open source Software Development Kits (SDKs). Their website states:
Edge Impulse was designed for software developers, engineers and domain experts to solve real problems using machine learning on edge devices without a PhD in machine learning.
Meaning that you can have little to no knowledge of Machine Learning and still develop your applications successfully.
You can use this tutorial as a starting point for audio classification with Edge Impulse. The following steps will describe how this project has been tailored to fulfill the particular needs of VoiceTurn.
The first thing you need to do is to sign up on Edge Impulse to create a free developer subscription. After the account confirmation step, log in and create a project. You will be prompted with a wizard asking about the kind of project you wish to create. Click on Audio:

In the next step, you can choose between three options. The first one is to build a custom audio dataset yourself by connecting a microphone-enabled development board. This process requires to record a large amount of audio data in order to obtain acceptable results, so we will ignore it for now. The second option is to upload an existing audio dataset and the third option to follow a tutorial. Click on Go to the uploader, within the Import existing data choice to keep going with VoiceTurn.

The audio dataset that we are going to use is the Google Speech Commands Dataset, which consists of 65, 000 one-second-long utterances of 30 short words, by thousands of different people. You can download the version 2 of this dataset from this link.
It is possible to think that only the audio recording subsets corresponding to the words left and right would be needed to train the model. However, as Pete Warden, from Google Brain, states in the article describing the methods used to collect and evaluate the dataset:
A key requirement for keyword spotting in real products is distinguishing between audio that contains speech, and clips that contain none.
Therefore, we will also use the subset of audio recordings contained in the _background_noise_ folder in order to enrich our model with some background noise. In addition, we will complement the noise database with the audios from the noise folder from the Keyword spotting pre-built dataset available as part of the Edge Impulse documentation.
Having a dataset containing the words left and right and some background noise is not enough, since we also need to provide the model with additional words. This way, if another word is heard, it will not be classified as left or right, but it will go into another category. To do that, we can select a random collection of audio recordings from the first dataset we downloaded. Just notice that the total amount of additional audio recordings should be similar to the total amount of recordings of each word of interest.
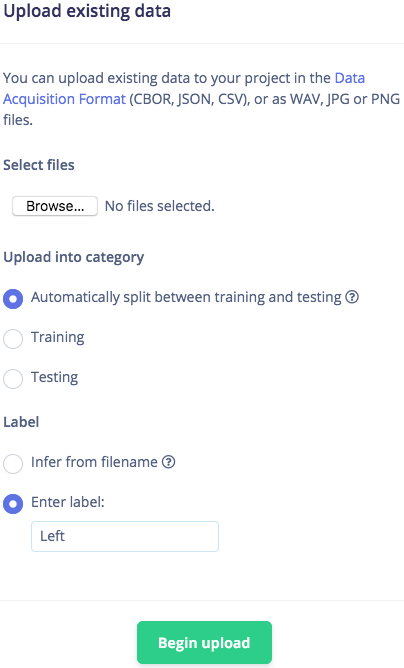
Once the audio recordings are gathered, upload them into your Edge Impulse project. Note that you will need to upload 4 different datasets, each of them corresponding to a different category. Browse your files, enter the labels manually, being Left, Right, noise and other, respectively, and make sure Automatically split between training and testing is selected. This will leave aside about 20% of the samples to be used for testing the model afterwards. Click on Begin upload.
As you can notice, all the audio samples you uploaded are available to check and listen to. Make sure that all of them are one-second-long in duration. If they are longer, click on the dots on the right of the audio sample row and click on Split sample, setting a segment length of 1000 ms.
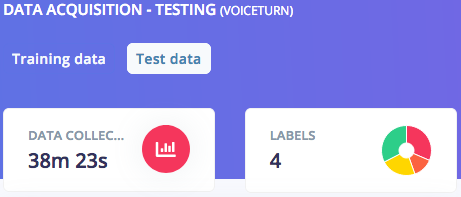
As a result, you should now see the total duration of your training and testing data, respectively, as well as your data split into four categories:
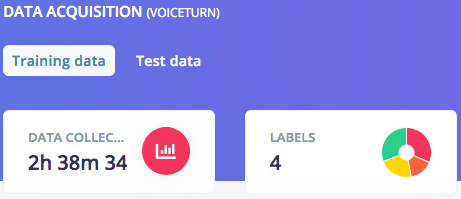
You can also double-check that the duration of your testing data is roughly 20% of the total dataset duration.
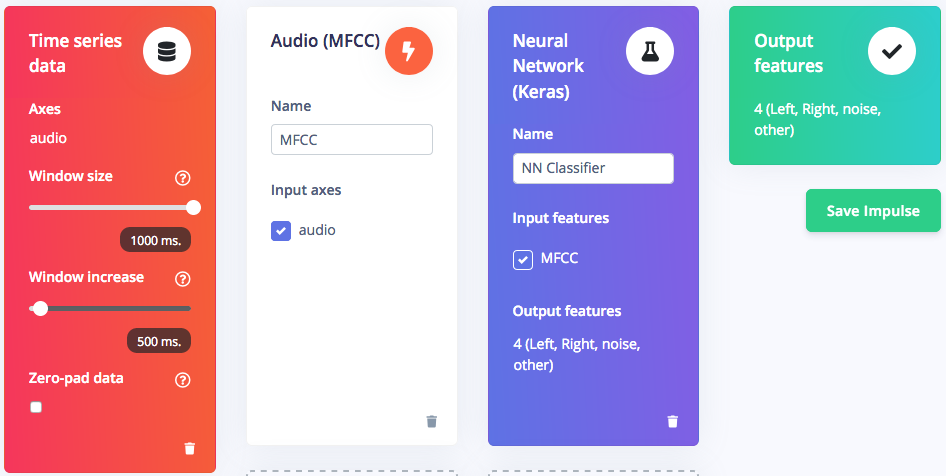
The next step is to design an impulse, which is the whole set of operations performed on the input voice data until the words are classified. Click on Create Impulse on the left hand menu. Our impulse will consist of an input block to slice the data, a processing block to pre-process them and a learning block to classify them into one of the four labels previously defined. Click on Add an input block and add a Time series data block, setting the window size to 1000 ms. Then, click on Add a processing block and add an Audio Mel Frequency Cepstral Coefficients (MFCC) block, which is suitable for human speech data. This block produces a simplified form of the input data, easier to process by the next block. Finally, click on Add a learning block and add a Classification (Keras) block, which is the Neural Network (NN) performing the classification and providing an output.
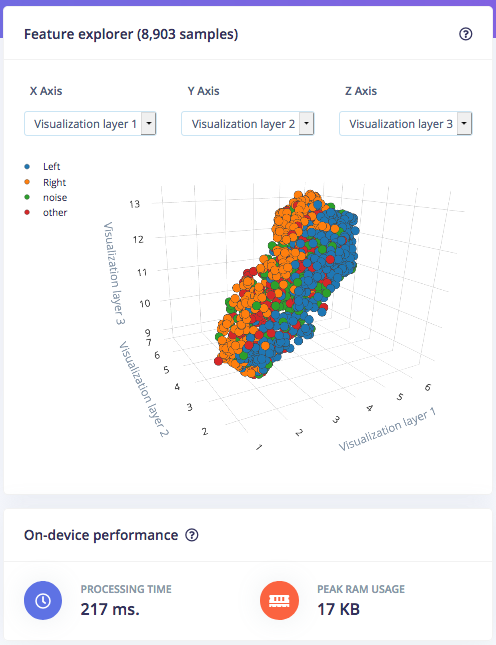
It is possible to configure both the processing and learning blocks. Click on MFCC on the left hand menu and you will see all the parameters related to the signal processing stage. In this project we will keep things simple and trust the default parameters of this block. Click on Generate features at the top and then click on the Generate features button to generate the MFCC blocks corresponding to the audio windows. After the job is finished you will be prompted with the Feature explorer, which is a 3D representation of your dataset. This tool is useful for quickly checking if your samples separate nicely into the categories you defined before, so that your dataset is suitable for Machine Learning. On this page you can also see an estimation of the time the Data Signal Processing (DSP) stage will take to process your data, as well as the RAM usage when running in a microcontroller.
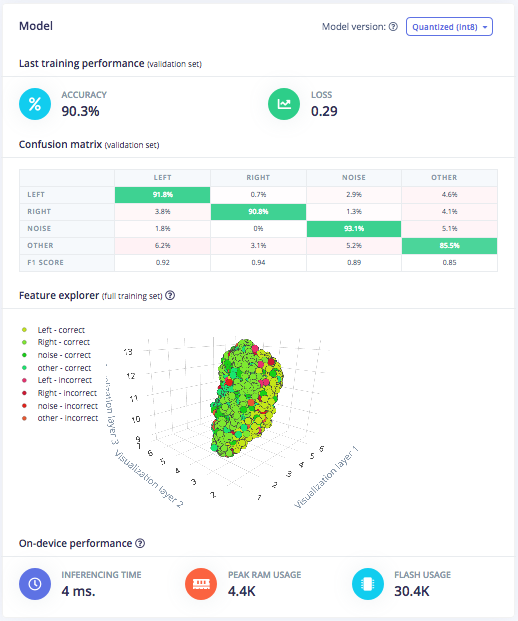
Now you can click on NN Classifier on the left hand menu and start training your neural network, a set of algorithms able to recognize patterns in their learning data. Watch this video to have a quick overview about the working principle of neural networks and some of their applications. We will leave most of the default Neural Network settings unchanged but we will slightly increase the Minimum confidence rating to 0.7. This means that during training, only predictions with a confidence probability above 70% will be considered as valid. Enable Data augmentation and set Add noise to High to make our neural network more robust in real life scenarios. Click on Start training at the bottom of the page. When training is finished you will see the accuracy of the model, calculated using a subset of 20% of the training data allocated for validation. You can also check the Confusion matrix, being a table showing the balance of correctly versus incorrectly classified words, and the estimation of on-device performance.
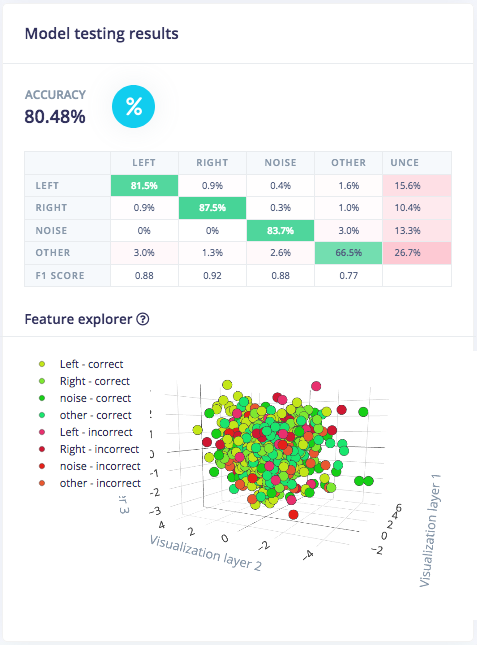
You can now test the model you just trained with new data. It is possible to connect the Arduino board to Edge Impulse to perform a live classification of data. However, we will test the model using the test data we left aside during the Data acquisition step. Click on Model testing on the left hand menu and then on Classify all test data. You will receive feedback regarding the performance of your model. Additionally, the Feature explorer will allow you to check what happened with the samples that were not correctly classified, so you can re-label them if needed or move them back to training to refine your model.
Finally, you can build a library containing your model and being ready to be deployed in a microcontroller. Click on Deployment on the left hand menu, choose to create an Arduino library and go to the bottom of the page. Here it is possible to enable the EON™ Compiler to increase on-device performance at the cost of reducing accuracy. However, since the memory usage is not too high for the Arduino Nano 33 BLE Sense, we can disable this option so to perform with the highest possible accuracy. Finally leave the Quantized (int8) option selected and click on the Build button to download the.zip file containing your library.
The VoiceTurn Edge Impulse project is publicly available, so you can directly clone it and work on it if you wish.
Check how words are classified
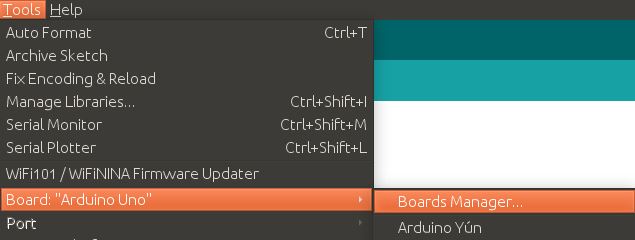
You can use the Arduino IDE to deploy the library built with Edge Impulse to your board. If you have not installed it yet, download the latest version from the Arduino software page. After that, you will need to add the drivers package supporting the Arduino Nano 33 BLE Sense board. Open the Arduino IDE and click on Tools > Board > Boards Manager...
Write nano 33 ble sense in the Search box and install the Arduino Mbed OS Nano Boards package.

Now your IDE is ready to work with your board. Connect your Arduino Nano 33 BLE Sense to your computer and apply the following settings:
- Click on Tools > Board > Arduino Mbed OS Nano Boards and select Ar