[ENG] I prepared the project description in both English and Hungarian.
GO TO ARDUINO PROJECT HUB PROJECT
[HUN] A projekt leírását elkészítettem angolul és magyarul is.
UGRÁS A MAGYAR LEÍRÁSHOZ (ARDUINO PROJECT HUB)
UGRÁS A MAGYAR LEÍRÁSHOZ (HACKSTER.IO)
━━━━━━━━━
ENGLISH VERSION
━━━━━━━━━
PROJECT STORY
I started working with the Arduino in February 2022, when I decided to write my thesis on this topic for my university degree, namely by building a concrete smart home. Since then, the thesis has been completed and my interest in Arduino has been rekindled, so I have been looking for my next possible hobby project.
On both my company laptop and my own private laptop, I was getting annoyed by the number of times I had to type in passwords, which are of course long and include lower case, upper case, numbers and special characters. So I decided to find a solution that would eliminate the need to type the password over and over again, while maintaining the same level of security, or even higher. That's when I came across RFID as a possible solution.
Another argument in favour of RFID was that I use an RFID card at work to access the building and I can only visit certain rooms with this card (provided I have the authorisation), so I can lock and unlock Windows with this one card.
INTRODUCTION
After researching on the internet, it became clear that this was the way I wanted to go for the project, but I also had concerns about security. Similar RFID projects can be found all over the web, but they did not deal with encryption or security increasing. I have completely rejected password solutions burned into program code or saved in simple txt files used by REGEDIT.
After a lot of brainstorming, I came up with two possible paths:
- To make RFID access more secure, I use an Android application that can send the user's password to the Arduino via Bluetooth, with AES encryption on the sending side and AES decryption on the receiving side. In addition, on the Arduino side, I incorporate additional mechanisms to increase security: in case of a bluetooth connection being broken, the password is always invalidated and deleted; if no one sits in front of the machine for a certain period of time, the system automatically locks the account; in case of continuous work, continuous bluetooth connection and active logged in account, a password validity period is also defined, which, when expired, the system will only work properly if the password is sent to the Arduino again via the application.
- The second version is completely the same as the first, except that it does not include two-sided AES encryption and decryption.
The choice between the two versions was essentially (unfortunately) simple. The memory (I didn't want to use a memory card) and speed of the Arduino Micro didn't allow for the addition of AES encryption to the program code. When looking at the version without encryption, I found that using encryption would not have made the system more secure, as the password would have had to be entered in the application anyway. The use of AES would have only increased the security level in the communication channel (bluetooth), however, I could not consider this as a maximization of security due to the decryption of AES.
Once the direction was chosen, the operational elements and functions of the system were defined:
- Only one RFID card is accepted as valid, both when locking the user account and when logging in.
- After each card reading, the scanned card data (UID) is released by the system and is not stored. Only the UID of the master card (which is used to operate the system) is burned into the program code.
- The application is able to connect to the HC-06 bluetooth module and to send the password given by the user.
- If the password expires, if there is no bluetooth connection or if the password is not correct, the access will fail. Therefore, in order to be able to perform an access, the following must be present: valid password, active bluetooth connection, valid, correctly entered password.
- To lock the account with an RFID card, only the master card is needed, with the same UID as the card burned into the program code.
- The device can also perform automatic locking using the ultrasonic distance sensor (HC-SR04) and the potmeter. The potentiometer is used to set the distance in centimetres within which, if nothing is detected by the range finder and the system status is an entered session, the account is automatically locked within 10 seconds. The countdown will be interrupted in two cases: when the potentiometer is set to a position where the rangefinder sensor is sensed again within the set value (distance), or when the rangefinder sensor is sensed again within the original, previously set value of the potentiometer.
- All information is displayed on the OLED display: the fact of entry and exit, the value of the sensing distance in centimetres modified by the potentiometer, the time remaining until automatic lock-out in seconds.
- The device is also able to wake up the system from sleep mode, combined with the login, provided that the last system status is 'locked account', the bluetooth connection is active and the password is correct. For this feature to work correctly on other devices, it may be necessary to modify the program code to optimize it for that device (modify the delay() commands in the login function to the appropriate delay time.)
EXPANDED TECHNICAL DETAILS
Advanced Cyber-Physical Security
This multi-factor authentication hub provides professional-grade security for Windows 10 computers by combining physical and digital keys.
- Multi-Source Authentication: Requires a successful RFID scan (MFRC522) AND a secondary digital confirmation from an authorized Android smartphone via Bluetooth (HC-06).
- Presence Detection: The HC-SR04 ultrasonic sensor monitors the user's proximity. If the user leaves the computer for more than 30 seconds, the Arduino automatically triggers a Windows Lock command.
Visual Feedback
- Secure Dashboard: Current security status, authorized user names, and connection status are displayed on a sharp I2C OLED screen, providing a clear visual interface for the authentication process.
HARDWARE
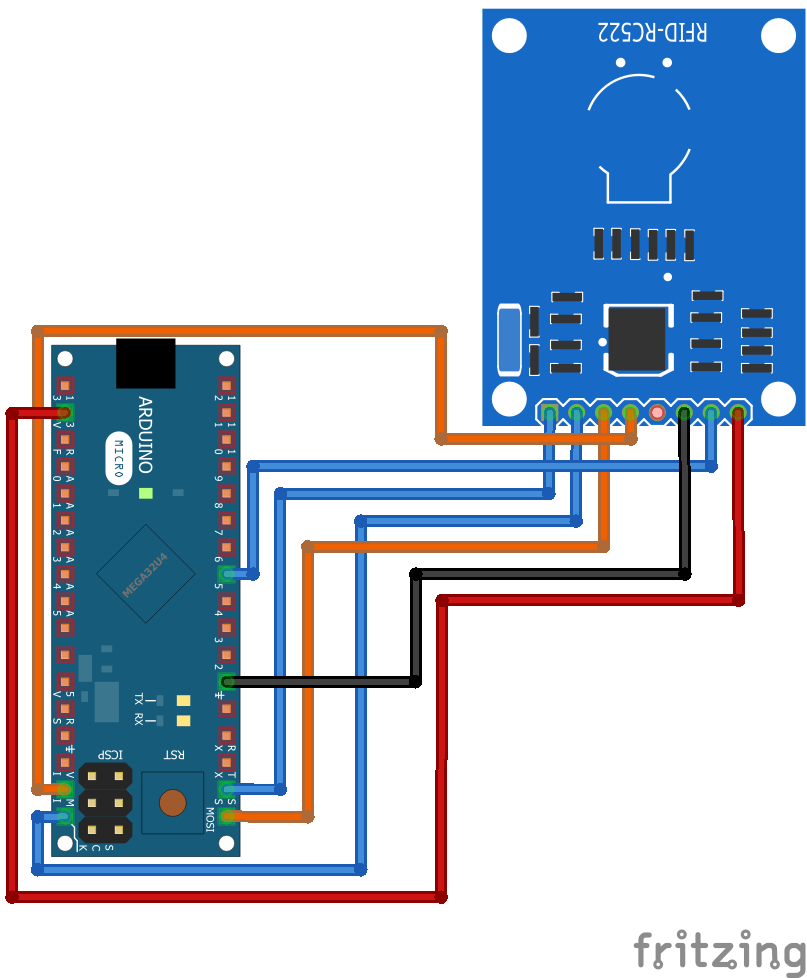
Below, I will describe the tools used in the project, their exact wiring and mention any important information relevant to the project.
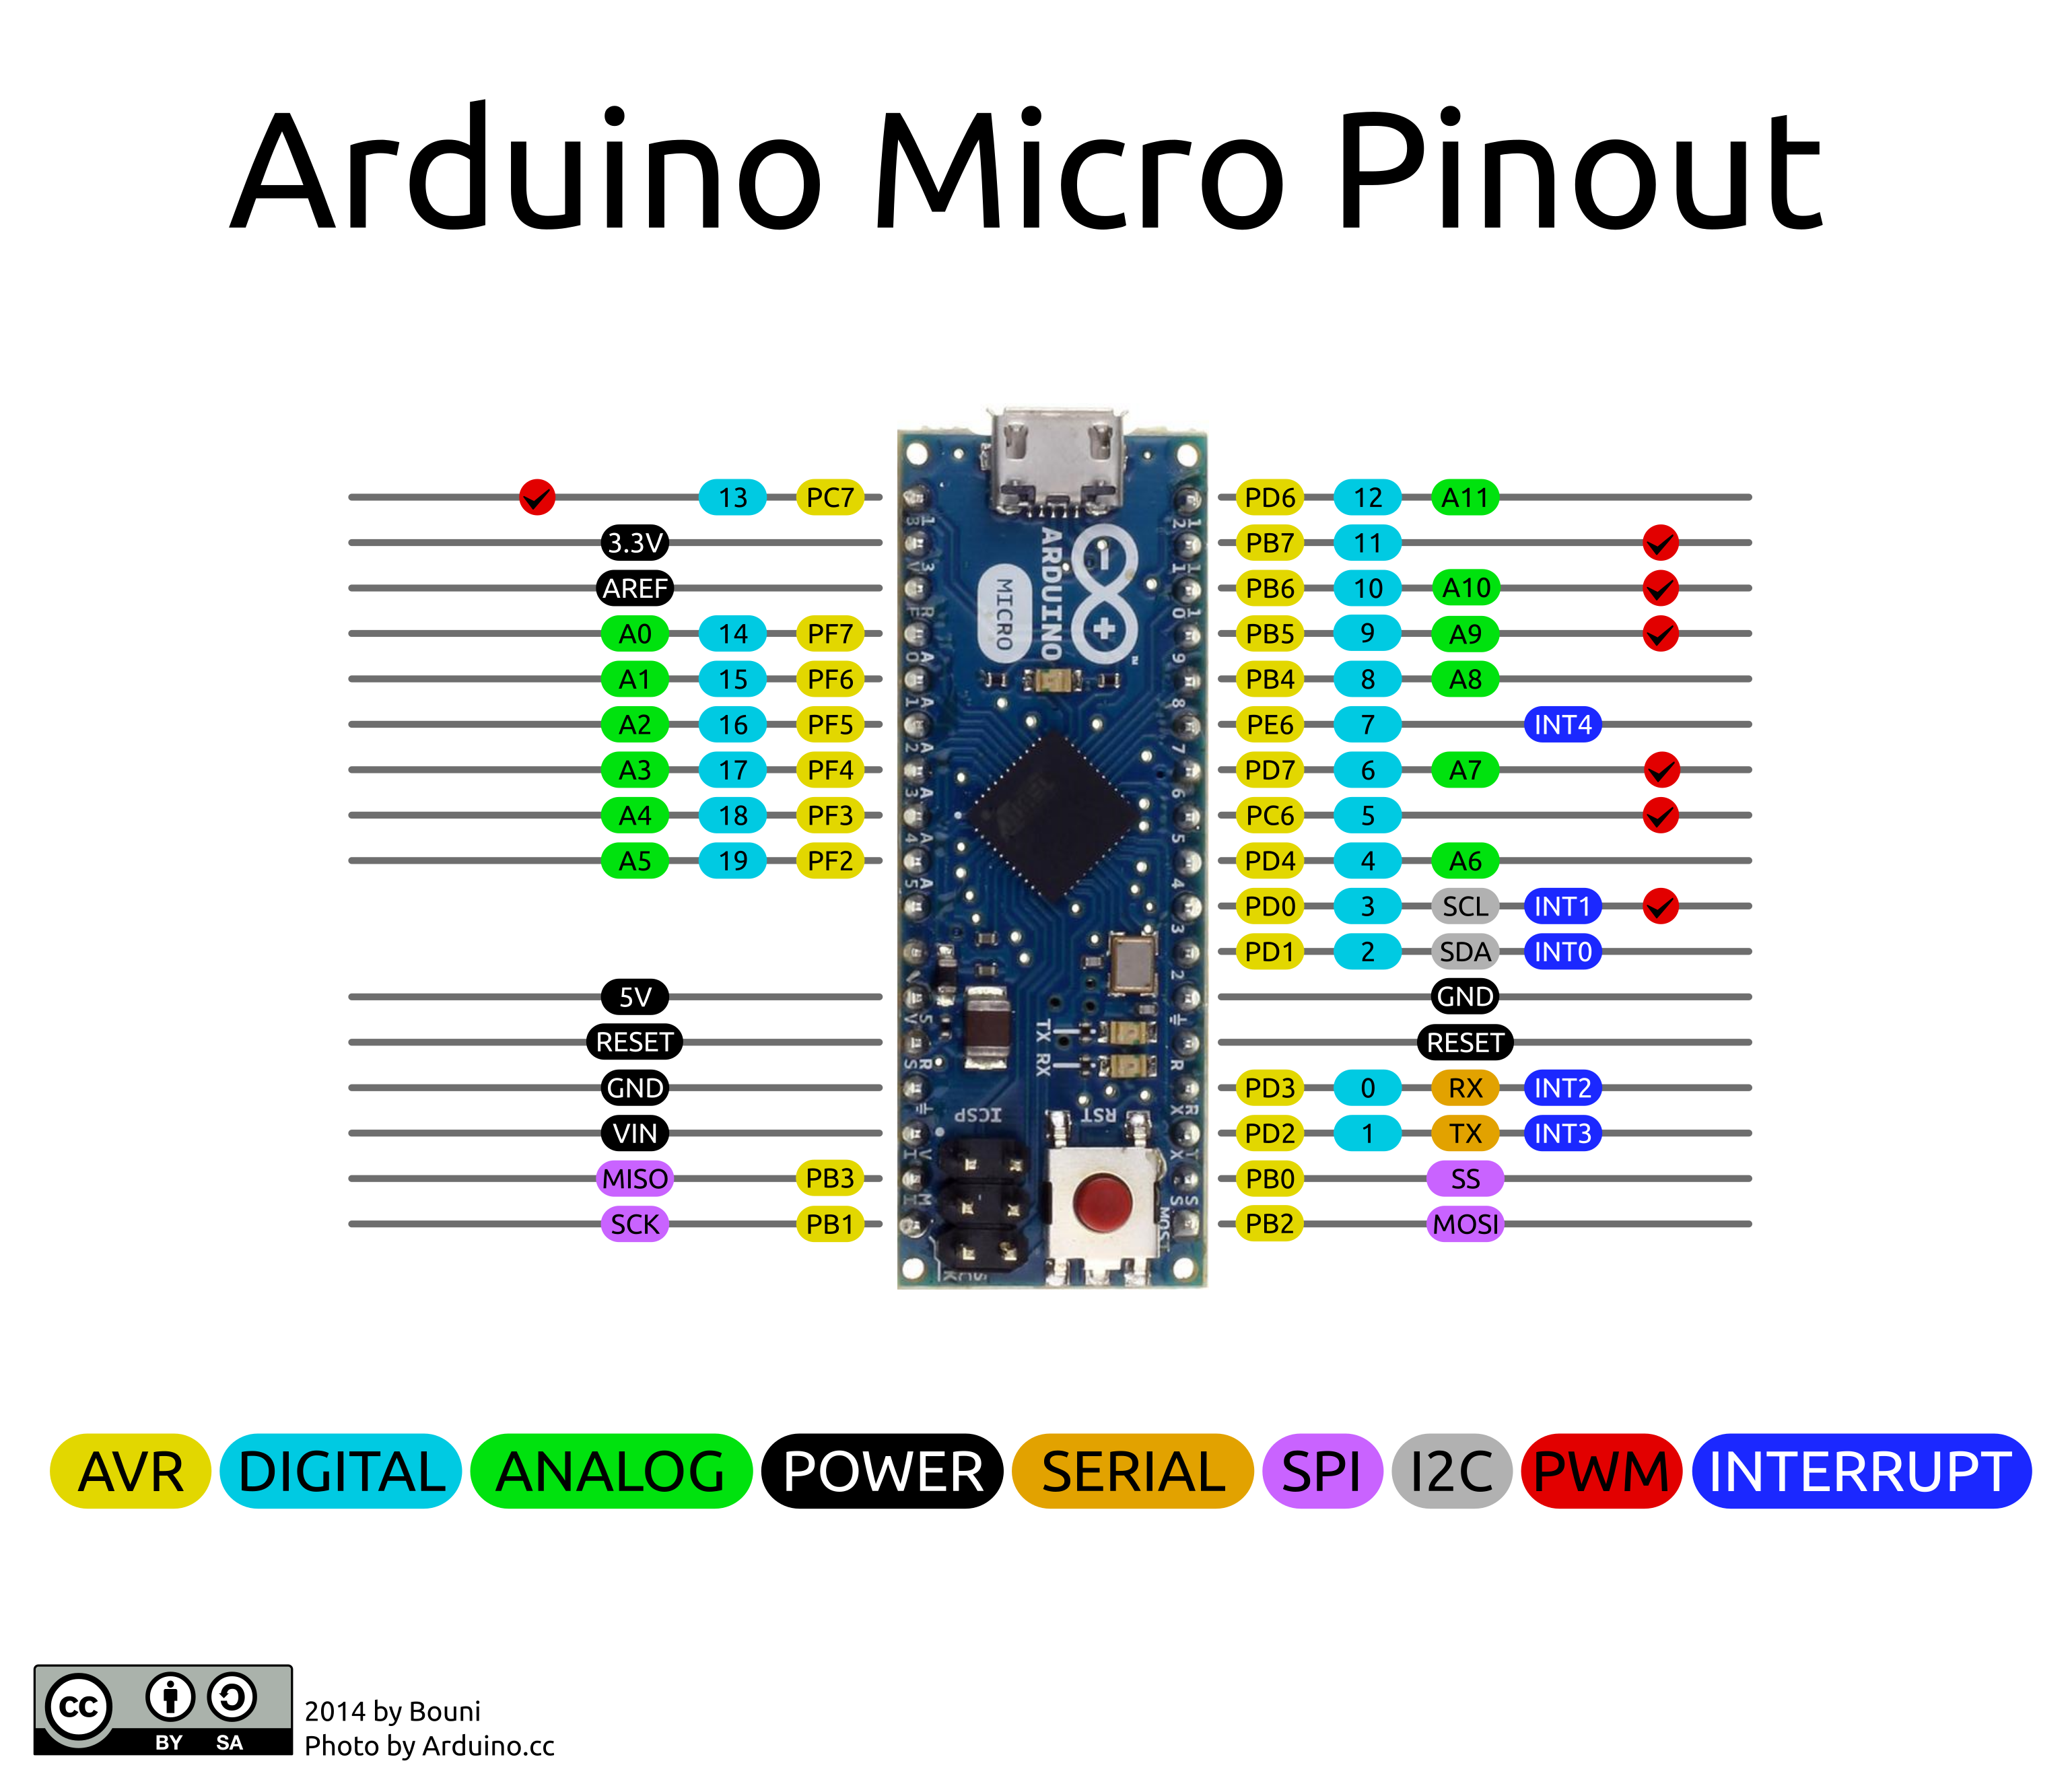
Arduino Micro
The Arduino Micro is a microcontroller card based on the ATmega32U4, developed in collaboration with Adafruit.
It has 20 digital input/output pins (7 of which can be used as PWM outputs and 12 as analogue inputs), a 16 MHz crystal oscillator, micro USB connection, ICSP header and reset button.
The MFRC522 module
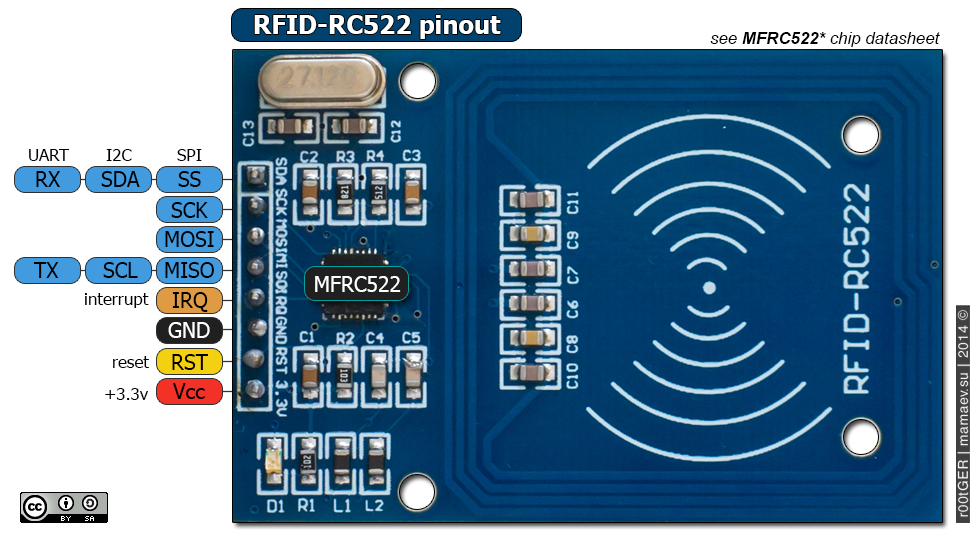
Connecting the MFRC522 via SPI: (MFRC522 -> Arduino Micro)
- SDA -> SS
- SCK -> SCK
- MOSI -> MOSI
- MISO -> MISO
- IRQ -> NOT CONNECTED
- GND -> GND
- RST -> 5
- VCC -> 3.3V
The HC-06 bluetooth module
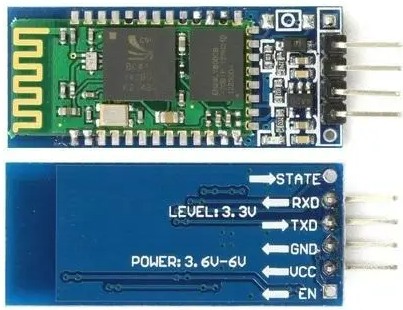
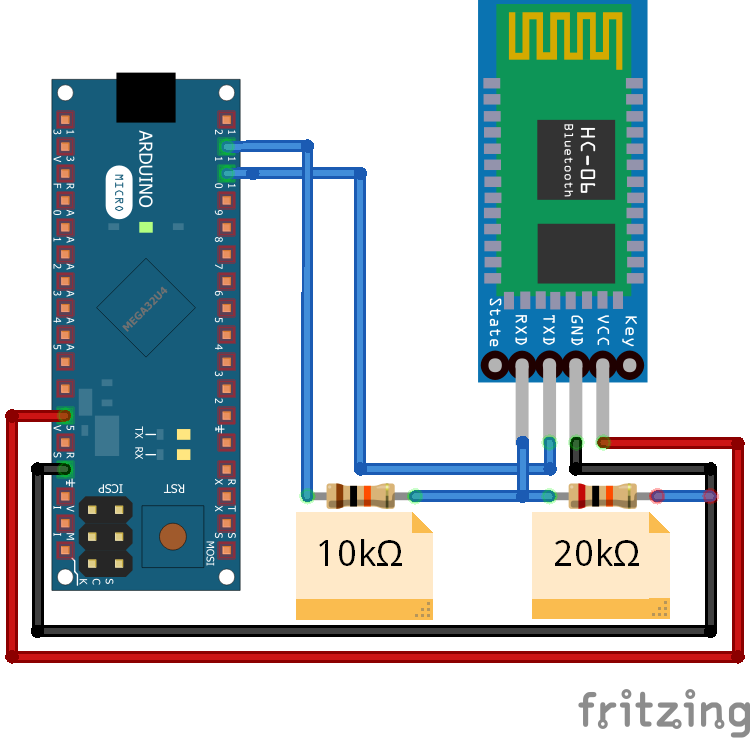
Connecting the HC-06 bluetooth module: (HC-06 -> Arduino Micro)
- RXD-> TXD
- TXD-> RXD
- GND -> GND
- VCC-> 5V
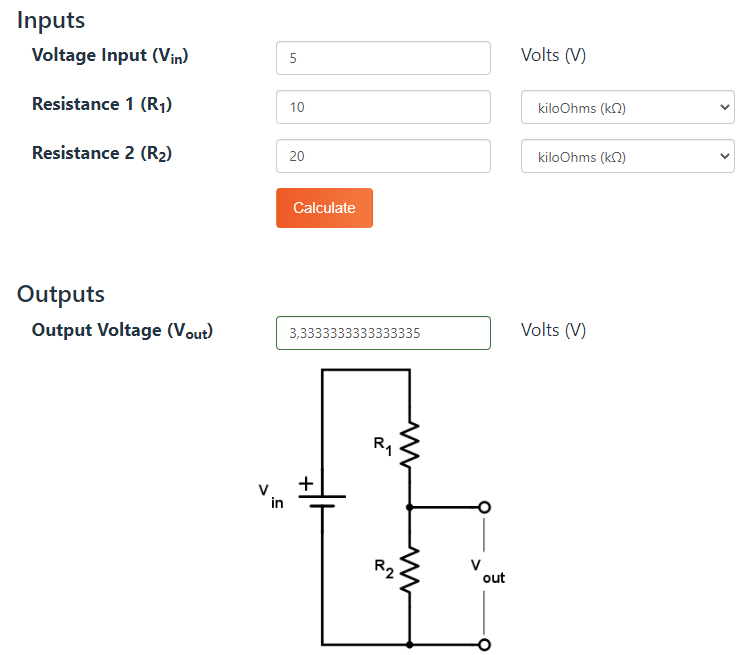
The RX and TX legs of the HC-06 bluetooth module are NOT 5V tolerant, however for proper operation it is sufficient to install a 5V - 3.3V voltage divider for the RX leg only, which I implemented with a 10kΩ and a 20kΩ resistor.
To check and calculate whether the correct resistors have been used in the design of the voltage divider, you can use the following calculator:
Why is it important to use the right voltage divider? In the initial phase of my project, I successfully forgot to install the necessary voltage divider for the HC-06 module, so I baked one, the result of which is nicely shown in the video below. (The LED flashes in a way not described in the documentation, the module could not be found with any tool, so connection/pairing was impossible.)
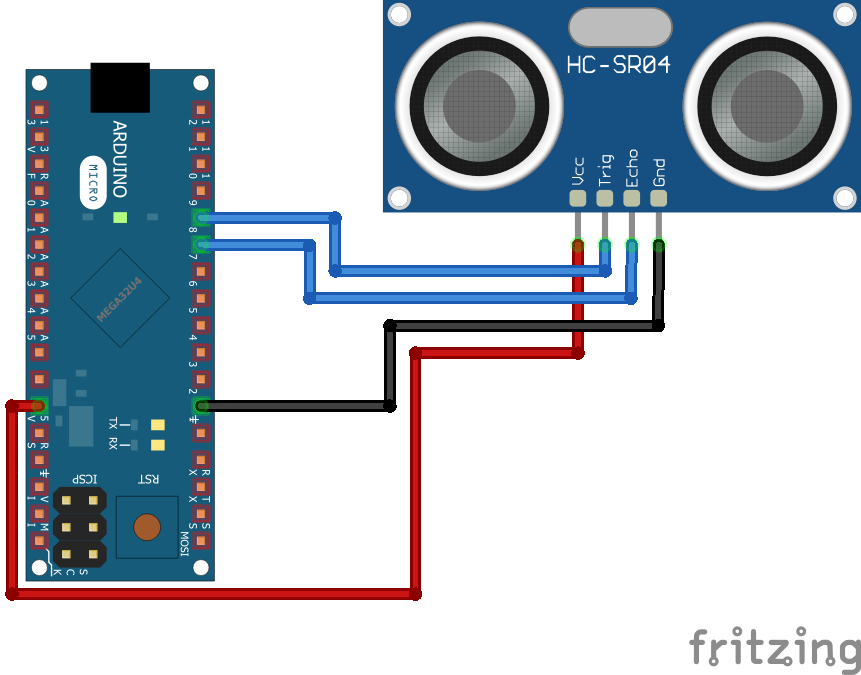
The HC-SR04 distance sensor module
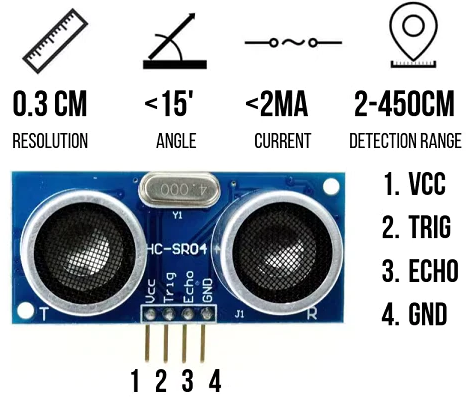

Connecting the HC-SR04 distance sensor module: (HC-SR04 -> Arduino Micro)
- VCC-> 5V
- TRIG -> 8
- ECHO -> 7
- GND -> GND
The OLED display
The main parameters of the display I use:
- 128x32 pixel resolution
- 0.91" Ø
- I2C communication
- SSD1306 driver
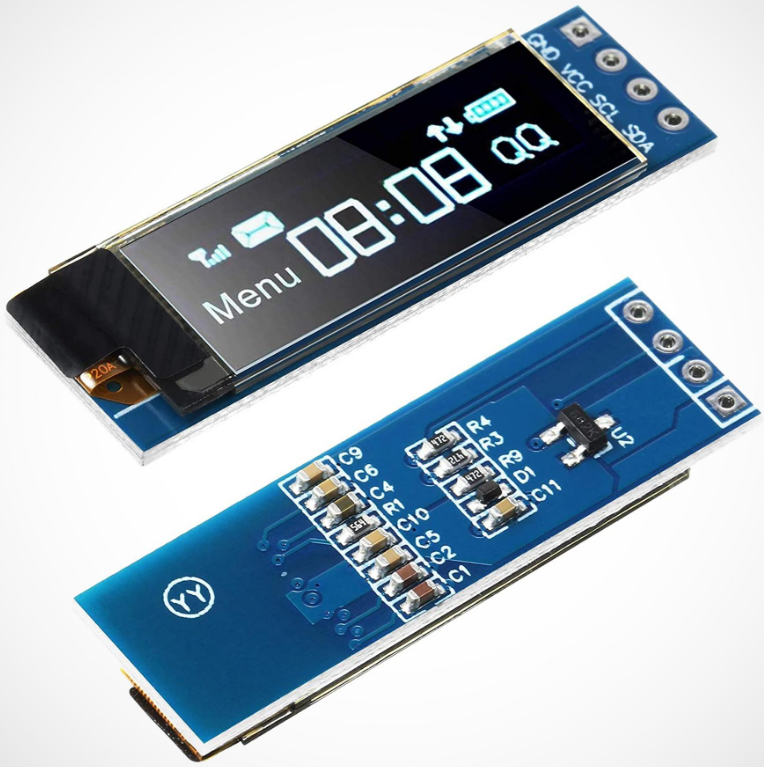
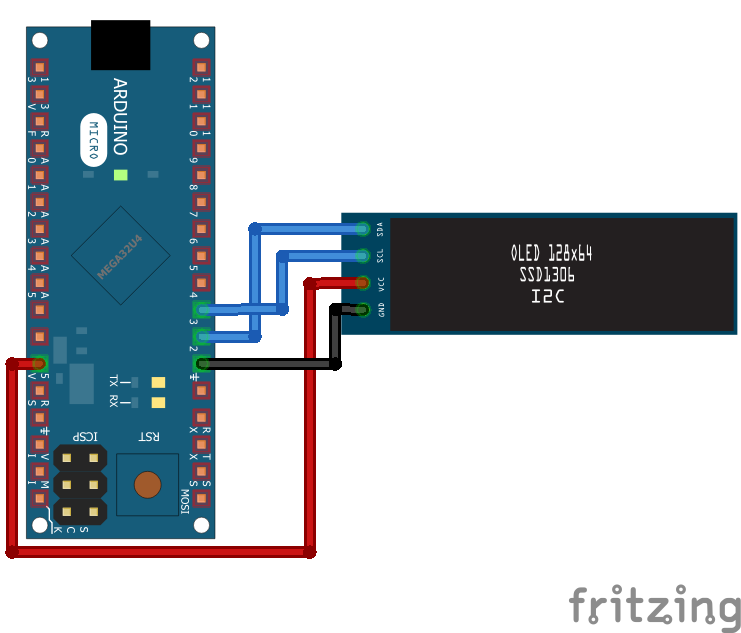
Connecting the OLED display: (OLED -> Arduino Micro)
- GND -> GND
- VCC -> 5V
- SCL -> 3
- SCA -> 2
ข้อมูล Frontmatter ดั้งเดิม
apps:
  - "1x MIT App Inventor 2"
author: "kela910512"
category: "Lab Stuff"
components:
  - "1x Universal PCB"
  - "1x Resistor 220 ohm"
  - "1x Soldering iron (generic)"
  - "1x Rotary potentiometer (generic)"
  - "1x RFID MFRC522"
  - "1x HC-06 Bluetooth Module"
  - "1x Hobby glass"
  - "1x Breadboard (generic)"
  - "1x Ultrasonic Sensor - HC-SR04 (Generic)"
  - "1x Blue OLED display - 128x32, 0.91 inch, I2C, SSD1306"
  - "1x Through Hole Resistor, 10 kohm"
  - "1x Through Hole Resistor, 20 kohm"
  - "20x Jumper wires (generic)"
  - "1x Arduino Micro"
  - "1x LED (generic)"
  - "1x TP-LINK TL-SF1008D 8 port switch"
  - "1x Solder Wire, Lead Free"
  - "1x HC-SR04-CLS"
description: "With this project, we can log in and out of our Windows 10 account with our own RFID card, with many convenience and security functions."
difficulty: "Intermediate"
documentationLinks: []
downloadableFiles:
  - "https://projects.arduinocontent.cc/369dc494-c5ac-41e3-b697-762c8464794e.ino"
  - "https://github.com/Kela910512/RFID_WIN10_LOGIN_SYSTEM"
  - "https://github.com/Kela910512/RFID_WIN10_LOGIN_SYSTEM/tree/main/ANDROID"
encryptedPayload: "U2FsdGVkX1/7EqlAGlBW+mKsJTMI9bV3kL5Xhz4uIs5OLwRlIgdqSH9i7OG6QHpctahrHhkjIXfQ+2DjRdzl1V6gpF51yCXj182ETgycPy0="
heroImage: "https://cdn.jsdelivr.net/gh/bigboxthailand/arduino-assets@main/images/projects/win10-login-via-mfrc522-hc06-oled-hcsr04-android-security-84307c_cover.jpg"
lang: "en"
likes: 0
passwordHash: "a02c88e43e5f8d870001121a435743dade49499e8831b05203acd96bd07ec91c"
price: 699
seoDescription: "Secure Windows 10 Login using RFID card with MFRC522, HC06, and HCSR04. Includes Android security features and OLED status display."
tags:
  - "Security"
  - "Smart appliances"
  - "Internet Of Things"
  - "Communication"
title: "Win10 login via MFRC522, HC06, OLED, HCSR04 (+Android security)"
tools: []
videoLinks:
  - "https://www.youtube.com/embed/a4jEotuZvxU"
  - "https://www.youtube.com/embed/UtUbcHyD2SY"
  - "https://www.youtube.com/embed/OPdHExjkcDc"
  - "https://www.youtube.com/embed/a4jEotuZvxU"
  - "https://www.youtube.com/embed/UtUbcHyD2SY"
  - "https://www.youtube.com/embed/OPdHExjkcDc"
views: 3452